Page 109 of 286

108
uuAdjusting the SeatsuRear Seats
Controls
Rear Seats
Pull the lever on the right to change the angle
of the right half of the seat-back, and left for
the left half.
1.Unlatch the detachable anchor from the
anchor buckle and store the detachable
anchor in the retractor housing.
2.Pull the release lever and fold down the
seat-back.
■
Adjusting the Rear Seat-BacksRelease Lever■
Folding Down the Rear Seats
1Folding Down the Rear Seats
The rear seat-backs can be folded down to
accommodate bulkier items in the cargo area.
Never drive with a seat-back folded down and the
tailgate open.
2Exhaust Gas Hazard P. 61
To lock a seat-back upright, push it backwards until it
locks. When returning a seat-back to it’s original
position, push it firmly back. Also, make sure all rear
shoulder belts are positioned in front of the seatback,
and the center shoulder belt is re-positioned in the
guide.
Make sure that the folded seat-back does not press
against the front passenger seat, as this can cause the
front passenger seat weight sensor to work
improperly.
2Side Airbag Off Indicator P. 47
Anchor
Buckle
Latch Plate
Release Lever
Page 110 of 286

109
uuAdjusting the SeatsuRear Seats
Controls
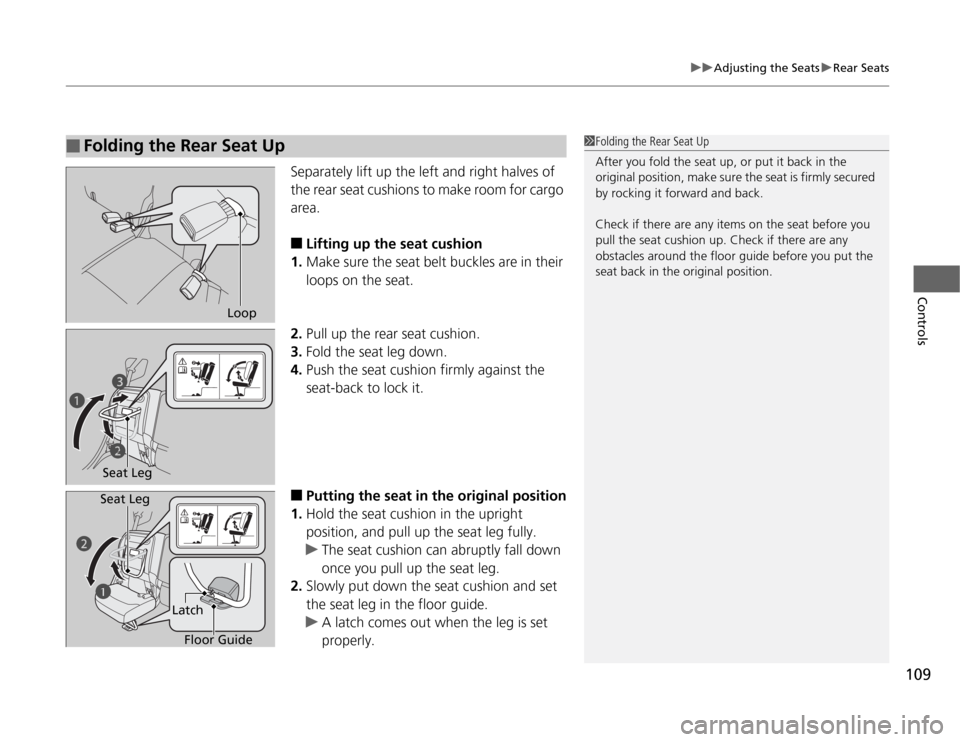
Separately lift up the left and right halves of
the rear seat cushions to make room for cargo
area.■
Lifting up the seat cushion
1.Make sure the seat belt buckles are in their
loops on the seat.
2.Pull up the rear seat cushion.
3.Fold the seat leg down.
4.Push the seat cushion firmly against the
seat-back to lock it.
■
Putting the seat in the original position
1.Hold the seat cushion in the upright
position, and pull up the seat leg fully.
uThe seat cushion can abruptly fall down
once you pull up the seat leg.
2.Slowly put down the seat cushion and set
the seat leg in the floor guide.
uA latch comes out when the leg is set
properly.
■
Folding the Rear Seat Up
1Folding the Rear Seat Up
After you fold the seat up, or put it back in the
original position, make sure the seat is firmly secured
by rocking it forward and back.
Check if there are any items on the seat before you
pull the seat cushion up. Check if there are any
obstacles around the floor guide before you put the
seat back in the original position.
Loop
Seat Legc
b a
b
a
Floor Guide Latch Seat Leg
Page 114 of 286
113
uuInterior Lights/Interior Convenience ItemsuInterior Convenience Items
Continued
Controls
Interior Convenience Items
Pull the handle to open the glove box.
Pull up on the lever to open the upper glove
box.
■
Glove Box
1Glove Box
3
WARNING
An open glove box can cause serious injury
to your passenger in a crash, even if the
passenger is wearing the seat belt.
Always keep the glove boxes closed while
driving.
■
Upper Glove Box
Page 157 of 286
156
uuBefore DrivinguDriving Preparation
Driving
•Be sure items placed on the floor behind the front seats cannot roll under the
seats.
uThey can interfere with the driver’s ability to operate the pedals, the operation
of the seats, or the operation of the sensors under the seats.
•Everyone in the vehicle must fasten their seat belt.
2Fastening a Seat Belt P. 29
•Make sure that the indicators in the instrument panel come on when you start the
vehicle, and go off soon after.
uAlways have a dealer check the vehicle if a problem is indicated.
2Indicators P. 64
Page 198 of 286

197
uuMaintenance Minder
TMuTo Use Maintenance Minder
TM
Continued
Maintenance
■
Maintenance Service Items
1Maintenance Service Items•Independent of the Maintenance Minder
information, replace the brake fluid every 3 years.•Inspect idle speed every 160,000 miles (256,000
km).•Adjust the valves during services A, B, 1, 2, or 3 if
they are noisy.
Maintenance Minder Message Maintenance
Minder Indicator
Sub Items Main Item
*1: If a message SERVICE does not appear more than 12 months after the display is reset, change the
engine oil every year.
*2: Canadian A/T models only
# : See information on maintenance and emissions warranty.CODE
Maintenance Main Items
A
●
Replace engine oil
*1
B
●
Replace engine oil and oil filter
●
Inspect front and rear brakes/service as necessary
●
Check parking brake adjustment
●
Inspect tie rod ends, steering gearbox, and boots
●
Inspect suspension components
●
Inspect driveshaft boots
●
Inspect brake hoses and lines (Including ABS/VSA)
●
Inspect all fluid levels and condition of fluids
●
Inspect exhaust system
#
●
Inspect fuel lines and connections
#
●
Check expiration date for TRK bottle
*2
*3: If you drive in dusty conditions, replace the air cleaner element every 15,000 miles (24,000 km).
*4: If you drive primarily in urban areas that have high concentrations of soot in the air from industry and
from diesel-powered vehicles, replace every 15,000 miles (24,000 km).
*5: If you tow a Fit behind a motorhome, the transmission fluid must be changed every 2 years or 30,000
miles (48,000 km), whichever comes first. (For A/T only)CODE
Maintenance Sub Items
1
●
Rotate tires
2
●
Replace air cleaner element
*3
●
Replace dust and pollen filter
*4
●
Inspect drive belt
3
●
Replace transmission fluid
*5
4
●
Replace spark plugs
●
Inspect valve clearance
5
●
Replace engine coolant
Page 224 of 286

223
uuChecking and Maintaining TiresuTire and Loading Information Label
Continued
Maintenance
Tire and Loading Information LabelThe label attached to the driver’s doorjamb provides necessary tire and loading
information.Tire Labeling
The tires that came on your vehicle have a
number of markings. Those you should be
aware of are described below.
Whenever tires are replaced, they should be replaced with tires of the same size.
1Tire and Loading Information Label
The tire and loading information label attached to the
driver’s doorjamb contains:a
The number of people your vehicle can carry.
b
The total weight your vehicle can carry. Do not
exceed this weight.
c
The original tire sizes for front, rear, and spare.
d
The proper cold tire pressure for front, rear, and
spare.
Label
Example
b a
d
cExample
Tire Size
Tire
Identification
Number (TIN)
Maximum
Tire Load
Maximum
Tire Pressure
Tire Size■
Tire Sizes
1Tire Sizes
Following is an example of tire size with an
explanation of what each component means.
175/65R15 84S
175: Tire width in millimeters.
65: Aspect ratio (the tire’s section height as a
percentage of its width).
R: Tire construction code (R indicates radial).
15: Rim diameter in inches.
84: Load index (a numerical code associated with the
maximum load the tire can carry).
S: Speed symbol (an alphabetical code indicating the
maximum speed rating).
Page 235 of 286

234Maintenance
CleaningInterior CareUse a damp cloth with a mixture of mild detergent and warm water to remove dirt.
Use a clean cloth to remove detergent residue.
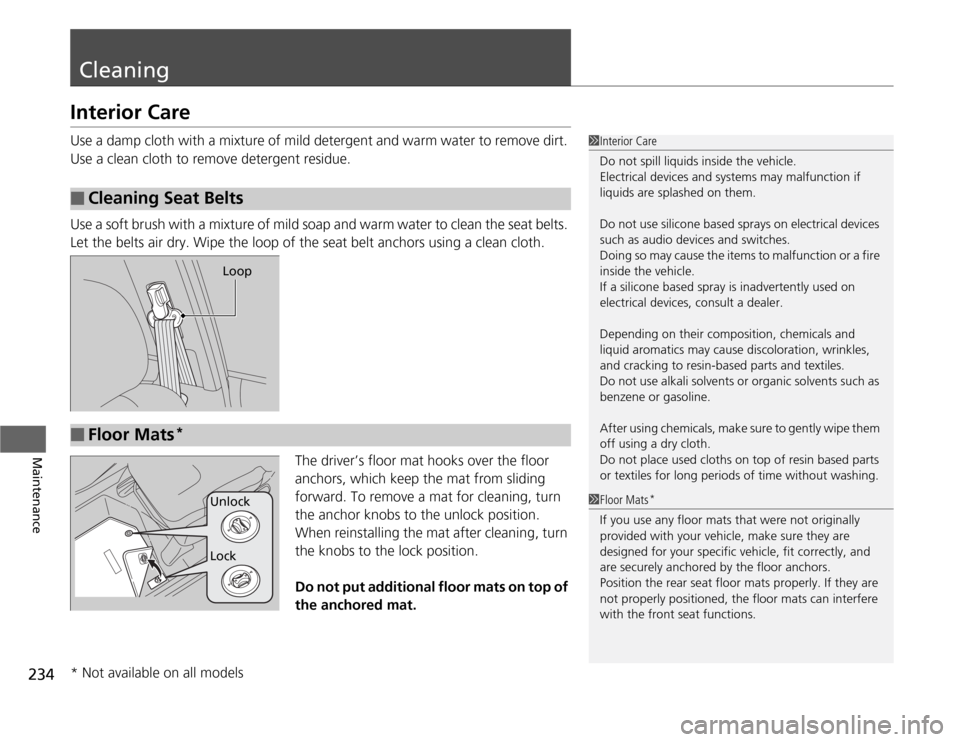
Use a soft brush with a mixture of mild soap and warm water to clean the seat belts.
Let the belts air dry. Wipe the loop of the seat belt anchors using a clean cloth.
The driver’s floor mat hooks over the floor
anchors, which keep the mat from sliding
forward. To remove a mat for cleaning, turn
the anchor knobs to the unlock position.
When reinstalling the mat after cleaning, turn
the knobs to the lock position.
Do not put additional floor mats on top of
the anchored mat.■
Cleaning Seat Belts
1Interior Care
Do not spill liquids inside the vehicle.
Electrical devices and systems may malfunction if
liquids are splashed on them.
Do not use silicone based sprays on electrical devices
such as audio devices and switches.
Doing so may cause the items to malfunction or a fire
inside the vehicle.
If a silicone based spray is inadvertently used on
electrical devices, consult a dealer.
Depending on their composition, chemicals and
liquid aromatics may cause discoloration, wrinkles,
and cracking to resin-based parts and textiles.
Do not use alkali solvents or organic solvents such as
benzene or gasoline.
After using chemicals, make sure to gently wipe them
off using a dry cloth.
Do not place used cloths on top of resin based parts
or textiles for long periods of time without washing.
Loop
■
Floor Mats
*
1Floor Mats
*
If you use any floor mats that were not originally
provided with your vehicle, make sure they are
designed for your specific vehicle, fit correctly, and
are securely anchored by the floor anchors.
Position the rear seat floor mats properly. If they are
not properly positioned, the floor mats can interfere
with the front seat functions.
Lock Unlock
* Not available on all models
Page 276 of 286

275
Continued
Information
Warranty Coverages■
U.S. Owners
Your new vehicle is covered by these warranties:
New Vehicle Limited Warranty – covers your new vehicle, except for the
emissions control systems and accessories, against defects in materials and
workmanship.
Emissions Control Systems Defects Warranty and Emissions Performance
Warranty – these two warranties cover your vehicle’s emissions control systems.
Time, mileage, and coverage are conditional. Please read your warranty booklet for
exact information.
Seat Belt Limited Warranty – a seat belt that fails to function properly is covered
by a limited warranty. Please read your warranty booklet for details.
Rust Perforation Limited Warranty – all exterior body panels are covered for
rust-through from the inside for the specified time period with no mileage limit.
Accessory Limited Warranty – Honda accessories are covered under this
warranty. Time and mileage limits depend on the type of accessory and other
factors. Please read your warranty booklet for details.
Replacement Parts Limited Warranty – covers all Honda replacement parts
against defects in materials and workmanship.