Page 206 of 286

205
uuMaintenance Under the HooduChanging the Engine Oil and Oil Filter
Maintenance
4.Remove the oil filter and dispose of the
remaining oil.
5.Check that the filter gasket is not stuck to
the engine contact surface.
uIf it is stuck, you must detach it.
6.Wipe away dirt and dust adhering to the
contact surface of the engine block, and
install a new oil filter.
uApply a light coat of new engine oil to
the oil filter rubber seal.
7.Put a new washer on the drain bolt, then
reinstall the drain bolt.
uTightening torque:
29 lbf∙ft (39 N∙m, 4.0 kgf∙m)
8.Pour the recommended engine oil into the
engine.
uEngine oil change capacity (including
filter):
3.8 US qt (3.6 L)
9.Reinstall the engine oil fill cap securely and
start the engine.
10.Run the engine for a few minutes, and
then check that there is no leak from the
drain bolt or oil filter.
11.Stop the engine, wait for three minutes,
and then check the oil level on the
dipstick.
uIf necessary, add more engine oil.
1Changing the Engine Oil and Oil Filter
You will need a special wrench to replace the oil
filter. You can buy this wrench from a dealer.
When installing the new oil filter, follow the
instructions supplied with the oil filter.
Reinstall the engine oil fill cap. Start the engine. The
low oil pressure indicator should go off within five
seconds. If it does not, turn off the engine, and check
your work.
Oil Filter
Page 207 of 286

206
uuMaintenance Under the HooduEngine Coolant
Maintenance
Engine CoolantThis coolant is premixed with 50% antifreeze and 50% water. Do not add any
straight antifreeze or water.
We recommend you check the engine coolant level every time you refuel. Check the
reserve tank first. If it is completely empty, also check the coolant level in the
radiator. Add the engine coolant accordingly.
1.Check the amount of coolant in the reserve
tank.
2.If the coolant level is below the MIN mark,
add the specified coolant until it reaches
the MAX mark.
3.Inspect the cooling system for leaks.Specified coolant: Honda Long Life Antifreeze/Coolant Type 2■
Reserve Tank
1Engine Coolant
NOTICEIf Honda antifreeze/coolant is not available, you may
use another major brand non-silicate coolant as a
temporary replacement. Check that it is a high quality
coolant recommended for aluminum engines.
Continued use of any non-Honda coolant can result
in corrosion, causing the cooling system to
malfunction or fail. Have the cooling system flushed
and refilled with Honda antifreeze/coolant as soon as
possible.
Do not add rust inhibitors or other additives to your
vehicle’s coolant system. They may not be compatible
with the coolant or with the engine components.
Reserve Tank
MAX
MIN
Page 209 of 286

208
uuMaintenance Under the HooduTransmission Fluid
Maintenance
Transmission FluidCheck the fluid level when the engine is at normal operating temperature.
1.Park on level ground, and start the engine.
2.Wait until the radiator fan starts and then
turn off the engine.
uPerform step 3 after waiting for about 60
seconds (less than 90 seconds).
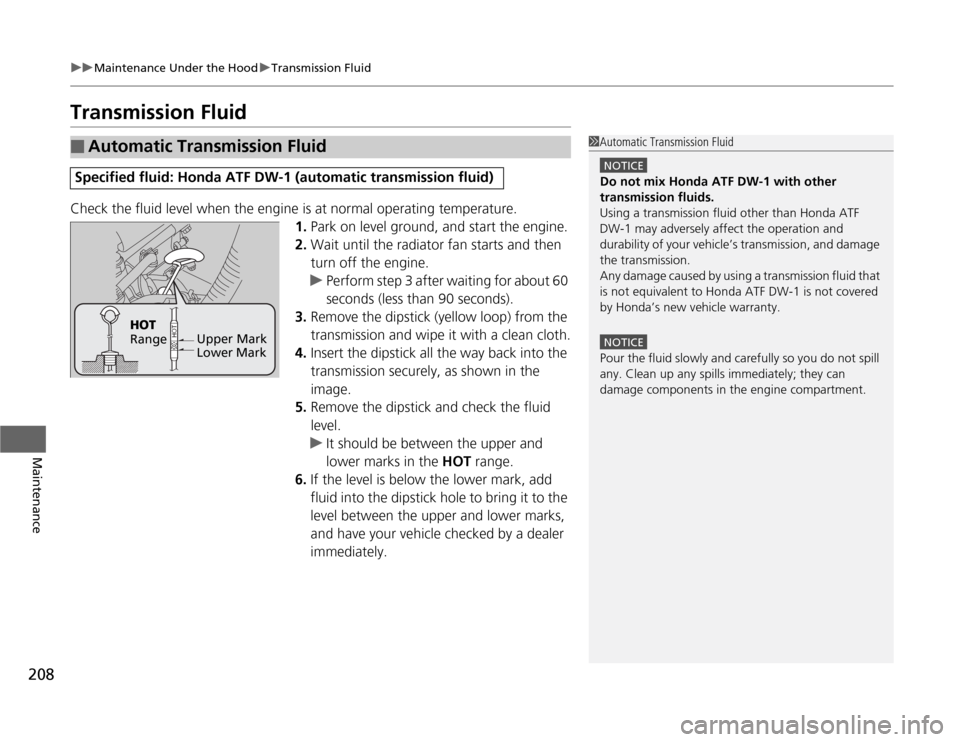
3.Remove the dipstick (yellow loop) from the
transmission and wipe it with a clean cloth.
4.Insert the dipstick all the way back into the
transmission securely, as shown in the
image.
5.Remove the dipstick and check the fluid
level.
uIt should be between the upper and
lower marks in the HOT range.
6.If the level is below the lower mark, add
fluid into the dipstick hole to bring it to the
level between the upper and lower marks,
and have your vehicle checked by a dealer
immediately.■
Automatic Transmission Fluid
Specified fluid: Honda ATF DW-1 (automatic transmission fluid)
1Automatic Transmission Fluid
NOTICEDo not mix Honda ATF DW-1 with other
transmission fluids.
Using a transmission fluid other than Honda ATF
DW-1 may adversely affect the operation and
durability of your vehicle’s transmission, and damage
the transmission.
Any damage caused by using a transmission fluid that
is not equivalent to Honda ATF DW-1 is not covered
by Honda’s new vehicle warranty.NOTICEPour the fluid slowly and carefully so you do not spill
any. Clean up any spills immediately; they can
damage components in the engine compartment.
Upper Mark
Lower Mark HOT
Range
Page 210 of 286

209
uuMaintenance Under the HooduTransmission Fluid
Maintenance
Check the fluid level when the engine is at normal operating temperature.
1.Park the vehicle on level ground.
2.Remove the transmission filler bolt and
washer. Carefully feel inside the bolt hole
with your fingers.
uCheck if the fluid level is up to the edge
of the bolt hole.
3.If the fluid level is not up to the edge of the
bolt hole, add Honda Manual Transmission
Fluid (MTF) until it runs out of the hole.
4.Put a new washer on the filler bolt, then
reinstall the filler bolt.
uTightening torque:
33 lbf∙ft (44 N∙m, 4.5 kgf∙m)■
Manual Transmission Fluid
Specified fluid: Honda Manual Transmission Fluid (MTF)
1Manual Transmission Fluid
If Honda MTF is not available, you may use the API
certificated SAE 10W-30 or 10W-40 viscosity motor
oil as a temporary measure.
Replace with MTF as soon as possible. Motor oil does
not contain the proper additives for the transmission
and continued use can cause decreased shifting
performance and lead to transmission damage.
Filter Bolt
Washer
Page 212 of 286
211
uuMaintenance Under the HooduRefilling Window Washer Fluid
Maintenance
Refilling Window Washer FluidCheck the amount of window washer fluid. Look for 1/2 mark on the reservoir.
If the level is low, fill the washer reservoir.
If the washer fluid is low, the indicator appears on the instrument panel. Pour the
washer fluid carefully. Do not overflow the reservoir.
1Refilling Window Washer Fluid
NOTICEDo not use engine antifreeze or a vinegar/water
solution in the windshield washer reservoir.
Antifreeze can damage your vehicle’s paint. A
vinegar/water solution can damage the windshield
washer pump.
Models without washer level sensorWindshield
Washer Reservoir
Fill up to here
Models with washer level sensor
Page 238 of 286

237
Handling the Unexpected
This chapter explains how to handle unexpected troubles.
Tools
Types of Tools .................................. 238
If a Tire Goes Flat
Changing a Flat Tire
*....................... 239
Temporarily Repairing a Flat Tire
*..... 245
Engine Does Not Start
Checking the Engine ........................ 250
Jump Starting.................................... 251
Shift Lever Does Not Move.............. 253
Overheating
How to Handle Overheating ............. 254Indicator, Coming On/Blinking
If the Low Oil Pressure Indicator Comes
On................................................ 256If the Charging System Indicator Comes
On ................................................. 256
If the Malfunction Indicator Lamp Comes
On or Blinks ..................................... 257If the Brake System Indicator Comes On .. 258If the EPS Indicator Comes On.......... 258
If the Low Tire Pressure Indicator Comes
On ................................................. 259
If the TPMS Indicator Comes On ...... 259Fuses
Fuse Locations ................................. 260
Inspecting and Changing Fuses ........ 263
Emergency Towing........................... 264
* Not available on all models
Page 248 of 286

Continued
247
uuIf a Tire Goes FlatuTemporarily Repairing a Flat Tire
*
Handling the Unexpected
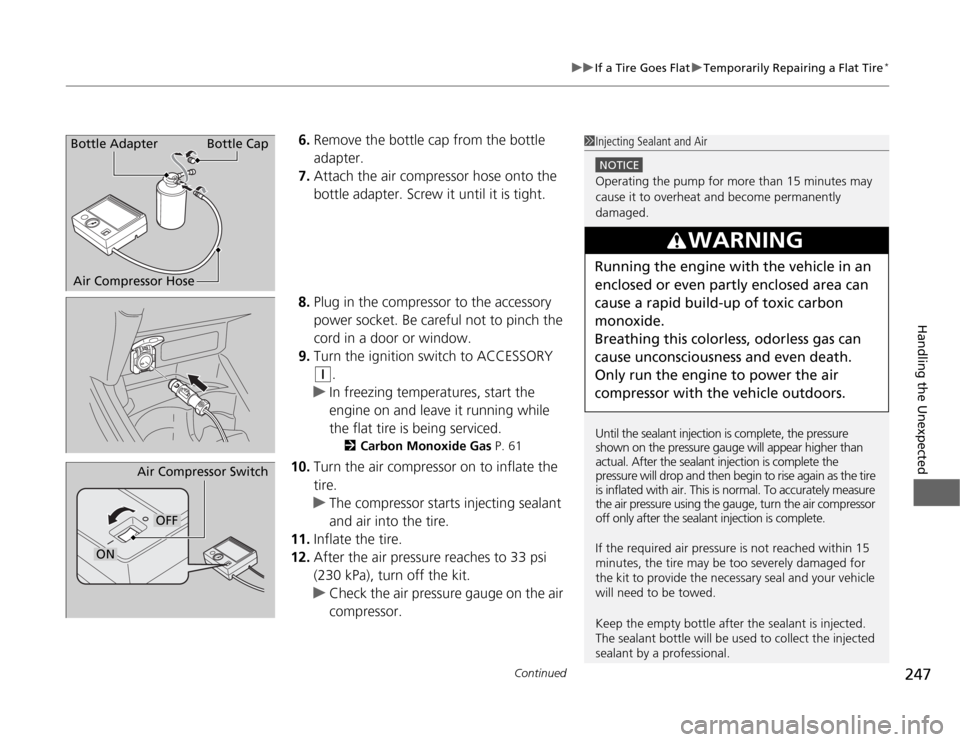
6.Remove the bottle cap from the bottle
adapter.
7.Attach the air compressor hose onto the
bottle adapter. Screw it until it is tight.
8.Plug in the compressor to the accessory
power socket. Be careful not to pinch the
cord in a door or window.
9.Turn the ignition switch to ACCESSORY
(q
.
uIn freezing temperatures, start the
engine on and leave it running while
the flat tire is being serviced.
2Carbon Monoxide Gas P. 61
10.Turn the air compressor on to inflate the
tire.
uThe compressor starts injecting sealant
and air into the tire.
11.Inflate the tire.
12.After the air pressure reaches to 33 psi
(230 kPa), turn off the kit.
uCheck the air pressure gauge on the air
compressor.
1Injecting Sealant and Air
NOTICEOperating the pump for more than 15 minutes may
cause it to overheat and become permanently
damaged.
Until the sealant injection is complete, the pressure
shown on the pressure gauge will appear higher than
actual. After the sealant injection is complete the
pressure will drop and then begin to rise again as the tire
is inflated with air. This is normal. To accurately measure
the air pressure using the gauge, turn the air compressor
off only after the sealant injection is complete.
If the required air pressure is not reached within 15
minutes, the tire may be too severely damaged for
the kit to provide the necessary seal and your vehicle
will need to be towed.
Keep the empty bottle after the sealant is injected.
The sealant bottle will be used to collect the injected
sealant by a professional.
3
WARNING
Running the engine with the vehicle in an
enclosed or even partly enclosed area can
cause a rapid build-up of toxic carbon
monoxide.
Breathing this colorless, odorless gas can
cause unconsciousness and even death.
Only run the engine to power the air
compressor with the vehicle outdoors.
Bottle Adapter
Air Compressor HoseBottle Cap
Air Compressor Switch
OFF
ON
Page 251 of 286

250Handling the Unexpected
Engine Does Not StartChecking the EngineIf the engine does not start, turn the ignition switch to START
(e
and check the
starter.
Starter condition
Checklist
Starter doesn’t turn or turns
over slowly.
The battery may be dead. Check
each of the items on the right and
respond accordingly.
Check brightness of the interior light.
Turn on interior lights and check brightness.●
If the interior lights are dim or do not come on at all
2Battery P. 231
●
If the interior lights come on normally
2 Inspecting and Changing Fuses P. 263
The starter turns over normally
but the engine doesn’t start.
There may be a problem with the
fuse. Check each of the items on
the right and respond accordingly.
Review the engine start procedure.
Follow its instructions, and try to start the engine again.
2 Starting the Engine P. 161
Check the immobilizer system indicator.
When the immobilizer system indicator is blinking, the engine cannot be started.
2Immobilizer System P. 90
Check the fuel level.
There should be enough fuel in the tank.
2 Fuel Gauge P. 72
Check the fuse.
Check all fuses, or have the vehicle checked by a dealer.
2Inspecting and Changing Fuses P. 263
If the problem continues:
2Emergency Towing P. 264
1Checking the Engine
If you must start the vehicle immediately, use an
assisting vehicle to jump start it.
2Jump Starting P. 251