Page 350 of 435

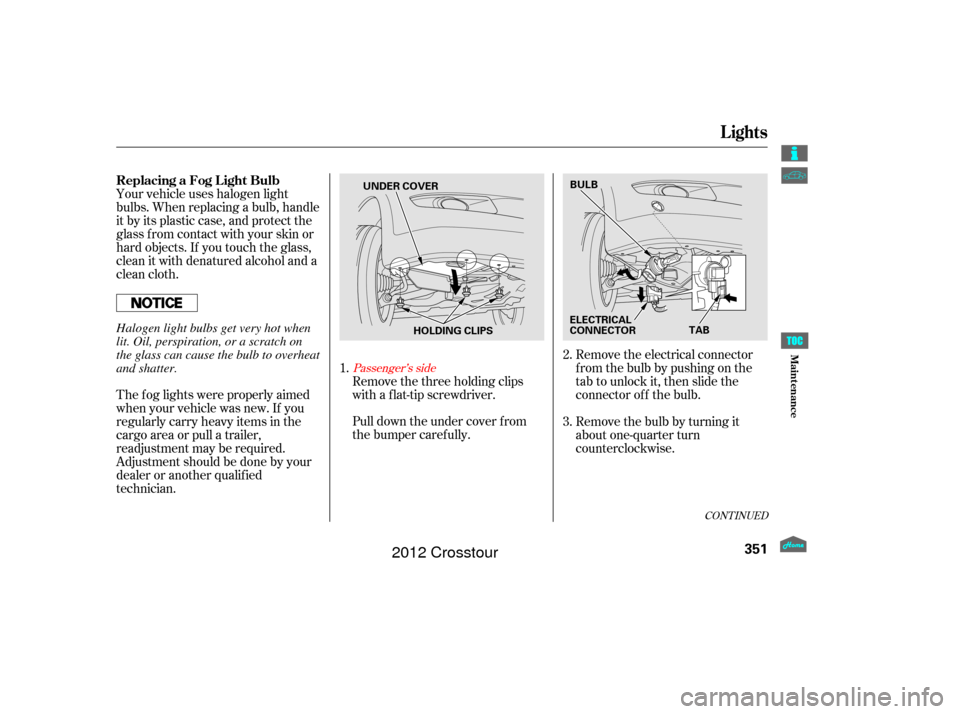
To change the passenger’s side
bulb, start the engine, turn the
steering wheel all the way to the
lef t, and turn of f the engine. To
change the driver’s side bulb, turn
the steering wheel to the right.
Use a f lat-tip screwdriver to
remove the holding clip f rom the
inner f ender, and remove the
screw with a Phillips-head
screwdriver.Pull the inner f ender cover away
f rom the f ender and bumper.
Remove the electrical connector
f rom the bulb by pushing on the
tab to unlock it, then slide the
connector of f the bulb.
Remove the bulb by turning it
approximately one-quarter turn
counterclockwise.Install the new bulb, and turn it
one-quarter turn clockwise to lock
it in place.
Push the electrical connector onto
the bulb.
Turn on the headlights to test the
new bulb.
Put the inner f ender cover in place.
Install the holding clip. Lock it in
placebypushingonthecenter.
Tighten the screw securely.
3.
4.
5.
1.
2. 6.
7.
8.
9.
L ow Beam Headlight
Lights
346
BULB
TAB
SCREW HOLDING CLIP
ELECTRICAL CONNECTOR
Maint enance
2012 Crosstour
Page 351 of 435
Remove the socket from the
headlight assembly by turning it
one-quarter turn counterclockwise.
To remove the burned out bulb,
push it in and turn it
counterclockwise until it unlocks.
Open the hood.
To change the turn signal bulb on
the passenger’s side, remove the
engine coolant reserve tank by
pulling it out of its stay. To change a bulb on the driver’s side,
remove the fastener with a flat-tip
screwdriver, and remove the splash
separator by pushing the tab. Then
remove the duct.
1. 2.
3.
CONT INUED
Lights
Replacing a Front T urn Signal/
Parking L ight Bulb
347
STAYDUCT
TAB
BULB
SOCKET
SPLASH
SEPARATOR
FASTENER
Maint enance
2012 Crosstour
Page 352 of 435
Install the new bulb and turn it
clockwise to lock it in place.
Turn on the lights to make sure
the new bulb is working. Insert the socket back into the
headlight assembly. Turn it
clockwise to lock it in place.
Reinstall the coolant reserve tank.Use a f lat-tip screwdriver to
remove the holding clip f rom the
inner f ender, and remove the
screw with a Phillips-head
screwdriver.
To change the bulb on the
driver’s side, start the engine,
turn the steering wheel all the
way to the right, then turn off the
engine. To change the bulb
on the passenger’s side, turn the
steering wheel to the left.
Reinstall the splash separator and
duct securely. Reinstall the
f astener and secure it by pushing
on the head until it locks.
6.
1.
7. 5. 4.
2.
Passenger’s side
Driver’s Side
Replacing a Front
Side Marker Light Bulb
Lights
348
SCREW HOLDING CLIP
Maint enance
2012 Crosstour
Page 353 of 435
CONT INUED
Open the tailgate. Place a cloth on
the edge of the cover to prevent
scratches. Remove the covers by
caref ully prying on the edge with a
small f lat-tip screwdriver.
Insert the socket back into the
headlight assembly. Turn it
clockwise to lock it in place.
Turn on the lights to make sure
the new bulb is working.
Put the inner f ender cover in place.
Install the holding clip. Lock it in
placebypushingonthecenter.
Tighten the screw securely.
Remove the socket from the
headlight assembly by turning it
one-quarter turn counterclockwise.
Pull the burned out bulb straight
out of its socket.
Push the new bulb straight into
the socket until it bottoms. 5.
6.
7.
1.
3.
4. Replacing Rear Bulbs
Lights
349
SOCKET
COVER
BULB
Maint enance
2012 Crosstour
Page 354 of 435
Turn on the lights to make sure
the new bulb is working.
Align the clips on the taillight
assembly with the holes in the
body, then push the taillight
assembly into place. Tighten the
two mounting screws securely and
reinstall the covers.
Use a Phillips-head screwdriver to
remove the taillight assembly
mounting screw under each cover.
Pull the taillight assembly out of
thebodybyslidingitoutside.
Determine which of the three
bulbs is burned out: stop/taillight,
back-up light or turn signal light. Remove the socket by turning it
one-quarter turn counterclockwise.
Pull the bulb straight out of its
socket. Push the new bulb straight
into the socket until it bottoms.
Insert the socket back into the
light assembly. Turn it clockwise
to lock it in place.8.
9.
2.
3.
4. 5.
6.
7.
Lights
350
BULB
SCREW
SOCKET
TAILLIGHT ASSEMBLY
Maint enance
2012 Crosstour
Page 355 of 435

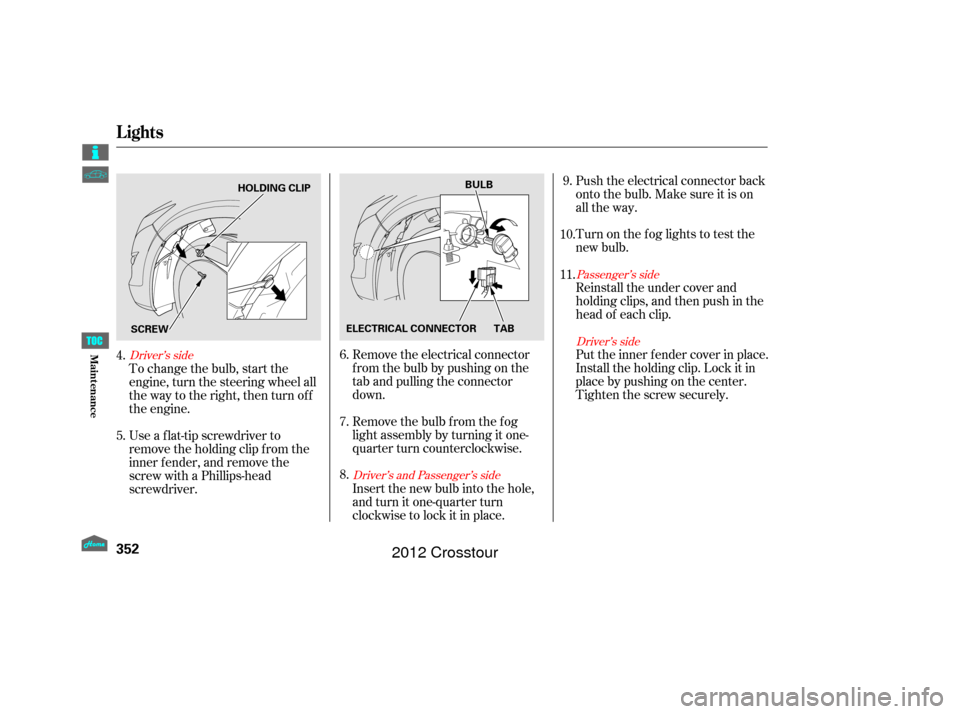
Pull down the under cover f rom
the bumper caref ully.Remove the electrical connector
f rom the bulb by pushing on the
tab to unlock it, then slide the
connector of f the bulb.
Remove the bulb by turning it
about one-quarter turn
counterclockwise.
Your vehicle uses halogen light
bulbs. When replacing a bulb, handle
it by its plastic case, and protect the
glass from contact with your skin or
hard objects. If you touch the glass,
clean it with denatured alcohol and a
clean cloth.
Thefoglightswereproperlyaimed
when your vehicle was new. If you
regularly carry heavy items in the
cargo area or pull a trailer,
readjustment may be required.
Adjustment should be done by your
dealer or another qualif ied
technician.
Remove the three holding clips
with a flat-tip screwdriver.
1.
2.
3.
CONT INUED
Passenger’s side
ReplacingaFogLightBulb
Lights
351
ELECTRICAL
CONNECTOR
TAB
UNDER COVER
BULB
HOLDING CLIPSHalogen light bulbs get very hot when
lit. Oil, perspiration, or a scratch on
the glass can cause the bulb to overheat
and shatter.
Maint enance
2012 Crosstour
Page 356 of 435

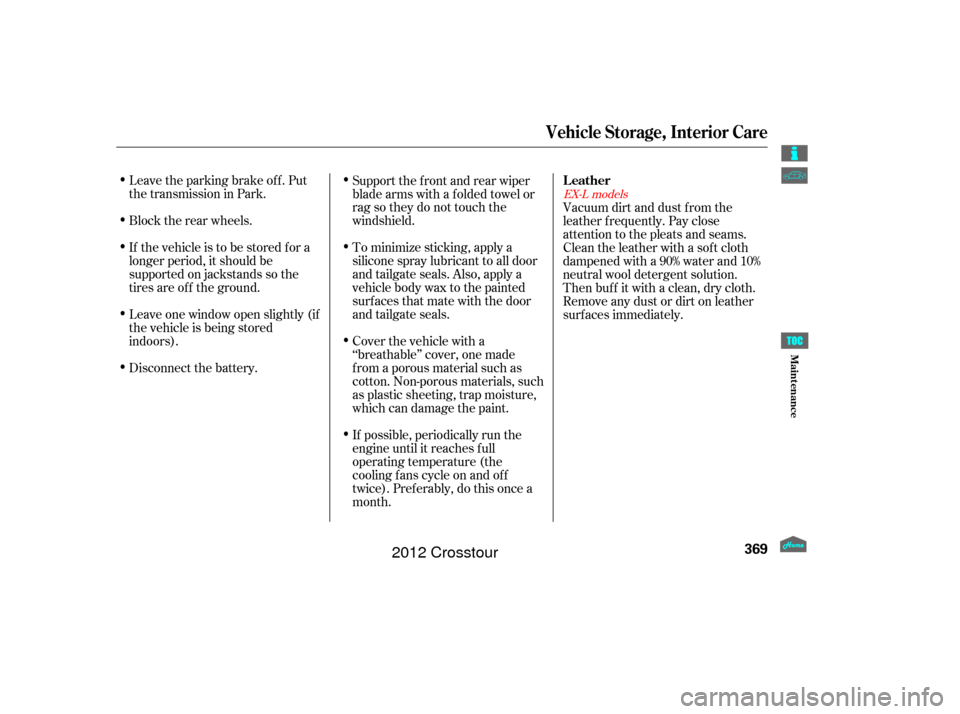
To change the bulb, start the
engine, turn the steering wheel all
the way to the right, then turn off
the engine.Remove the electrical connector
f rom the bulb by pushing on the
tab and pulling the connector
down.
Remove the bulb f rom the f og
light assembly by turning it one-
quarter turn counterclockwise.
Use a f lat-tip screwdriver to
remove the holding clip f rom the
inner f ender, and remove the
screw with a Phillips-head
screwdriver. Push the electrical connector back
onto the bulb. Make sure it is on
all the way.
Turn on the f og lights to test the
new bulb.
Put the inner f ender cover in place.
Install the holding clip. Lock it in
placebypushingonthecenter.
Tighten the screw securely.
Insert the new bulb into the hole,
and turn it one-quarter turn
clockwise to lock it in place. Reinstall the under cover and
holdingclips,andthenpushinthe
head of each clip.
6.
7.
8.
4.
5. 9.
11. 10.
Passenger’s side Driver’s side
Driver’s side
Driver’s and Passenger’s side
Lights
352
ELECTRICAL CONNECTOR TAB
SCREW BULB
HOLDING CLIP
Maint enance
2012 Crosstour
Page 373 of 435

Leave the parking brake off. Put
the transmission in Park.
Block the rear wheels.
If the vehicle is to be stored f or a
longer period, it should be
supported on jackstands so the
tires are of f the ground.
Leave one window open slightly (if
the vehicle is being stored
indoors).
Disconnect the battery.Support the f ront and rear wiper
blade arms with a f olded towel or
ragsotheydonottouchthe
windshield.
To minimize sticking, apply a
silicone spray lubricant to all door
and tailgate seals. Also, apply a
vehiclebodywaxtothepainted
surfaces that mate with the door
and tailgate seals.
Cover the vehicle with a
‘‘breathable’’ cover, one made
f rom a porous material such as
cotton. Non-porous materials, such
as plastic sheeting, trap moisture,
which can damage the paint.
If possible, periodically run the
engine until it reaches f ull
operating temperature (the
cooling f ans cycle on and of f
twice). Pref erably, do this once a
month.Vacuum dirt and dust f rom the
leather f requently. Pay close
attention to the pleats and seams.
Clean the leather with a sof t cloth
dampened with a 90% water and 10%
neutral wool detergent solution.
Then buf f it with a clean, dry cloth.
Remove any dust or dirt on leather
surf aces immediately.
EX-L models
Vehicle Storage, Interior Care
Leather
369
Maint enance
2012 Crosstour