Page 235 of 361

234
uuTowing a TraileruDriving Safely with a Trailer
Driving
Driving Safely with a Trailer •Have the trailer properly serviced and keep it in good condition.
• Make sure that all the weights and load in the vehicle and trailer are within limits.
2 Towing Load Limits P. 231
• Securely attach the hitch, safety chains, and other necessary parts to the trailer.
• Securely store all the items in and on the trailer so that they do not shift while
driving.
• Check if the lights and brakes on the trailer are working properly.
• Check the pressures of the trailer tires, including the spare.
• Drive slower than normal.
• Obey posted speed limits for vehicles with trailers.
• Use the
(D position when towing a trailer on level roads.
• Turn more slowly and with a wider turning arc than normal.
• Allow more time and distance for braking.
• Do not brake or turn suddenly.
• Monitor your temperature gauge. If it nears the red (Hot) mark, turn off the
heating and cooling system *
/climate control system *
and reduce speed. Pull to the
side of the road safely to cool down the engine if necessary.
• Shift to the
(d position if the transmission shifts frequently.
■Things You Need To Know Before Towing a Trailer
■Towing Speeds and Gears
■Turning and Braking
■Driving in Hilly Terrain
1Driving Safely with a Trailer
Parking
In addition to the normal precautions, place wheel
chocks at each of the trailer's tires.
* Not available on all models
Page 236 of 361

235
uuTowing a TraileruTowing Your Vehicle
Continued
Driving
Towing Your Vehicle
Your vehicle can be towed behind a motorhome.
Perform the following procedure before towing your vehicle. 1.Check the transmission fluid level.
uMake sure the fluid level is between the upper and lower marks.
2. Start the engine.
3. Depress the brake pedal. Move the shift lever through all its positions.
4. Shift to
(D and hold for five seconds, then to (N. Let the engine run for three
minutes, then turn it off.
5. Release the parking brake.
6. Leave the ignition switch in ACCESSORY
(q .uMake sure the steering wheel does not lock.
7. Turn off all the electric devices. Do not use any accessory power sockets.
uThis can prevent the battery from running down.
■When Your Vehicle is Towed Behind a Motorhome
1Towing Your Vehicle
NOTICEFailure to follow the recommended instructions
exactly will result in severe automatic transmission
damage. If you cannot shift the transmission or start
the engine, your vehicle must be transported on a
flat-bed truck or trailer.
Do not exceed 65 mph (100 km/h).
To avoid damage to the AWD system, your vehicle
must be towed with all four wheels on the ground.
Consult your towing parts sales or rental agency if
any other items are recommended or required for
your towing situation.
If you tow your vehicle behind a motorhome, the
transmission fluid must be changed every 2 years or
30,000 miles (48,000 km), whichever comes first.
AWD models
1When Your Vehicle is Towed Behind a Motorhome
NOTICESevere transmission damage will occur if the vehicle is
shifted from (R to (N and then towed with the drive
wheels on the ground.
Page 237 of 361
236
uuTowing a TraileruTowing Your Vehicle
Driving
■Extended towing
If you tow more than 8 hours in one day , you should repeat the “before towing your
vehicle procedure” at least every 8 hours. You also need to perform the following
procedure to prevent the battery from running down.
1.Remove the 7.5 A accessory radio fuse. This
fuse is located in the interior fuse box.
2 Interior Fuse Box P. 334
2. Store the fuse in a safe place so you do not
lose it.
uMake sure to reinstall the fuse before
you start driving your vehicle.
Accessory Radio Fuse
Page 239 of 361

238
uuOff-Highway Driving GuidelinesuAvoiding Trouble
Driving
Avoiding Trouble •Check Out Your Vehicle before you leave the pavement and make sure that all
scheduled maintenance has been completed. Pay special attention to the
condition of the tires, and check the tire pressures.
• Remember the route you choose presents limits (too steep or bumpy), you have
limits (driving skill and comfort), and your vehicle has limits (traction, stability, and
power). Failing to recognize these limits will likely put you and your passengers in
a hazardous situation.
• Accelerating and Braking should be done slowly and gradually. Trying to start
or stop too fast can cause a loss of traction and you could lose control.
• Avoiding Obstacles and Debris in the road reduces the likelihood of a rollover
or damage to your suspension or other components.
• Driving on Slopes increasing your risk of a rollover, particularly if you attempt to
drive across a slope that is too steep. Going straight or down a slope is usually the
safest. If you can’t clearly see all conditions or obstacles on a slope, walk it before
you drive it. If there is any doubt whether you can safely pass, don’t try it. Find
another route. If you get stuck when c limbing, do not try to turn around. Back
down slowly following the same route you took up the hill.
• Crossing a Stream - Avoid driving through deep water. If you encounter water
in your route (a small stream or large puddle, for example), evaluate it carefully
before going ahead. Make sure it is shallow, flowing slowly, and has firm ground
underneath. If you are not sure of the depth or the ground, turn around and find
another route. Driving through deep water can also damage your vehicle. The
water can get into the transmission and differential, diluting the lubricant and
causing an eventual failure. It can also wash the grease out of the wheel bearings.
• If You Get Stuck , carefully go in the direction that you think will get you
unstuck. Do not spin the tires as this will only make things worse and could
damage the transmission. If you are unable to free yourself, your vehicle will need
to be towed. Front and rear tow hooks are provided for this purpose.
Page 244 of 361
243
uuWhen DrivinguShifting
Continued
Driving
Shifting
Change the shift position in accordance with your driving needs. ■Shift lever positions
1Shifting
You cannot turn the ignition switch to LOCK
(0 and
remove the key unless the shift lever is in (P .
The vehicle may move forward very slightly even in
(N while the engine is cold.
Depress the brake pedal firmly and, when necessary,
apply the parking brake.Park
Used when parking or starting the
engine
Reverse
Used when reversing
Neutral
Used when idling
Drive
Used for normal driving (gears change
between 1st and 5th au tomatically)
Drive (D3)Press the
(d button while the shift lever
is in (D .
Used when: ● Going up or down hills
● Towing a trailer in hilly terrain
Second
Used to increase engine braking
(the transmission is locked in 2nd gear)
First
Used to further increase engine braking
(the transmission is locked in 1st gear)
Release Button(d
Button
Page 268 of 361

267
uuBefore Performing MaintenanceuSafety When Performing Maintenance
Maintenance
Safety When Performing Maintenance
Some of the most important safety precautions are given here.
However, we cannot warn you of every conceivable hazard that can arise in
performing maintenance. Only you can decide whether or not you should perform
a given task. • To reduce the possibility of fire or explosion, keep cigarettes, sparks, and flames
away from the battery and all fuel related parts.
• Never leave rags, towels, or other flammable objects under the hood.
uHeat from the engine and exhaust can ignite them causing a fire.
• To clean parts, use a commercially available degreaser or parts cleaner, not
gasoline.
• Wear eye protection and protective clothing when working with the battery or
compressed air.
• Engine exhaust contains carbon monoxide, which is poisonous and can kill you.
uOnly operate the engine if there is sufficient ventilation.
• The vehicle must be in a stationary condition.
uMake sure your vehicle is parked on level ground, the parking brake is set, and
the engine is off.
• Be aware that hot parts can burn you.
uMake sure to let the engine and exhaust system cool thoroughly before
touching vehicle parts.
• Be aware that moving parts can injure you.
uDo not start the engine unless instructed, and keep your hands and limbs away
from moving parts.
■Maintenance Safety
■Vehicle Safety
1Safety When Performing Maintenance
3WARNING
Improperly maintaining this vehicle or
failing to correct a problem before driving
can cause a crash in which you can be
seriously hurt or killed.
Always follow the inspection and
maintenance recommendations according
to the schedules in this owner's manual.
3WARNING
Failure to properly follow maintenance
instructions and precautions can cause you
to be seriously hurt or killed.
Always follow the procedures and
precautions in this owner's manual.
Page 275 of 361

274
uuMaintenance Under the HooduOpening the Hood
Maintenance
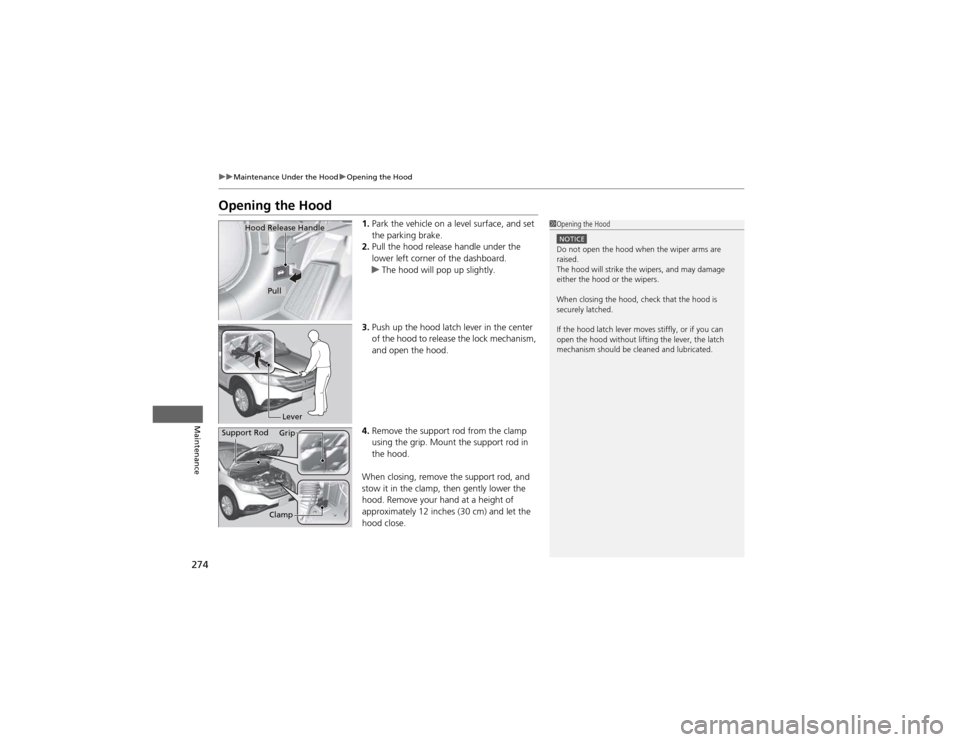
Opening the Hood1.Park the vehicle on a level surface, and set
the parking brake.
2. Pull the hood release handle under the
lower left corner of the dashboard.
uThe hood will pop up slightly.
3. Push up the hood latch lever in the center
of the hood to release the lock mechanism,
and open the hood.
4. Remove the support rod from the clamp
using the grip. Mount the support rod in
the hood.
When closing, remove the support rod, and
stow it in the clamp, then gently lower the
hood. Remove your hand at a height of
approximately 12 inches (30 cm) and let the
hood close.
1Opening the Hood
NOTICEDo not open the hood when the wiper arms are raised.
The hood will strike the wipers, and may damage
either the hood or the wipers.
When closing the hood, check that the hood is
securely latched.
If the hood latch lever moves stiffly, or if you can
open the hood without lifting the lever, the latch
mechanism should be cleaned and lubricated.
Hood Release Handle
Pull
Lever
Support Rod Grip
Clamp
Page 277 of 361
276
uuMaintenance Under the HooduOil Check
Maintenance
Oil Check
We recommend that you check the engine oil level every time you refuel.
Park the vehicle on level ground.
Wait approximately three minutes after turning the engine off before you check the
oil.1.Remove the dipstick (orange handle).
2. Wipe the dipstick with a clean cloth or
paper towel.
3. Insert the dipstick back all the way into its
hole.
4. Remove the dipstick again, and check the
level. It should be between the upper and
lower marks. Add oil if necessary.
1Oil Check
If the oil level is near or below the lower mark, slowly
add oil being careful not to overfill.
Upper Mark
Lower Mark