Page 245 of 361

uuWhen DrivinguShifting
244
Driving
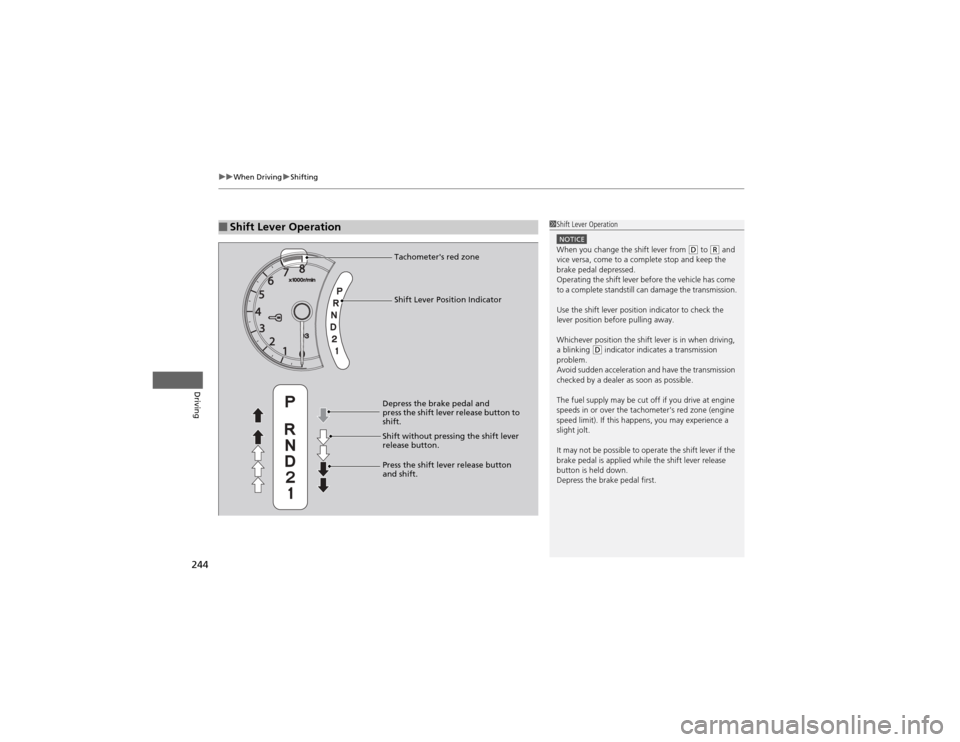
■Shift Lever Operation1Shift Lever Operation
NOTICEWhen you change the shift lever from (D to (R and
vice versa, come to a complete stop and keep the
brake pedal depressed.
Operating the shift lever before the vehicle has come
to a complete standstill can damage the transmission.
Use the shift lever position indicator to check the
lever position before pulling away.
Whichever position the shift lever is in when driving,
a blinking
(D indicator indicates a transmission
problem.
Avoid sudden acceleration and have the transmission
checked by a dealer as soon as possible.
The fuel supply may be cut off if you drive at engine
speeds in or over the tachometer's red zone (engine
speed limit). If this happens, you may experience a
slight jolt.
It may not be possible to operate the shift lever if the
brake pedal is applied while the shift lever release
button is held down.
Depress the brake pedal first.
Tachometer's red zone
Shift Lever Position Indicator
Depress the brake pedal and
press the shift lever release button to
shift.
Shift without pressing the shift lever release button.
Press the shift lever release button
and shift.
Page 249 of 361

248
uuWhen DrivinguVSA® (Vehicle Stability Assist), aka ESC (Electronic Stability Control), System
Driving
VSA ® (Vehicle Stability Assist), aka ESC (Electronic
Stability Control), System VSA ® helps to stabilize the vehicle during cornering if the vehicle turns more or less
than what was intended. It also assists in maintaining traction on slippery surfaces.
It does so by regulating engine output and selectively applying the brakes.
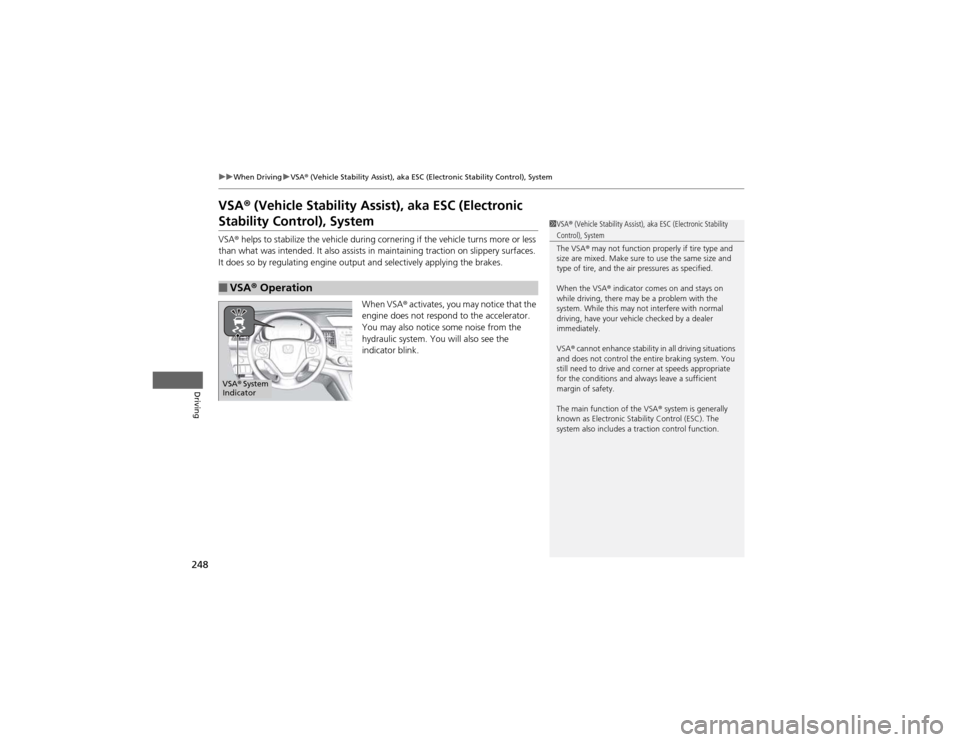
When VSA® activates, you may notice that the
engine does not respond to the accelerator.
You may also notice some noise from the
hydraulic system. You will also see the
indicator blink.
■VSA ® Operation
1VSA ® (Vehicle Stability Assist), aka ESC (Electronic Stability Control), System
The VSA ® may not function properly if tire type and
size are mixed. Make sure to use the same size and
type of tire, and the air pressures as specified.
When the VSA ® indicator comes on and stays on
while driving, there may be a problem with the
system. While this may not interfere with normal
driving, have your vehicle checked by a dealer immediately.
VSA ® cannot enhance stability in all driving situations
and does not control the entire braking system. You
still need to drive and corner at speeds appropriate
for the conditions and always leave a sufficient
margin of safety.
The main function of the VSA ® system is generally
known as Electronic Stability Control (ESC). The
system also includes a traction control function.
VSA ® System
Indicator
Page 250 of 361

249
uuWhen DrivinguVSA® (Vehicle Stability Assist), aka ESC (Electronic Stability Control), System
Driving
This button is on the driver side control panel.
To turn the VSA® system on and off, press and
hold it until you hear a beep. VSA ® will stop and the indicator will come on.
To turn it on again, press the (VSA ® OFF)
button until you hear a beep.VSA ® is turned on every time you start the
engine, even if you turned it off the last time
you drove the vehicle.
■VSA ® On and Off1VSA ® (Vehicle Stability Assist), aka ESC (Electronic Stability Control), System
Without VSA ®, your vehicle will have normal braking
and cornering ability, but it will not have VSA ®
traction and stability enhancement.
In certain unusual conditions when your vehicle gets
stuck in shallow mud or fresh snow, it may be easier
to free it with the VSA ® temporarily switched off.
When the VSA ® system is off, the traction control
system is also off. You should only attempt to free
your vehicle with the VSA ® off if you are not able to
free it when the VSA ® is on.
Immediately after freeing your vehicle, be sure to
switch VSA ® on again. We do not recommend driving
your vehicle with the VSA ® and traction control
systems switched off.
If the low tire pressure, or TPMS indicator comes on
or blinks, the VSA ® system comes on automatically. In
this case, you cannot turn the system off by pressing
the button.
You may hear a motor sound coming from the
engine compartment while system checks are being
performed immediately after starting the engine or
while driving. This is normal.
VSA ® OFF
Indicator
Page 255 of 361

uuBrakinguBrake System
254
Driving
Your vehicle is equipped with disc brakes at all four wheels. A power assist helps
reduce the effort needed on the brake pedal. The brake assist system increases the
stopping force when you depress the brake pedal hard in an emergency situation.
The anti-lock brake system (ABS) helps you retain steering control when braking very
hard. 2 Brake Assist System P. 256
2 ABS (Anti-lock Brake System) P. 255
■Foot Brake1Foot Brake
Check the brakes after driving through deep water,
or if there is a buildup of road surface water. If
necessary, dry the brakes by lightly depressing the
pedal several times.
If you hear a continuous metallic friction sound when
applying the brakes, the brake pads need to be
replaced. Have the vehicle checked by a dealer.
Constantly using the brake pedal while going down a
long hill builds up heat, which reduces the brake
effectiveness. Apply engine braking by taking your
foot off the accelerator pedal and downshifting to a
lower gear.
Do not rest your foot on the brake pedal while
driving, as it will lightly apply the brakes and cause
them to lose effectiveness over time and reduce pad
life. It will also confuse drivers behind you.
Page 256 of 361

255
uuBrakinguABS (Anti-lock Brake System)
Driving
ABS (Anti-lock Brake System)
Helps prevent the wheels from locking up, and helps you retain steering control by
pumping the brakes rapidly, much faster than you.
The electronic brake distribution (EBD) system, which is part of the ABS, also
balances the front-to-rear braking distribution according to vehicle loading.
You should never pump the brake pedal. Let the ABS work for you by always
keeping firm, steady pressure on the brake pedal. This is sometimes referred to as
"stomp and steer." ■ABS operation
The brake pedal may pulsate slightly when the ABS is working. Keep holding the
pedal firmly down. On dry pavement, you will need to press on the brake pedal very
hard before the ABS activates. However, you may feel the ABS activate immediately
if you are trying to stop on snow or ice.
When the vehicle speed goes under 6 mph (10 km/h), the ABS stops.
■ABS1ABS (Anti-lock Brake System)
NOTICEThe ABS may not function correctly if you use an
incorrect tire type and size.
When the ABS indicator comes on while driving,
there may be a problem with the system.
While normal braking is not affected, there is a
possibility of the ABS not operating. Have the vehicle checked by a dealer immediately.
The ABS does not reduce the time or distance it takes
to stop the vehicle. It only helps with steering control
during hard braking.
In the following cases, your vehicle may need more
stopping distance than a vehicle without the ABS: • When driving on rough road surfaces, including
when driving on uneven surfaces, such as gravel or
snow.
• When tire chains are installed.
You may hear a motor sound coming from the
engine compartment while system checks are being
performed immediately after starting the engine or
while driving. This is normal.
Page 277 of 361
276
uuMaintenance Under the HooduOil Check
Maintenance
Oil Check
We recommend that you check the engine oil level every time you refuel.
Park the vehicle on level ground.
Wait approximately three minutes after turning the engine off before you check the
oil.1.Remove the dipstick (orange handle).
2. Wipe the dipstick with a clean cloth or
paper towel.
3. Insert the dipstick back all the way into its
hole.
4. Remove the dipstick again, and check the
level. It should be between the upper and
lower marks. Add oil if necessary.
1Oil Check
If the oil level is near or below the lower mark, slowly
add oil being careful not to overfill.
Upper Mark
Lower Mark
Page 278 of 361
277
uuMaintenance Under the HooduAdding Engine Oil
Maintenance
Adding Engine Oil1.Unscrew and remove the engine oil fill cap.
2. Add oil slowly.
3. Reinstall the engine oil fill cap, and tighten
it securely.
4. Wait for three minutes and recheck the
engine oil dipstick.
1Adding Engine Oil
If any oil spills, wipe it up immediately. Spilled oil may
damage the engine compartment components.
NOTICEDo not fill the engine oil above the upper mark.
Overfilling the engine oil can result in leaks and
engine damage.
Engine Oil
Fill Cap
Page 280 of 361

279
uuMaintenance Under the HooduChanging the Engine Oil and Oil Filter
Maintenance
5.Remove the oil filter and dispose of the
remaining oil.
6. Check that the filter gasket is not stuck to
the engine contact surface.
uIf it is stuck, you must detach it.
7. Wipe away dirt and dust adhering to the
contact surface of the engine block, and
install a new oil filter.
uApply a light coat of new engine oil to
the oil filter rubber seal.
8. Put a new washer on the drain bolt, then
reinstall the drain bolt.
uTightening torque:
30 lbf�ft (40 N�m, 4.0 kgf�m)
9. Pour the recommended engine oil into the
engine.
uEngine oil change capacity (including
filter):
4.2 US qt (4.0 L)
10. Reinstall the engine oil fill cap securely and
start the engine.
11. Run the engine for a few minutes, and
then check that there is no leak from the
drain bolt or oil filter.
12. Stop the engine, wait for three minutes,
and then check the oil level on the
dipstick.
uIf necessary, add more engine oil.
1Changing the Engine Oil and Oil Filter
You will need a special wrench to replace the oil
filter. You can buy this wrench from a dealer.
When installing the new oil filter, follow the
instructions supplied with the oil filter.
Reinstall the engine oil fill cap. Start the engine. The
low oil pressure indicator should go off within five
seconds. If it does not, turn off the engine, and check your work.
Oil Filter