2012 HONDA CR-V Transmission
[x] Cancel search: TransmissionPage 5 of 361

Visual Index
4
Quick Reference Guide
❙Power Door Lock Master Switch (P 102)
❙Power Window Switches (P 108)
❙Rearview Mirror (P 120)
❙Interior Fuse Box (P 334)
❙Parking Brake (P 253)
❙Hood Release Handle (P 274)
❙Accessory Power Socket
(P 135)
❙Seat Heater Switches*
(P 139)
❙Shift Lever Automatic Transmission
(P 242)
❙Glove Box (P 133)
❙Driver's Front Airbag (P 40)
❙Door Mirror Controls (P 121)
❙Driver’s Pocket
❙Passenger's Front Airbag
(P 40)
❙Fuel Fill Door Release Handle (P 260)
Page 16 of 361

15
Quick Reference Guide
Driving (P 225)
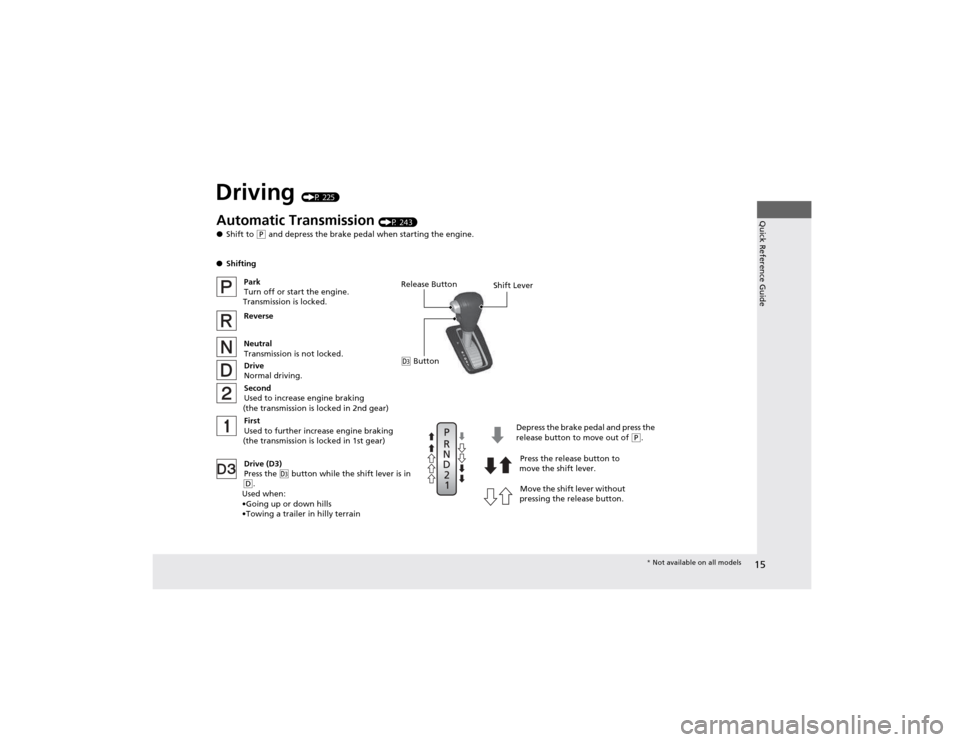
Release Button
Shift Lever
Depress the brake pedal and press the
release button to move out of
(P.
Move the shift lever without
pressing the release button. Press the release button to
move the shift lever.
Automatic Transmission
(P 243)
● Shift to
(P and depress the brake pedal when starting the engine.
● Shifting
Park
Turn off or start the engine.
Transmission is locked.
Reverse
Neutral
Transmission is not locked.
Drive
Normal driving.
Drive (D3) Press the
(d button while the shift lever is in (D.
Used when:
•Going up or down hills
•Towing a trailer in hilly terrain Second
Used to increase engine braking
(the transmission is locked in 2nd gear)
First
Used to further increase engine braking
(the transmission is locked in 1st gear)
(d Button
* Not available on all models
Page 71 of 361

70
uuIndicatorsu
Instrument Panel
IndicatorNameOn/BlinkingExplanation
Transmission
Indicator
●Comes on for a few seconds when you turn
the ignition switch to ON
(w , then goes off.
● Blinks if the transmission system has a
problem.
●Blinks while driving - Avoid sudden starts and
acceleration and have the vehicle checked by a dealer immediately.
Seat Belt
Reminder
Indicator
● Comes on and the beeper sounds if you are
not wearing a seat belt when you turn the
ignition switch to ON
(w . If the front
passenger is not wearing a seat belt, the
indicator comes on about six seconds later.
● Blinks while driving if either you or the front
passenger has not fastened a seat belt. The
beeper sounds and the indicator blinks at regular intervals.
●The beeper stops and the indicator goes off when you
and the front passenger fasten their seat belts.
● Stays on after you or the front passenger has
fastened the seat belt - A detection error may have
occurred in the sensor. Have the vehicle checked by a dealer. 2Seat Belt Reminder P. 30
Low Fuel
Indicator
●
Comes on when the fuel reserve is running
low (approximately 2.3 U.S. gal./8.6 Liter left).
● Blinks if there is a problem with the fuel
gauge.●Comes on - Refuel your vehicle as soon as possible.
● Blinks - Have the vehicle checked by a dealer.
Page 117 of 361

uuOperating the Switches Around the Steering WheeluWipers and Washers
116
Controls
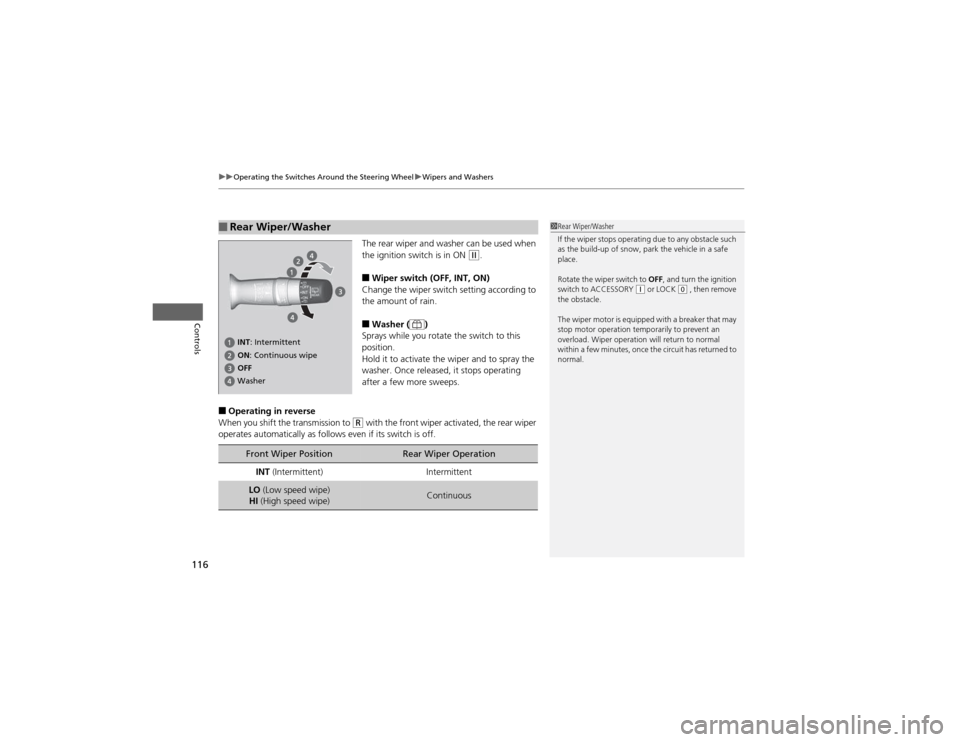
The rear wiper and washer can be used when
the ignition switch is in ON (w .
■ Wiper switch (OFF, INT, ON)
Change the wiper switch setting according to
the amount of rain. ■ Washer ( )
Sprays while you rotate the switch to this
position.
Hold it to activate the wiper and to spray the
washer. Once released, it stops operating
after a few more sweeps.
■ Operating in reverse
When you shift the transmission to
(R with the front wiper activated, the rear wiper
operates automatically as follows even if its switch is off.
■Rear Wiper/Washer1Rear Wiper/Washer
If the wiper stops operating due to any obstacle such
as the build-up of snow, park the vehicle in a safe place.
Rotate the wiper switch to OFF, and turn the ignition
switch to ACCESSORY
(q or LOCK (0 , then remove
the obstacle.
The wiper motor is equipped with a breaker that may
stop motor operation temporarily to prevent an
overload. Wiper operation will return to normal
within a few minutes, once the circuit has returned to
normal.
INT : Intermittent
OFF
ON : Continuous wipe
Washer
Front Wiper PositionRear Wiper Operation
INT (Intermittent)Intermittent
LO (Low speed wipe)
HI (High speed wipe)Continuous
Page 120 of 361

119
uuOperating the Switches Around the Steering WheeluECON Button
Controls
ECON ButtonThe ECON button turns the ECON mode on
and off.
The ECON mode helps you improve your fuel
economy by adjusting the performance of the
engine, transmission, air conditioning system,
and cruise control.
Adjusting the Steering Wheel
The steering wheel height and distance from your body can be adjusted so that you
can comfortably grip the steering wheel in an appropriate driving posture. 1.Pull the steering wheel adjustment lever up.
uThe steering wheel adjustment lever is
under the steering column.
2. Move the steering wheel up or down, and
in or out.
uMake sure you can see the instrument
panel gauges and indicators.
3. Push the steering wheel adjustment lever
down to lock the steering wheel in position.
uAfter adjusting the position, make sure
you have securely locked the steering
wheel in place by trying to move it up,
down, in, and out.
1Adjusting the Steering Wheel
Make any steering wheel adjustments before you
start driving.
3WARNING
Adjusting the steering wheel position while
driving may cause you to lose control of the
vehicle and be seriously injured in a crash.
Adjust the steering wheel only when the
vehicle is stopped.To adjust
To lockLever
Page 226 of 361

225
Driving
This chapter discusses driving, refueling, and information on items such as accessories.
Before Driving Driving Preparation .......................... 226
Maximum Load Limit........................ 229
Towing a Trailer Towing Preparation .......................... 231
Driving Safely with a Trailer .............. 234
Towing Your Vehicle ........................ 235
Off-Highway Driving Guidelines General Information ......................... 237
Important Safety Precautions............ 237
Avoiding Trouble ............................. 238
When Driving Starting the Engine .......................... 239
Precautions While Driving................. 241 Automatic Transmission ................... 242
Shifting ............................................ 243
Cruise Control ................................. 245
VSA® (Vehicle Stability Assist), aka ESC
(Electronic Stability Control), System ...... 248
REAL TIME AWD with Intelligent Control System™ *
......................................... 250
TPMS (Tire Pressure Monitoring System) ... 250Tire Pressure Monitoring System (TPMS) -
Required Federal Explanation ......... 251
Braking Brake System ................................... 253
ABS (Anti-lock Brake System) ........... 255 Brake Assist System ......................... 256
Parking Your Vehicle When Stopped ................................ 257
Parking ............................................ 257
Multi-View Rear Camera .................. 258
Refueling
Fuel Information .............................. 259
How to Refuel ................................. 260
Fuel Economy .................................... 262
Improving Fuel Economy .................. 262
Accessories and Modifications Accessories ...................................... 263
Modifications................................... 263
* Not available on all models
Page 235 of 361

234
uuTowing a TraileruDriving Safely with a Trailer
Driving
Driving Safely with a Trailer •Have the trailer properly serviced and keep it in good condition.
• Make sure that all the weights and load in the vehicle and trailer are within limits.
2 Towing Load Limits P. 231
• Securely attach the hitch, safety chains, and other necessary parts to the trailer.
• Securely store all the items in and on the trailer so that they do not shift while
driving.
• Check if the lights and brakes on the trailer are working properly.
• Check the pressures of the trailer tires, including the spare.
• Drive slower than normal.
• Obey posted speed limits for vehicles with trailers.
• Use the
(D position when towing a trailer on level roads.
• Turn more slowly and with a wider turning arc than normal.
• Allow more time and distance for braking.
• Do not brake or turn suddenly.
• Monitor your temperature gauge. If it nears the red (Hot) mark, turn off the
heating and cooling system *
/climate control system *
and reduce speed. Pull to the
side of the road safely to cool down the engine if necessary.
• Shift to the
(d position if the transmission shifts frequently.
■Things You Need To Know Before Towing a Trailer
■Towing Speeds and Gears
■Turning and Braking
■Driving in Hilly Terrain
1Driving Safely with a Trailer
Parking
In addition to the normal precautions, place wheel
chocks at each of the trailer's tires.
* Not available on all models
Page 236 of 361

235
uuTowing a TraileruTowing Your Vehicle
Continued
Driving
Towing Your Vehicle
Your vehicle can be towed behind a motorhome.
Perform the following procedure before towing your vehicle. 1.Check the transmission fluid level.
uMake sure the fluid level is between the upper and lower marks.
2. Start the engine.
3. Depress the brake pedal. Move the shift lever through all its positions.
4. Shift to
(D and hold for five seconds, then to (N. Let the engine run for three
minutes, then turn it off.
5. Release the parking brake.
6. Leave the ignition switch in ACCESSORY
(q .uMake sure the steering wheel does not lock.
7. Turn off all the electric devices. Do not use any accessory power sockets.
uThis can prevent the battery from running down.
■When Your Vehicle is Towed Behind a Motorhome
1Towing Your Vehicle
NOTICEFailure to follow the recommended instructions
exactly will result in severe automatic transmission
damage. If you cannot shift the transmission or start
the engine, your vehicle must be transported on a
flat-bed truck or trailer.
Do not exceed 65 mph (100 km/h).
To avoid damage to the AWD system, your vehicle
must be towed with all four wheels on the ground.
Consult your towing parts sales or rental agency if
any other items are recommended or required for
your towing situation.
If you tow your vehicle behind a motorhome, the
transmission fluid must be changed every 2 years or
30,000 miles (48,000 km), whichever comes first.
AWD models
1When Your Vehicle is Towed Behind a Motorhome
NOTICESevere transmission damage will occur if the vehicle is
shifted from (R to (N and then towed with the drive
wheels on the ground.