Page 252 of 345
251
Continued
Maintenance
Maintenance Under the Hood
Maintenance Items Under the Hood
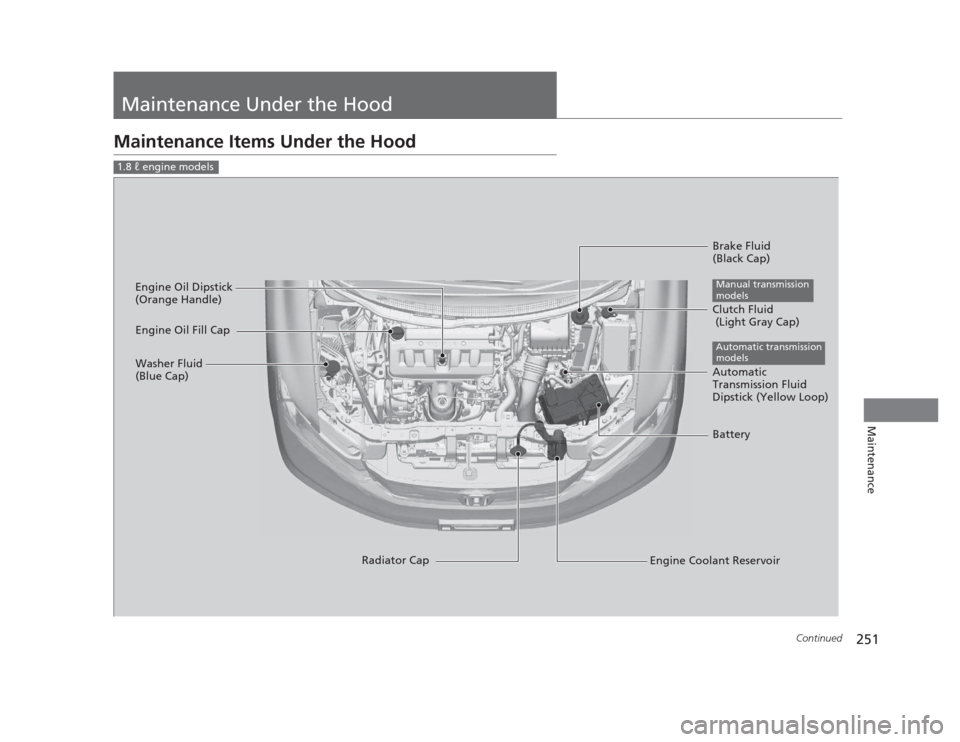
1.8 � engine models
Brake Fluid
(Black Cap)
Engine Coolant Reservoir
Radiator Cap
Washer Fluid
(Blue Cap)
Engine Oil Dipstick
(Orange Handle)
Clutch Fluid
(Light Gray Cap)
Manual transmission
models
Engine Oil Fill Cap
Automatic
Transmission Fluid
Dipstick (Yellow Loop)
Automatic transmission
models
Battery
Page 253 of 345
252
uuMaintenance Under the HooduMaintenance Items Under the Hood
Maintenance
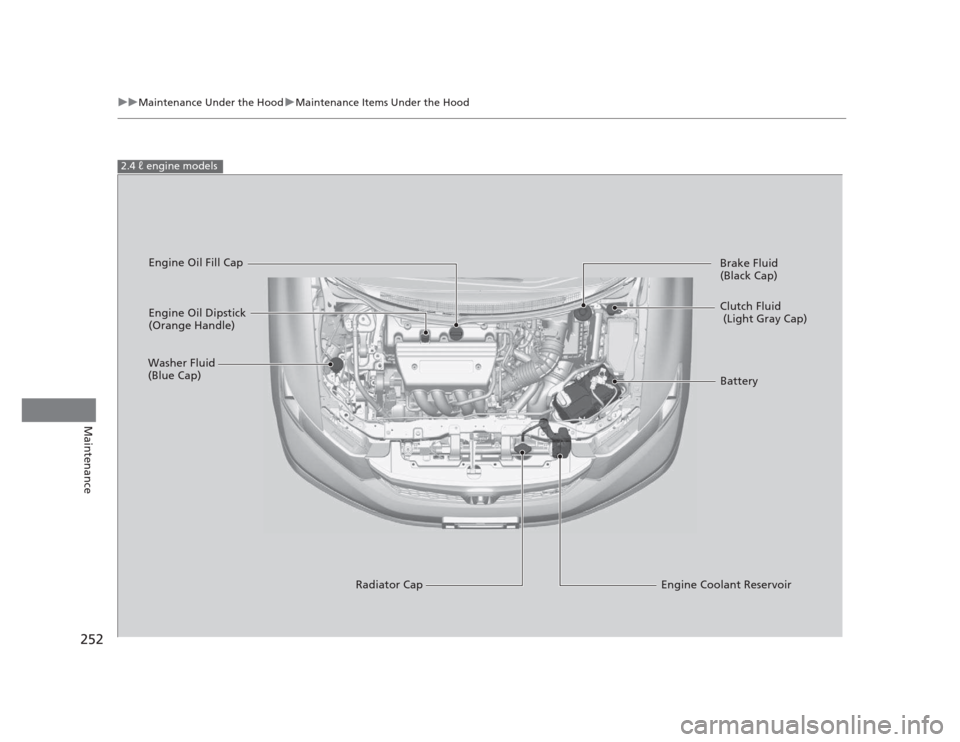
2.4 � engine models
Engine Oil Dipstick
(Orange Handle)
Washer Fluid
(Blue Cap)
Engine Coolant Reservoir
Radiator Cap Brake Fluid
(Black Cap)
Engine Oil Fill Cap
Clutch Fluid
(Light Gray Cap)
Battery
Page 254 of 345

253
uuMaintenance Under the HooduOpening the Hood
Maintenance
Opening the Hood1.Park the vehicle on a level surface, and set
the parking brake.
2. Pull the hood release handle under the
lower left corner of the dashboard.
uThe hood will pop up slightly.
3. Push up the hood latch lever in the center
of the hood to release the lock mechanism,
and open the hood.
4. Remove the support rod from the clamp
using the grip. Mount the support rod in
the hood.
When closing, remove the support rod, and
stow it in the clamp, then gently lower the
hood. Remove your hand at a height of
approximately 12 inches (30 cm) and let the
hood close.
1Opening the Hood
NOTICE
Do not open the hood when the wiper arms are raised.
The hood will strike the wipers, and may damage
either the hood or the wipers.
When closing the hood, check that the hood is
securely latched.
If the hood latch lever moves stiffly, or if you can
open the hood without lifting the lever, the latch
mechanism should be cleaned and lubricated.
Hood Release Handle
Pull
Lever
Support Rod Grip
Clamp
Page 267 of 345

266
uuMaintenance Under the HooduBrake/Clutch Fluid
Maintenance
Brake/Clutch Fluid
Use the same fluid for both the brakes and clutch.The fluid level should be between the MIN and
MAX marks on the side of the reservoir.
The fluid level should be between the MIN and
MAX marks on the side of the reservoir.
Specified fluid: Honda Heavy Duty Brake Fluid DOT 3
■Checking the Brake Fluid
1Brake/Clutch Fluid
NOTICE
Brake fluid marked DOT 5 is not compatible with your
vehicle's braking system and can cause extensive damage.
If the specified brake fluid is not available, you should
use only DOT 3 or DOT 4 fluid from a sealed
container as a temporary replacement.
Using any non-Honda brake fluid can cause corrosion
and decrease the longevity of the system. Have the
brake system flushed and refilled with Honda Heavy
Duty Brake Fluid DOT 3 as soon as possible.
If the brake fluid level is at or below the MIN mark,
have a dealer inspect for leaks or worn brake pads as
soon as possible.
Brake Reservoir
MIN
MAX
■Checking the Clutch Fluid1Checking the Clutch Fluid
If the clutch fluid level is at or below the MIN mark,
have a dealer inspect for leaks or an excessively worn
clutch plate as soon as possible.
Clutch Reservoir
MIN
MAX
Page 269 of 345

268
Maintenance
Replacing Light Bulbs
Headlight Bulbs
When replacing, use the following bulbs.1.Remove the coupler.
uIt can be removed by pushing the tab.
2. Rotate the old bulb to the left to remove.
3. Insert a new bulb into the headlight
assembly and turn it to the right.
4. Insert the coupler into the connector of the
bulb.
High beam headlight: 60 W (HB3)
Low beam headlight: 51 W (HB4)
■High Beam Headlight
1Headlight Bulbs
NOTICE
Halogen bulbs get very hot when lit.
Oil, perspiration, or a scratch on the glass can cause
the bulb to overheat and shatter.
The headlight aim is set by the factory, and does not
need to be adjusted. However, if you regularly carry
heavy items in the trunk or tow a trailer, have the
aiming readjusted at a dealer or by a qualified
technician.
The HB3 and HB4 types are halogen bulbs.
When replacing a bulb, handle it by its base, and
protect the glass from contact with your skin or hard
objects. If you touch the glass, clean it with
denatured alcohol and a clean cloth.
The exterior lights' inside lenses (headlights, brake
lamps, etc.) may fog temporarily after a vehicle wash
or while driving in the rain. This does not impact the
exterior light function.
However, if you see a large amount of water or ice
accumulated inside the lenses, have your vehicle
inspected by a dealer.
Tab
Coupler
Bulb
Page 276 of 345
275
uuReplacing Light BulbsuBrake Light, Taillight, Back-Up Light, Rear Turn Signal Light and Rear Side Marker Light Bulbs
Maintenance
Brake Light, Taillight, Back-Up Light, Rear Turn
Signal Light and Rear Side Marker Light Bulbs
When replacing, use the following bulbs.1.Remove the holding clips using a flat-tip
screwdriver, then pull the lining back.
2 Low Beam Headlights P. 271
2. Turn the socket to the left and remove it.
Remove the old bulb.
3. Insert a new bulb.
Brake/Taillight: 21/5 W
Back-Up Light: 21 W
Rear Turn Signal Light: 21 W (Amber)
Rear Side Marker Light: 3 CP
Lining
Clip
Bulb Socket
Page 278 of 345
277
uuReplacing Light BulbsuHigh-Mount Brake Light Bulb
Maintenance
High-Mount Brake Light Bulb
When replacing, use the following bulb.1.Open the trunk.
2. Turn the socket to the left and remove it.
3. Remove the old bulb and insert a new bulb.
High-mount brake light bulbs are LED type. Have an authorized Honda dealer
inspect and replace the light bulbs.
High-Mount Brake Light: 21 W
1.8 � engine models
Bulb
Socket
2.4 � engine models
Page 289 of 345

288
uuChecking and Maintaining TiresuWinter Tires
Maintenance
Winter Tires
If driving on snowy or frozen roads, mount all season marked ”M+S” tires, snow
tires, or tire chains; reduce speed; and maintain sufficient distance between vehicles when driving.
Be particularly careful when operating the steering wheel or brakes to prevent
skidding.
Use tire chains, snow tires, or all season tires when necessary or according to the law.
When mounting, refer to the following points.
For winter tires: • Select the size and load ranges that are the same as the original tires.
• Mount the tires to all four wheels.
For tire chains:• Install them on the front tires only.
• Because your vehicle has limited tire clearance, we strongly recommend using the
chains listed below:
• Follow the chain manufacturer's instruc tion when installing. Mount them as
tightly as you can.
• Check that the chains do not touch the brake lines or suspension.
• Drive slowly.
Cable-type: SCC Radial Chain SC1030
Cable-type: SCC Radial Chain SC1032
1Winter Tires
NOTICE
Traction devices that are the wrong size or improperly
installed can damage your vehicle's brake lines,
suspension, body, and wheels. Stop driving if they are
hitting any part of the vehicle.
When tire chains are mounted, follow the chain
manufacturer's instructions regarding vehicle
operational limits.
If your vehicle is equipped with summer tires, be
aware that these tires are not designed for winter
driving conditions. For more information, contact a dealer.
3WARNING
Using the wrong chains, or not properly
installing chains, can damage the brake
lines and cause a crash in which you can be
seriously injured or killed.
Follow all instruction s in this owner's
manual regarding the selection and use of
tire chains.
Models with P195/65R15 tires
Models with P205/55R16 tires
Models with P215/45R17 tires
Models with 215/45ZR17 tires