Page 241 of 345

240
Maintenance
Before Performing Maintenance
Inspection and Maintenance
For your safety, perform all listed inspections and maintenance to keep your vehicle
in good condition. If you become aware of any abnormality (noise, smell, insufficient
brake fluid, oil residue on the ground, etc.), have your vehicle inspected by a dealer.
(Note, however, that service at a dealer is not mandatory to keep your warranties in
effect.) Refer to the separate maintenance booklet for detailed maintenance and inspection information. ■Daily inspections
Perform inspections before long distance trips, when washing the vehicle, or when refueling. ■ Periodic inspections
• Check the automatic transmission fluid level monthly.
2 Automatic Transmission Fluid P. 263
• Check the brake fluid level monthly.
2 Brake/Clutch Fluid P. 266
• Check the tire pressure monthly. Examine the tread for wear and foreign objects.
2 Checking and Maintaining Tires P. 280
• Check the operation of the exterior lights monthly.
2 Replacing Light Bulbs P. 268
• Check the condition of the wiper blades at least every six months.
2 Checking and Maintaining Wiper Blades P. 278
■Types of Inspection and Maintenance
1Inspection and Maintenance
Maintenance, replacement, or repair of
emissions control devices and systems may be
done by any automotive repair establishment or
individuals using parts that are "certified" to EPA standards.
According to state and federal regulations, failure to
perform maintenance on the maintenance main
items marked with # will not void your emissions
warranties. However, all maintenance services should
be performed in accordance with the intervals
indicated by the information display *
/multi-
information display *
.
2 Maintenance Service Items P. 245, 249
If you want to perform complex maintenance tasks
that require more skills and tools, you can purchase a
subscription to the Service Express website at
www.techinfo.honda.com .
2 Authorized Manuals P. 335
If you want to perform maintenance yourself, make
sure that you have the necessary tools and skills first.
After performing maintenance, update the records in
the separate maintenance booklet.
U.S. models
* Not available on all models
Page 269 of 345

268
Maintenance
Replacing Light Bulbs
Headlight Bulbs
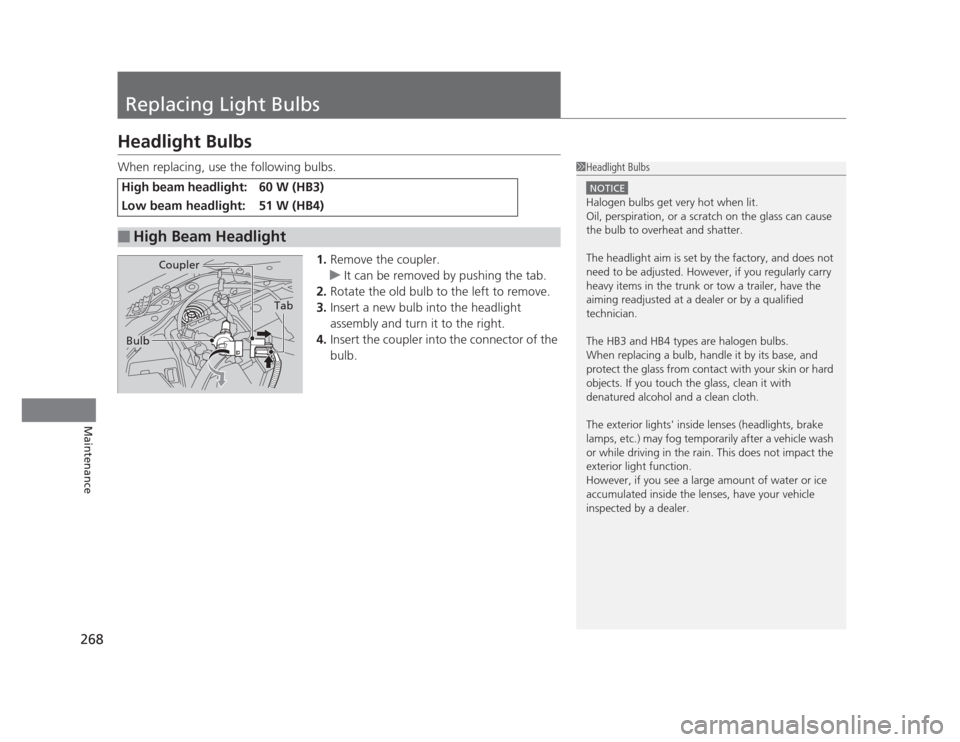
When replacing, use the following bulbs.1.Remove the coupler.
uIt can be removed by pushing the tab.
2. Rotate the old bulb to the left to remove.
3. Insert a new bulb into the headlight
assembly and turn it to the right.
4. Insert the coupler into the connector of the
bulb.
High beam headlight: 60 W (HB3)
Low beam headlight: 51 W (HB4)
■High Beam Headlight
1Headlight Bulbs
NOTICE
Halogen bulbs get very hot when lit.
Oil, perspiration, or a scratch on the glass can cause
the bulb to overheat and shatter.
The headlight aim is set by the factory, and does not
need to be adjusted. However, if you regularly carry
heavy items in the trunk or tow a trailer, have the
aiming readjusted at a dealer or by a qualified
technician.
The HB3 and HB4 types are halogen bulbs.
When replacing a bulb, handle it by its base, and
protect the glass from contact with your skin or hard
objects. If you touch the glass, clean it with
denatured alcohol and a clean cloth.
The exterior lights' inside lenses (headlights, brake
lamps, etc.) may fog temporarily after a vehicle wash
or while driving in the rain. This does not impact the
exterior light function.
However, if you see a large amount of water or ice
accumulated inside the lenses, have your vehicle
inspected by a dealer.
Tab
Coupler
Bulb
Page 270 of 345
Continued269
uuReplacing Light BulbsuHeadlight Bulbs
Maintenance
1.Remove the holding clips (A). Push up the
tab, and remove the cover of the air intake
duct and its upper part.
1. Unlock the holding clips (B), then remove
the cover of the air intake duct.
Fold in the upper part of the air intake duct
to get enough working space.
■Low Beam Headlights1Low Beam Headlights
Pull the clip straight up to remove it.
Keep the head of the clip raised when you insert it,
push until it clicks.
Holding clip (A-type)
Cover
Tab Clip (A)
Air
Intake Duct
Driver side
1.8 � engine models
Cover
Clip (B)
Air Intake Duct
2.4 � engine models
Page 271 of 345
uuReplacing Light BulbsuHeadlight Bulbs
270
Maintenance
2. Remove the holding clip (C) using a flat-tip
screwdriver, then remove the upper part of
the windshield washer reservoir.
1Low Beam Headlights
Press down the central pin until it clicks to unlock it.
Push the central pin back to lock the clip. Then, insert
the clip into the hole and press on the central pin until it is flat.
Holding clip (B-type)
Central pin
Push until
the pin is
flat.
Clip (C)Passenger side
All models
Page 272 of 345
271
uuReplacing Light BulbsuHeadlight Bulbs
Maintenance
3.Remove the coupler.
uIt can be removed by pushing the tab.
4. Rotate the old bulb to the left to remove.
5. Insert a new bulb into the headlight
assembly and turn it to the right.
6. Insert the coupler into the connector of the
bulb.
1Low Beam Headlights
Insert a flat-tip screwdriver, lift and remove the
central pin to remove the clip.
Insert the clip with the central pin raised, and push until it is flat.
Holding clip (C-type)
Central pin
Push until the
pin is flat.
Tab
Coupler
Bulb
All models
Page 273 of 345
272
uuReplacing Light BulbsuFog Light Bulbs*
Maintenance
Fog Light Bulbs *
When replacing, use the following bulbs.
1.Remove the screw using a Phillips-head
screwdriver and carefully pull the fog light
assembly out of the bumper.
2. Remove the coupler.
uIt can be removed by pushing the tab.
3. Rotate the old bulb to the left to remove.
4. Insert a new bulb into the fog light
assembly and turn it to the right.
5. Insert the coupler into the connector of the
bulb.
Fog Light: 55 W (H11)
1Fog Light Bulbs
NOTICE
Halogen bulbs get very hot when lit. Oil, perspiration,
or a scratch on the glass can cause the bulb to
overheat and shatter.
The fog lights are halogen bulbs.
When replacing a bulb, handle it by its plastic case,
and protect the glass from contact with your skin or
hard objects. If you touch the glass, clean it with
denatured alcohol and a clean cloth.
Screw
Bulb Coupler
Tab
* Not available on all models
Page 274 of 345
273
uuReplacing Light BulbsuFront Turn Signal/Parking/Side Marker Light Bulbs
Continued
Maintenance
Front Turn Signal/Parking/Side Marker Light Bulbs
When replacing, use the following bulbs.1.Turn the steering wheel all the way to the
opposite side from the light being replaced.
Passenger side: Turn the steering wheel to
the left.
Driver side: Turn the steering wheel to the
right.
2. Remove the holding clips, and pull the inner
fender back.
2 Low Beam Headlights P. 271
3. Detach the air intake duct tube and swing it out of the inner fender.
Front Turn Signal/Parking/Side Marker Light: 28/8 W
Clip
Inner
Fender
Air
Intake
Duct Tube
2.4 � engine models
Page 276 of 345
275
uuReplacing Light BulbsuBrake Light, Taillight, Back-Up Light, Rear Turn Signal Light and Rear Side Marker Light Bulbs
Maintenance
Brake Light, Taillight, Back-Up Light, Rear Turn
Signal Light and Rear Side Marker Light Bulbs
When replacing, use the following bulbs.1.Remove the holding clips using a flat-tip
screwdriver, then pull the lining back.
2 Low Beam Headlights P. 271
2. Turn the socket to the left and remove it.
Remove the old bulb.
3. Insert a new bulb.
Brake/Taillight: 21/5 W
Back-Up Light: 21 W
Rear Turn Signal Light: 21 W (Amber)
Rear Side Marker Light: 3 CP
Lining
Clip
Bulb Socket