2012 HONDA CIVIC Lock doors
[x] Cancel search: Lock doorsPage 109 of 345

108
uuLocking and Unlocking the DoorsuCustomizing the Auto Door Locking/Unlocking Setting*
Controls
*1: Default setting for manual transmission models
*2: Default setting for automatic transmission models
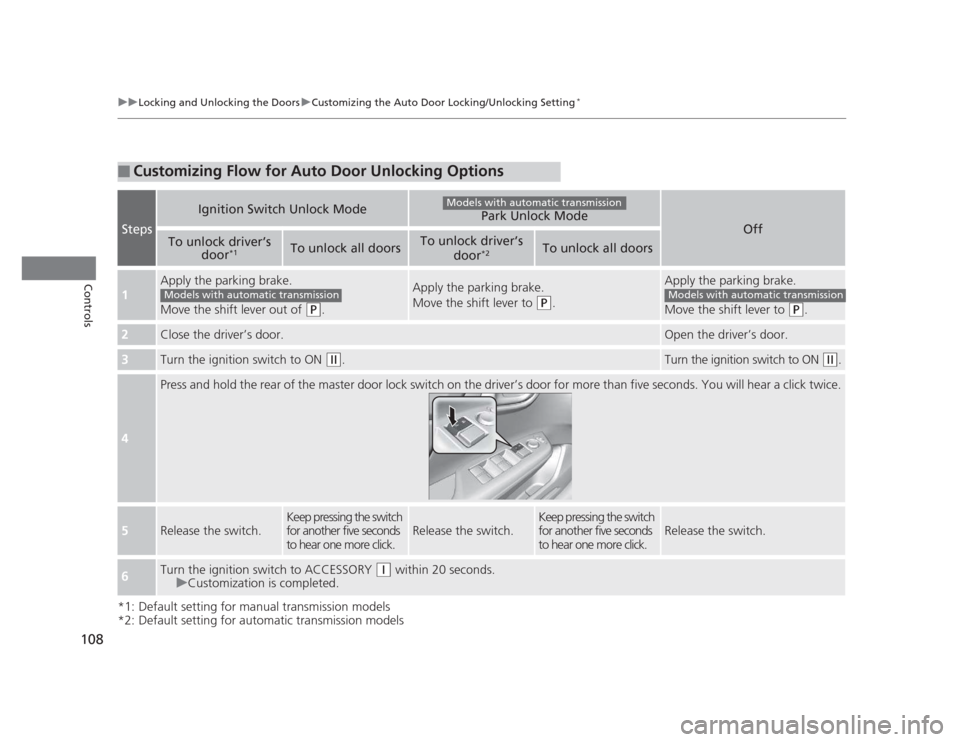
■Customizing Flow for Auto Door Unlocking Options
Steps
Ignition Switch Unlock ModePark Unlock Mode
Off
To unlock driver’s
door*1To unlock all doorsTo unlock driver’s
door*2To unlock all doors
1
Apply the parking brake.
Move the shift lever out of
(P
.
Apply the parking brake.
Move the shift lever to
(P.
Apply the parking brake.
Move the shift lever to
(P.
2Close the driver’s door.Open the driver’s door.
3Turn the ignition switch to ON (w .Turn the ignition switch to ON (w.
4
Press and hold the rear of the master door lock switch on the driver’s door for more than five seconds. You will hear a click t wice.
5Release the switch.
Keep pressing the switch
for another five seconds
to hear one more click.
Release the switch.
Keep pressing the switch
for another five seconds
to hear one more click.
Release the switch.
6Turn the ignition switch to ACCESSORY (q within 20 seconds.
uCustomization is completed.
Models with automatic transmission
Models with automatic transmissionModels with automatic transmission
Page 113 of 345

112
Controls
Security System
Immobilizer System
The immobilizer system prevents a key that has not been pre-registered from
starting the engine. Each key contains electronic transmitters that use electronic
signals to verify the key.
Pay attention to the following when inserting the key into the ignition switch: •Do not allow objects that emit strong radio waves near the ignition switch.
• Make sure the key is not covered by or touching a metal object.
• Do not bring a key from another vehicle's immobilizer system near the ignition
switch.
Security System Alarm *
The security system alarm activates when the doors, trunk, or hood are opened
without the key, or remote transmitter. ■ When the security system alarm activates
The horn sounds intermittently and all of the exterior lights flash.■ To deactivate the security system alarm
Unlock the vehicle using the key, or remote transmitter. The system, along with the
horn and flashing lights, is deactivated.
1Immobilizer System
NOTICE
Leaving the ignition key in the vehicle can result in
theft or accidental movement of the vehicle.
Always take the ignition key with you whenever you
leave the vehicle unattended.
Do not alter the system or add other devices to it.
Doing so may damage the system and make your
vehicle inoperable.
1Security System Alarm
The security alarm continues for a maximum of two
minutes until the security system deactivates.
* Not available on all models
Page 114 of 345

113
uuSecurity SystemuSecurity System Alarm*
Controls
■
Setting the security system alarm
The security system alarm automatically sets when the following conditions have
been met: • The ignition switch is in LOCK
(0 , and the key has been removed from the
ignition switch.
• The hood and trunk are closed.
• All doors are locked with the key or the remote transmitter.
■ When the security system alarm sets
The security system indicator in the instrument panel blinks. When the blinking
interval changes after about 15 seconds, the security system is set. ■ To cancel the security system alarm
The security system is canceled when the vehicle is unlocked using the key or remote
transmitter, or the ignition switch is turned to ON
(w . The security system indicator
goes off at the same time.
■The panic button on the remote
transmitter
If you press the panic button for
approximately one second, the following will
occur for about 30 seconds: • The horn sounds.
• Some exterior lights flash.
■ Canceling panic mode
Press any button on the remote transmitter, or turn the ignition switch to ON
(w .
■Panic Mode
1Security System Alarm
Do not set the security system alarm when someone
is in the vehicle or a window is open. The system can
accidentally activate when:•Unlocking the door with the lock tab or the master
door lock switch.
• Opening the trunk with the trunk release or the
emergency trunk opener.
If the battery goes dead after you have set the
security system alarm, the security alarm may go off
once the battery is recharged or replaced.
If this occurs, deactivate the security system alarm by
unlocking a door using the key or remote transmitter.
Do not attempt to alter this system or add another device to it.
Panic
Button
Page 115 of 345

114
Controls
Opening and Closing the Windows
Opening/Closing the Power Windows
The power windows can be opened and closed when the ignition switch is in ON
(w, using the switches on the doors. The driver's side switches can be used to open
and close all of the windows.
The power window lock button on the driver's side must be switched off (not
pushed in, indicator off) to open and close the windows from anywhere other than
the driver's seat.
When the power window lock button is pushed in, the indicator comes on and you
can only operate the driver's window. Turn the power window lock button on when
children are in the vehicle.
■Automatic operation
To open: Push the switch down firmly.
To close: Pull the switch up firmly.
The window opens or closes completely. To
stop the window at any time, push or pull the
switch briefly. ■ Manual operation
To open: Push the switch down lightly.
To close: Pull the switch up lightly.
Release the switch when the window reaches
the desired position.
■Opening/Closing Windows with Auto-Open/Close Function *
1Opening/Closing the Power Windows
The power windows can be operated for up to 10
minutes after you turn the ignition switch off.
Opening either front door cancels this function.
Auto Reverse
If a power window senses resistance when closing
automatically, it will stop closing and reverse direction.
The driver’s window auto reverse function is disabled
when you continuously pull up the switch.
The auto reverse function stops sensing when the
window is almost closed to ensure that it fully closes.
3WARNING
Closing a power window on someone's
hands or fingers can cause serious injury.
Make sure your passengers are away from
the windows before closing them.
ON
OFF
Power Window
Lock Button
Indicator
Driver’s
Window
Switch
Front Passenger’s
Window Switch
* Not available on all models
Page 135 of 345

134
Controls
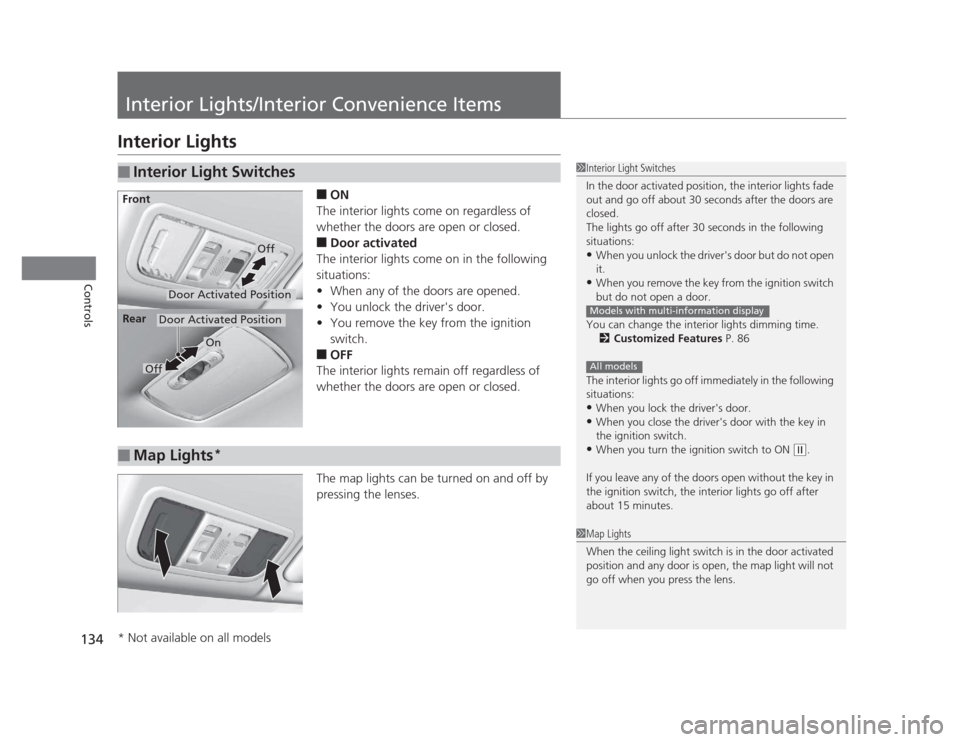
Interior Lights/Interior Convenience Items
Interior Lights■ON
The interior lights come on regardless of
whether the doors are open or closed. ■ Door activated
The interior lights come on in the following
situations: • When any of the doors are opened.
• You unlock the driver's door.
• You remove the key from the ignition
switch.
■ OFF
The interior lights remain off regardless of
whether the doors are open or closed.
The map lights can be turned on and off by
pressing the lenses.
■Interior Light Switches1Interior Light Switches
In the door activated position, the interior lights fade
out and go off about 30 seconds after the doors are closed.
The lights go off after 30 seconds in the following
situations:• When you unlock the driver's door but do not open it.
• When you remove the key from the ignition switch
but do not open a door.
You can change the interior lights dimming time. 2 Customized Features P. 86
The interior lights go off immediately in the following
situations: • When you lock the driver's door.
• When you close the driver's door with the key in
the ignition switch.
• When you turn the ignition switch to ON
(w .
If you leave any of the doors open without the key in
the ignition switch, the interior lights go off after
about 15 minutes.
Models with multi-information display
All models
Door Activated Position
Off
Front
Door Activated Position
On
Off
Rear
■Map Lights
*
1Map Lights
When the ceiling light switch is in the door activated
position and any door is open, the map light will not
go off when you press the lens.
* Not available on all models
Page 203 of 345

202
Driving
Before Driving
Driving Preparation
Check the following items before you start driving. •Make sure there are no obstructions on the windows, door mirrors, exterior
lights, or other parts of the vehicle.
uRemove any frost, snow, or ice.
uRemove any snow on the roof, as this can slip down and obstruct your field of
vision while driving. If frozen solid, remove ice once it has softened.
uWhen removing ice from around the wheels, be sure not to damage the wheel
or wheel components.
• Make sure the hood is securely closed.
uIf the hood opens while driving, your front view will be blocked.
• Make sure the tires are in good condition.
uCheck air pressure, check for damage and excessive wear.
2 Checking and Maintaining Tires P. 280
• Make sure there are no people or objects behind or around the vehicle.
uThere are blind spots from the inside.
■Exterior Checks1Exterior Checks
NOTICE
When doors are frozen shut, use warm water around
the door edges to melt any ice. Do not try to force
them open, as this can damage the rubber trim
around the doors. When done, wipe dry to avoid further freezing.
Do not pour warm water into the key cylinder.
You will be unable to insert key if the water freezes in
the hole.
Page 204 of 345

Continued203
uuBefore DrivinguDriving Preparation
Driving
•Store or secure all items on board properly.
uCarrying too much cargo, or improp erly storing it, can affect your vehicle's
handling, stability, stopping distance, and tires, and make it unsafe. 2 Maximum Load Limit P. 205
• Do not pile items higher than the seat height.
uThey can block your view and may be thrown forward in the event of sudden
braking.
• Do not place anything in the front seat footwells. Make sure to secure the floor mat *
.
uAn object or unsecured floor mat can interfere with your brake and accelerator
pedal operation while driving.
• If you have any animals on board, do not let them move around in the vehicle.
uThey may interfere with driving and a crash could occur.
• Securely close and lock all doors and the trunk.
2 Locking/Unlocking the Doors from the Inside P. 103
• Adjust your seating position properly.
uAdjust the head restraint, too.
2 Adjusting the Seats P. 126
2 Adjusting the Head Restraints P. 129
• Adjust the mirrors and steering wheel properly for your driving.
uAdjust them while sitting in the proper driving position.
2 Adjusting the Mirrors P. 125
2 Adjusting the Steering Wheel P. 124
■Interior Checks1Interior Checks
The headlight aim is set by the factory, and does not
need to be adjusted. However, if you regularly carry
heavy items in the trunk or tow a trailer, have the
aiming readjusted at a dealer or by a qualified
technician.
* Not available on all models
Page 339 of 345

338
INDEX
Bulb Replacement..................................... 268
Brake Light, Taillight, Back-Up Light, Rear Turn Signal Light and Rear Side Marker
Lights..................................................... 275
Fog Lights ................................................ 272
Front Turn Signal/Parking/Side Marker Lights..................................................... 273
Headlights ............................................... 268
High-Mount Brake Light .......................... 277
Rear License Plate Light............................ 276
Bulb Specifications ............................ 324, 326
C
Carbon Monoxide Gas ................................ 62
Carrying Cargo .................................. 203, 205
CD Player ........................................... 151, 161
Certification Label .................................... 328
Changing Bulbs ......................................... 268
Charging System Indicator ................. 67, 313
Child Safety ................................................. 50
Childproof Door Locks ............................. 104
Emergency Trunk Opener ........................ 111
Child Seat .................................................... 50
Booster Seats ............................................. 61
Child Seat for Infants ................................. 52
Child Seat for Small Children ..................... 53
Installing a Child Seat with a Lap/
Shoulder Seat Belt.................................... 57
Larger Children .......................................... 60
Rear-facing Child Seat ............................... 52 Selecting a Child Seat ................................ 54
Using a Tether ........................................... 59
Childproof Door Locks ............................. 104
Cleaning the Exterior ............................... 294
Cleaning the Interior ................................ 292
Clock ............................................................ 98
Clutch Fluid ............................................... 266
Coat Hook ................................................. 138
Compact Spare Tire .................. 299, 325, 327
Console Compartment ............................. 135
Controls ....................................................... 97
Coolant (Engine) ...................................... 261
Adding to the Radiator ......... ............... .... 262
Adding to the Reserve Tank..................... 261
High Temperature Indicator ....................... 69
Low Temperature Indicator........................ 74
Overheating ............................................ 311
Creeping (Automatic Transmission) ........ 214
Cruise Control ........................................... 220
Indicator.................................................... 75
Cup Holders .............................................. 136
Customer Service Information ................. 336
Customized Features .................................. 86
D
Daytime Running Lights .......................... 120
Dead Battery ............................................. 307
Defrosting the Windshield and
Windows ................................................. 142
Devices that Emit Radio Waves ............... 329Dimming
Headlights .............................................. 118
Rearview Mirror ...................................... 125
Dipstick (Engine Oil) ................................ 255
Directional Signals (Turn Signal) ............. 118
Display/Information Button ...................... 82
Door Mirrors ............................................. 125
Doors .......................................................... 99
Auto Door Locking.................................. 105
Auto Door Unlocking .............................. 105
Door Open Indicator ........................... 27, 70
Keys.......................................................... 99
Locking/Unlocking the Doors
from the Inside...................................... 103
Locking/Unlocking the Doors from the Outside................................... 101
Lockout Prevention System ..................... 102
DOT Tire Quality Grading ........................ 283
Driving ...................................................... 201
Automatic Transmission .......................... 214
Braking ................................................... 229
Cruise Control ........................................ 220
Shifting Gear ...... ............................ 215, 217
Starting the Engine ................................. 211
Dust and Pollen Filter .............................. 291
E
Eco Assist System .......................................... 7
ECON Button ............................................ 123
Elapsed Time .............................................. 84