Page 245 of 345

244
uuMaintenance Minder™uTo Use Maintenance MinderTM
Maintenance
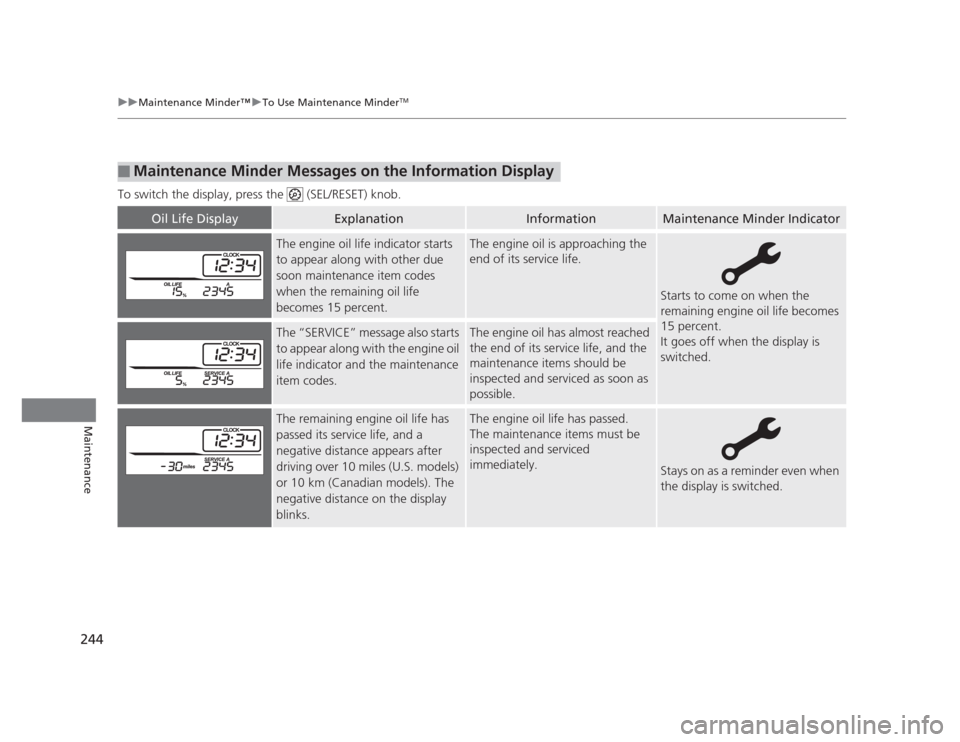
To switch the display, press the (SEL/RESET) knob.
■Maintenance Minder Messages on the Information Display
Oil Life DisplayExplanationInformationMaintenance Minder Indicator
The engine oil life indicator starts
to appear along with other due
soon maintenance item codes
when the remaining oil life
becomes 15 percent.The engine oil is approaching the
end of its service life.
Starts to come on when the
remaining engine oil life becomes
15 percent.
It goes off when the display is switched.
The “SERVICE” message also starts
to appear along with the engine oil
life indicator and the maintenance
item codes.The engine oil has almost reached
the end of its service life, and the
maintenance items should be
inspected and serviced as soon as
possible.
The remaining engine oil life has
passed its service life, and a negative distance appears after
driving over 10 miles (U.S. models)
or 10 km (Canadian models). The
negative distance on the display
blinks.The engine oil life has passed.
The maintenance items must be
inspected and serviced immediately.
Stays on as a reminder even when
the display is switched.
Page 249 of 345

248
uuMaintenance Minder™uTo Use Maintenance MinderTM
Maintenance
The system message indicator ( ) comes on along with the Maintenance Minder message.
■Maintenance Minder Messages on the Multi-Information
Display
Maintenance MessageOil Life DisplayExplanationInformation
SERVICE DUE SOON15 %The remaining engine oil life is 15 to
6 percent. Once you switch the
display by pressing the
(display/information) button, this
message will go off.The engine oil is approaching the end
of its service life, and the maintenance
items should be inspected and serviced
soon.
SERVICE DUE NOW5 %The remaining engine oil life is 5 to 1
percent. Press the button to
switch to another display.The engine oil has almost reached the
end of its service life, and the
maintenance items should be inspected
and serviced as soon as possible.
SERVICE PAST DUENegative DistanceThe remaining engine oil life has
passed its service life, and a negative
distance appears after driving over
10 miles (U.S. models) or 10 km
(Canadian models). Press the
button to switch to another display.The engine oil life has passed.
The maintenance items must be
inspected and serviced immediately.
2345
15
Engine oil
Air filters
2345
2345
5
Engine oil
Air filters
2345
23452345
-30
Page 255 of 345
254
uuMaintenance Under the HooduRecommended Engine Oil
Maintenance
Recommended Engine OilOil is a major contributor to your engine's
performance and longevity. If you drive the
vehicle with insufficient or deteriorated oil,
the engine may fail or be damaged.
This seal indicates the oil is energy conserving
and that it meets the American Petroleum
Institute’s latest requirements.
Use a Genuine Honda Motor Oil or another
commercial engine oil of suitable viscosity for
the ambient temperature as shown.
■ Synthetic oil
You may also use synthetic motor oil if it is labeled with the API Certification Seal
and is the specified viscosity grade.
• Genuine Honda Motor Oil
• Premium-grade 0W-20 detergent oil with an API Certification Seal on the
container.1Recommended Engine Oil
Engine Oil Additives
Your vehicle does not require oil additives. In fact,
they may adversely affect the engine performance
and durability.
Ambient Temperature
Page 262 of 345

261
uuMaintenance Under the HooduEngine Coolant
Continued
Maintenance
Engine Coolant
This coolant is premixed with 50% antifreeze and 50% water. Do not add any
straight antifreeze or water.
We recommend you check the engine coolant level every time you refuel. Check the
reserve tank first. If it is completely empty, also check the coolant level in the
radiator. Add the engine coolant accordingly.1.Check the amount of coolant in the reserve tank.
2. If the coolant level is below the MIN mark,
add the specified coolant until it reaches the MAX mark.
3. Inspect the cooling system for leaks.
Specified coolant: Honda Long Life Antifreeze/Coolant Type 2
■Reserve Tank
1Engine Coolant
NOTICE
You will need a more concentrated coolant if you are
driving in extremely cold temperature below −31°F
(−35°C). Consult your Honda dealer for details about
a suitable coolant mixture.
If Honda antifreeze/coolant is not available, you may
use another major brand non-silicate coolant as a
temporary replacement. Check that it is a high quality
coolant recommended for aluminum engines.
Continued use of any non-Honda coolant can result
in corrosion, causing the cooling system to
malfunction or fail. Have the cooling system flushed
and refilled with Honda antifreeze/coolant as soon as
possible.
Do not add rust inhibitors or other additives to your
vehicle's coolant system. They may not be compatible
with the coolant or with the engine components.
2.4 � engine models
All models
Reserve Tank
MAX
MIN
Page 263 of 345

uuMaintenance Under the HooduEngine Coolant
262
Maintenance
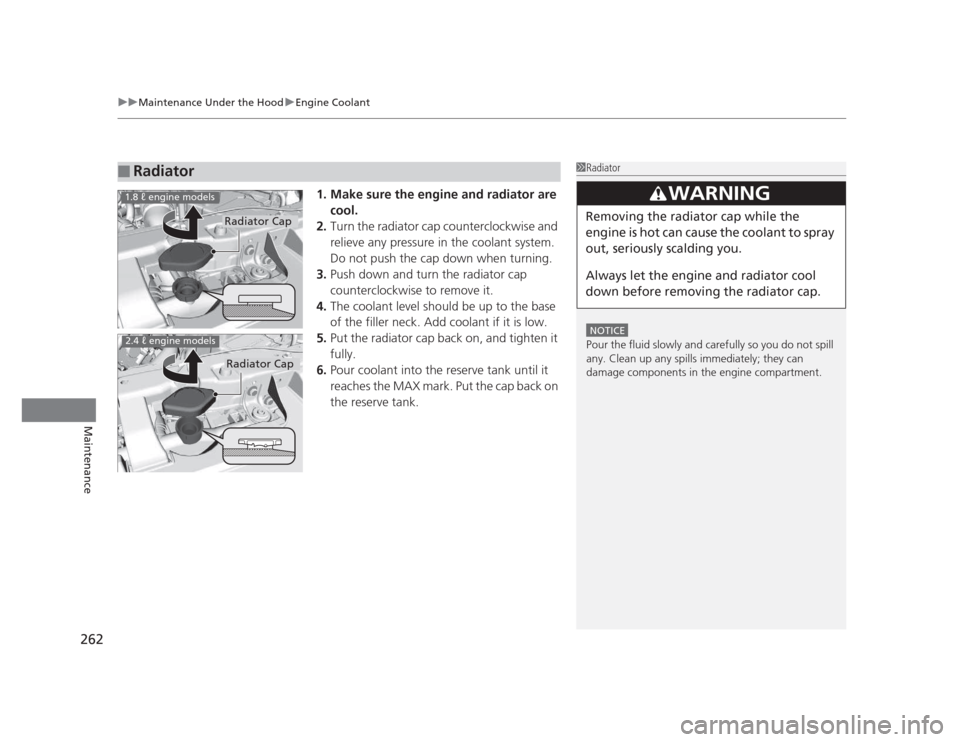
1. Make sure the engine and radiator are cool.
2. Turn the radiator cap counterclockwise and
relieve any pressure in the coolant system.
Do not push the cap down when turning.
3. Push down and turn the radiator cap
counterclockwise to remove it.
4. The coolant level should be up to the base
of the filler neck. Add coolant if it is low.
5. Put the radiator cap back on, and tighten it
fully.
6. Pour coolant into the reserve tank until it
reaches the MAX mark. Put the cap back on the reserve tank.
■Radiator1Radiator
NOTICE
Pour the fluid slowly and carefully so you do not spill
any. Clean up any spills immediately; they can
damage components in the engine compartment.
3WARNING
Removing the radiator cap while the
engine is hot can cause the coolant to spray
out, seriously scalding you.
Always let the engine and radiator cool
down before removing the radiator cap.Radiator Cap
1.8 � engine models
2.4 � engine models
Radiator Cap
Page 268 of 345
267
uuMaintenance Under the HooduRefilling Window Washer Fluid
Maintenance
Refilling Window Washer Fluid
Check the amount of window washer fluid using the washer fluid level gauge on the cap.If the level is low, fill the washer reservoir.
1Refilling Window Washer Fluid
NOTICE
Do not use engine antifreeze or a vinegar/water
solution in the windshield washer reservoir.
Antifreeze can damage your vehicle's paint. A
vinegar/water solution can damage the windshield washer pump.
Level Gauge
Page 269 of 345

268
Maintenance
Replacing Light Bulbs
Headlight Bulbs
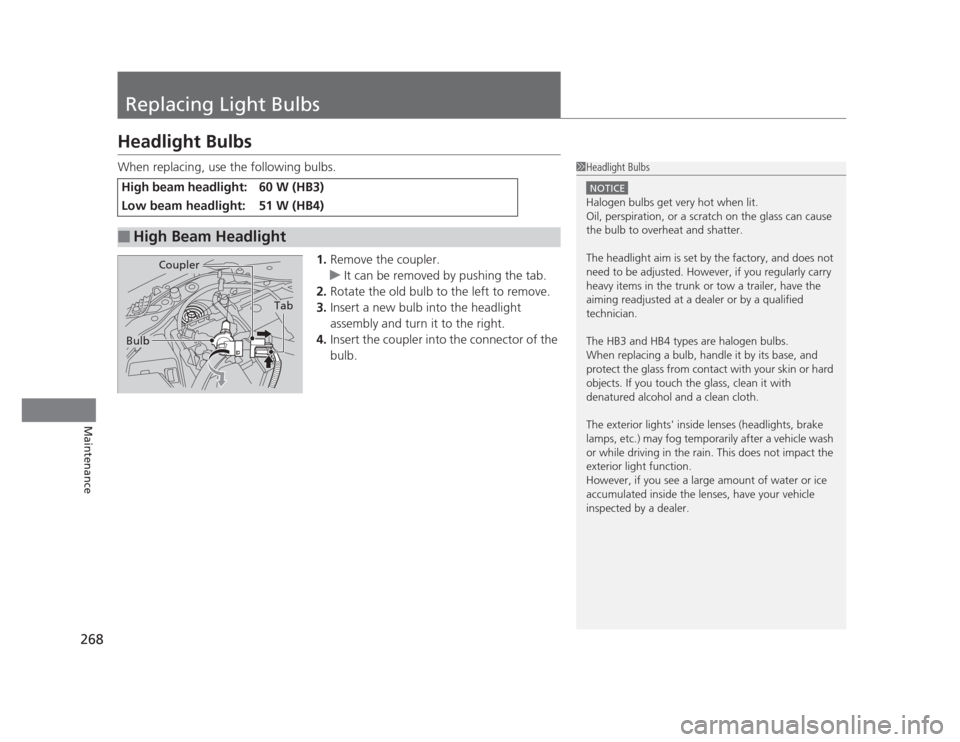
When replacing, use the following bulbs.1.Remove the coupler.
uIt can be removed by pushing the tab.
2. Rotate the old bulb to the left to remove.
3. Insert a new bulb into the headlight
assembly and turn it to the right.
4. Insert the coupler into the connector of the
bulb.
High beam headlight: 60 W (HB3)
Low beam headlight: 51 W (HB4)
■High Beam Headlight
1Headlight Bulbs
NOTICE
Halogen bulbs get very hot when lit.
Oil, perspiration, or a scratch on the glass can cause
the bulb to overheat and shatter.
The headlight aim is set by the factory, and does not
need to be adjusted. However, if you regularly carry
heavy items in the trunk or tow a trailer, have the
aiming readjusted at a dealer or by a qualified
technician.
The HB3 and HB4 types are halogen bulbs.
When replacing a bulb, handle it by its base, and
protect the glass from contact with your skin or hard
objects. If you touch the glass, clean it with
denatured alcohol and a clean cloth.
The exterior lights' inside lenses (headlights, brake
lamps, etc.) may fog temporarily after a vehicle wash
or while driving in the rain. This does not impact the
exterior light function.
However, if you see a large amount of water or ice
accumulated inside the lenses, have your vehicle
inspected by a dealer.
Tab
Coupler
Bulb
Page 281 of 345

280
Maintenance
Checking and Maintaining Tires
Checking Tires
To safely operate your vehicle, your tires must be of the proper type and size, in
good condition with adequate tread, and properly inflated. ■Inflation guidelines
Properly inflated tires provide the best combination of handling, tread life, and comfort.
Refer to the driver’s doorjamb label or specification’s page for the specified pressure.
Underinflated tires wear unevenly, adversely affect handling and fuel economy, and
are more likely to fail from overheating.
Overinflated tires make your vehicle ride harshly, are more prone to road hazards, and wear unevenly.
Every day before you drive, look at each of the tires. If one looks lower than the
others, check the pressure with a tire gauge.
At least once a month or before long trips, use a gauge to measure the pressure in
all tires, including the spare. Even tires in good condition can lose 1 to 2 psi (10 to
20 kPa, 0.1 to 0.2 kgf/cm 2
) per month.
■ Inspection guidelines
Every time you check inflation, also examine the tires and valve stems.Look for:• Bumps or bulges on the side or in the tread. Replace the tire if you find any cuts,
splits, or cracks in the side of the tire. Replace it if you see fabric or cord.
• Remove any foreign objects and inspect for air leaks.
• Uneven tread wear. Have a dealer check the wheel alignment.
• Excessive tread wear.
2 Wear Indicators P. 285
• Cracks or other damage around valve stem.
1Checking Tires
Measure the air pressure when tires are cold. This
means the vehicle has been parked for at least three
hours, or driven less than 1 mile (1.6 km). If
necessary, add or release air until the specified
pressure is reached.
If checked when hot, tire pressure can be as much as
4–6 psi (30–40 kPa, 0.3–0.4 kgf/cm 2
) higher than if
checked when cold.
Have a dealer check the tires if you feel a consistent
vibration while driving. New tires and any that have
been removed and reinstalled should be properly balanced.
3WARNING
Using tires that are excessively worn or
improperly inflated can cause a crash in
which you can be seriously hurt or killed.
Follow all instruction s in this owner’s
manual regarding tire inflation and
maintenance.