Page 6 of 345
5
Quick Reference Guide
❙Seat Belt to Secure a Child Seat (P 59)
❙Seat Belt (Installing a Child Seat) (P 57)
❙Sun Visors
❙Vanity Mirrors
❙Moonroof Switch*
(P 116)
❙Map Lights *
(P 134)
❙USB Adapter Cable *
(P 145)
❙Accessory Power
Socket *
(P 137)
❙Front Seat (P 126)
❙Seat Belts (P 28)
❙Side Airbags (P 42)
❙Rear Seat (P 132)
❙LATCH to Secure a Child Seat (P 55)
❙Ceiling Light (P 134)
❙Side Curtain Airbags (P 45)
❙Coat Hook (P 138)
❙Grab Handle
* Not available on all models
Page 7 of 345
Visual Index
6Quick Reference Guide
❙Maintenance Under the Hood (P 251)
❙Windshield Wipers (P 121, 278)
❙Tires (P 280, 299)
❙Fog Lights *
(P 120, 272)
❙Door Lock/Unlock Control (P 101)
❙Power Door Mirrors*
(P 125)
❙Headlights (P 118, 268)
❙Front Turn Signal/Parking/Side Marker Lights (P 118, 273)
❙How to Refuel (P 235)
❙High-Mount Brake Light *
(P 277)
❙Emergency Trunk Release Lever
(P 111)
❙Opening/Closing the Trunk (P 109)
❙Back-Up Lights (P 275)
❙Brake/Taillights (P 275)
❙Rear Turn Signal Lights (P 275)
❙Rear Side Marker Lights (P 275)
Page 12 of 345

11
Quick Reference Guide
Steering Wheel (P 124)
● To adjust, pull the adjustment lever
towards you, adjust to the desired
position, then lock the lever back in place.
Unlocking the Front Doors from the Inside
(P 103) ● Pull either front door inner handle to
unlock and open it at the same time.Trunk (P 109)
● To unlock and open the trunk:
• Pull the trunk release.
• Press the trunk release button *
.
• Turn the key in the cylinder on the trunk *
.
Power Door Mirrors *
(P 125) ● With the ignition switch in ON
(w, move
the selector switch to L or R.
● Push the appropriate edge of the
adjustment switch to adjust the mirror.
Trunk Release
Selector Switch
Adjustment Switch
Power Windows (P 114)
● With the ignition switch in ON
(w, open
and close the power windows.
● If the power window lock button is in the
OFF position, each passenger's window
can be opened and closed with its own
switch.
● If the power window lock button is in the
ON position (indicator is on), each
passenger's window switch is disabled.
Power Window Lock Button
Window
Switch Indicator
*
Not available on all models
Page 98 of 345

97
Controls
This chapter explains how to operate the various controls necessary for driving.
Setting the Clock ................................ 98
Locking and Unlocking the Doors
Key Types and Functions ... ................. 99
Locking/Unlocking the Doors from the Outside .......................................... 101
Locking/Unlocking the Doors from the
Inside ............................................. 103
Childproof Door Locks ..................... 104
Auto Door Locking/Unlocking *
........ 105
Opening and Closing the Trunk ....... 109
Security System ................................ 112
Immobilizer System .......................... 112
Security System Alarm *
.................... 112
Opening and Closing the Windows ..... 114Opening and Closing the Moonroof*...... 116Operating the Switches Around the
Steering WheelIgnition Switch ................................. 117
Turn Signals ..................................... 118
Light Switches.................................. 118Fog Lights *
...................................... 120
Daytime Running Lights ................... 120
Wipers and Washers ........................ 121
Brightness Control ........................... 122 Rear Defogger/Heated Door Mirror *
Button ........................................... 123
ECON Button *
................................. 123
Adjusting the Steering Wheel........... 124 Adjusting the Mirrors
....................... 125
Interior Rearview Mirror ................... 125
Power Door Mirrors *
....................... 125
Adjusting the Seats .......................... 126
Adjusting the Seat Positions ............. 126
Interior Lights/Interior Convenience Items ................................................ 134
Interior Lights .................................. 134
Interior Convenience Items .............. 135
Heating and Cooling *
....................... 140
Using Vents, Heating and A/C *
........ 140
* Not available on all models
Page 124 of 345

123
uuOperating the Switches Around the Steering WheeluRear Defogger/Heated Door Mirror*
Button
Controls
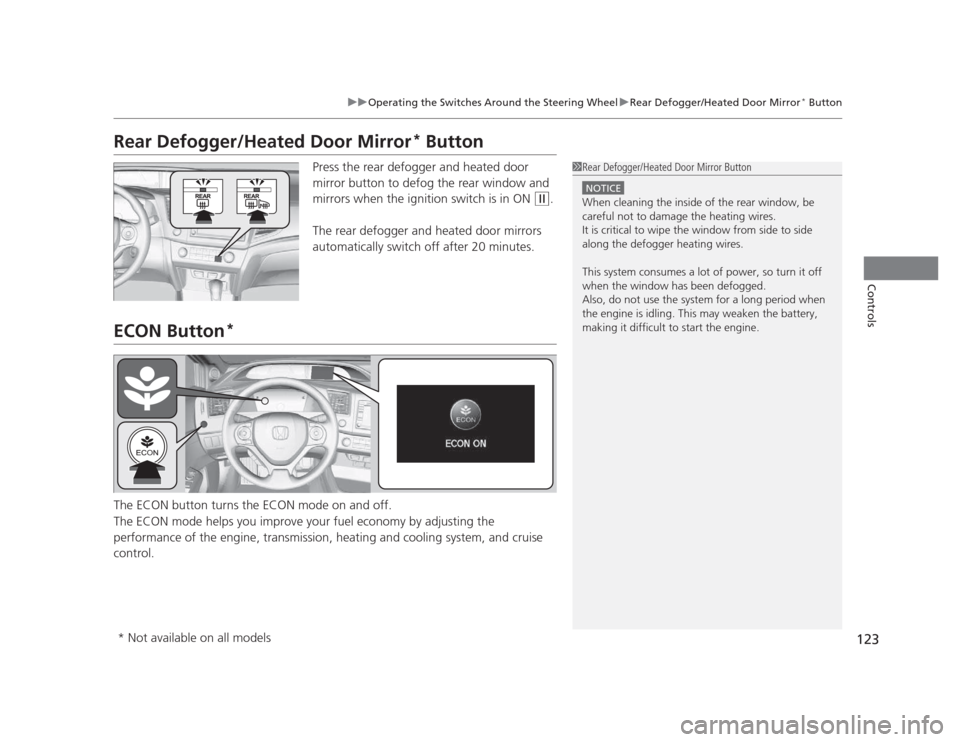
Rear Defogger/Heated Door Mirror *
Button
Press the rear defogger and heated door
mirror button to defog the rear window and
mirrors when the ignition switch is in ON
(w .
The rear defogger and heated door mirrors
automatically switch off after 20 minutes.
ECON Button *
The ECON button turns the ECON mode on and off.
The ECON mode helps you improve your fuel economy by adjusting the
performance of the engine, transmission, heating and cooling system, and cruise control.
1Rear Defogger/Heated Door Mirror Button
NOTICE
When cleaning the inside of the rear window, be careful not to damage the heating wires.
It is critical to wipe the window from side to side
along the defogger heating wires.
This system consumes a lot of power, so turn it off
when the window has been defogged.
Also, do not use the system for a long period when
the engine is idling. This may weaken the battery,
making it difficult to start the engine.
* Not available on all models
Page 126 of 345
125
Controls
Adjusting the Mirrors
Interior Rearview Mirror
Adjust the angle of the rearview mirror when you are sitting in the correct driving
position.Flip the tab to switch the position.
The night position will help to reduce the glare
from headlights behind you when driving after dark.
Power Door Mirrors*
You can adjust the door mirrors when the
ignition switch is in ON
(w.
■ Mirror position adjustment
L/R selector switch: Select the left or right
mirror. After adjusting the mirror, return the
switch to the center position.
Mirror position adjustment switch: Press
the switch left, right, up, or down to move the
mirror.
■Rearview Mirror with Day and Night Positions
1Adjusting the Mirrors
Keep the inside and outside mirrors clean and
adjusted for best visibility.
Adjust the mirrors before you start driving. 2 Adjusting the Seat Positions P. 126
Tab
Daytime Position
Night PositionUp
Down
Selector
Switch
Adjustment
Switch
* Not available on all models
Page 203 of 345

202
Driving
Before Driving
Driving Preparation
Check the following items before you start driving. •Make sure there are no obstructions on the windows, door mirrors, exterior
lights, or other parts of the vehicle.
uRemove any frost, snow, or ice.
uRemove any snow on the roof, as this can slip down and obstruct your field of
vision while driving. If frozen solid, remove ice once it has softened.
uWhen removing ice from around the wheels, be sure not to damage the wheel
or wheel components.
• Make sure the hood is securely closed.
uIf the hood opens while driving, your front view will be blocked.
• Make sure the tires are in good condition.
uCheck air pressure, check for damage and excessive wear.
2 Checking and Maintaining Tires P. 280
• Make sure there are no people or objects behind or around the vehicle.
uThere are blind spots from the inside.
■Exterior Checks1Exterior Checks
NOTICE
When doors are frozen shut, use warm water around
the door edges to melt any ice. Do not try to force
them open, as this can damage the rubber trim
around the doors. When done, wipe dry to avoid further freezing.
Do not pour warm water into the key cylinder.
You will be unable to insert key if the water freezes in
the hole.
Page 204 of 345

Continued203
uuBefore DrivinguDriving Preparation
Driving
•Store or secure all items on board properly.
uCarrying too much cargo, or improp erly storing it, can affect your vehicle's
handling, stability, stopping distance, and tires, and make it unsafe. 2 Maximum Load Limit P. 205
• Do not pile items higher than the seat height.
uThey can block your view and may be thrown forward in the event of sudden
braking.
• Do not place anything in the front seat footwells. Make sure to secure the floor mat *
.
uAn object or unsecured floor mat can interfere with your brake and accelerator
pedal operation while driving.
• If you have any animals on board, do not let them move around in the vehicle.
uThey may interfere with driving and a crash could occur.
• Securely close and lock all doors and the trunk.
2 Locking/Unlocking the Doors from the Inside P. 103
• Adjust your seating position properly.
uAdjust the head restraint, too.
2 Adjusting the Seats P. 126
2 Adjusting the Head Restraints P. 129
• Adjust the mirrors and steering wheel properly for your driving.
uAdjust them while sitting in the proper driving position.
2 Adjusting the Mirrors P. 125
2 Adjusting the Steering Wheel P. 124
■Interior Checks1Interior Checks
The headlight aim is set by the factory, and does not
need to be adjusted. However, if you regularly carry
heavy items in the trunk or tow a trailer, have the
aiming readjusted at a dealer or by a qualified
technician.
* Not available on all models