2012 GMC SIERRA 1500 lock
[x] Cancel search: lockPage 145 of 556
Black plate (7,1)GMC Sierra Owner Manual - 2012 - CRC - 11/15/11
Instruments and Controls 5-7
To calibrate the compass, use the
following procedure:
Compass Calibration Procedure
1. Before calibrating the compass,make sure the compass zone is
set to the variance zone in which
the vehicle is located. See
“Compass Variance (Zone)
Procedure” earlier in this
section.
Do not operate any switches
such as window, sunroof,
climate controls, or seats during
the calibration procedure.
2. Press the vehicle information button until PRESS
VTO
CALIBRATE COMPASS
displays. Or, if the vehicle does
not have DIC buttons, press the
trip odometer reset stem until
CALIBRATE COMPASS
displays. 3. Press the set/reset button to
start the compass calibration.
Or, if the vehicle does not have
DIC buttons, press and hold the
trip odometer reset stem for
two seconds to start the
compass calibration.
4. The DIC will display CALIBRATING: DRIVE IN
CIRCLES. Drive the vehicle
in tight circles at less than
8 km/h (5 mph) to complete the
calibration. The DIC will display
CALIBRATION COMPLETE
for a few seconds when the
calibration is complete. The DIC
display will then return to the
previous menu.
Clock
AM-FM Radio and AM‐FM
Radio with CD Player
To set the clock:
1. Turn the ignition key to ACC/
ACCESSORY or ON/RUN, then
press the
Obutton to turn the
radio on.
2. Press the
Hbutton until the hour
numbers begin to flash, then
turn the
fknob to increase or
decrease the hour.
3. Press the
Hbutton until the
minute numbers begin to flash,
then turn the
fknob to increase
or decrease the minutes.
4. Press the
Hbutton until the
12HR or 24HR time format
begins to flash, then turn
the
fknob to change the time
format.
Page 146 of 556
Black plate (8,1)GMC Sierra Owner Manual - 2012 - CRC - 11/15/11
5-8 Instruments and Controls
5. Press theHbutton again until
the clock display stops flashing
to set the currently displayed
time, or wait until the flashing
stops after five seconds and the
current time displayed
automatically sets.
MP3 Radios with a Single CD
or a Single CD and DVD Player
To adjust the time and date:
1. Turn the ignition key to ACC/ ACCESSORY or ON/RUN, then
press the
Obutton to turn the
radio on.
2. Press the
Hbutton to display
HR, MIN, MM, DD, YYYY (hour,
minute, month, day, and year).
3. Press the softkey located under any one of the tabs to change
that setting. 4. To increase the time or date, do
one of the following:
.Press the softkey below the
selected tab.
.Press the¨SEEK button.
.Press the\FWD button.
.Turn thefknob clockwise.
5. To decrease the time or date, do one of the following:
.Press the©SEEK button.
.Press thesREV button.
.Turn thefknob
counterclockwise. To change the time default setting
from 12 hour to 24 hour or to change
the date default setting from month/
day/year to day/month/year:
1. Press the
Hbutton and then
the softkey located below the
forward arrow tab. 12H, 24H, the
date MM/DD (month and day),
and DD/MM (day and month)
displays.
2. Press the softkey located below the desired option.
3. Press the
Hbutton again to
apply the desired option, or let
the screen time out.
MP3 Radio with a Six-Disc CD
Player
To set the time and date:
1. Turn the ignition key to ACC/ ACCESSORY or ON/RUN, then
press the
Obutton to turn the
radio on.
Page 147 of 556
Black plate (9,1)GMC Sierra Owner Manual - 2012 - CRC - 11/15/11
Instruments and Controls 5-9
2. Press the MENU button andthen the softkey under the
Htab
to display HR, MIN, MM, DD,
YYYY (hour, minute, month, day,
and year).
3. Press the softkey located under any one of the tabs to change
that setting.
4. To increase the time or date, do one of the following:
.Press the softkey below the
selected tab.
.Press the¨SEEK button.
.Press the\FWD button.
.Turn thefknob clockwise.
5. To decrease the time or date, do one of the following:
.Press the©SEEK button.
.Press thesREV button.
.Turn thefknob
counterclockwise. To change the time default setting
from 12 hour to 24 hour or to change
the date default setting from month/
day to day/month:
1. Press the MENU button
and then the softkey under
the
Htab.
2. Press the softkey located below the forward arrow tab. 12H, 24H,
the date MM/DD (month and
day), and DD/MM (day and
month) displays.
3. Press the softkey located below the desired option.
4. Press the MENU button again to apply the desired option, or let
the screen time out.
Power Outlets
Accessory power outlets can
be used to plug in electrical
equipment, such as a cell phone,
MP3 player, etc.
The vehicle may have two
accessory power outlets located
below the climate control system,
or may have one accessory power
outlet and one cigarette lighter. The
cigarette lighter is designed to fit
only in the receptacle closest to the
driver.
There may be another accessory
power outlet in the rear cargo area.
If the vehicle has a floor console,
there is an accessory power outlet
inside the storage bin and one on
the rear of the floor console.
Remove the cover to access and
replace when not in use.
Page 148 of 556
Black plate (10,1)GMC Sierra Owner Manual - 2012 - CRC - 11/15/11
5-10 Instruments and Controls
The accessory power outlets are
powered, even when the ignition is
in LOCK/OFF. Continuing to use
power outlets while the ignition is in
LOCK/OFF may cause the vehicle's
battery to run down.
{WARNING
Power is always supplied to the
outlets. Do not leave electrical
equipment plugged in when the
vehicle is not in use because the
vehicle could catch fire and cause
injury or death.
Notice: Leaving electrical
equipment plugged in for an
extended period of time while
the vehicle is off will drain the
battery. Always unplug electrical
equipment when not in use and
do not plug in equipment that
exceeds the maximum 20 ampere
rating. Certain power accessory plugs may
not be compatible to the accessory
power outlet and could overload
vehicle or adapter fuses. If a
problem is experienced, see your
dealer.
When adding electrical equipment,
be sure to follow the proper
installation instructions included
with the equipment. See
Add-On
Electrical Equipment on page 9‑105.
Notice: Hanging heavy
equipment from the power outlet
can cause damage not covered
by the vehicle warranty. The
power outlets are designed for
accessory power plugs only, such
as cell phone charge cords.
Cigarette Lighter
To use the cigarette lighter, push it
in all the way, and let go. When it is
ready for use, the lighter pops
back out.
Notice: Holding a cigarette lighter
in while it is heating does not let
the lighter back away from the
heating element when it is hot.
Damage from overheating can
occur to the lighter or heating
element, or a fuse could be
blown. Do not hold a cigarette
lighter in while it is heating.
Page 164 of 556
Black plate (26,1)GMC Sierra Owner Manual - 2012 - CRC - 11/15/11
5-26 Instruments and Controls
Antilock Brake System
(ABS) Warning Light
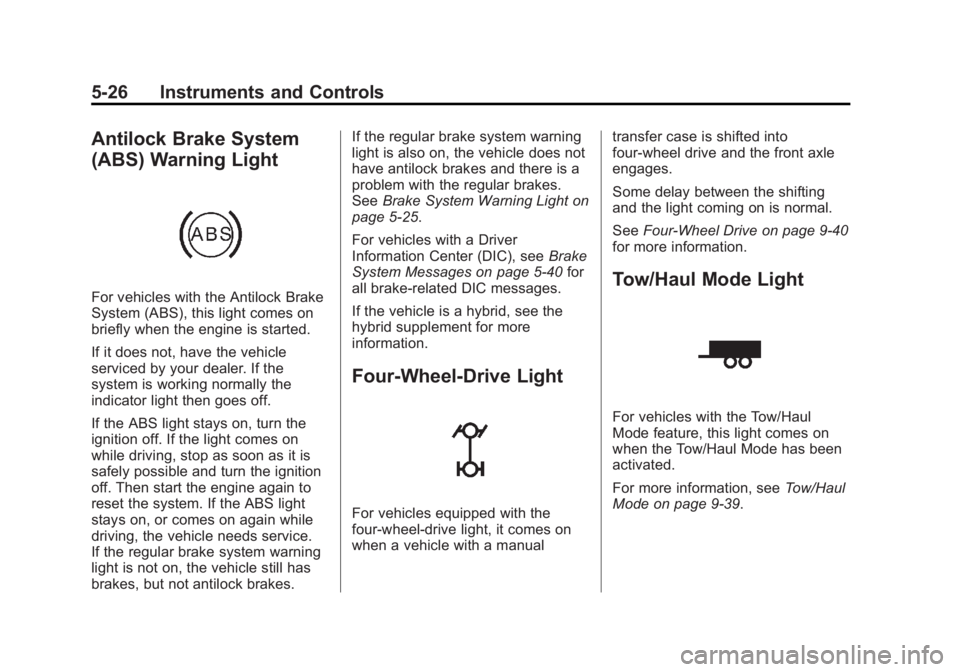
For vehicles with the Antilock Brake
System (ABS), this light comes on
briefly when the engine is started.
If it does not, have the vehicle
serviced by your dealer. If the
system is working normally the
indicator light then goes off.
If the ABS light stays on, turn the
ignition off. If the light comes on
while driving, stop as soon as it is
safely possible and turn the ignition
off. Then start the engine again to
reset the system. If the ABS light
stays on, or comes on again while
driving, the vehicle needs service.
If the regular brake system warning
light is not on, the vehicle still has
brakes, but not antilock brakes.If the regular brake system warning
light is also on, the vehicle does not
have antilock brakes and there is a
problem with the regular brakes.
See
Brake System Warning Light on
page 5‑25.
For vehicles with a Driver
Information Center (DIC), see Brake
System Messages on page 5‑40 for
all brake‐related DIC messages.
If the vehicle is a hybrid, see the
hybrid supplement for more
information.
Four-Wheel-Drive Light
For vehicles equipped with the
four-wheel-drive light, it comes on
when a vehicle with a manual transfer case is shifted into
four-wheel drive and the front axle
engages.
Some delay between the shifting
and the light coming on is normal.
See
Four-Wheel Drive on page 9‑40
for more information.
Tow/Haul Mode Light
For vehicles with the Tow/Haul
Mode feature, this light comes on
when the Tow/Haul Mode has been
activated.
For more information, see Tow/Haul
Mode on page 9‑39.
Page 174 of 556
Black plate (36,1)GMC Sierra Owner Manual - 2012 - CRC - 11/15/11
5-36 Instruments and Controls
The trip odometer can be reset to
zero by pressing and holding the trip
odometer reset stem while the trip
odometer is displayed.
The trip odometer has a feature
called the retro-active reset. This
can be used to set the trip odometer
to the number of miles (kilometers)
driven since the ignition was last
turned on. This can be used if the
trip odometer is not reset at the
beginning of the trip.
To use the retro-active reset feature,
press and hold the trip odometer
reset stem for at least four seconds.
The trip odometer will display the
number of kilometers (km) or
miles (mi) driven since the ignition
was last turned on and the vehicle
was moving. Once the vehicle
begins moving, the trip odometer
will accumulate mileage. For
example, if the vehicle was driven8 km (5 miles) before it is started
again, and then the retro-active
reset feature is activated, the
display will show 8 km (5 miles).
As the vehicle begins moving, the
display will then increase to 8.2 km
(5.1 miles), 8.4 km (5.2 miles), etc.
Language
This display allows you to select
the language in which the DIC
messages will appear. To select a
language:
1. Press the trip odometer reset
stem until ODOMETER displays.
2. While in the ODOMETER display, press and hold the
trip odometer reset stem for
three seconds until the currently
set language displays. 3. Continue to press and hold the
trip odometer reset stem to scroll
through all of the available
languages.
The available selections
are ENGLISH (default),
FRANCAIS (French),
ESPANOL (Spanish), and
NO CHANGE.
4. Once the desired language is displayed, release the trip
odometer reset stem to set the
choice.
Engine Hours
To display the ENGINE HOURS,
place the ignition in LOCK/OFF or
ACC/ACCESSORY, then press and
hold the trip odometer reset stem
for four seconds while viewing the
ODOMETER. This display shows
the total number of hours the engine
has run.
Page 181 of 556
Black plate (43,1)GMC Sierra Owner Manual - 2012 - CRC - 11/15/11
Instruments and Controls 5-43
be reduced the next time the vehicle
is driven. The vehicle may be driven
at a reduced speed while this
message is on, but acceleration and
speed may be reduced. Anytime
this message stays on, the vehicle
should be taken to your dealer for
service as soon as possible.
Fuel System Messages
FUEL LEVEL LOW
This message displays and a chime
may sound if the fuel level is low.
Refuel as soon as possible. See
Fuel Gauge on page 5‑14andFuel
on page 9‑68 for more information.
TIGHTEN GAS CAP
This message may display along
with the check engine light on the
instrument panel cluster if the
vehicle's fuel cap is not tightened
properly. SeeMalfunction Indicator
Lamp on page 5‑22. Reinstall the
fuel cap fully. See Filling the Tank
on page 9‑72. The diagnostic
system can determine if the fuel cap has been left off or improperly
installed. A loose or missing fuel
cap allows fuel to evaporate into the
atmosphere. A few driving trips with
the cap properly installed should
turn this light and message off.
Key and Lock Messages
REPLACE BATTERY IN
REMOTE KEY
This message displays if a Remote
Keyless Entry (RKE) transmitter
battery is low. The battery needs to
be replaced in the transmitter. See
“Battery Replacement”
under
Remote Keyless Entry (RKE)
System Operation on page 2‑3.
Lamp Messages
TURN SIGNAL ON
This message displays and a chime
sounds if a turn signal is left on for
1.2 km (0.75 mi). Move the turn
signal/multifunction lever to the off
position.
Object Detection System
Messages
PARK ASST BLOCKED SEE
OWNERS MANUAL
This message displays if there is
something interfering with the park
assist system. See Ultrasonic
Parking Assist on page 9‑61 for
more information.
PARK ASSIST OFF
After the vehicle has been started,
this message displays to remind the
driver that the URPA system has
been turned off. Press the set/reset
button or the trip odometer reset
stem to acknowledge this message
and clear it from the DIC display. To
turn the URPA system back on, see
Ultrasonic Parking Assist on
page 9‑61.
Page 184 of 556
Black plate (46,1)GMC Sierra Owner Manual - 2012 - CRC - 11/15/11
5-46 Instruments and Controls
Several conditions may cause this
message to appear. SeeTire
Pressure Monitor Operation on
page 10‑62 for more information.
If the warning comes on and stays
on, there may be a problem with the
TPMS. See your dealer.
TIRE LEARNING ACTIVE
If the vehicle has the Tire Pressure
Monitor System (TPMS), this
message displays when the system
is re-learning the tire positions on
your vehicle. The tire positions must
be re-learned after rotating the tires
or after replacing a tire or sensor.
See Tire Inspection on page 10‑65,
Tire Rotation on page 10‑65, Tire
Pressure Monitor System on
page 10‑60, and Tire Pressure on
page 10‑58 for more information.
TIRE LOW ADD AIR TO TIRE
If the vehicle has the Tire Pressure
Monitor System (TPMS), this
message displays when the
pressure in one or more of the
vehicle's tires is low. This message also displays LEFT FRT (left front),
RIGHT FRT (right front), LEFT RR
(left rear), or RIGHT RR (right rear)
to indicate the location of the low
tire. The low tire pressure warning
light will also come on. See
Tire
Pressure Light on page 5‑27. You
can receive more than one tire
pressure message at a time. To
read the other messages that may
have been sent at the same time,
press the set/reset button or the
trip odometer reset stem. If a tire
pressure message appears on the
DIC, stop as soon as you can. Have
the tire pressures checked and set
to those shown on the Tire Loading
Information label. See Tires on
page 10‑50, Vehicle Load Limits on
page 9‑16, and Tire Pressure on
page 10‑58. The DIC also shows
the tire pressure values. See Driver
Information Center (DIC) on
page 5‑30.
Transmission Messages
SERVICE 4 WHEEL DRIVE
If the vehicle has four-wheel
drive, this message may display
if a problem occurs with the
four-wheel-drive system. If this
message appears, stop as soon as
possible and turn off the vehicle.
Make sure the key is in the LOCK/
OFF position for at least one minute
and then restart the vehicle and
check for the message on the DIC
display. If the message is still
displayed or appears again
when you begin driving, the
four-wheel-drive system needs
service. See your dealer.