2012 GMC SIERRA 1500 child lock
[x] Cancel search: child lockPage 104 of 556

Black plate (36,1)GMC Sierra Owner Manual - 2012 - CRC - 11/15/11
3-36 Seats and Restraints
Additional Factors Affecting
System Operation
Safety belts help keep the
passenger in position on the
seat during vehicle maneuvers
and braking, which helps the
passenger sensing system maintain
the passenger airbag status.
See“Safety Belts” and“Child
Restraints” in the Index for
additional information about the
importance of proper restraint use.
If the shoulder portion of the belt is
pulled out all the way, the child
restraint locking feature will be
engaged. This may unintentionally
cause the passenger sensing
system to turn the airbag off for
some adult size occupants. If this
happens, let the belt go back all the
way and start again.
A thick layer of additional material,
such as a blanket or cushion,
or aftermarket equipment such as
seat covers, seat heaters, and seat
massagers can affect how well the
passenger sensing system operates. We recommend that
you not use seat covers or other
aftermarket equipment except when
approved by GM for your specific
vehicle. See
Adding Equipment to
the Airbag-Equipped Vehicle on
page 3‑37 for more information
about modifications that can affect
how the system operates.
The on indicator may be lit if an
object, such as a briefcase,
handbag, grocery bag, laptop or
other electronic device, is put on an
unoccupied seat. If this is not
desired, remove the object from
the seat.
{WARNING
Stowing of articles under the
passenger seat or between the
passenger seat cushion and
seatback may interfere with the
proper operation of the passenger
sensing system.
Servicing the
Airbag-Equipped Vehicle
Airbags affect how the vehicle
should be serviced. There are parts
of the airbag system in several
places around the vehicle. Your
dealer and the service manual have
information about servicing the
vehicle and the airbag system. To
purchase a service manual, see
Service Publications Ordering
Information on page 13‑16.
{WARNING
For up to 10 seconds after the
vehicle is turned off and the
battery is disconnected, an airbag
can still inflate during improper
service. You can be injured if you
are close to an airbag when it
inflates. Avoid yellow connectors.
They are probably part of the
airbag system. Be sure to follow
(Continued)
Page 120 of 556
Black plate (52,1)GMC Sierra Owner Manual - 2012 - CRC - 11/15/11
3-52 Seats and Restraints
{WARNING
Children can be seriously injured
or strangled if a shoulder belt is
wrapped around their neck and
the safety belt continues to
tighten. Buckle any unused safety
belts behind the child restraint so
children cannot reach them. Pull
the shoulder belt all the way out
of the retractor to set the lock,
if the vehicle has one, after the
child restraint has been installed.
Notice: Do not let the LATCH
attachments rub against the
vehicle’ s safety belts. This may
damage these parts. If necessary,
move buckled safety belts to
avoid rubbing the LATCH
attachments.
Do not fold the empty rear seat
with a safety belt buckled. This
could damage the safety belt or
the seat. Unbuckle and return the
safety belt to its stowed position,
before folding the seat. Regular Cab Models
1. If the child restraint manufacturer
recommends that the top tether
be attached, attach and tighten
the top tether to the top tether
anchor, if your vehicle has one.
Refer to the child restraint
instructions and the following
steps:
1.1. Pull the passenger seatback forward by pulling
the recliner handle upward
to access the top tether
anchor. See Reclining
Seatbacks on page 3‑5 for
additional information.
1.2. Find the top tether anchor.
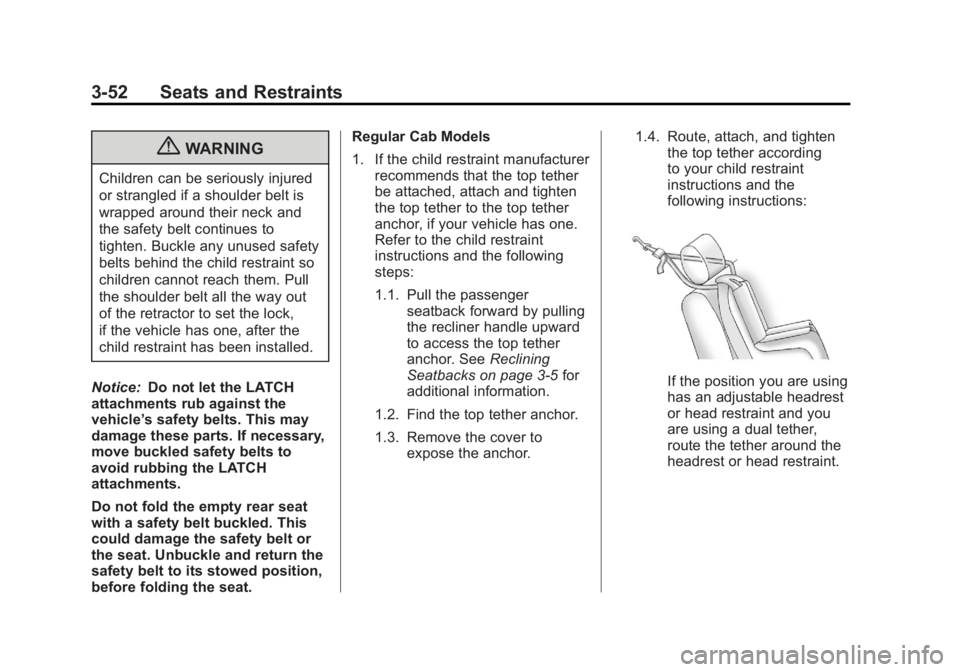
1.3. Remove the cover to expose the anchor. 1.4. Route, attach, and tighten
the top tether according
to your child restraint
instructions and the
following instructions:
If the position you are using
has an adjustable headrest
or head restraint and you
are using a dual tether,
route the tether around the
headrest or head restraint.
Page 125 of 556
Black plate (57,1)GMC Sierra Owner Manual - 2012 - CRC - 11/15/11
Seats and Restraints 3-57
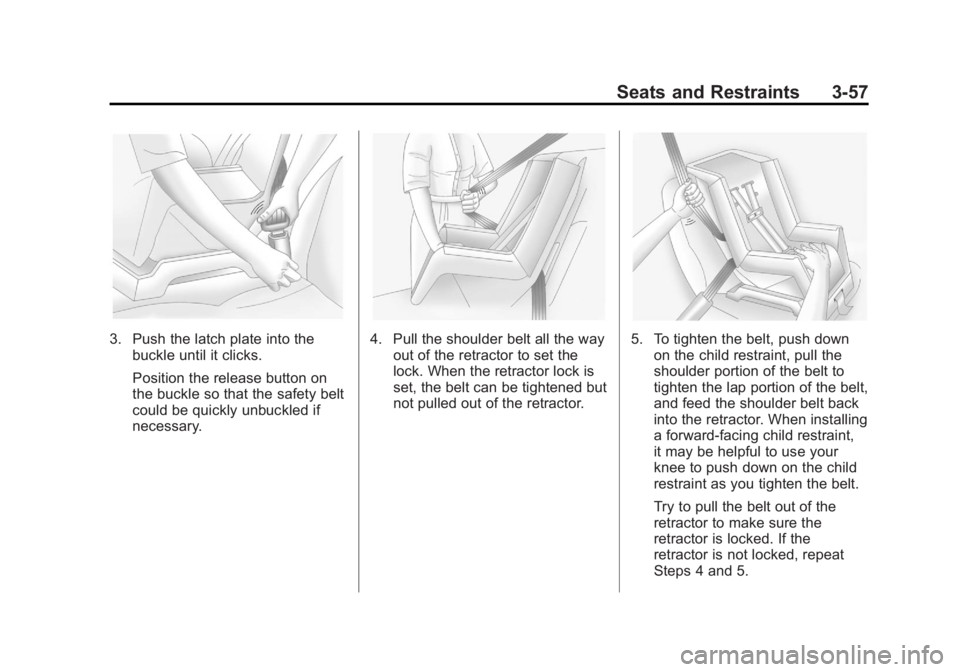
3. Push the latch plate into thebuckle until it clicks.
Position the release button on
the buckle so that the safety belt
could be quickly unbuckled if
necessary.4. Pull the shoulder belt all the wayout of the retractor to set the
lock. When the retractor lock is
set, the belt can be tightened but
not pulled out of the retractor.5. To tighten the belt, push downon the child restraint, pull the
shoulder portion of the belt to
tighten the lap portion of the belt,
and feed the shoulder belt back
into the retractor. When installing
a forward-facing child restraint,
it may be helpful to use your
knee to push down on the child
restraint as you tighten the belt.
Try to pull the belt out of the
retractor to make sure the
retractor is locked. If the
retractor is not locked, repeat
Steps 4 and 5.
Page 128 of 556
Black plate (60,1)GMC Sierra Owner Manual - 2012 - CRC - 11/15/11
3-60 Seats and Restraints
You will be using the lap-shoulder
belt to secure the child restraint in
this position. Follow the instructions
that came with the child restraint.
1. Move the seat as far back as itwill go before securing the
forward-facing child restraint.
When the passenger sensing
system, if equipped, has turned
off the right front passenger
frontal airbag, the off indicator
in the passenger airbag status
indicator should light and stay
lit when you start the vehicle.
See Passenger Airbag Status
Indicator on page 5‑21.
2. Put the child restraint on the seat.
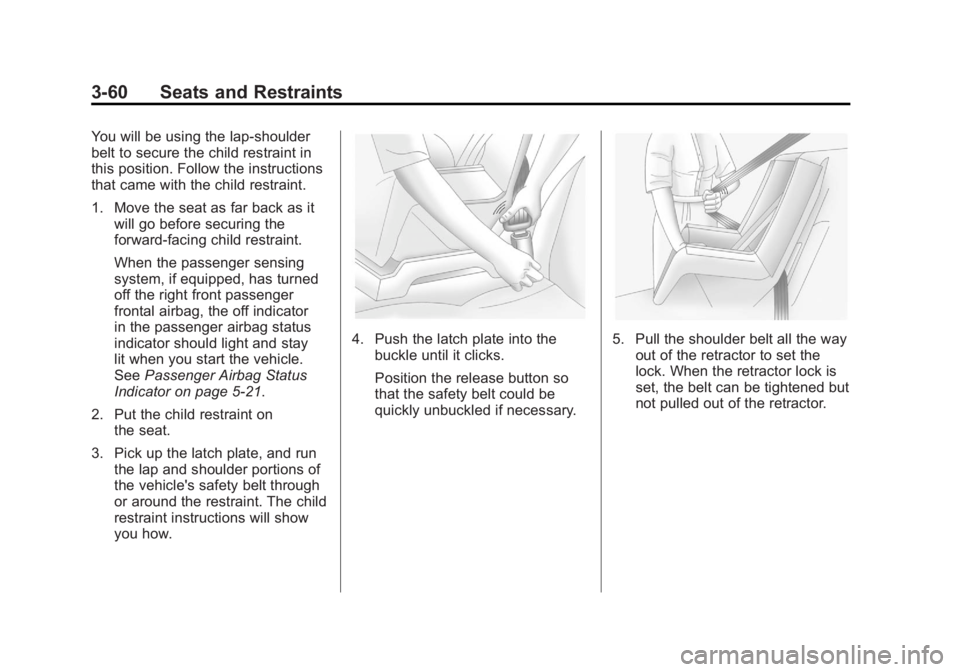
3. Pick up the latch plate, and run the lap and shoulder portions of
the vehicle's safety belt through
or around the restraint. The child
restraint instructions will show
you how.
4. Push the latch plate into the
buckle until it clicks.
Position the release button so
that the safety belt could be
quickly unbuckled if necessary.5. Pull the shoulder belt all the wayout of the retractor to set the
lock. When the retractor lock is
set, the belt can be tightened but
not pulled out of the retractor.
Page 129 of 556
Black plate (61,1)GMC Sierra Owner Manual - 2012 - CRC - 11/15/11
Seats and Restraints 3-61
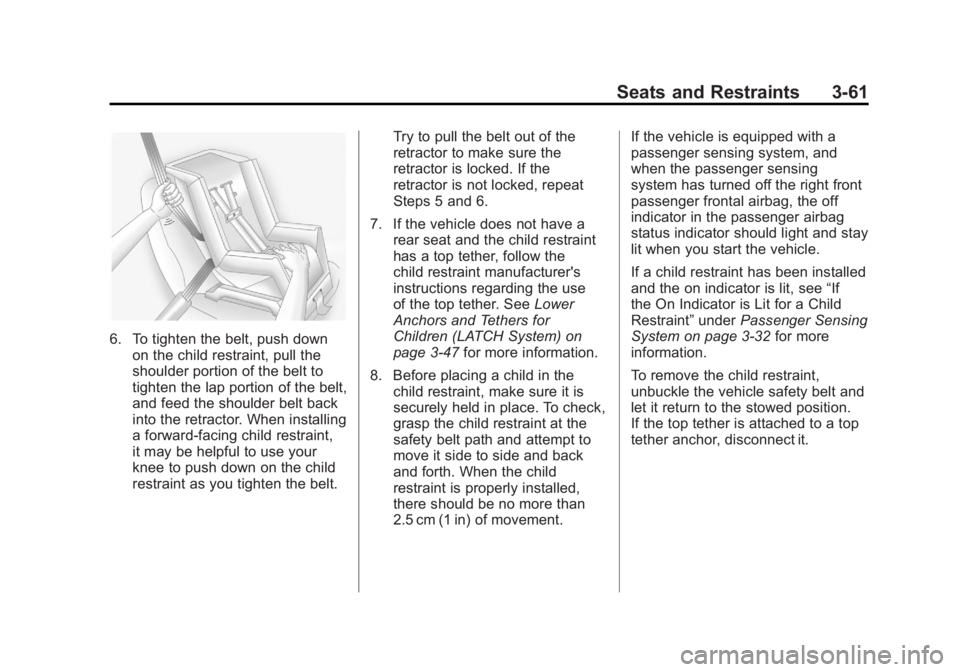
6. To tighten the belt, push downon the child restraint, pull the
shoulder portion of the belt to
tighten the lap portion of the belt,
and feed the shoulder belt back
into the retractor. When installing
a forward-facing child restraint,
it may be helpful to use your
knee to push down on the child
restraint as you tighten the belt. Try to pull the belt out of the
retractor to make sure the
retractor is locked. If the
retractor is not locked, repeat
Steps 5 and 6.
7. If the vehicle does not have a rear seat and the child restraint
has a top tether, follow the
child restraint manufacturer's
instructions regarding the use
of the top tether. See Lower
Anchors and Tethers for
Children (LATCH System) on
page 3‑47 for more information.
8. Before placing a child in the child restraint, make sure it is
securely held in place. To check,
grasp the child restraint at the
safety belt path and attempt to
move it side to side and back
and forth. When the child
restraint is properly installed,
there should be no more than
2.5 cm (1 in) of movement. If the vehicle is equipped with a
passenger sensing system, and
when the passenger sensing
system has turned off the right front
passenger frontal airbag, the off
indicator in the passenger airbag
status indicator should light and stay
lit when you start the vehicle.
If a child restraint has been installed
and the on indicator is lit, see
“If
the On Indicator is Lit for a Child
Restraint” underPassenger Sensing
System on page 3‑32 for more
information.
To remove the child restraint,
unbuckle the vehicle safety belt and
let it return to the stowed position.
If the top tether is attached to a top
tether anchor, disconnect it.
Page 132 of 556
Black plate (64,1)GMC Sierra Owner Manual - 2012 - CRC - 11/15/11
3-64 Seats and Restraints
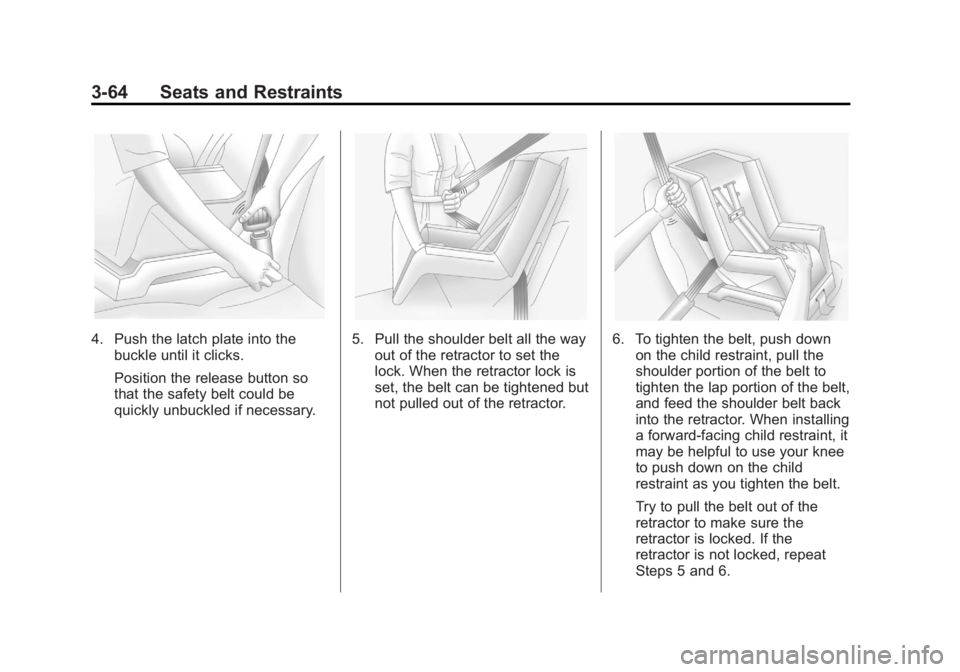
4. Push the latch plate into thebuckle until it clicks.
Position the release button so
that the safety belt could be
quickly unbuckled if necessary.5. Pull the shoulder belt all the wayout of the retractor to set the
lock. When the retractor lock is
set, the belt can be tightened but
not pulled out of the retractor.6. To tighten the belt, push downon the child restraint, pull the
shoulder portion of the belt to
tighten the lap portion of the belt,
and feed the shoulder belt back
into the retractor. When installing
a forward-facing child restraint, it
may be helpful to use your knee
to push down on the child
restraint as you tighten the belt.
Try to pull the belt out of the
retractor to make sure the
retractor is locked. If the
retractor is not locked, repeat
Steps 5 and 6.
Page 135 of 556
Black plate (67,1)GMC Sierra Owner Manual - 2012 - CRC - 11/15/11
Seats and Restraints 3-67
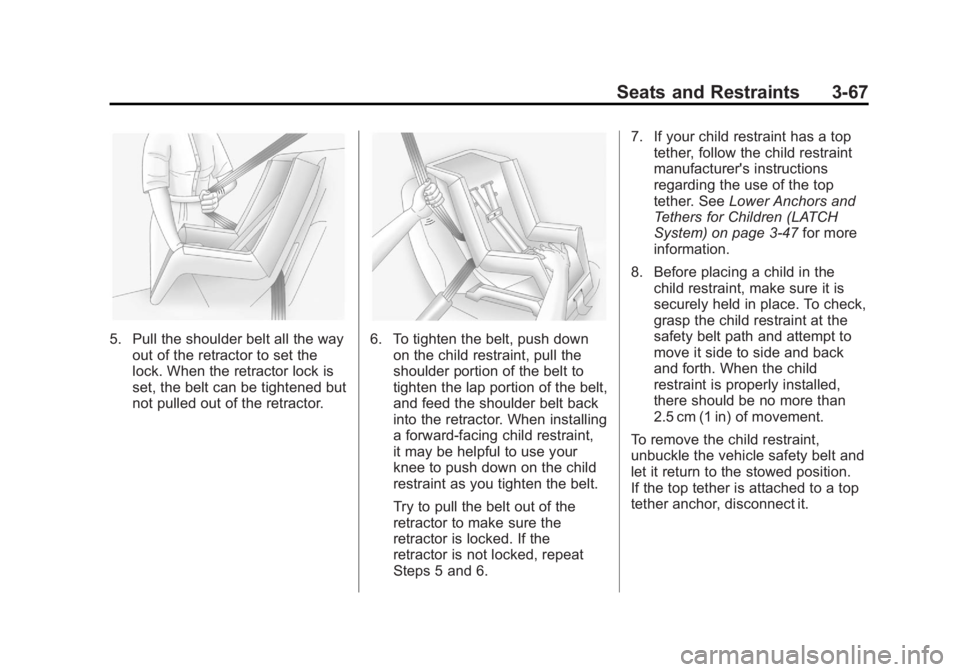
5. Pull the shoulder belt all the wayout of the retractor to set the
lock. When the retractor lock is
set, the belt can be tightened but
not pulled out of the retractor.6. To tighten the belt, push downon the child restraint, pull the
shoulder portion of the belt to
tighten the lap portion of the belt,
and feed the shoulder belt back
into the retractor. When installing
a forward-facing child restraint,
it may be helpful to use your
knee to push down on the child
restraint as you tighten the belt.
Try to pull the belt out of the
retractor to make sure the
retractor is locked. If the
retractor is not locked, repeat
Steps 5 and 6. 7. If your child restraint has a top
tether, follow the child restraint
manufacturer's instructions
regarding the use of the top
tether. See Lower Anchors and
Tethers for Children (LATCH
System) on page 3‑47 for more
information.
8. Before placing a child in the child restraint, make sure it is
securely held in place. To check,
grasp the child restraint at the
safety belt path and attempt to
move it side to side and back
and forth. When the child
restraint is properly installed,
there should be no more than
2.5 cm (1 in) of movement.
To remove the child restraint,
unbuckle the vehicle safety belt and
let it return to the stowed position.
If the top tether is attached to a top
tether anchor, disconnect it.
Page 348 of 556
Black plate (72,1)GMC Sierra Owner Manual - 2012 - CRC - 11/15/11
9-72 Driving and Operating
Filling the Tank
If the vehicle has a diesel engine,
see the Duramax diesel supplement
for more information.
{WARNING
Fuel vapor burns violently and a
fuel fire can cause bad injuries.
To help avoid injuries to you and
others, read and follow all the
instructions on the fuel pump
island. Turn off the engine when
refueling. Do not smoke near fuel
or when refueling the vehicle. Do
not use cellular phones. Keep
sparks, flames, and smoking
materials away from fuel. Do not
leave the fuel pump unattended
when refueling the vehicle. This is
against the law in some places.
Do not re-enter the vehicle while
pumping fuel. Keep children away
from the fuel pump; never let
children pump fuel.The tethered fuel cap is located
behind a hinged fuel door on the
driver side of the vehicle. Vehicles
that have a FlexFuel badge and
a yellow fuel cap can use either
unleaded gasoline or ethanol fuel
containing up to 85% ethanol (E85).
See
Fuel E85 (85% Ethanol) on
page 9‑71.
To remove the fuel cap, turn it
slowly counterclockwise.
{WARNING
Fuel can spray out on you
if you open the fuel cap too
quickly. If you spill fuel and then
something ignites it, you could be
badly burned. This spray can
happen if the tank is nearly full,
and is more likely in hot weather.
Open the fuel cap slowly and wait
for any hiss noise to stop. Then
unscrew the cap all the way. If the vehicle is a dual fuel tank
chassis cab model, and it runs out
of fuel, refuel the front fuel tank first
to ensure a quick restart.
Be careful not to spill fuel. Do not
top off or overfill the tank and wait a
few seconds after you have finished
pumping before removing the
nozzle. Clean fuel from painted
surfaces as soon as possible. See
Exterior Care on page 10‑98.
When replacing the fuel cap, turn it
clockwise until it clicks. It will require
more effort to turn the fuel cap on
the last turn as you tighten it. Make
sure the cap is fully installed. The
diagnostic system can determine if
the fuel cap has been left off or
improperly installed. This would
allow fuel to evaporate into the
atmosphere. See
Malfunction
Indicator Lamp on page 5‑22.