2012 GMC ACADIA tow
[x] Cancel search: towPage 106 of 468

Black plate (50,1)GMC Acadia/Acadia Denali Owner Manual - 2012
3-50 Seats and Restraints
Securing a Child Restraint
Designed for the LATCH
System
{WARNING
If a LATCH-type child restraint is
not attached to anchors, the child
restraint will not be able to protect
the child correctly. In a crash, the
child could be seriously injured
or killed. Install a LATCH-type
child restraint properly using the
anchors, or use the vehicle safety
belts to secure the restraint,
following the instructions that
came with the child restraint and
the instructions in this manual.
{WARNING
Do not attach more than one
child restraint to a single anchor.
Attaching more than one child
restraint to a single anchor could
cause the anchor or attachment
to come loose or even break
during a crash. A child or others
could be injured. To reduce the
risk of serious or fatal injuries
during a crash, attach only one
child restraint per anchor.
{WARNING
Children can be seriously injured
or strangled if a shoulder belt is
wrapped around their neck and
the safety belt continues to(Continued)
WARNING (Continued)
tighten. Buckle any unused safety
belts behind the child restraint
so children cannot reach them.
Pull the shoulder belt all the way
out of the retractor to set the lock,
if the vehicle has one, after the
child restraint has been installed.
Notice: Do not let the LATCH
attachments rub against the
vehicle’ s safety belts. This may
damage these parts. If necessary,
move buckled safety belts to
avoid rubbing the LATCH
attachments.
Do not fold the empty rear seat
with a safety belt buckled. This
could damage the safety belt or
the seat. Unbuckle and return the
safety belt to its stowed position,
before folding the seat.
Page 111 of 468

Black plate (55,1)GMC Acadia/Acadia Denali Owner Manual - 2012
Seats and Restraints 3-55
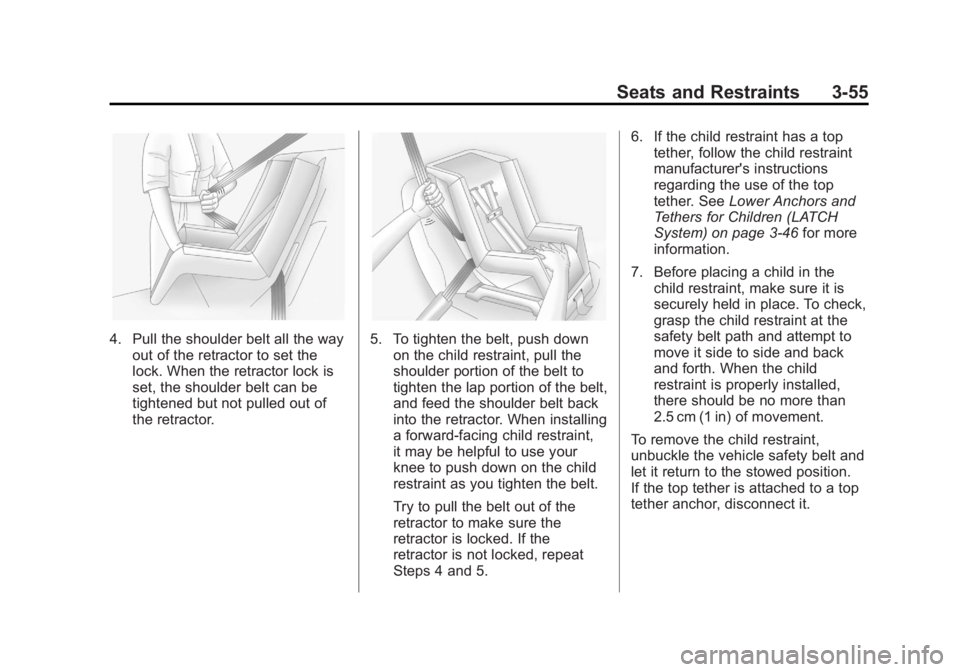
4. Pull the shoulder belt all the wayout of the retractor to set the
lock. When the retractor lock is
set, the shoulder belt can be
tightened but not pulled out of
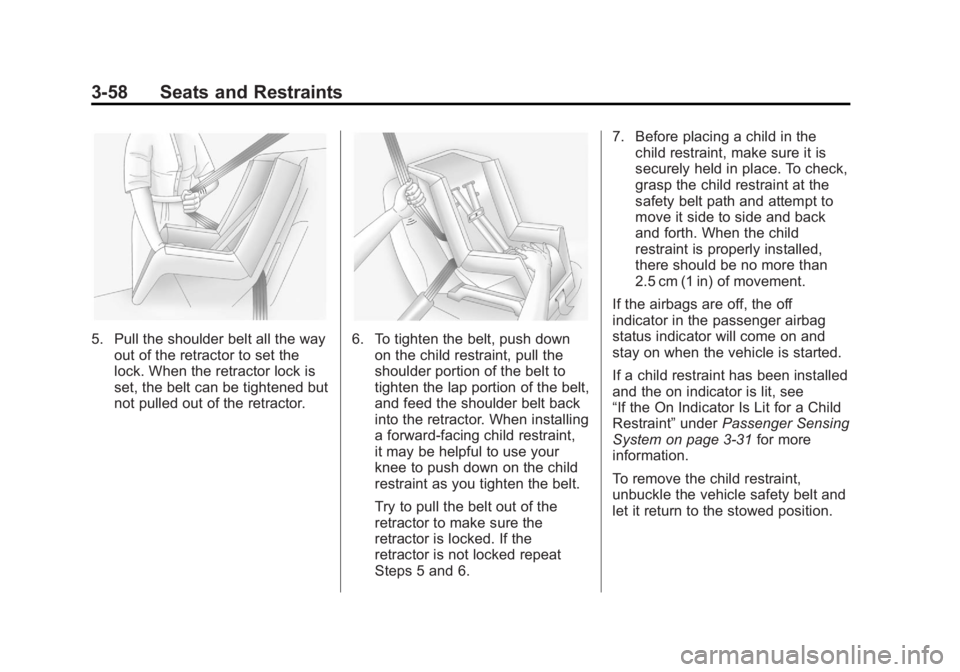
the retractor.5. To tighten the belt, push downon the child restraint, pull the
shoulder portion of the belt to
tighten the lap portion of the belt,
and feed the shoulder belt back
into the retractor. When installing
a forward-facing child restraint,
it may be helpful to use your
knee to push down on the child
restraint as you tighten the belt.
Try to pull the belt out of the
retractor to make sure the
retractor is locked. If the
retractor is not locked, repeat
Steps 4 and 5. 6. If the child restraint has a top
tether, follow the child restraint
manufacturer's instructions
regarding the use of the top
tether. See Lower Anchors and
Tethers for Children (LATCH
System) on page 3‑46 for more
information.
7. Before placing a child in the child restraint, make sure it is
securely held in place. To check,
grasp the child restraint at the
safety belt path and attempt to
move it side to side and back
and forth. When the child
restraint is properly installed,
there should be no more than
2.5 cm (1 in) of movement.
To remove the child restraint,
unbuckle the vehicle safety belt and
let it return to the stowed position.
If the top tether is attached to a top
tether anchor, disconnect it.
Page 114 of 468

Black plate (58,1)GMC Acadia/Acadia Denali Owner Manual - 2012
3-58 Seats and Restraints
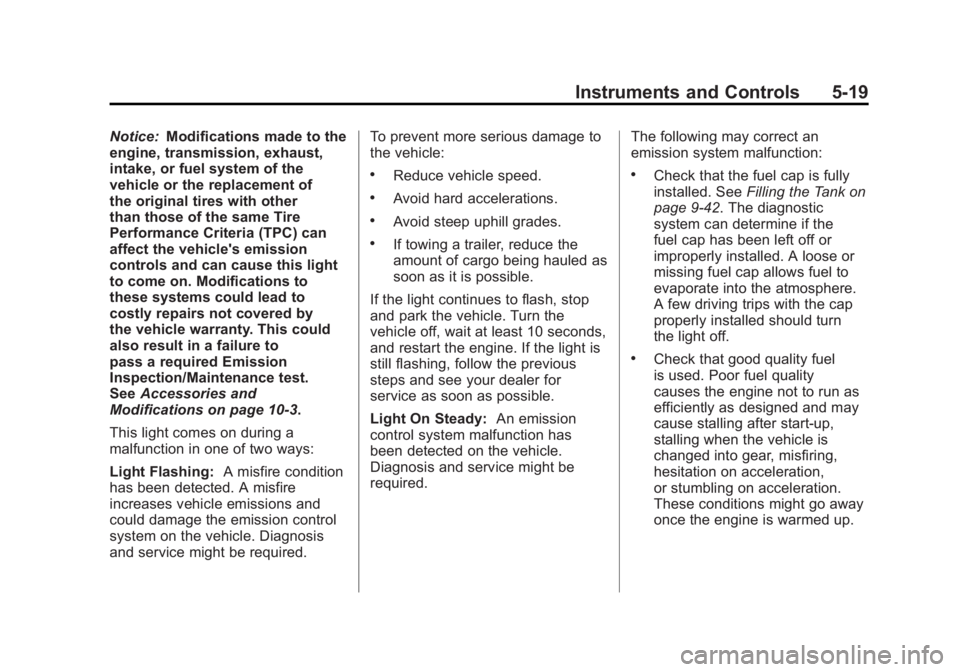
5. Pull the shoulder belt all the wayout of the retractor to set the
lock. When the retractor lock is
set, the belt can be tightened but
not pulled out of the retractor.6. To tighten the belt, push downon the child restraint, pull the
shoulder portion of the belt to
tighten the lap portion of the belt,
and feed the shoulder belt back
into the retractor. When installing
a forward-facing child restraint,
it may be helpful to use your
knee to push down on the child
restraint as you tighten the belt.
Try to pull the belt out of the
retractor to make sure the
retractor is locked. If the
retractor is not locked repeat
Steps 5 and 6. 7. Before placing a child in the
child restraint, make sure it is
securely held in place. To check,
grasp the child restraint at the
safety belt path and attempt to
move it side to side and back
and forth. When the child
restraint is properly installed,
there should be no more than
2.5 cm (1 in) of movement.
If the airbags are off, the off
indicator in the passenger airbag
status indicator will come on and
stay on when the vehicle is started.
If a child restraint has been installed
and the on indicator is lit, see
“If the On Indicator Is Lit for a Child
Restraint” underPassenger Sensing
System on page 3‑31 for more
information.
To remove the child restraint,
unbuckle the vehicle safety belt and
let it return to the stowed position.
Page 121 of 468

Black plate (1,1)GMC Acadia/Acadia Denali Owner Manual - 2012
Instruments and Controls 5-1
Instruments and
Controls
Controls
Steering Wheel Adjustment . . . 5-2
Steering Wheel Controls . . . . . . 5-2
Horn . . . . . . . . . . . . . . . . . . . . . . . . . . 5-5
Windshield Wiper/Washer . . . . . 5-5
Rear WindowWiper/Washer . . . . . . . . . . . . . . . 5-6
Compass . . . . . . . . . . . . . . . . . . . . . 5-6
Clock . . . . . . . . . . . . . . . . . . . . . . . . . 5-8
Power Outlets . . . . . . . . . . . . . . . . . 5-9
Warning Lights, Gauges, and
Indicators
Warning Lights, Gauges, and Indicators . . . . . . . . . . . . . . . . . . . 5-11
Instrument Cluster . . . . . . . . . . . 5-12
Speedometer . . . . . . . . . . . . . . . . 5-13
Odometer . . . . . . . . . . . . . . . . . . . . 5-13
Tachometer . . . . . . . . . . . . . . . . . . 5-13 Fuel Gauge . . . . . . . . . . . . . . . . . . 5-13
Engine Coolant Temperature
Gauge . . . . . . . . . . . . . . . . . . . . . . 5-14
Voltmeter Gauge . . . . . . . . . . . . . 5-15
Safety Belt Reminders . . . . . . . 5-15
Airbag Readiness Light . . . . . . 5-16
Passenger Airbag Status Indicator . . . . . . . . . . . . . . . . . . . . 5-17
Charging System Light . . . . . . 5-18
Malfunction Indicator Lamp . . . . . . . . . . . . . 5-18
Brake System Warning Light . . . . . . . . . . . . . . . . . . . . . . . 5-21
Antilock Brake System (ABS) Warning Light . . . . . . . . . . . . . . 5-22
Tow/Haul Mode Light . . . . . . . . 5-22
StabiliTrak
®Indicator Light . . . 5-22
Engine Coolant Temperature Warning Light . . . . . . . . . . . . . . 5-23
Tire Pressure Light . . . . . . . . . . 5-23
Engine Oil Pressure Light . . . . 5-24
Security Light . . . . . . . . . . . . . . . . 5-24
High-Beam On Light . . . . . . . . . 5-25
Front Fog Lamp Light . . . . . . . . 5-25
Cruise Control Light . . . . . . . . . 5-25
Information Displays
Driver Information Center (DIC) (With DIC Buttons) . . . 5-25
Driver Information Center (DIC) (Without DIC
Buttons) . . . . . . . . . . . . . . . . . . . . 5-30
Head-Up Display (HUD) . . . . . 5-33
Vehicle Messages
Vehicle Messages . . . . . . . . . . . 5-37
Battery Voltage and Charging Messages . . . . . . . . . . . . . . . . . . 5-37
Brake System Messages . . . . 5-38
Cruise Control Messages . . . . 5-38
Door Ajar Messages . . . . . . . . . 5-38
Engine Cooling System Messages . . . . . . . . . . . . . . . . . . 5-39
Engine Oil Messages . . . . . . . . 5-40
Engine Power Messages . . . . 5-40
Fuel System Messages . . . . . . 5-40
Key and Lock Messages . . . . . 5-41
Lamp Messages . . . . . . . . . . . . . 5-41
Object Detection System
Messages . . . . . . . . . . . . . . . . . . 5-41
Page 139 of 468

Black plate (19,1)GMC Acadia/Acadia Denali Owner Manual - 2012
Instruments and Controls 5-19
Notice:Modifications made to the
engine, transmission, exhaust,
intake, or fuel system of the
vehicle or the replacement of
the original tires with other
than those of the same Tire
Performance Criteria (TPC) can
affect the vehicle's emission
controls and can cause this light
to come on. Modifications to
these systems could lead to
costly repairs not covered by
the vehicle warranty. This could
also result in a failure to
pass a required Emission
Inspection/Maintenance test.
See Accessories and
Modifications on page 10‑3.
This light comes on during a
malfunction in one of two ways:
Light Flashing: A misfire condition
has been detected. A misfire
increases vehicle emissions and
could damage the emission control
system on the vehicle. Diagnosis
and service might be required. To prevent more serious damage to
the vehicle:
.Reduce vehicle speed.
.Avoid hard accelerations.
.Avoid steep uphill grades.
.If towing a trailer, reduce the
amount of cargo being hauled as
soon as it is possible.
If the light continues to flash, stop
and park the vehicle. Turn the
vehicle off, wait at least 10 seconds,
and restart the engine. If the light is
still flashing, follow the previous
steps and see your dealer for
service as soon as possible.
Light On Steady: An emission
control system malfunction has
been detected on the vehicle.
Diagnosis and service might be
required. The following may correct an
emission system malfunction:
.Check that the fuel cap is fully
installed. See
Filling the Tank on
page 9‑42. The diagnostic
system can determine if the
fuel cap has been left off or
improperly installed. A loose or
missing fuel cap allows fuel to
evaporate into the atmosphere.
A few driving trips with the cap
properly installed should turn
the light off.
.Check that good quality fuel
is used. Poor fuel quality
causes the engine not to run as
efficiently as designed and may
cause stalling after start-up,
stalling when the vehicle is
changed into gear, misfiring,
hesitation on acceleration,
or stumbling on acceleration.
These conditions might go away
once the engine is warmed up.
Page 141 of 468

Black plate (21,1)GMC Acadia/Acadia Denali Owner Manual - 2012
Instruments and Controls 5-21
Brake System Warning
Light
The vehicle brake system consists
of two hydraulic circuits. If one
circuit is not working, the remaining
circuit can still work to stop the
vehicle. For normal braking
performance, both circuits need to
be working.
If the warning light comes on, there
is a brake problem. Have the brake
system inspected right away.
MetricEnglish
This light should come on briefly
when the ignition key is turned to
ON/RUN. If it does not come on
then, have it fixed so it will be ready
to warn if there is a problem. This light may also come on due to
low brake fluid. See
Brakes on
page 10‑22 for more information.
When the ignition is on, the brake
system warning light will also come
on when the parking brake is set.
The light will stay on if the parking
brake does not release fully. If it
stays on after the parking brake is
fully released, it means there is a
brake problem.
If the light comes on while driving,
pull off the road and stop carefully.
Make sure the parking brake is
fully released. The pedal may be
harder to push or, the pedal may go
closer to the floor. It may take longer
to stop. If the light is still on, have
the vehicle towed for service. See
Towing the Vehicle on page 10‑82.
{WARNING
The brake system might not be
working properly if the brake
system warning light is on.
Driving with the brake system
warning light on can lead to a
crash. If the light is still on after
the vehicle has been pulled off
the road and carefully stopped,
have the vehicle towed for
service.
The brake message remains on
until any DIC button is pressed. the
brake light remains on until the
problem is fixed. See Brake System
Messages on page 5‑38 for more
information.
Page 142 of 468

Black plate (22,1)GMC Acadia/Acadia Denali Owner Manual - 2012
5-22 Instruments and Controls
Antilock Brake System
(ABS) Warning Light
The ABS warning light comes on
briefly when the ignition key is
turned to ON/RUN. This is normal.
If the light does not come on then,
have it fixed so it will be ready to
warn you if there is a problem.
If the light stays on, turn the ignition
to LOCK/OFF. If the light comes on
while driving, stop as soon as
possible and turn the ignition off.
Then start the engine again to reset
the system. If the light still stays on,
or comes on again while driving, the
vehicle needs service. If the regularbrake system warning light is not
on, there are still brakes, but no
antilock brakes. If the regular brake
system warning light is also on,
there are no antilock brakes and
there is a problem with the regular
brakes. See
Brake System Warning
Light on page 5‑21.Tow/Haul Mode Light
This light comes on when the
Tow/Haul mode has been activated.
For more information, see Tow/Haul
Mode on page 9‑26.
StabiliTrak®Indicator
Light
This light comes on briefly while
starting the engine. If it does not,
have the vehicle serviced by your
dealer. If the system is working
normally, the indicator light goes off.
If it stays on, or comes on while
driving, there could be a problem
with the StabiliTrak system and the
vehicle might need service. When
this warning light is on, the system
is off and will not limit wheel spin.
This light flashes when the
StabiliTrak system is active.
See StabiliTrak
®System on
page 9‑30 for more information.
Page 153 of 468

Black plate (33,1)GMC Acadia/Acadia Denali Owner Manual - 2012
Instruments and Controls 5-33
Head-Up Display (HUD)
{WARNING
If the HUD image is too bright or
too high in your field of view, it
may take you more time to see
things you need to see when it is
dark outside. Be sure to keep the
HUD image dim and placed low in
your field of view.
For vehicles with the Head-Up
Display (HUD), some information
concerning the operation of the
vehicle is projected onto the
windshield. This includes the
speedometer reading, rpm reading,
transmission position, outside air
temperature, the manual mode gear
range, and a brief display of the current radio station, including XM
information or CD track. It will also
display turn-by-turn navigation
information if the vehicle has a
navigation radio. The images are
projected by the HUD lens located
on the driver side of the instrument
panel.
The HUD information can be
displayed in one of three languages,
English, French, or Spanish.
The speedometer reading and
other numerical values can be
displayed in either English or
metric units.
The language selection and the
units of measurement are changed
through the trip computer in the
Driver Information Center (DIC).
See
Vehicle Personalization
(With DIC Buttons) on page 5‑46.
HUD Display on the Vehicle
Windshield
The HUD information appears as an
image focused out toward the front
of the vehicle.
When the ignition key is turned to
ON/RUN, the HUD will display an
introductory message for a short
time, until the HUD is ready.