Page 12 of 306

Engine starting (parking brake applied)
Air chime (if
equipped with air
compressor)The low air pressure warning chime should sound
immediately after the engine starts but before the
compressor has built-up pressure. The chime
should stop when the air pressure reaches 70 psi
(483 kPa) (or more). Let the air pressure build
to governed cut-out pressure, which should occur
between 115–130 psi (793–896 kPa).
AcceleratorPress the accelerator and verify that it operates
smoothly, without any binding or irregular feel.
Release the pedal and verify the engine returns
to idle speed immediately.
VoltmeterInspect the gauge (diesel engine) or indicator
light (gasoline engine) to verify the alternator is
charging.
Steering linkage
free playInspect for excessive free play in the steering
linkages. The steering wheel should have less
than 2 inches (5 cm) of free play at its rim.
Full Power
Hydraulic brake
inspectionPump the brake pedal several times with the
ignition in the off or run position; the
motor/pumps can be heard momentarily
replenishing the accumulators.
Parking brakeVerify the parking brake holds the vehicle by
gently trying to pull forward with the parking
brake applied.
Vehicle Inspection Guide
12
2012 F-650/750(f67)
Supplement, 2nd Printing
USA(fus)
Page 13 of 306
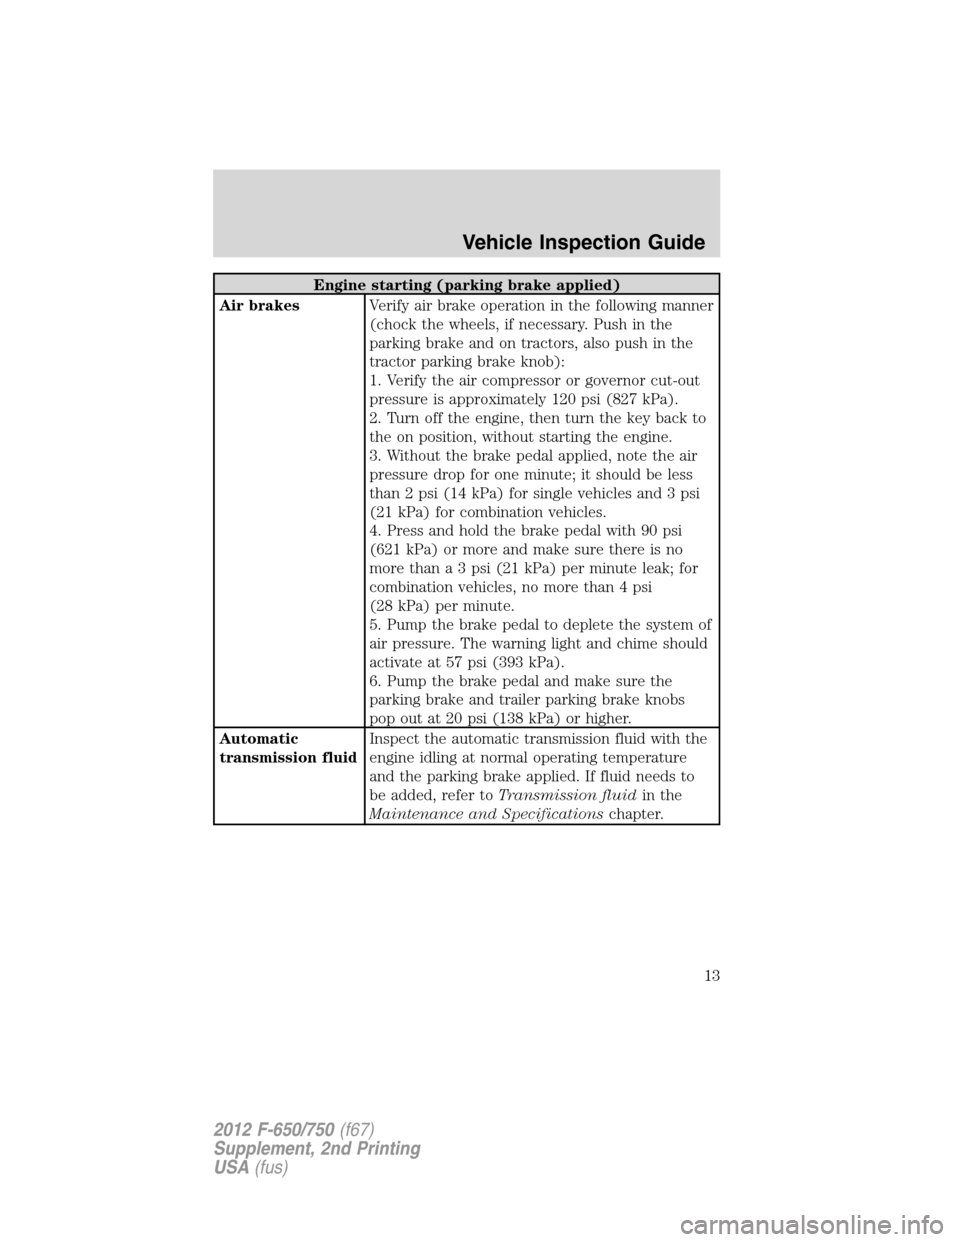
Engine starting (parking brake applied)
Air brakesVerify air brake operation in the following manner
(chock the wheels, if necessary. Push in the
parking brake and on tractors, also push in the
tractor parking brake knob):
1. Verify the air compressor or governor cut-out
pressure is approximately 120 psi (827 kPa).
2. Turn off the engine, then turn the key back to
the on position, without starting the engine.
3. Without the brake pedal applied, note the air
pressure drop for one minute; it should be less
than 2 psi (14 kPa) for single vehicles and 3 psi
(21 kPa) for combination vehicles.
4. Press and hold the brake pedal with 90 psi
(621 kPa) or more and make sure there is no
more than a 3 psi (21 kPa) per minute leak; for
combination vehicles, no more than 4 psi
(28 kPa) per minute.
5. Pump the brake pedal to deplete the system of
air pressure. The warning light and chime should
activate at 57 psi (393 kPa).
6. Pump the brake pedal and make sure the
parking brake and trailer parking brake knobs
pop out at 20 psi (138 kPa) or higher.
Automatic
transmission fluidInspect the automatic transmission fluid with the
engine idling at normal operating temperature
and the parking brake applied. If fluid needs to
be added, refer toTransmission fluidin the
Maintenance and Specificationschapter.
Vehicle Inspection Guide
13
2012 F-650/750(f67)
Supplement, 2nd Printing
USA(fus)
Page 14 of 306
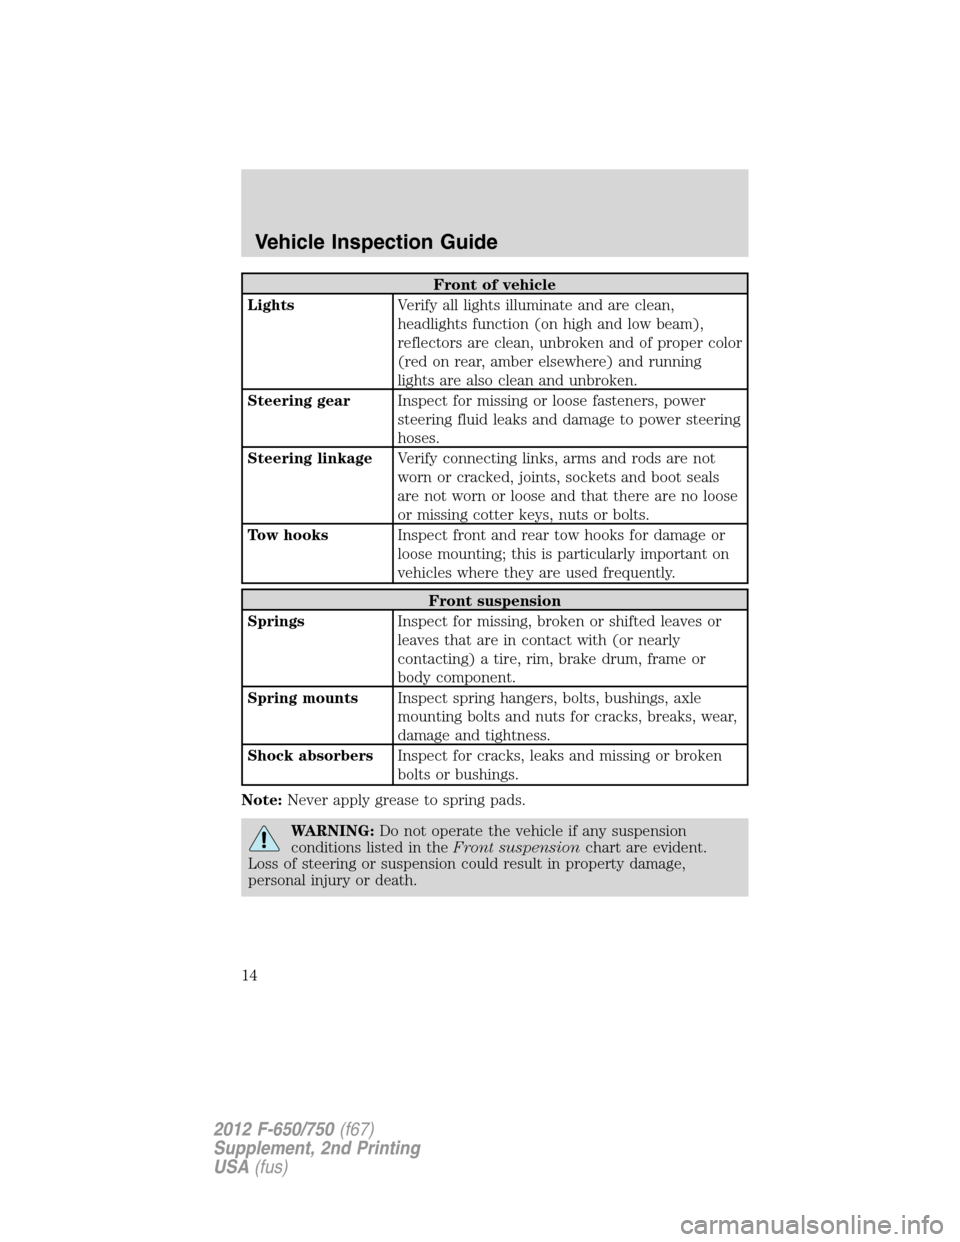
Front of vehicle
LightsVerify all lights illuminate and are clean,
headlights function (on high and low beam),
reflectors are clean, unbroken and of proper color
(red on rear, amber elsewhere) and running
lights are also clean and unbroken.
Steering gearInspect for missing or loose fasteners, power
steering fluid leaks and damage to power steering
hoses.
Steering linkageVerify connecting links, arms and rods are not
worn or cracked, joints, sockets and boot seals
are not worn or loose and that there are no loose
or missing cotter keys, nuts or bolts.
Tow hooksInspect front and rear tow hooks for damage or
loose mounting; this is particularly important on
vehicles where they are used frequently.
Front suspension
SpringsInspect for missing, broken or shifted leaves or
leaves that are in contact with (or nearly
contacting) a tire, rim, brake drum, frame or
body component.
Spring mountsInspect spring hangers, bolts, bushings, axle
mounting bolts and nuts for cracks, breaks, wear,
damage and tightness.
Shock absorbersInspect for cracks, leaks and missing or broken
bolts or bushings.
Note:Never apply grease to spring pads.
WARNING:Do not operate the vehicle if any suspension
conditions listed in theFront suspensionchart are evident.
Loss of steering or suspension could result in property damage,
personal injury or death.
Vehicle Inspection Guide
14
2012 F-650/750(f67)
Supplement, 2nd Printing
USA(fus)
Page 15 of 306
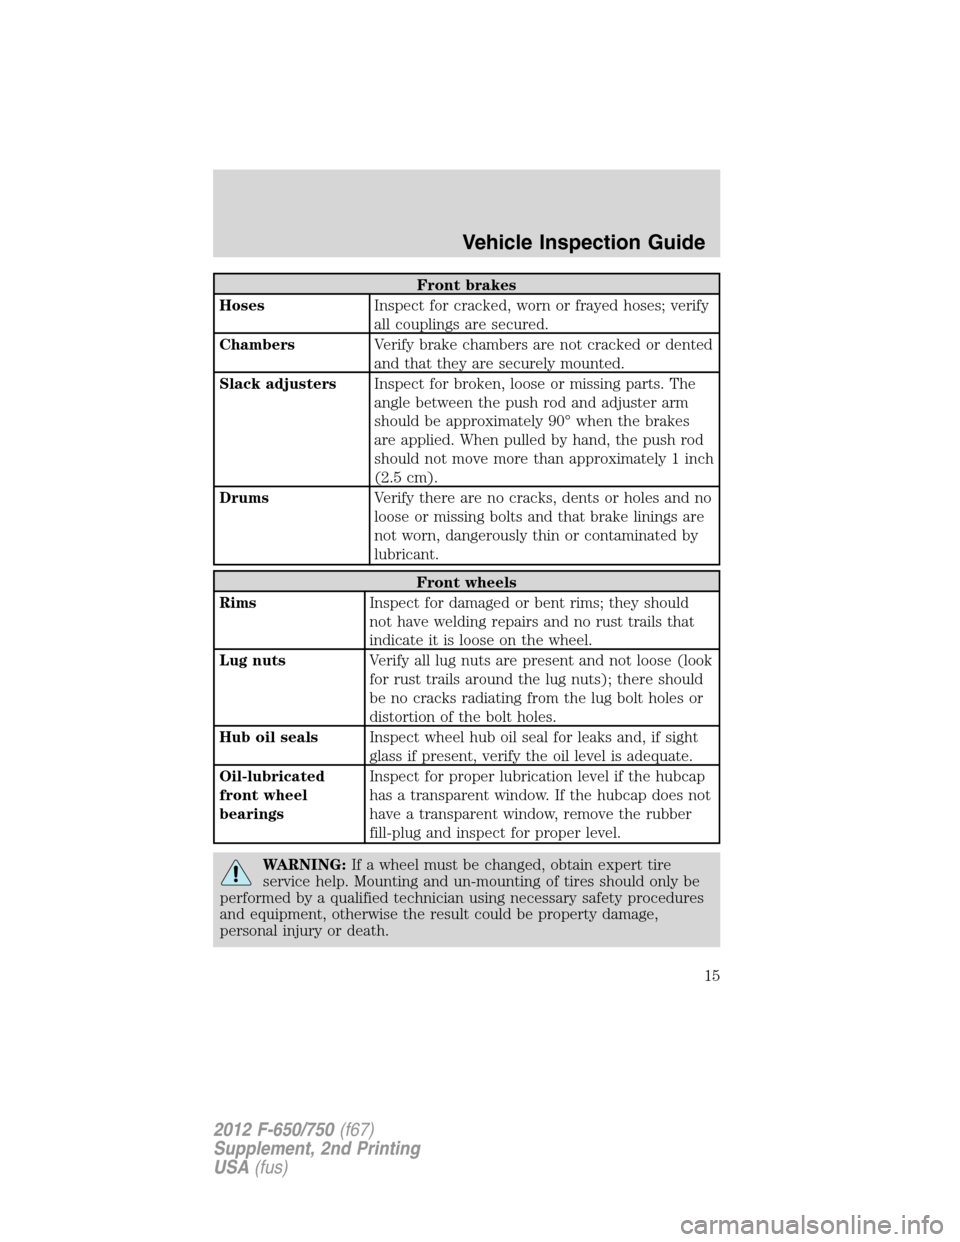
Front brakes
HosesInspect for cracked, worn or frayed hoses; verify
all couplings are secured.
ChambersVerify brake chambers are not cracked or dented
and that they are securely mounted.
Slack adjustersInspect for broken, loose or missing parts. The
angle between the push rod and adjuster arm
should be approximately 90° when the brakes
are applied. When pulled by hand, the push rod
should not move more than approximately 1 inch
(2.5 cm).
DrumsVerify there are no cracks, dents or holes and no
loose or missing bolts and that brake linings are
not worn, dangerously thin or contaminated by
lubricant.
Front wheels
RimsInspect for damaged or bent rims; they should
not have welding repairs and no rust trails that
indicate it is loose on the wheel.
Lug nutsVerify all lug nuts are present and not loose (look
for rust trails around the lug nuts); there should
be no cracks radiating from the lug bolt holes or
distortion of the bolt holes.
Hub oil sealsInspect wheel hub oil seal for leaks and, if sight
glass if present, verify the oil level is adequate.
Oil-lubricated
front wheel
bearingsInspect for proper lubrication level if the hubcap
has a transparent window. If the hubcap does not
have a transparent window, remove the rubber
fill-plug and inspect for proper level.
WARNING:If a wheel must be changed, obtain expert tire
service help. Mounting and un-mounting of tires should only be
performed by a qualified technician using necessary safety procedures
and equipment, otherwise the result could be property damage,
personal injury or death.
Vehicle Inspection Guide
15
2012 F-650/750(f67)
Supplement, 2nd Printing
USA(fus)
Page 16 of 306
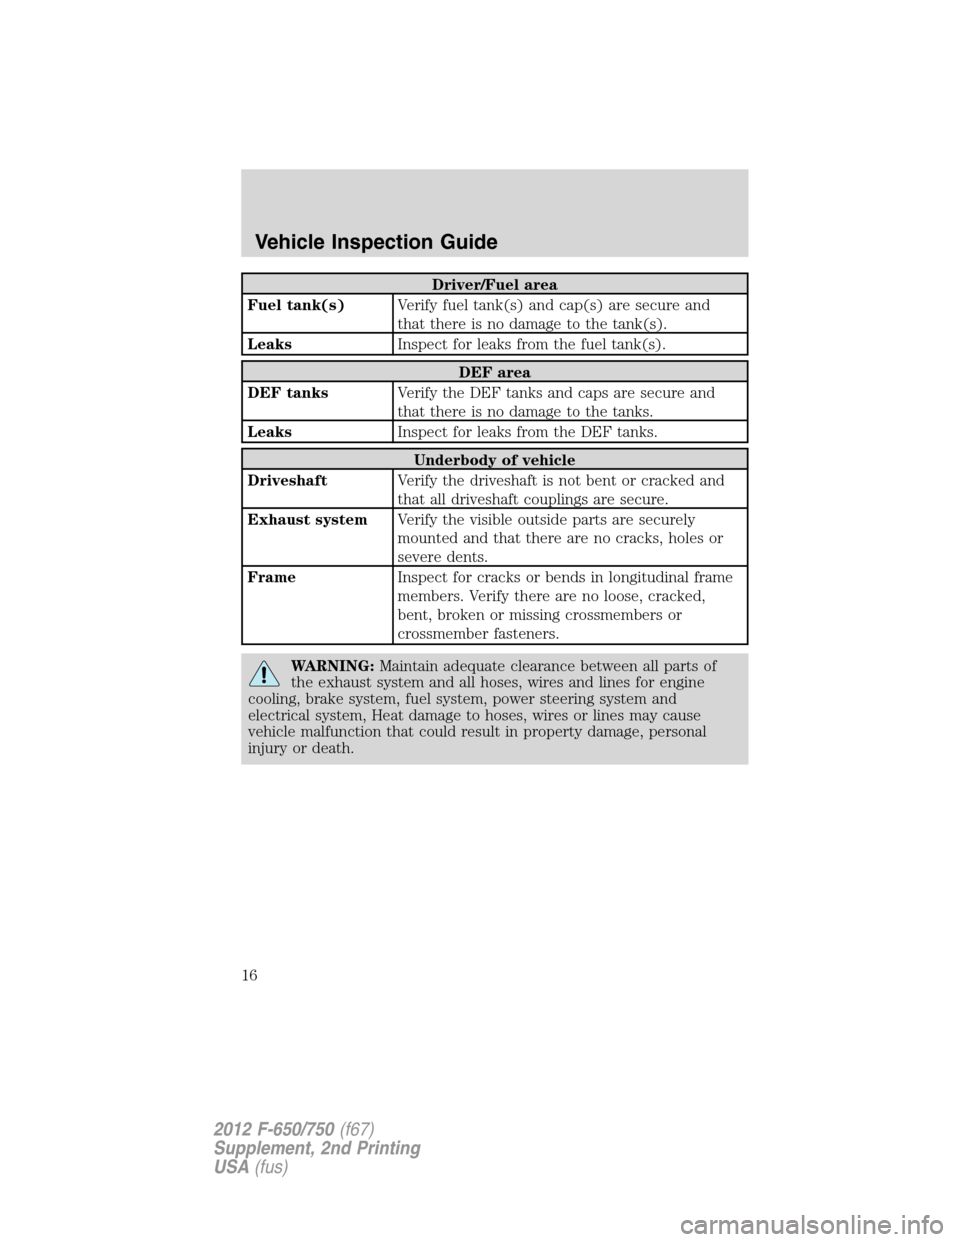
Driver/Fuel area
Fuel tank(s)Verify fuel tank(s) and cap(s) are secure and
that there is no damage to the tank(s).
LeaksInspect for leaks from the fuel tank(s).
DEF area
DEF tanksVerify the DEF tanks and caps are secure and
that there is no damage to the tanks.
LeaksInspect for leaks from the DEF tanks.
Underbody of vehicle
DriveshaftVerify the driveshaft is not bent or cracked and
that all driveshaft couplings are secure.
Exhaust systemVerify the visible outside parts are securely
mounted and that there are no cracks, holes or
severe dents.
FrameInspect for cracks or bends in longitudinal frame
members. Verify there are no loose, cracked,
bent, broken or missing crossmembers or
crossmember fasteners.
WARNING:Maintain adequate clearance between all parts of
the exhaust system and all hoses, wires and lines for engine
cooling, brake system, fuel system, power steering system and
electrical system, Heat damage to hoses, wires or lines may cause
vehicle malfunction that could result in property damage, personal
injury or death.
Vehicle Inspection Guide
16
2012 F-650/750(f67)
Supplement, 2nd Printing
USA(fus)
Page 19 of 306
Rear wheels
SpacersVerify dual wheels are evenly separated and that
tires are not touching one another.
RimsInspect for damaged or bent rims. Rims should
not have welding repairs and no rust trails that
indicate it is loose on the wheel.
Lug nutsVerify all lug nuts are present and not loose (look
for rust trails around the lug nuts); there should
be no cracks radiating from the lug bolt holes or
distortion of the bolt holes.
Trailer
If you are pulling a trailer, an inspection of the trailer similar to that of
the tractor should be done. The inspection should follow trailer
manufacturer recommendations and should include at a minimum:
general condition, landing gear, doors, sides, lights, reflectors,
suspension, brakes, tires, wheels, cargo placement, stability and
tie-downs.
Transmission
If your vehicle is equipped with an automatic transmission, regularly
inspect the transmission’s neutral start switch. The engine should only
start in the N (Neutral) or P (Park) positions.
WARNING:If the unit starts in gear and/or the neutral start
switch is not functioning correctly, the vehicle may inadvertently
move which could result in property damage, personal injury or death.
Inspect the transmission fluid level and shift linkage for proper
operation.
Vehicle Inspection Guide
19
2012 F-650/750(f67)
Supplement, 2nd Printing
USA(fus)
Page 20 of 306
WARNING LIGHTS AND CHIMES
Base instrument cluster for diesel engine with standard measure
shown; metric similar
Base instrument cluster for gasoline engine with standard
measure shown; metric similar
Warning lights can alert you to a vehicle condition that may become
serious enough to cause expensive repairs by illuminating when a
problem exists with one of your vehicle’s systems. Many lights illuminate
Instrument Cluster
20
2012 F-650/750(f67)
Supplement, 2nd Printing
USA(fus)
Page 21 of 306

when you start your vehicle to make sure the bulb works. If any light
remains on after starting the vehicle, refer to the respective system
warning light for additional information.
Note:Some warning lights are
reconfigurable telltale (RTT)
indicator lights and illuminate in the
message center. These lights
function the same as the other
warning lights.
Anti-lock brake system:If the
ABS light stays illuminated or
continues to flash, a malfunction has
been detected, have the system
serviced immediately by your
authorized dealer. Normal braking is still functional unless the brake
warning light is also illuminated.
Brake system warning light:To
confirm the brake system warning
light is functional, it momentarily
illuminates when the ignition is
turned to the on position when the
engine is not running, or in a
position between on and start, or by
applying the parking brake when the
ignition is turned to the on position.
If the brake system warning light does not illuminate at this time, seek
service immediately from your authorized dealer. Illumination after
releasing the parking brake indicates low brake fluid level and the brake
system should be inspected immediately by your authorized dealer.
WARNING:Driving a vehicle with the brake system warning
light on is dangerous. A significant decrease in braking
performance may occur. It takes you longer to stop the vehicle. Have
the vehicle checked by your authorized dealer. Driving extended
distances with the parking brake engaged can cause brake failure and
the risk of personal injury.
ABS
Instrument Cluster
21
2012 F-650/750(f67)
Supplement, 2nd Printing
USA(fus)