2012 FORD F650 wheel torque
[x] Cancel search: wheel torquePage 2 of 306

Seating and Safety Restraints 69
Seating 69
Rear seats 78
Safety restraints 80
Child restraints 89
Driving 103
Starting 103
Brakes 110
Air suspension 129
Transmission operation 132
Vehicle loading 146
Roadside Emergencies 152
Hazard flasher switch 153
Fuses and relays 153
Jump starting 162
Wrecker towing 166
Customer Assistance 170
Getting assistance outside the U.S. and Canada 172
Reporting safety defects (U.S. only) 174
Reporting safety defects (Canada only) 174
Cleaning 175
Underbody preservation 179
Maintenance and Specifications 181
Hood 189
Engine oil 192
Battery 195
Engine coolant 197
Fuel information 204
Diesel Exhaust Fluid (DEF) 210
Wheel lug nut torque 237
Tire information 238
Lubricant specifications 245
Refill capacities 259
Engine data 262
Table of Contents
2
2012 F-650/750(f67)
Supplement, 2nd Printing
USA(fus)
Page 120 of 306
Releasing spring brake manually
WARNING:Do not attempt to disassemble the parking brake
chamber under any circumstances. The high spring load may
cause serious injury if the chamber clamps are removed.
If air pressure is released from the spring brake chamber the power spring
applies the brake and, unless air pressure can be re-established, the spring
brake must be released as follows in order to move the vehicle.
WARNING:Block the wheels to help prevent the vehicle from
moving.
WARNING:Unexpected and possibly sudden vehicle movement
may occur if these precautions are not taken.
Impact wrenches should not be used as they may damage the piston and
prevent proper caging of the spring. Do not apply more than 50 ft-lb
(68 N•m) torque to the release bolt nut.
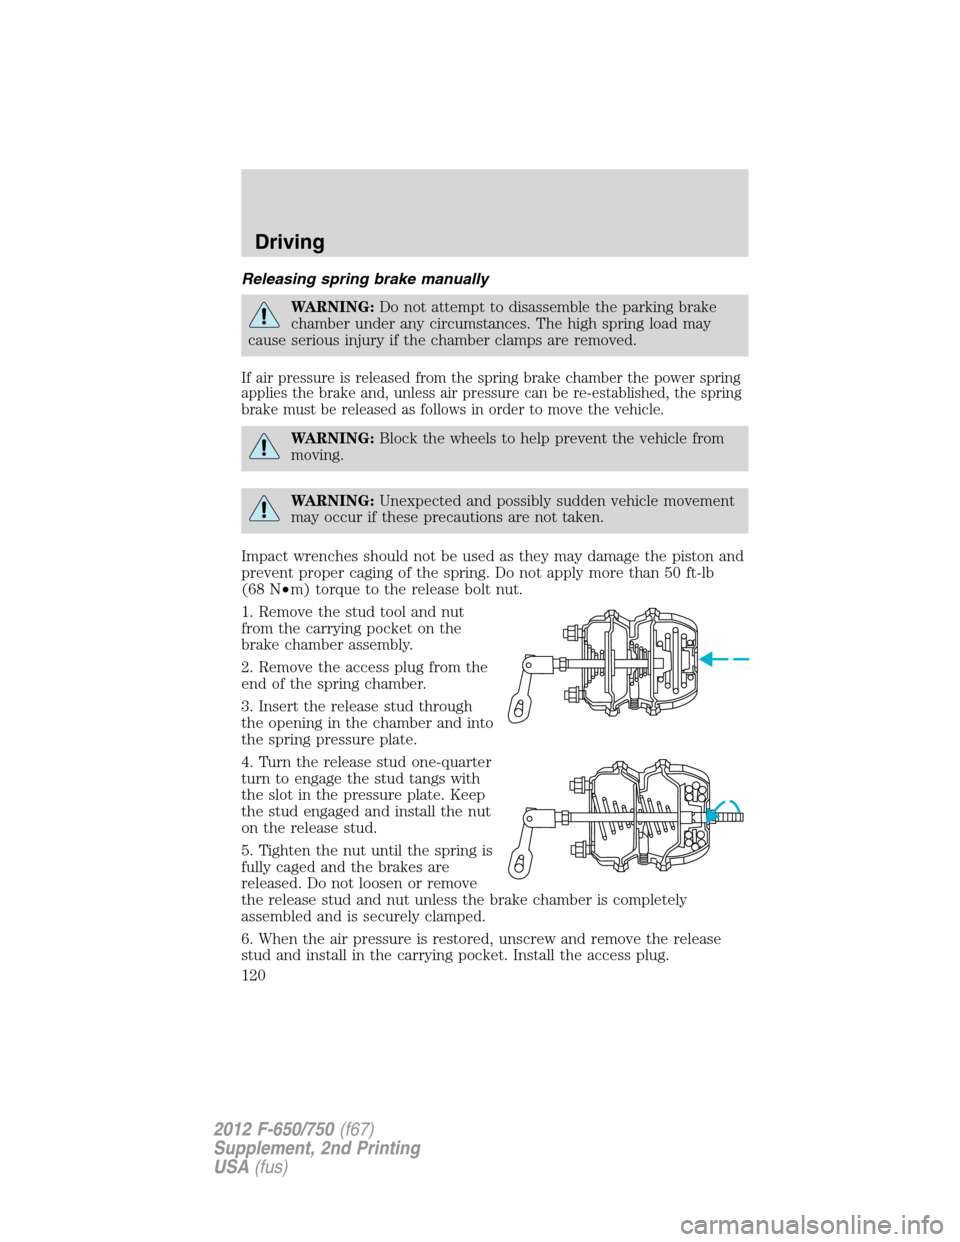
1. Remove the stud tool and nut
from the carrying pocket on the
brake chamber assembly.
2. Remove the access plug from the
end of the spring chamber.
3. Insert the release stud through
the opening in the chamber and into
the spring pressure plate.
4. Turn the release stud one-quarter
turn to engage the stud tangs with
the slot in the pressure plate. Keep
the stud engaged and install the nut
on the release stud.
5. Tighten the nut until the spring is
fully caged and the brakes are
released. Do not loosen or remove
the release stud and nut unless the brake chamber is completely
assembled and is securely clamped.
6. When the air pressure is restored, unscrew and remove the release
stud and install in the carrying pocket. Install the access plug.
Driving
120
2012 F-650/750(f67)
Supplement, 2nd Printing
USA(fus)
Page 141 of 306
PTO operation with vehicle stationary
Stop the vehicle, idle the engine and set the parking brake. Make sure the
gear selector is in any forward drive range, then engage the PTO. After the
PTO is engaged, move the range selector to N (Neutral). Increase the engine
speed until the desired PTO operation speed is obtained. To disengage the
PTO after operation with the vehicle standing, release the throttle, allow the
drive equipment to come to a stop, and then disengage the PTO.
WARNING:When the PTO is operated with the vehicle
stationary, the transmission must be placed in N (Neutral) with
the parking brake set. If the transmission is not in N (Neutral) and is
equipped with a remote throttle control, an increase in engine speed
can overpower the parking brake and cause the vehicle to move,
possibly resulting in personal injury and/or property damage.
PTO operation while vehicle is moving
After the PTO is engaged for driven vehicle operation, shift to the desired
range and drive the vehicle. The speed of the PTO, during this period of
operation, always maintains direct relation to vehicle speed. PTO speed
decreases in relation to vehicle (transmission output) speed as shifts to a
higher gear occur. When operating the PTO while the vehicle is moving,
the PTO may be disengaged whenever it is no longer required. When there
is no load on the PTO gear, it can be pulled out of engagement.
Vehicles equipped with an Allison 3000 Series automatic transmission
The PTO drive gear is engine-driven and provides direct engine power.
The PTO can be operated when the vehicle is either stationary or
moving. The PTO gear is in constant mesh with the drive gear in the
torque converter housing. A friction clutch or constant drive is used to
transmit power to the PTO.
Vehicles equipped with a manual transmission
Transmission-mounted PTO units are available for local installation on
your vehicle. See yourBody Builder’s Layout Bookfor restrictions on
use and installation of PTO units.
To engage the PTO unit, stop the vehicle and place the transmission in N
(Neutral). Press the clutch and allow the gears to stop rotating, then
engage the PTO unit. The PTO can also be selected with the
transmission in gear as long as the clutch is pressed.
When operating the PTO with the vehicle stationary, first set the parking
brake (chock the wheels if the vehicle is on a hill or another uneven
surface).
Driving
141
2012 F-650/750(f67)
Supplement, 2nd Printing
USA(fus)
Page 169 of 306
4. If tapered dowels are required, install them at each stud and into the
flange of the axle shaft. Use a punch or drift and hammer, if needed.
5. Install the fasteners and tighten to correct torque value. Refer to the
Service Manual.
Towing the vehicle with the rear wheels suspended
Note:To avoid damage to the cab roof or air deflector when towing the
vehicle backward (rear wheels suspended) the air deflector must be
removed.
Whenever possible, it is preferable to tow a disabled vehicle from the
rear by raising the rear of the chassis. When towing a vehicle with the
rear of the chassis suspended, the front wheels must be locked in the
straight-ahead position.
Vehicles equipped with a manual transmission must have at least 1.0 pint
(0.5L) of transmission fluid drained from the case. This prevents the
transmission fluid from entering the clutch housing and fluid saturating
the clutch discs. Make sure that the transmission fluid is replaced before
the vehicle is returned to service.
Roadside Emergencies
169
2012 F-650/750(f67)
Supplement, 2nd Printing
USA(fus)
Page 183 of 306
At regular intervals, or during other scheduled maintenance (tire
rotation/service, wheel bearing service, alignment, etc.), the kingpins
should be checked for excessive wear. Refer to the service manual for
proper procedures.
Toe-in setting - general inspection
Inspecting steer axle tires in the first 3,000–10,000 service miles
(5,000–16,000 service km) generally shows if tires are wearing normally.
Rapid outside shoulder wear on both tires indicates too much toe-in.
Rapid inside shoulder wear on both tires indicates too much toe-out. In
P&D-type service, left-to-right steer tire tread life differentials up to 40%
can be observed depending on routes and other variables.
Follow the tire manufacturer’s recommended cold inflation pressure for
the tire size, load range (ply rating) and steer axle loading typical for
their operation (each steer axle tire equals
1�2steer axle loading).
Special applications may warrant a setting based on experience with the
type of tire operating loads and conditions. Radial tires are more
sensitive to toe-in setting than bias ply tires. While not insensitive to
vehicle alignment, fine tuning school bus alignment to line-haul truck
standards does not drastically improve tire tread life.
It is essential that correct toe-in and tire pressure be maintained for
optimum tire wear.
Rear axle - general inspection
Make sure that the axle mounting U-bolts, attaching or mounting bolts
and nuts are securely tightened. Refer toU-bolt nut torquein this
chapter. Regularly check the rear axle for damaged, binding or worn
parts.
NoSpin Detroit Locker positive locking differential
Vehicles equipped with this type differential have the operator’s manual
supplied with the vehicle. Refer to this manual for maintenance checks.
Maintenance and Specifications
183
2012 F-650/750(f67)
Supplement, 2nd Printing
USA(fus)
Page 230 of 306
Supporting your vehicle for service
Prepare the vehicle for service repairs by doing the following:
1. Park the vehicle on a level concrete floor.
2. Set the parking brake and block the wheels to prevent the vehicle
from moving.
3. Select a jack with a rated capacity sufficient to lift and hold up the
vehicle.
4. Raise the vehicle with the jack applied to the axle(s). DO NOT use the
bumper as a lifting point.
5. Support the vehicle with floor stands under the axle(s). If the axle or
the suspension are being serviced, support the vehicle with floor stands
under the frame side-members, preferably between the axles.
WARNING:Do not use a jack when working under a vehicle. It
may give way, causing the vehicle to fall and result in property
damage, personal injury or death. Always use floor stands to support
the vehicle.
FRAME AND TOW HOOKS
Your vehicle’s chassis is manufactured with frame rails of either HSLA
steel or heat-treated steel; each must be handled in a specific manner to
ensure maximum service life. Consult the service manual or your dealer
before attempting frame repair or modification.
It is important, particularly on vehicles where the tow hooks are used
frequently, to inspect the front and rear tow hooks for damage or a loose
mounting.
SPRING U-BOLT CHECKS
Check U-bolt nuts and re-torque every 36,000 miles (58,000 km) after
initial 1,000 miles (1,600 km) re-torque. The U-bolt and nut threads and
seats should be cleaned and lubricated to ensure peak condition when
re-torqued.
U-bolt nut torque
Suspension ft-lb N•m
Front axle – 8500 lb (3856 kg) 180-200 244-271
Front axles – 10000 lb (4536 kg) and higher 260-300 353-407
Maintenance and Specifications
230
2012 F-650/750(f67)
Supplement, 2nd Printing
USA(fus)
Page 233 of 306
Oil-lubricated front wheel bearings
During normal vehicle duty cycle, the lube and air inside the hub/wheel
cavity expands and, if not vented, causes pressure build-up that could
cause accelerated seal wear. There are two venting methods that can be
used to prevent pressure build-up:
•a slit or small hole in the rubber check vent or
•the window
Normal maintenance
Over a period of time, if not routinely cleaned, a slight film of oil can
collect dirt around the rubber fill plug and face, which could appear to
be a leak. Routine cleaning ensures that the lube level can be easily
observed through the clear window as intended. In situations where the
window is clean on the outside but discolored on the inside, the lube
level may be checked by inserting a finger through the rubber check
vent hole.
The specified lube level for a clear window type hubcaps is from the
minimum line to + 5/16 inch above the minimum line. If the lube level
should suddenly drop dramatically below the minimum level, see the
Workshop Manualfor diagnostic procedure.
Installation, tightening and alignment
Verify the threads on studs and nuts are clean to permit correct torque
when installing wheels. The mounting surfaces of rims, wheels, spacer
rings and clamps must be free of dirt, rust, lubricants or damage. Use a
wire brush to clean the mounting contact surfaces. Do not use lubricant
on threads.
Check the rim or wheel for proper alignment after it has been properly
tightened. Rotate the wheel with a piece of chalk attached to a steady,
firm surface, and placed to just barely clear the outside surface of the
tire bead seat; this procedure points out the high spot. A high spot does
not necessarily mean that the lug nuts have been unevenly tightened,
but could be the result of a bent wheel.
Use the following installation procedure:
1. Slide inner rear or front tire and wheel in position over studs and push
it back as far as possible. Use care so that the threads on studs are not
damaged.
Maintenance and Specifications
233
2012 F-650/750(f67)
Supplement, 2nd Printing
USA(fus)
Page 236 of 306
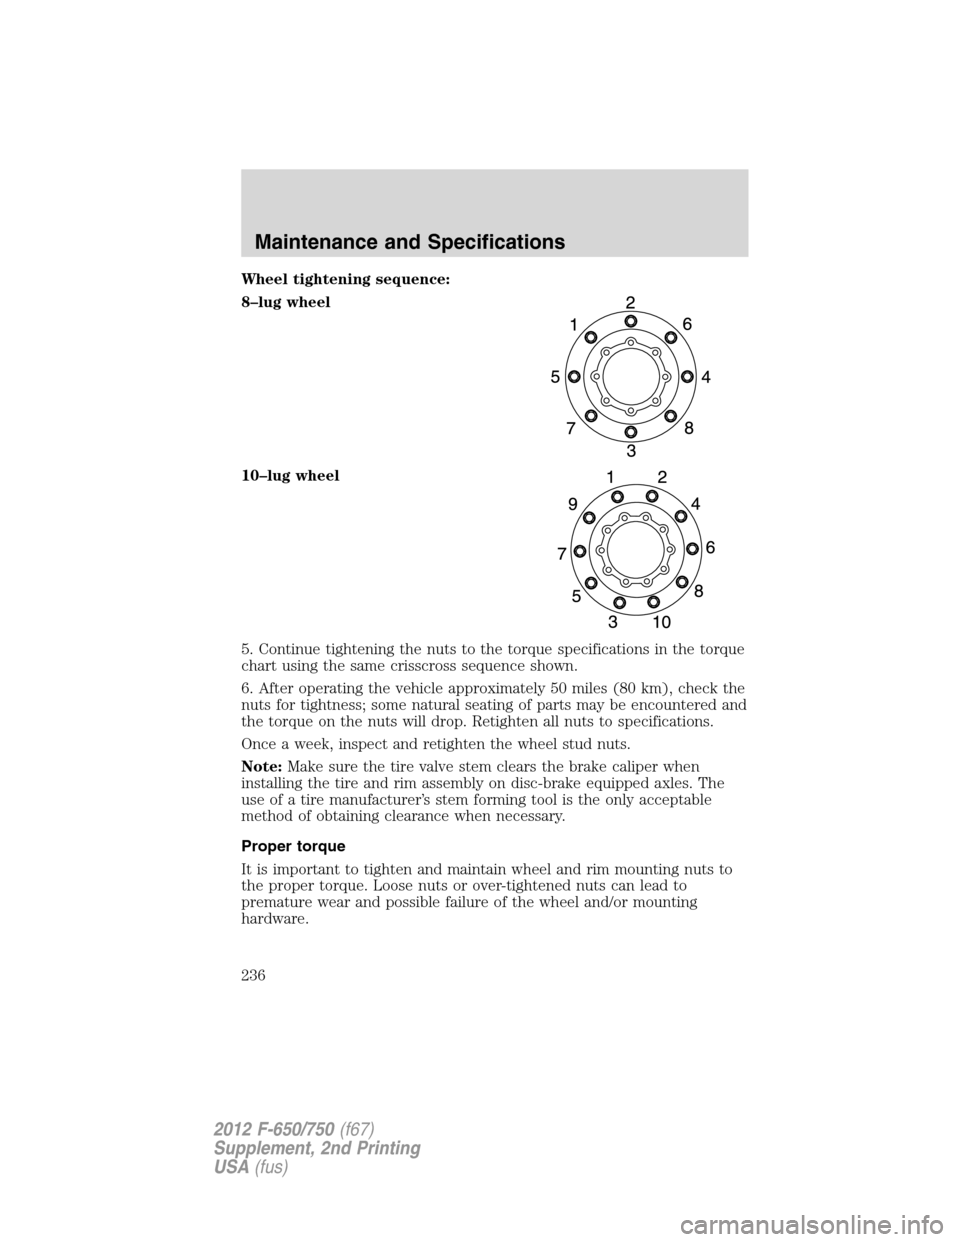
Wheel tightening sequence:
8–lug wheel
10–lug wheel
5. Continue tightening the nuts to the torque specifications in the torque
chart using the same crisscross sequence shown.
6. After operating the vehicle approximately 50 miles (80 km), check the
nuts for tightness; some natural seating of parts may be encountered and
the torque on the nuts will drop. Retighten all nuts to specifications.
Once a week, inspect and retighten the wheel stud nuts.
Note:Make sure the tire valve stem clears the brake caliper when
installing the tire and rim assembly on disc-brake equipped axles. The
use of a tire manufacturer’s stem forming tool is the only acceptable
method of obtaining clearance when necessary.
Proper torque
It is important to tighten and maintain wheel and rim mounting nuts to
the proper torque. Loose nuts or over-tightened nuts can lead to
premature wear and possible failure of the wheel and/or mounting
hardware.
Maintenance and Specifications
236
2012 F-650/750(f67)
Supplement, 2nd Printing
USA(fus)