2012 FORD F250 tow bar
[x] Cancel search: tow barPage 42 of 448

It is important to press RESET in order to reset the function after
setting the speed control to get accurate highway fuel economy readings.
For more information refer toEssentials of good fuel economyin the
Maintenance and Specificationschapter.
Fuel Hist.:Press the right arrow key (when in the Fuel Econ. menu) to
reach Fuel Hist. Fuel history shows fuel usage (AVG MPG or L/100km) as a
bar graph based on time. The duration time can be changed as follows:
Duration– Press the right arrow key (when in the Fuel Hist. menu) to
reach the following duration choices.
•5 Minutes
•10 Minutes
•30 Minutes
•Last 5 Resets
Use the up/down arrows keys to highlight one of the choices; press and
hold OK to set your choice.
The graph is updated each minute with the fuel economy that was
achieved during the prior 5, 10, 30 minutes or last 5 resets of driving.
Truck Apps (if equipped)
In this mode, off-road and trailer towing application options are available.
Off Road*
Pitch and bank angle (in degrees). Displays the pitch angle (front to
rear) and bank angle (side to side) of the road surface.
Steering angle (in degrees). Displays the steering angle of the front
wheels after the vehicle has been driven for a period of time.
Differential lock/unlock. Displays the state (locked or unlocked) of the
electronic locking differential.
Energy flow. Displays the operating mode of the transfer case: 4X2,
4X4 Low or 4X4 High.
* If equipped—your vehicle may be equipped with some or all of these
options.
When “Press OK for info” is displayed, pressing OK will give you
information on the following options if equipped (Note:Information is
only available when traveling less than 3 mph [5 km/h]):
•ELD (electronic locking differential)
•Hill Descent Control
Instrument Cluster
42
2012 F-250/350/450/550(f23)
Owners Guide, 4th Printing
USA(fus)
Page 125 of 448

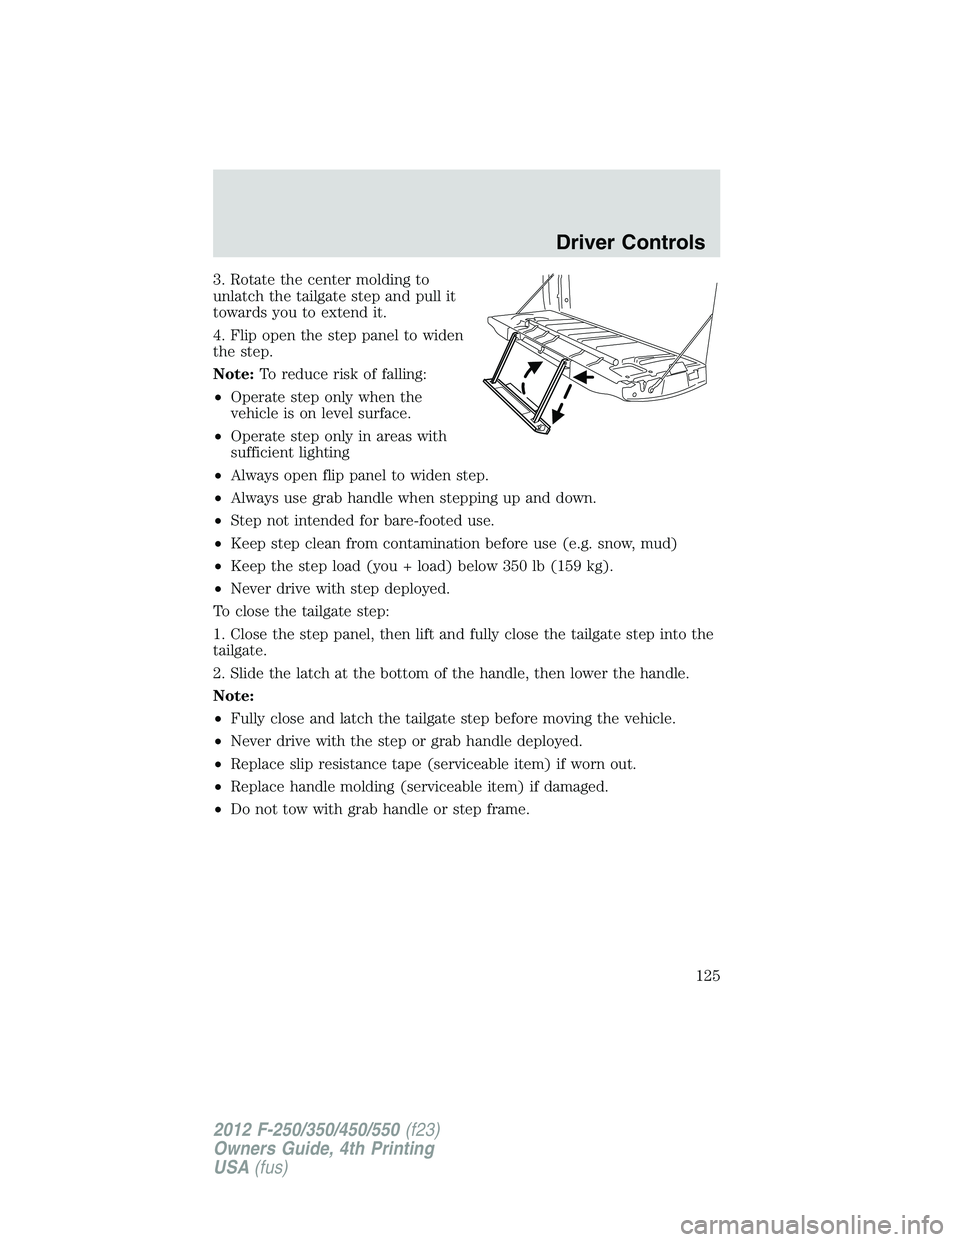
3. Rotate the center molding to
unlatch the tailgate step and pull it
towards you to extend it.
4. Flip open the step panel to widen
the step.
Note:To reduce risk of falling:
•Operate step only when the
vehicle is on level surface.
•Operate step only in areas with
sufficient lighting
•Always open flip panel to widen step.
•Always use grab handle when stepping up and down.
•Step not intended for bare-footed use.
•Keep step clean from contamination before use (e.g. snow, mud)
•Keep the step load (you + load) below 350 lb (159 kg).
•Never drive with step deployed.
To close the tailgate step:
1. Close the step panel, then lift and fully close the tailgate step into the
tailgate.
2. Slide the latch at the bottom of the handle, then lower the handle.
Note:
•Fully close and latch the tailgate step before moving the vehicle.
•Never drive with the step or grab handle deployed.
•Replace slip resistance tape (serviceable item) if worn out.
•Replace handle molding (serviceable item) if damaged.
•Do not tow with grab handle or step frame.
Driver Controls
125
2012 F-250/350/450/550(f23)
Owners Guide, 4th Printing
USA(fus)
Page 160 of 448

Power recline (if equipped)
Press the control to recline the
seatback forward or rearward.
Using the power lumbar support (if equipped)
The power lumbar control is located on the outboard side of the seat.
Press one side of the control to
adjust firmness.
Press the other side of the control
to adjust softness.
Using the manual lumbar support (if equipped)
The lumbar support control is
located on the outboard side of the
seat
Turn the lumbar support forward
toward the front of the vehicle for
more support.
Turn the lumbar support backward
toward the rear of the vehicle for
less support.
Seating and Safety Restraints
160
2012 F-250/350/450/550(f23)
Owners Guide, 4th Printing
USA(fus)
Page 253 of 448

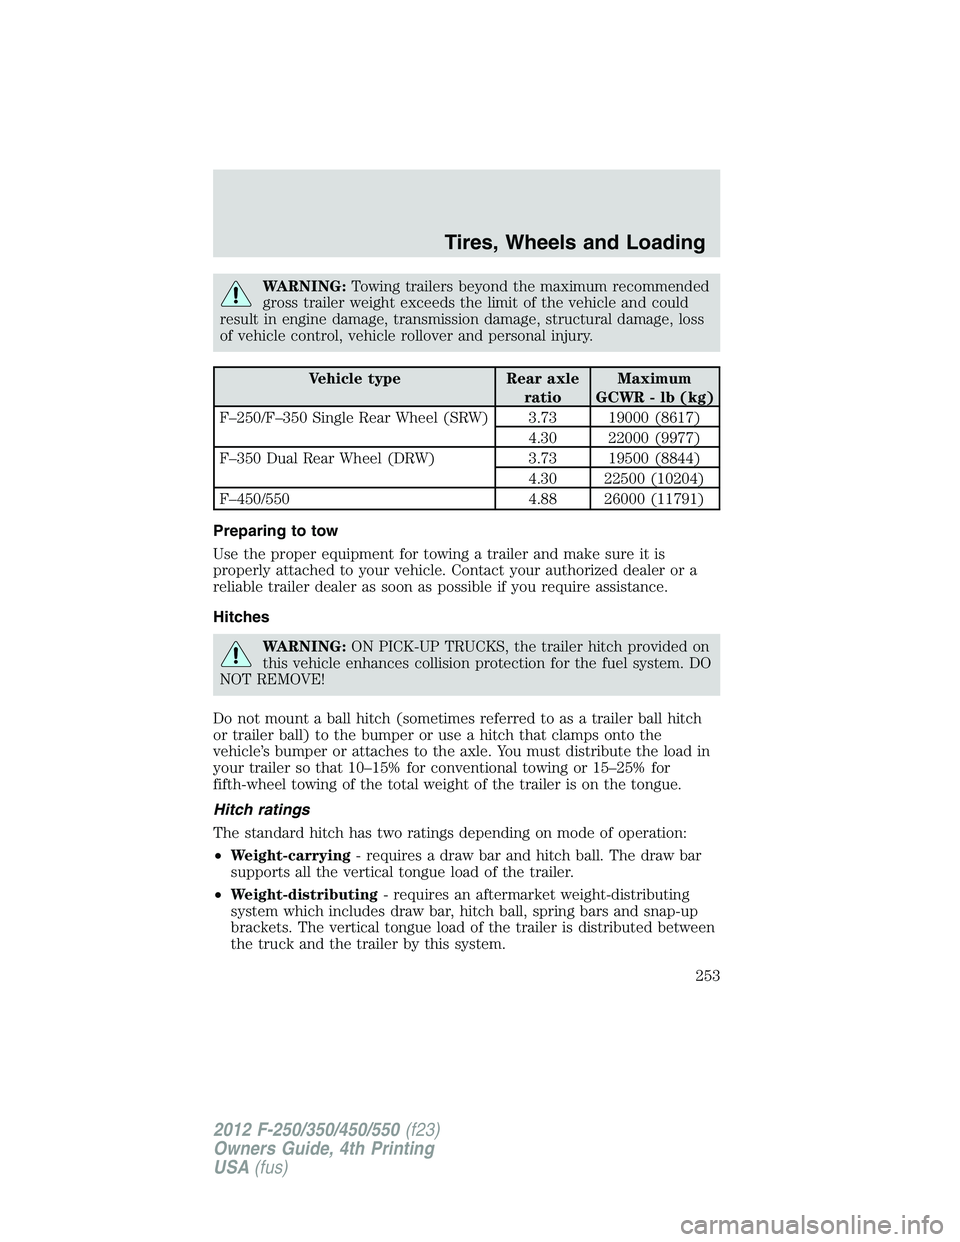
WARNING:Towing trailers beyond the maximum recommended
gross trailer weight exceeds the limit of the vehicle and could
result in engine damage, transmission damage, structural damage, loss
of vehicle control, vehicle rollover and personal injury.
Vehicle type Rear axle
ratioMaximum
GCWR - lb (kg)
F–250/F–350 Single Rear Wheel (SRW) 3.73 19000 (8617)
4.30 22000 (9977)
F–350 Dual Rear Wheel (DRW) 3.73 19500 (8844)
4.30 22500 (10204)
F–450/550 4.88 26000 (11791)
Preparing to tow
Use the proper equipment for towing a trailer and make sure it is
properly attached to your vehicle. Contact your authorized dealer or a
reliable trailer dealer as soon as possible if you require assistance.
Hitches
WARNING:ON PICK-UP TRUCKS, the trailer hitch provided on
this vehicle enhances collision protection for the fuel system. DO
NOT REMOVE!
Do not mount a ball hitch (sometimes referred to as a trailer ball hitch
or trailer ball) to the bumper or use a hitch that clamps onto the
vehicle’s bumper or attaches to the axle. You must distribute the load in
your trailer so that 10–15% for conventional towing or 15–25% for
fifth-wheel towing of the total weight of the trailer is on the tongue.
Hitch ratings
The standard hitch has two ratings depending on mode of operation:
•Weight-carrying- requires a draw bar and hitch ball. The draw bar
supports all the vertical tongue load of the trailer.
•Weight-distributing- requires an aftermarket weight-distributing
system which includes draw bar, hitch ball, spring bars and snap-up
brackets. The vertical tongue load of the trailer is distributed between
the truck and the trailer by this system.
Tires, Wheels and Loading
253
2012 F-250/350/450/550(f23)
Owners Guide, 4th Printing
USA(fus)
Page 254 of 448

To determine which trailer hitch your vehicle is equipped with, refer to
the trailer hitch label located on trailer hitch cross tube. Once you
determine which trailer hitch you have consult your authorized dealer,
theRV and Trailer Towing Guideprovided by your dealer or online at
https://www.fleet.ford.com/showroom/rv_trailer_towing/default.asp.
WARNING:The hitch rating listed on the trailer hitch label are
maximum possible trailer ratings for that hitch but may not be
what your vehicle is capable of towing. To find the maximum trailer
weight allowed for your specific vehicle, consult your authorized dealer
(or theRV and Trailer Towing Guideprovided by your authorized
dealer).
WARNING:Towing trailers beyond the maximum tongue weight
exceeds the limit of the towing system and could result in
vehicle structural damage, loss of vehicle control and personal injury.
Weight-Distributing Hitches
When hooking-up a trailer using a weight-distributing hitch, always use
the following procedure:
1. Park the vehicle (without the trailer) on a level surface.
2. Measure the height of the top of the front wheel opening on the
fender, this is H1.
3. Attach the trailer to the vehicle without the weight distributing bars
connected.
4. Measure the height of the top of the front wheel opening on the
fender a second time, this is H2.
5. Install and adjust the tension in the weight distributing bars so that the
height of the front fender is approximately halfway between H1 and H2.
6. Check that the trailer is level. If not level, adjust the ball height
accordingly and repeat Steps 3–6.
WARNING:Do not adjust a weight-distributing hitch to any
position where the rear bumper of the vehicle is higher than it
was before attaching the trailer. Doing so will defeat the function of
the weight-distributing hitch, which may cause unpredictable handling,
and could result in serious personal injury.
Tires, Wheels and Loading
254
2012 F-250/350/450/550(f23)
Owners Guide, 4th Printing
USA(fus)
Page 261 of 448

Your vehicle may be equipped with a temporary or conventional spare
tire. If the spare tire is different in size (diameter and/or width), tread
type (All-Season or All-Terrain) or is from a different manufacturer other
than the road tires on your vehicle, your spare tire is considered
“temporary”. Consult information on the Tire Label or Safety Compliance
Certification Label for limitations when using.
Trailer towing safety tips
General
•Ensure that the trailer, safety chains and 7–pin electrical connectors
are securely fastened.
•Make sure the truck receiver, draw bar and coupler are properly
connected and adjusted.
•Check rear view and side mirrors for proper visibility especially when
towing a trailer wider than the truck.
•When turning, make wide turns to allow trailer tires to properly clear
any obstacles.
•Operate the vehicle at lower speeds than you would when not towing
a trailer; the likelihood of trailer sway is greater at higher speeds.
•Be prepared for trailer sway due to buffeting when larger vehicles
pass in either direction.
•If you will be towing a trailer frequently in hot weather, hilly
conditions, at GCWR, or any combination of these factors, consider
refilling your rear axle with synthetic gear lubricant if not already so
equipped. Refer toMaintenance product specifications and
capacitiesin theMaintenance and Specificationschapter for the
proper axle lubricant. Remember that regardless of the rear axle
lubricant used, do not tow a trailer for the first 500 miles (800 km) of
a new vehicle, and that the first 500 miles (800 km) of towing be done
at no faster than 70 mph (113 km/h) with no full-throttle starts.
Loading
•Trailer loads should be evenly distributed front-to-back and
left-to-right.
•Never exceed truck, trailer, receiver, ball, tongue, tire or coupler
loading recommendations.
•Keep the center of gravity low for best handling.
Tires, Wheels and Loading
261
2012 F-250/350/450/550(f23)
Owners Guide, 4th Printing
USA(fus)
Page 328 of 448

Fuse/Relay
LocationFuse Amp
RatingProtected Circuits
10 — Not used
11 — Not used
12 — Not used
13 — Not used
14 — Not used
15 Diode Fuel pump (diesel engine)
16 — Not used
17 15A** Heated mirror
18 — Not used
19 — Not used
20 — Not used
21 — Not used
22 30A* Trailer tow electric brake
23 40A* Blower motor
24 — Not used
25 30A* Wipers
26 30A* Trailer tow park lamps
27 25A* Urea heaters (diesel engine)
28 — Buss bar
29 Relay Trailer tow park lamps
30 Relay A/C clutch
31 Relay Wipers
32 — Not used
33 15A** Vehicle power (VPWR) 1
34 15A** VPWR 2 (diesel engine)
20A** VPWR 2 (gas engine)
35 10A** VPWR 3
36 15A** VPWR 4 (diesel engine)
20A** VPWR 4 (gas engine)
37 10A** VPWR 5 (diesel engine)
Roadside Emergencies
328
2012 F-250/350/450/550(f23)
Owners Guide, 4th Printing
USA(fus)
Page 395 of 448

•Warming up a vehicle on cold mornings is not required and may
reduce fuel economy.
•Resting your foot on the brake pedal while driving may reduce fuel
economy.
•Combine errands and minimize stop-and-go driving.
Maintenance
•Keep tires properly inflated and use only recommended size.
•Operating a vehicle with the wheels out of alignment will reduce fuel
economy.
•Use recommended engine oil. Refer toMaintenance product
specifications and capacitiesin this chapter.
•Perform all regularly scheduled maintenance items. Follow the
recommended maintenance schedule and owner maintenance checks
found inscheduled maintenance information.
Conditions
•Heavily loading a vehicle or towing a trailer may reduce fuel economy
at any speed.
•Carrying unnecessary weight may reduce fuel economy (approximately
1 mpg [0.4 km/L] is lost for every 400 lb [180 kg] of weight carried).
•Adding certain accessories to your vehicle (for example bug
deflectors, rollbars/light bars, running boards, ski/luggage racks) may
reduce fuel economy.
•To maximize the fuel economy, drive with the tonneau cover installed
(if equipped).
•Using fuel blended with alcohol may lower fuel economy.
•Fuel economy may decrease with lower temperatures during the first
8–10 miles (12–16 km) of driving.
•Driving on flat terrain offers improved fuel economy as compared to
driving on hilly terrain.
•Transmissions give their best fuel economy when operated in the top
cruise gear and with steady pressure on the gas pedal.
•Four-wheel-drive operation (if equipped) is less fuel efficient than
two-wheel-drive operation.
•Close windows for high speed driving.
Maintenance and Specifications
395
2012 F-250/350/450/550(f23)
Owners Guide, 4th Printing
USA(fus)