2012 FORD F250 airbag
[x] Cancel search: airbagPage 197 of 448
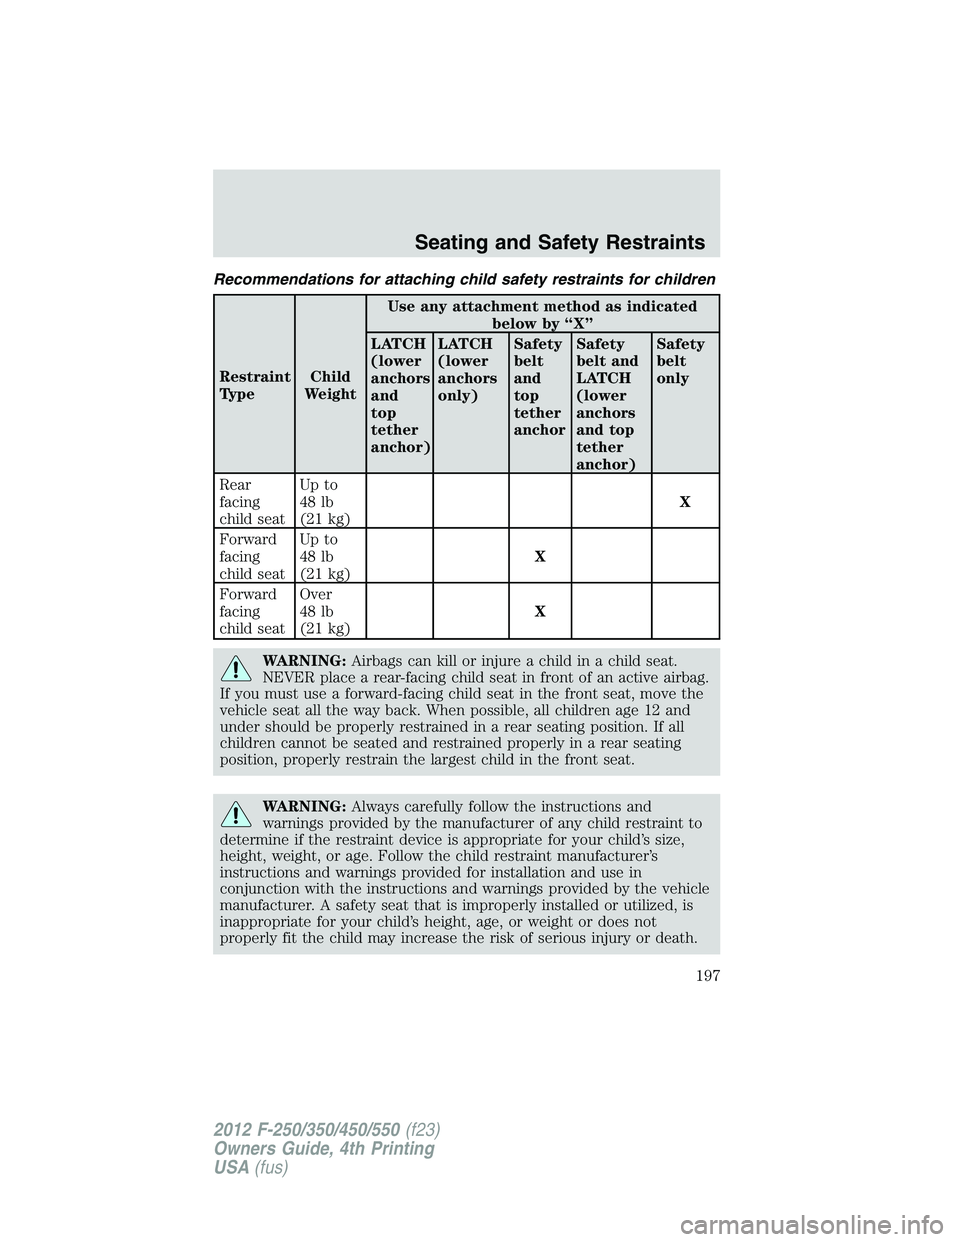
Recommendations for attaching child safety restraints for children
Restraint
TypeChild
WeightUse any attachment method as indicated
below by “X”
LATCH
(lower
anchors
and
top
tether
anchor)LATCH
(lower
anchors
only)Safety
belt
and
top
tether
anchorSafety
belt and
LATCH
(lower
anchors
and top
tether
anchor)Safety
belt
only
Rear
facing
child seatUp to
48 lb
(21 kg)X
Forward
facing
child seatUp to
48 lb
(21 kg)X
Forward
facing
child seatOver
48 lb
(21 kg)X
WARNING:Airbags can kill or injure a child in a child seat.
NEVER place a rear-facing child seat in front of an active airbag.
If you must use a forward-facing child seat in the front seat, move the
vehicle seat all the way back. When possible, all children age 12 and
under should be properly restrained in a rear seating position. If all
children cannot be seated and restrained properly in a rear seating
position, properly restrain the largest child in the front seat.
WARNING:Always carefully follow the instructions and
warnings provided by the manufacturer of any child restraint to
determine if the restraint device is appropriate for your child’s size,
height, weight, or age. Follow the child restraint manufacturer’s
instructions and warnings provided for installation and use in
conjunction with the instructions and warnings provided by the vehicle
manufacturer. A safety seat that is improperly installed or utilized, is
inappropriate for your child’s height, age, or weight or does not
properly fit the child may increase the risk of serious injury or death.
Seating and Safety Restraints
197
2012 F-250/350/450/550(f23)
Owners Guide, 4th Printing
USA(fus)
Page 199 of 448
Follow all the safety restraint and airbag precautions that apply to adult
passengers in your vehicle.
If the child is the proper height, age, and weight (as specified by your
child safety seat or booster manufacturer), fits the restraint and can be
restrained properly, then restrain the child in the child safety seat or
with the belt-positioning booster. Remember that child seats and
belt-positioning boosters vary and may be designed to fit children of
different heights, ages and weights. Children who are too large for child
safety seats or belt-positioning boosters (as specified by your child safety
seat manufacturer) should always properly wear safety belts.
SAFETY SEATS FOR CHILDREN
Infant and/or toddler seats
Use a safety seat that is recommended for the size and weight of the
child.
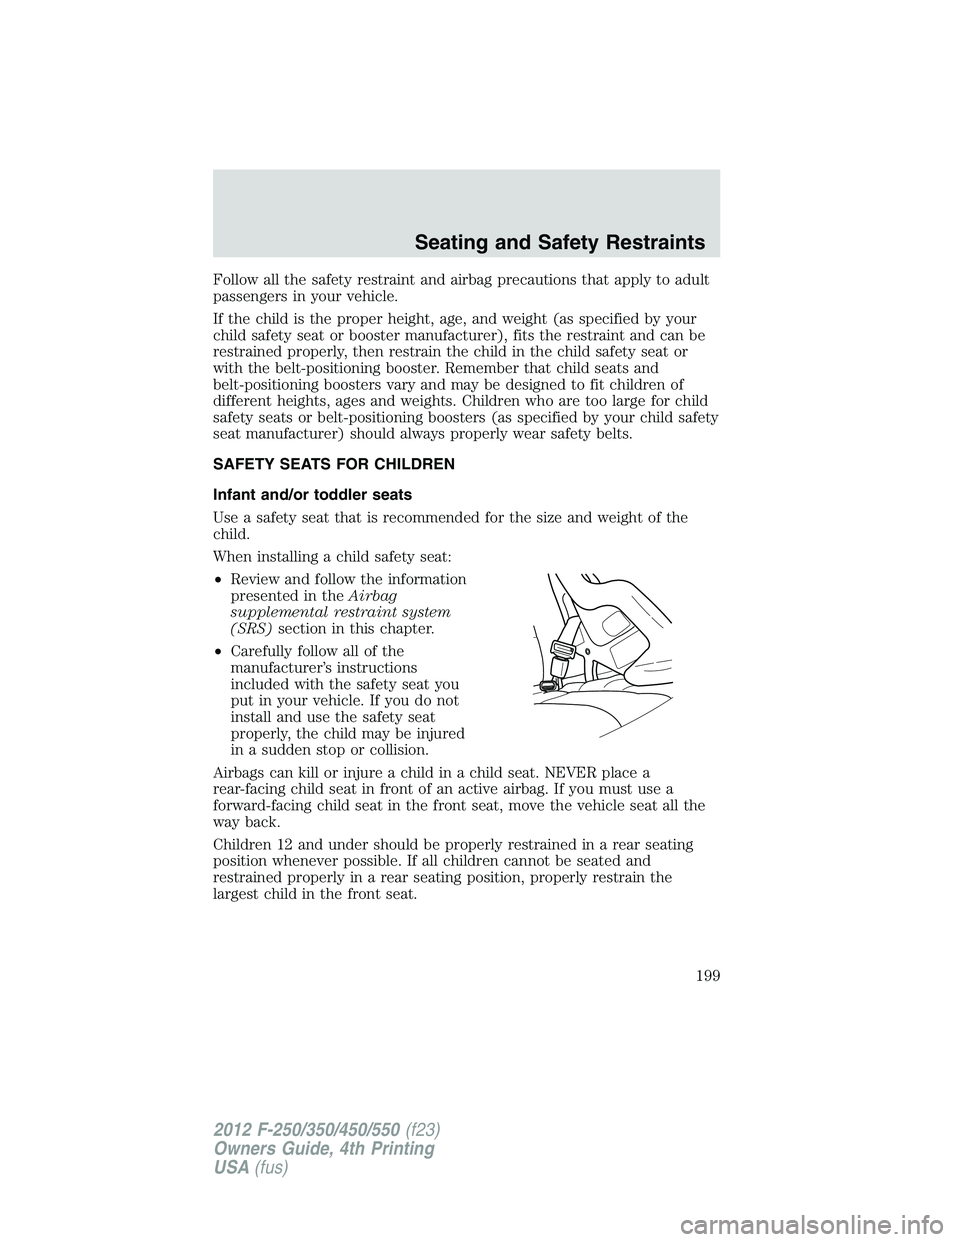
When installing a child safety seat:
•Review and follow the information
presented in theAirbag
supplemental restraint system
(SRS)section in this chapter.
•Carefully follow all of the
manufacturer’s instructions
included with the safety seat you
put in your vehicle. If you do not
install and use the safety seat
properly, the child may be injured
in a sudden stop or collision.
Airbags can kill or injure a child in a child seat. NEVER place a
rear-facing child seat in front of an active airbag. If you must use a
forward-facing child seat in the front seat, move the vehicle seat all the
way back.
Children 12 and under should be properly restrained in a rear seating
position whenever possible. If all children cannot be seated and
restrained properly in a rear seating position, properly restrain the
largest child in the front seat.
Seating and Safety Restraints
199
2012 F-250/350/450/550(f23)
Owners Guide, 4th Printing
USA(fus)
Page 201 of 448
Installing the child safety seat
Perform the following steps when installing the child seat in the
outboard combination lap/shoulder belts:
Note:Although the child seat illustrated is a forward facing child seat,
the steps are the same for installing a rear facing child seat.
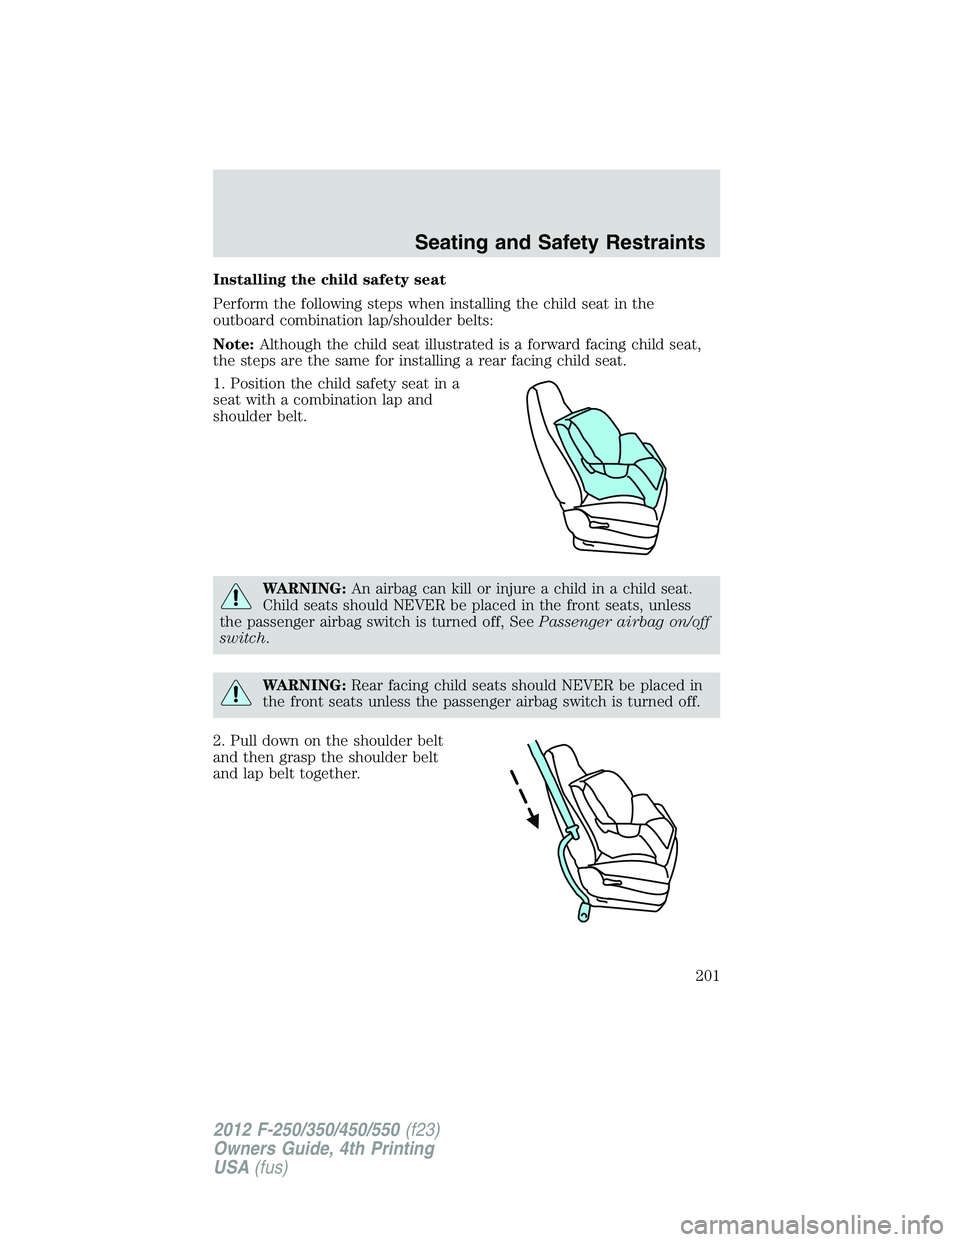
1. Position the child safety seat in a
seat with a combination lap and
shoulder belt.
WARNING:An airbag can kill or injure a child in a child seat.
Child seats should NEVER be placed in the front seats, unless
the passenger airbag switch is turned off, SeePassenger airbag on/off
switch.
WARNING:Rear facing child seats should NEVER be placed in
the front seats unless the passenger airbag switch is turned off.
2. Pull down on the shoulder belt
and then grasp the shoulder belt
and lap belt together.
Seating and Safety Restraints
201
2012 F-250/350/450/550(f23)
Owners Guide, 4th Printing
USA(fus)
Page 204 of 448
Installing child safety seats in cinch tongue combination lap and
shoulder belt seating positions (All front center and Super/Crew
cab rear center positions)
The belt webbing below the tongue is the lap portion of the combination
lap/shoulder belt, and the belt webbing above the tongue is the shoulder
belt portion of the combination lap/shoulder belt.
WARNING:Always use both lap and shoulder safety belt in the
Regular Cab center seating position if applicable.
Note:Although the child seat illustrated is a forward facing child seat,
the steps are the same for installing a rear facing child seat.
1. Position the child safety seat in
the center seat.
WARNING:Airbags can kill or injure a child in a child seat. If
you must use a forward-facing child seat in the front seat, move
seat all the way back.
WARNING:Rear facing child seats should NEVER be placed in
front of an active airbag.
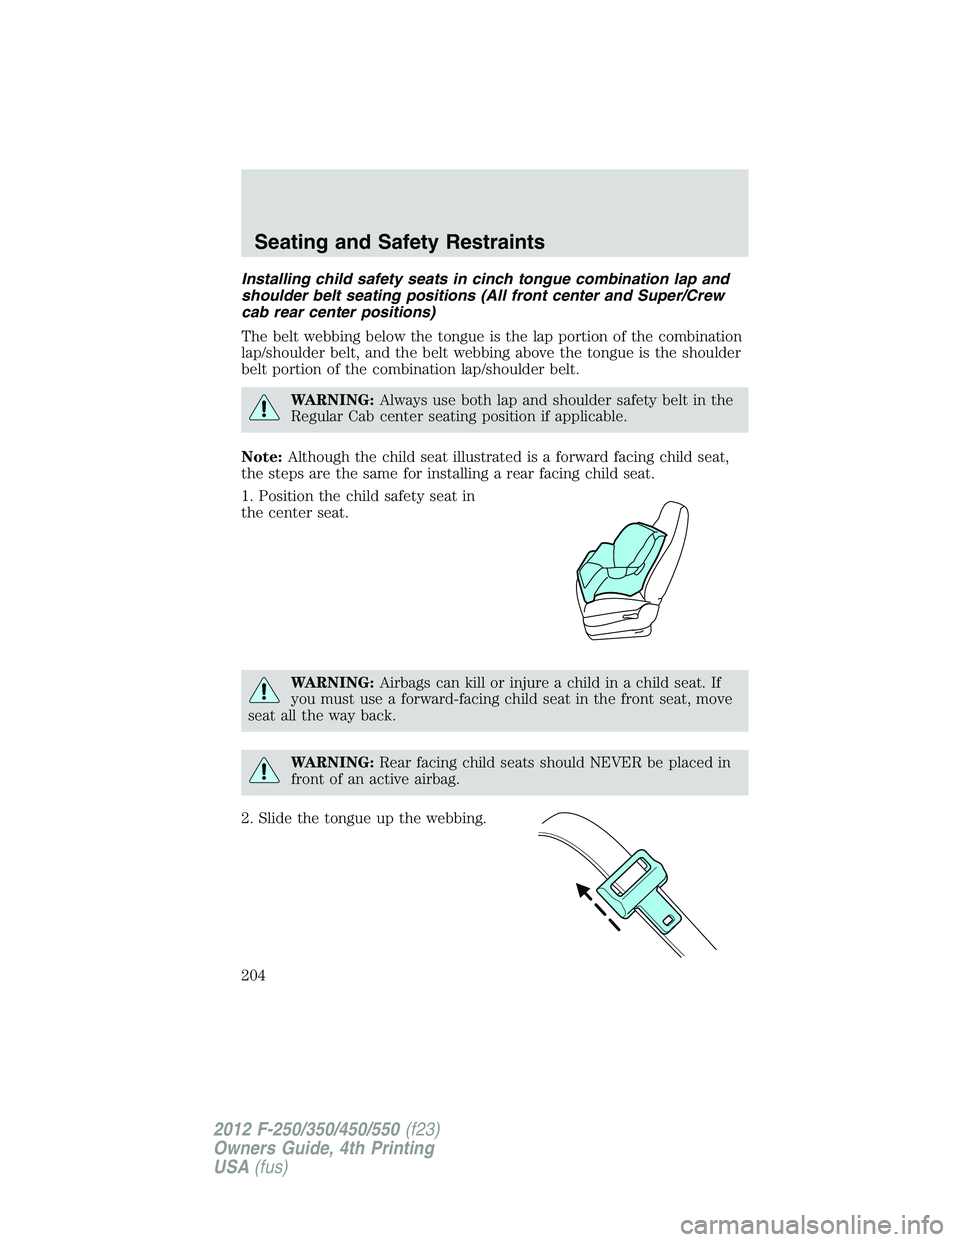
2. Slide the tongue up the webbing.
Seating and Safety Restraints
204
2012 F-250/350/450/550(f23)
Owners Guide, 4th Printing
USA(fus)
Page 316 of 448
SNOWPLOWING
Ford recommends that the Super Duty F-Series used for snow removal
include the Snow Plow Package Option.
Installing the snowplow
Weight limits and guidelines for selecting and installing the snowplow can
be found in theFord Truck Body Builders Layout Book,Snowplow
section, found at www.fleet.ford.com/truckbbas. A typical installation
affects the following:
•Certification to government safety laws such as occupant protection
and airbag deployment, braking, and lighting. Look for an “Alterer’s
Label” on the vehicle from the snowplow installer certifying that the
installation meets all applicable Federal Motor Vehicle Safety
Standards (FMVSS).
•The Total Accessory Reserve Capacity (TARC) is shown on the lower
right side of the vehicle’s Safety Compliance Certification Label. This
applies to Ford-completed vehicles of 10,000 lb. (4,536 kg) GVWR or
less. This is the weight of permanently-attached auxiliary equipment,
such as snowplow frame-mounting hardware, that can be added to the
vehicle and satisfy Ford compliance certification to FMVSS. Exceeding
this weight may require the auxiliary equipment installer additional
safety certification responsibility. The Front Accessory Reserve
Capacity (FARC) is added for customer convenience.
•Rear ballast weight behind the rear axle may be required to prevent
exceeding the FGAWR, and provide front-to-rear weight balance for
proper braking and steering.
•Front wheel toe may require re-adjustment to prevent premature
uneven tire wear. Specifications are found in the FordWorkshop
Manual.
•Headlight aim may require re-adjustment.
•The tire air pressures recommended for general driving are found on
the vehicle’s Safety Certification Label. The maximum cold inflation
pressure for the tire and associated load rating is imprinted on the tire
sidewall. Tire air pressure may require re-adjustment within these
pressure limits to accommodate the additional weight of the snowplow
installation.
•Federal and some local regulations require additional exterior lamps
for snowplow-equipped vehicles. Consult your authorized dealer for
additional information.
Driving
316
2012 F-250/350/450/550(f23)
Owners Guide, 4th Printing
USA(fus)
Page 317 of 448

Operating the vehicle with the snowplow attached
Do not use your vehicle for snow removal until it has been driven at
least 500 miles (800 km).
The attached snowplow blade restricts airflow to the radiator, and may
cause the engine to run at a higher temperature: Attention to engine
temperature is especially important when outside temperatures are
above freezing. Angle the blade to maximize airflow to the radiator and
monitor engine temperature to determine whether a left or right angle
provides the best performance.
Follow the severe duty schedule in yourscheduled maintenance
informationfor engine oil and transmission fluid change intervals.
Snowplowing with your airbag-equipped vehicle
Your vehicle is equipped with a driver and passenger airbag
Supplemental Restraint System (SRS) The SRS is designed to activate in
certain frontal and offset frontal collisions when the vehicle sustains
sufficient longitudinal deceleration.
Careless or high speed driving while plowing snow which results in
sufficient vehicle decelerations can deploy the airbag. Such driving also
increases the risk of accidents.
WARNING:All occupants of the vehicle, including the driver,
should always properly wear their safety belts, even when an air
bag supplemental restraint system (SRS) is provided.
Never remove or defeat the “tripping mechanisms” designed into the
snow removal equipment by its manufacturer. Doing so may cause
damage to the vehicle and the snow removal equipment as well as
possible airbag deployment.
WARNING:Do not attempt to service, repair, or modify the air
bag supplemental restraint system (SRS) or its fuses. See your
Ford or Lincoln Mercury dealer.
WARNING:Additional equipment such as snowplow equipment
may effect the performance of the airbag sensors increasing the
risk of injury. Please refer to theBody Builders Layout Bookfor
instructions about the appropriate installation of additional equipment.
Driving
317
2012 F-250/350/450/550(f23)
Owners Guide, 4th Printing
USA(fus)
Page 326 of 448

Fuse/Relay
LocationFuse Amp
RatingProtected Circuits
31 5A Trailer brake controller (brake
signal), Customer access
32 15A Moon roof, Telescoping mirror
switch, Auto dimming mirrors,
Power invertor, Driver and
passenger door lock switch
illumination
33 10A Restraint control module
34 10A Not used (spare)
35 5A Select shift switch, Reverse park
aid module, Trailer brake control
module
36 10A Fuel tank select switch
37 10A PTC heater
38 10A Radio faceplate
39 15A High beam headlamps
40 10A Parking lamps (in mirrors), Roof
marker lamps
41 7.5A Passenger airbag deactivation
indicator
42 5A Not used (spare)
43 10A Wiper relay
44 10A Upfitter switches
45 5A Not used (spare)
46 10A Climate control
47 15A Fog lamps, Fog lamp indicator (in
switch)
48 30A Circuit
BreakerPower windows switch, Power
rear sliding window switch
49 Relay Delayed accessory
Roadside Emergencies
326
2012 F-250/350/450/550(f23)
Owners Guide, 4th Printing
USA(fus)
Page 365 of 448
helps to remove the hot wax deposited on the wiper blade and
windshield from automated car wash facilities. Be sure to replace
wiper blades when they appear worn or do not function properly.
•Do not use abrasives, as they may cause scratches.
•Do not use fuel, kerosene, or paint thinner to clean any parts.
INSTRUMENT PANEL/INTERIOR TRIM AND CLUSTER LENS
(EXCEPT HARLEY-DAVIDSON)
Clean the instrument panel, interior trim areas and cluster lens with a
clean and damp, white cotton cloth, then with a clean and dry, white
cotton cloth.
•Avoid cleaners or polishes that increase the gloss of the upper portion
of the instrument panel. The dull finish in this area helps protect the
driver from undesirable windshield reflection.
•Be certain to wash or wipe your hands clean if you have been in
contact with certain products such as insect repellent and suntan
lotion in order to avoid possible damage to the interior painted
surfaces.
•Do not use household or glass cleaners as these may damage the
finish of the instrument panel, interior trim and cluster lens.
•Do not allow air fresheners and hand sanitizers to spill on interior
surfaces. If a spill occurs,wipe off immediately. Damage may not be
covered by your warranty.
WARNING:Do not use chemical solvents or strong detergents
when cleaning the steering wheel or instrument panel to avoid
contamination of the airbag system.
If a staining liquid like coffee/juice has been spilled on the instrument
panel or on interior trim surfaces, clean as follows:
1. Wipe up spilled liquid using a clean white cotton cloth.
2. Wipe the surface with a damp, clean, white cotton cloth. For more
thorough cleaning, use a mild soap and water solution. If the spot cannot
be completely cleaned by this method, the area may be cleaned using a
commercially available cleaning product designed for automotive
interiors.
3. If necessary, apply more soap and water solution or cleaning product
to a clean, white, cotton cloth and press the cloth onto the soiled
area–allow this to set at room temperature for 30 minutes.
Cleaning
365
2012 F-250/350/450/550(f23)
Owners Guide, 4th Printing
USA(fus)