Page 298 of 448

Keep the RSS sensors (located on the rear bumper/fascia) free
from snow, ice and large accumulations of dirt (do not clean the
sensors with sharp objects). If the sensors are covered, it will
affect the accuracy of the RSS.
If your vehicle sustains damage to the rear bumper/fascia, leaving
it misaligned or bent, the sensing zone may be altered causing
inaccurate measurement of obstacles or false alarms.
REARVIEW CAMERA SYSTEM (IF EQUIPPED)
The rearview camera system,
located on the tailgate, provides a
video image, which appears in the
rearview mirror or on the navigation
screen (if equipped), of the area
behind the vehicle. It adds
assistance to the driver while
reversing or reverse parking the
vehicle.
To use the camera system, place the transmission in R (Reverse); an
image will display on the left portion of the rearview mirror or on the
navigation screen (if equipped). The area displayed on the screen may
vary according to the vehicle orientation and/or road condition.
Driving
298
2012 F-250/350/450/550(f23)
Owners Guide, 4th Printing
USA(fus)
Page 299 of 448

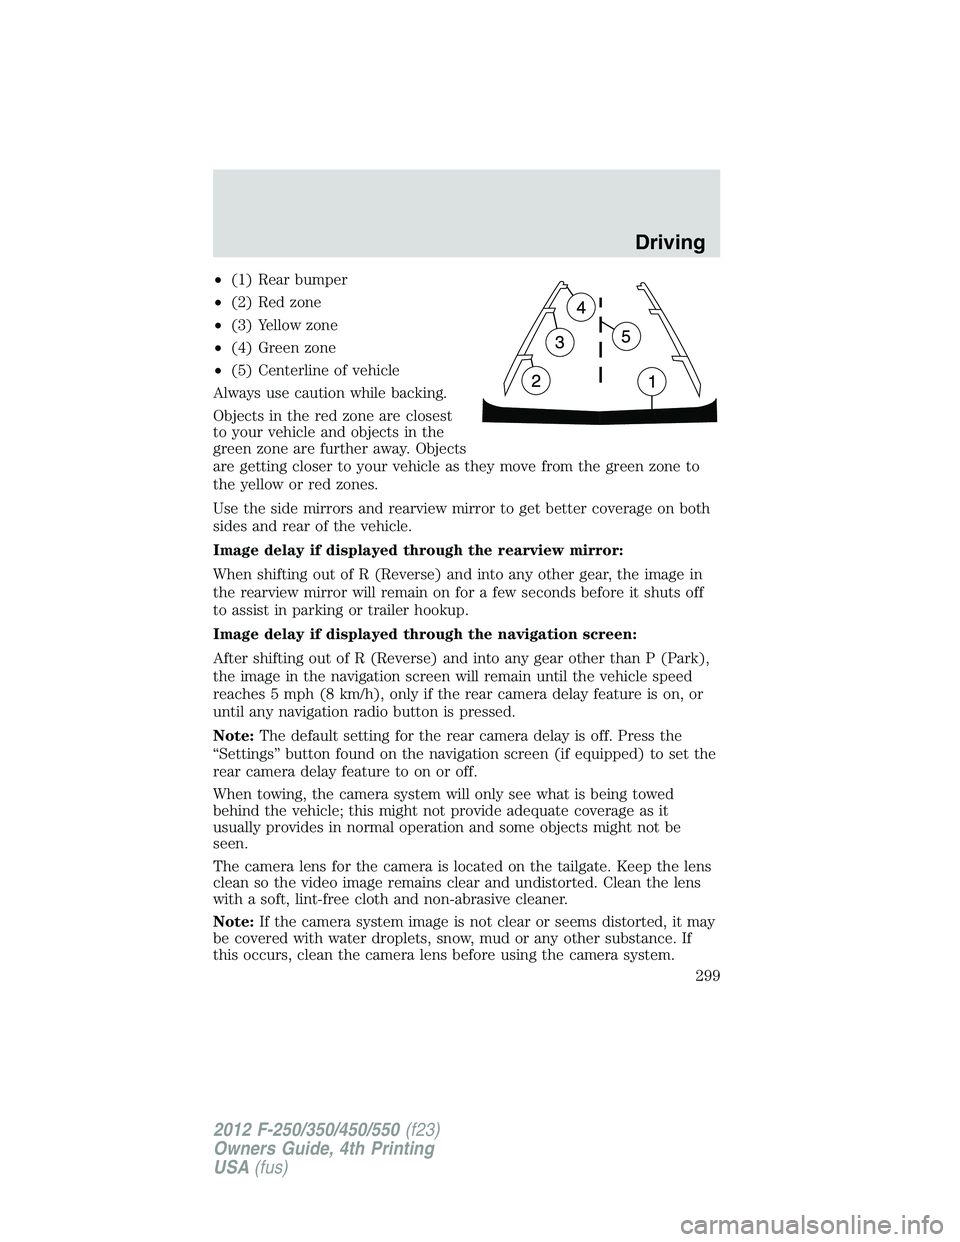
•(1) Rear bumper
•(2) Red zone
•(3) Yellow zone
•(4) Green zone
•(5) Centerline of vehicle
Always use caution while backing.
Objects in the red zone are closest
to your vehicle and objects in the
green zone are further away. Objects
are getting closer to your vehicle as they move from the green zone to
the yellow or red zones.
Use the side mirrors and rearview mirror to get better coverage on both
sides and rear of the vehicle.
Image delay if displayed through the rearview mirror:
When shifting out of R (Reverse) and into any other gear, the image in
the rearview mirror will remain on for a few seconds before it shuts off
to assist in parking or trailer hookup.
Image delay if displayed through the navigation screen:
After shifting out of R (Reverse) and into any gear other than P (Park),
the image in the navigation screen will remain until the vehicle speed
reaches 5 mph (8 km/h), only if the rear camera delay feature is on, or
until any navigation radio button is pressed.
Note:The default setting for the rear camera delay is off. Press the
“Settings” button found on the navigation screen (if equipped) to set the
rear camera delay feature to on or off.
When towing, the camera system will only see what is being towed
behind the vehicle; this might not provide adequate coverage as it
usually provides in normal operation and some objects might not be
seen.
The camera lens for the camera is located on the tailgate. Keep the lens
clean so the video image remains clear and undistorted. Clean the lens
with a soft, lint-free cloth and non-abrasive cleaner.
Note:If the camera system image is not clear or seems distorted, it may
be covered with water droplets, snow, mud or any other substance. If
this occurs, clean the camera lens before using the camera system.
Driving
299
2012 F-250/350/450/550(f23)
Owners Guide, 4th Printing
USA(fus)
Page 300 of 448

WARNING:The camera system is a reverse aid supplement
device that still requires the driver to use it in conjunction with
the rear view mirror and the side mirrors for maximum coverage.
WARNING:Objects that are close to either corner of the
bumper or under the bumper, might not be seen on the screen
due to the limited coverage of the camera system.
WARNING:Back up as slow as possible since higher speeds
might limit your reaction time to stop the vehicle.
WARNING:Do not use the camera system with the tailgate
open.
If the back end of the vehicle is hit or damaged, then check with your
authorized dealer to have your rearview camera system checked for
proper coverage and operation.
Night time and dark area use
At night time or in dark areas, the camera system relies on the reverse
lamp lighting to produce an image. Therefore it is necessary that both
reverse lamps are operating in order to get a clear image in the dark. If
either of the lamps are not operating, stop using the camera system, at
least in the dark, until the lamp(s) are replaced and functioning.
Servicing
•If the image comes on while the vehicle is not in R (Reverse), have
the system inspected by your authorized dealer.
•If the image is not clear, then check if there is anything covering the
lens such as dirt, mud, ice, snow, etc. If the image is still not clear
after cleaning, have your system inspected by your authorized dealer.
Driving
300
2012 F-250/350/450/550(f23)
Owners Guide, 4th Printing
USA(fus)
Page 324 of 448
The fuses are coded as follows.
Fuse/Relay
LocationFuse Amp
RatingProtected Circuits
1 30A Not used (spare)
2 15A Upfitter relay #4
3 30A Not used (spare)
4 10A Interior lights, Hood lamp
5 20A Moon roof
6 5A Driver seat module
7 7.5A Driver seat switch, Driver lumbar
motor
8 10A Power mirror switch
9 10A Upfitter relay #3
10 10A Run/accessory relay, Customer
access feed
11 10A Instrument cluster
1
2
3
4
5
6
7
8
9
10
11
12
13
14
15
16
17
18
19
20
21
223341
42
43
44
45
34
35
36
37
23
24
25
26
27
283846
394729
32
40
31
30
48
49
Roadside Emergencies
324
2012 F-250/350/450/550(f23)
Owners Guide, 4th Printing
USA(fus)
Page 325 of 448

Fuse/Relay
LocationFuse Amp
RatingProtected Circuits
12 15A Interior lighting, Lighted running
board lamps
13 15A Right turn signals and brake
lamps, Right trailer tow (TT) stop
turn relay
14 15A Left turn signals and brake lamps,
Left TT stop turn relay
15 15A High-mounted stop lamps, Backup
lamps, TT backup relay
16 10A Right low beam headlamp
17 10A Left low beam headlamp
18 10A Keypad illumination, Passive
anti-theft indicator (PATS),
Powertrain control module
(PCM), Brake shift interlock
19 20A Subwoofer
20 20A Power door locks
21 10A Brake on/off switch
22 20A Horn
23 15A Not used (spare)
24 15A Steering wheel control module,
Diagnostic connector, Power fold
mirror relay, Remote keyless entry
25 15A Not used (spare)
26 5A Steering wheel control module
27 20A Amplifier
28 15A Ignition switch
29 20A SYNC�, GPS module, Radio
faceplate
30 15A Parking lamp relay, TT parking
lamp relay
Roadside Emergencies
325
2012 F-250/350/450/550(f23)
Owners Guide, 4th Printing
USA(fus)
Page 326 of 448
Fuse/Relay
LocationFuse Amp
RatingProtected Circuits
31 5A Trailer brake controller (brake
signal), Customer access
32 15A Moon roof, Telescoping mirror
switch, Auto dimming mirrors,
Power invertor, Driver and
passenger door lock switch
illumination
33 10A Restraint control module
34 10A Not used (spare)
35 5A Select shift switch, Reverse park
aid module, Trailer brake control
module
36 10A Fuel tank select switch
37 10A PTC heater
38 10A Radio faceplate
39 15A High beam headlamps
40 10A Parking lamps (in mirrors), Roof
marker lamps
41 7.5A Passenger airbag deactivation
indicator
42 5A Not used (spare)
43 10A Wiper relay
44 10A Upfitter switches
45 5A Not used (spare)
46 10A Climate control
47 15A Fog lamps, Fog lamp indicator (in
switch)
48 30A Circuit
BreakerPower windows switch, Power
rear sliding window switch
49 Relay Delayed accessory
Roadside Emergencies
326
2012 F-250/350/450/550(f23)
Owners Guide, 4th Printing
USA(fus)
Page 328 of 448
Fuse/Relay
LocationFuse Amp
RatingProtected Circuits
10 — Not used
11 — Not used
12 — Not used
13 — Not used
14 — Not used
15 Diode Fuel pump (diesel engine)
16 — Not used
17 15A** Heated mirror
18 — Not used
19 — Not used
20 — Not used
21 — Not used
22 30A* Trailer tow electric brake
23 40A* Blower motor
24 — Not used
25 30A* Wipers
26 30A* Trailer tow park lamps
27 25A* Urea heaters (diesel engine)
28 — Buss bar
29 Relay Trailer tow park lamps
30 Relay A/C clutch
31 Relay Wipers
32 — Not used
33 15A** Vehicle power (VPWR) 1
34 15A** VPWR 2 (diesel engine)
20A** VPWR 2 (gas engine)
35 10A** VPWR 3
36 15A** VPWR 4 (diesel engine)
20A** VPWR 4 (gas engine)
37 10A** VPWR 5 (diesel engine)
Roadside Emergencies
328
2012 F-250/350/450/550(f23)
Owners Guide, 4th Printing
USA(fus)
Page 362 of 448

WAXING
•Wash the vehicle first.
•Use a quality wax that does not contain abrasives.
•Do not allow paint sealant to come in contact with any non-body
(low-gloss black) colored trim, such as grained door handles, roof
racks, bumpers, side moldings, mirror housings or the windshield cowl
area. The paint sealant will “gray” or stain the parts over time.
PAINT CHIPS
Your authorized dealer has touch-up paint to match your vehicle’s color.
Take your color code (printed on a sticker in the driver’s door jamb) to
your authorized dealer to ensure you get the correct color.
•Remove particles such as bird droppings, tree sap, insect deposits, tar
spots, road salt and industrial fallout before repairing paint chips.
•Always read the instructions before using the products.
ALUMINUM WHEELS AND WHEEL COVERS
Aluminum wheels and wheel covers are coated with a clear coat paint
finish. In order to maintain their shine:
•Clean weekly with Motorcraft�Wheel and Tire Cleaner, which is
available from your authorized dealer. Heavy dirt and brake dust
accumulation may require agitation with a sponge. Rinse thoroughly
with a strong stream of water.
•Never apply any cleaning chemical to hot or warm wheel rims or
covers.
•Some automatic car washes may cause damage to the finish on your
wheel rims or covers. Industrial-strength (heavy-duty) cleaners, or
cleaning chemicals, in combination with brush agitation to remove
brake dust and dirt, could wear away the clear coat finish over time.
•Do not use hydrofluoric acid-based or high caustic-based wheel
cleaners, steel wool, fuels or strong household detergent.
•To remove tar and grease, use Motorcraft�Bug and Tar Remover ,
available from your authorized dealer.
Cleaning
362
2012 F-250/350/450/550(f23)
Owners Guide, 4th Printing
USA(fus)