2012 FORD F150 ignition
[x] Cancel search: ignitionPage 321 of 462

Emergency maneuvers
•In an unavoidable emergency situation where a sudden sharp turn
must be made, remember to avoid “over-driving” your vehicle, i.e.,
turn the steering wheel only as rapidly and as far as required to avoid
the emergency. Excessive steering will result in less vehicle control,
not more. Additionally, smooth variations of the accelerator and/or
brake pedal pressure should be utilized if changes in vehicle speed are
called for. Avoid abrupt steering, acceleration or braking which could
result in an increased risk of loss of vehicle control, vehicle rollover
and/or personal injury. Use all available road surface to return the
vehicle to a safe direction of travel.
•In the event of an emergency stop, avoid skidding the tires and do not
attempt any sharp steering wheel movements.
•If the vehicle goes from one type of surface to another (i.e., from
concrete to gravel) there will be a change in the way the vehicle
responds to a maneuver (steering, acceleration or braking). Again,
avoid these abrupt inputs.
Parking
On some 4WD vehicles, when the transfer case is in the N (Neutral)
position, the engine and transmission are disconnected from the rest of
the driveline. Therefore, the vehicle is free to roll even if the automatic
transmission is in P (Park) or the manual transmission is in gear. Do not
leave the vehicle unattended with the transfer case in the N (Neutral)
position. Always set the parking brake fully and turn off the ignition
when leaving the vehicle.
WARNING:Always set the parking brake fully and make sure
the gearshift is latched in P (Park). Turn the ignition to the off
position and remove the key whenever you leave your vehicle.
WARNING:If the parking brake is fully released, but the brake
warning lamp remains illuminated, the brakes may not be
working properly. See your authorized dealer.
4WD systems
4WD (when you select a 4WD mode) uses all four wheels to power the
vehicle. This increases traction, enabling you to drive over terrain and
road conditions that a conventional two-wheel drive vehicle cannot.
Power is supplied to all four wheels through a transfer case. On 4WD
vehicles, the transfer case allows you to select 4WD when necessary.
Driving
321
2012 F-150(f12)
Owners Guide, 1st Printing
USA(fus)
Page 322 of 462

Information on transfer case operation and shifting procedures can be
found in this chapter. Information on transfer case maintenance can be
found in theMaintenance and Specificationschapter. You should
become thoroughly familiar with this information before you operate
your vehicle.
Normal characteristics
On some 4WD models, the initial shift from two-wheel drive to 4x4 while
the vehicle is moving can cause some momentary clunk and ratcheting
sounds. This is the front drivetrain coming up to speed and the
automatic locking hubs engaging and is not cause for concern.
Sand
When driving over sand, try to keep all four wheels on the most solid
area of the trail. Avoid reducing the tire pressures but shift to a lower
gear and drive steadily through the terrain. Apply the accelerator slowly
and avoid spinning the wheels.
Avoid excessive speed because vehicle momentum can work against you
and cause the vehicle to become stuck to the point that assistance may
be required from another vehicle. Remember, you may be able to back
out the way you came if you proceed with caution.
Mud and water
If you must drive through high
water, drive slowly. Traction or
brake capability may be limited.
When driving through water,
determine the depth; avoid water
higher than the bottom of the hubs
(if possible) and proceed slowly. If
the ignition system gets wet, the
vehicle may stall.
Once through water, always try the brakes. Wet brakes do not stop the
vehicle as effectively as dry brakes. Drying can be improved by moving
your vehicle slowly while applying light pressure on the brake pedal.
Be cautious of sudden changes in vehicle speed or direction when you
are driving in mud. Even 4WD vehicles can lose traction in slick mud. As
when you are driving over sand, apply the accelerator slowly and avoid
spinning your wheels. If the vehicle does slide, steer in the direction of
the slide until you regain control of the vehicle.
If the transmission, transfer case or front axle are submerged in water,
their fluids should be checked and changed, if necessary.
Driving
322
2012 F-150(f12)
Owners Guide, 1st Printing
USA(fus)
Page 327 of 462

Vehicles sold in the U.S. : Using roadside assistance
Complete the roadside assistance identification card and place it in your
wallet for quick reference. This card is found in the Owner’s Guide
portfolio in the glove compartment.
U.S. Ford vehicle customers who require Roadside Assistance, call
1-800-241-3673.
If you need to arrange roadside assistance for yourself, Ford Motor
Company will reimburse a reasonable amount for towing to the nearest
dealership within 35 miles (56 km). To obtain reimbursement
information, U.S. Ford vehicle customers call 1-800-241-3673. Customers
will be asked to submit their original receipts.
Vehicles sold in Canada : Getting roadside assistance
Canadian customers who require roadside assistance, call 1–800–665–2006.
Vehicles sold in Canada : Using roadside assistance
Complete the roadside assistance identification card and place it in your
wallet for quick reference. In Canada, the card is found in the Warranty
Guide in the glove box.
Canadian Roadside coverage and benefits may differ from the U.S.
coverage. Please refer to your Warranty Guide or visit our website at
www.ford.ca for information on Canadian services and benefits.
Canadian customers who need to obtain roadside information, call
1-800-665-2006 or visit our website at www.ford.ca.
HAZARD FLASHER CONTROL
The hazard flasher control is located
on the instrument panel by the
radio. The hazard flashers will
operate when the ignition is in any
position or if the key is not in the
ignition.
•Press the flasher control and all front and rear direction signals will
flash.
•Press the flasher control again to turn them off.
Use it when your vehicle is disabled and is creating a safety hazard for
other motorists.
Note:With extended use, the flasher may run down your battery.
Roadside Emergencies
327
2012 F-150(f12)
Owners Guide, 1st Printing
USA(fus)
Page 328 of 462

FUEL PUMP SHUT-OFF
In the event of a moderate to severe collision, this vehicle is equipped
with a fuel pump shut-off feature that stops the flow of fuel to the
engine. Not every impact will cause a shut-off.
Should your vehicle shut off after a collision due to this feature, you may
restart your vehicle by doing the following:
1. Turn the ignition switch to the off position.
2. Turn the ignition switch to the on position.
In some instances the vehicle may not restart the first time you try to
restart and may take one additional attempt.
WARNING:Failure to inspect and if necessary repair fuel leaks
after a collision may increase the risk of fire and serious injury.
Ford Motor Company recommends that the fuel system be inspected
by an authorized dealer after any collision.
FUSES AND RELAYS
Fuses
If electrical components in the
vehicle are not working, a fuse may
have blown. Blown fuses are
identified by a broken wire within
the fuse. Check the appropriate
fuses before replacing any electrical
components.
Note:Always replace a fuse with one that has the specified amperage
rating. Using a fuse with a higher amperage rating can cause severe wire
damage and could start a fire.
Standard fuse amperage rating and color
COLOR
Fuse
ratingMini
fusesStandard
fusesMaxi
fusesCartridge
maxi
fusesFuse link
cartridge
2A Grey Grey — — —
3A Violet Violet — — —
4A Pink Pink — — —
15
Roadside Emergencies
328
2012 F-150(f12)
Owners Guide, 1st Printing
USA(fus)
Page 331 of 462

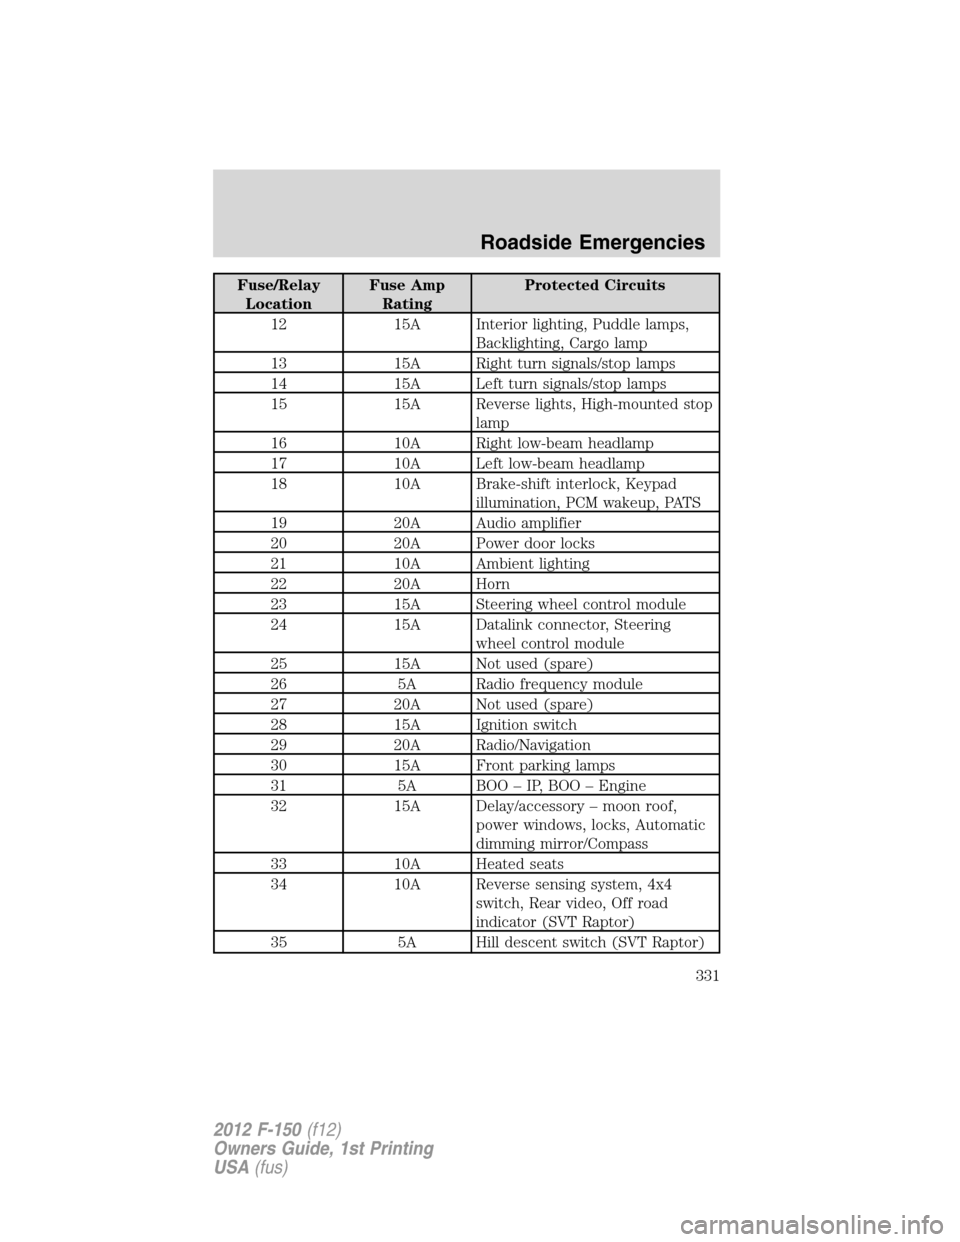
Fuse/Relay
LocationFuse Amp
RatingProtected Circuits
12 15A Interior lighting, Puddle lamps,
Backlighting, Cargo lamp
13 15A Right turn signals/stop lamps
14 15A Left turn signals/stop lamps
15 15A Reverse lights, High-mounted stop
lamp
16 10A Right low-beam headlamp
17 10A Left low-beam headlamp
18 10A Brake-shift interlock, Keypad
illumination, PCM wakeup, PATS
19 20A Audio amplifier
20 20A Power door locks
21 10A Ambient lighting
22 20A Horn
23 15A Steering wheel control module
24 15A Datalink connector, Steering
wheel control module
25 15A Not used (spare)
26 5A Radio frequency module
27 20A Not used (spare)
28 15A Ignition switch
29 20A Radio/Navigation
30 15A Front parking lamps
31 5A BOO – IP, BOO – Engine
32 15A Delay/accessory – moon roof,
power windows, locks, Automatic
dimming mirror/Compass
33 10A Heated seats
34 10A Reverse sensing system, 4x4
switch, Rear video, Off road
indicator (SVT Raptor)
35 5A Hill descent switch (SVT Raptor)
Roadside Emergencies
331
2012 F-150(f12)
Owners Guide, 1st Printing
USA(fus)
Page 337 of 462

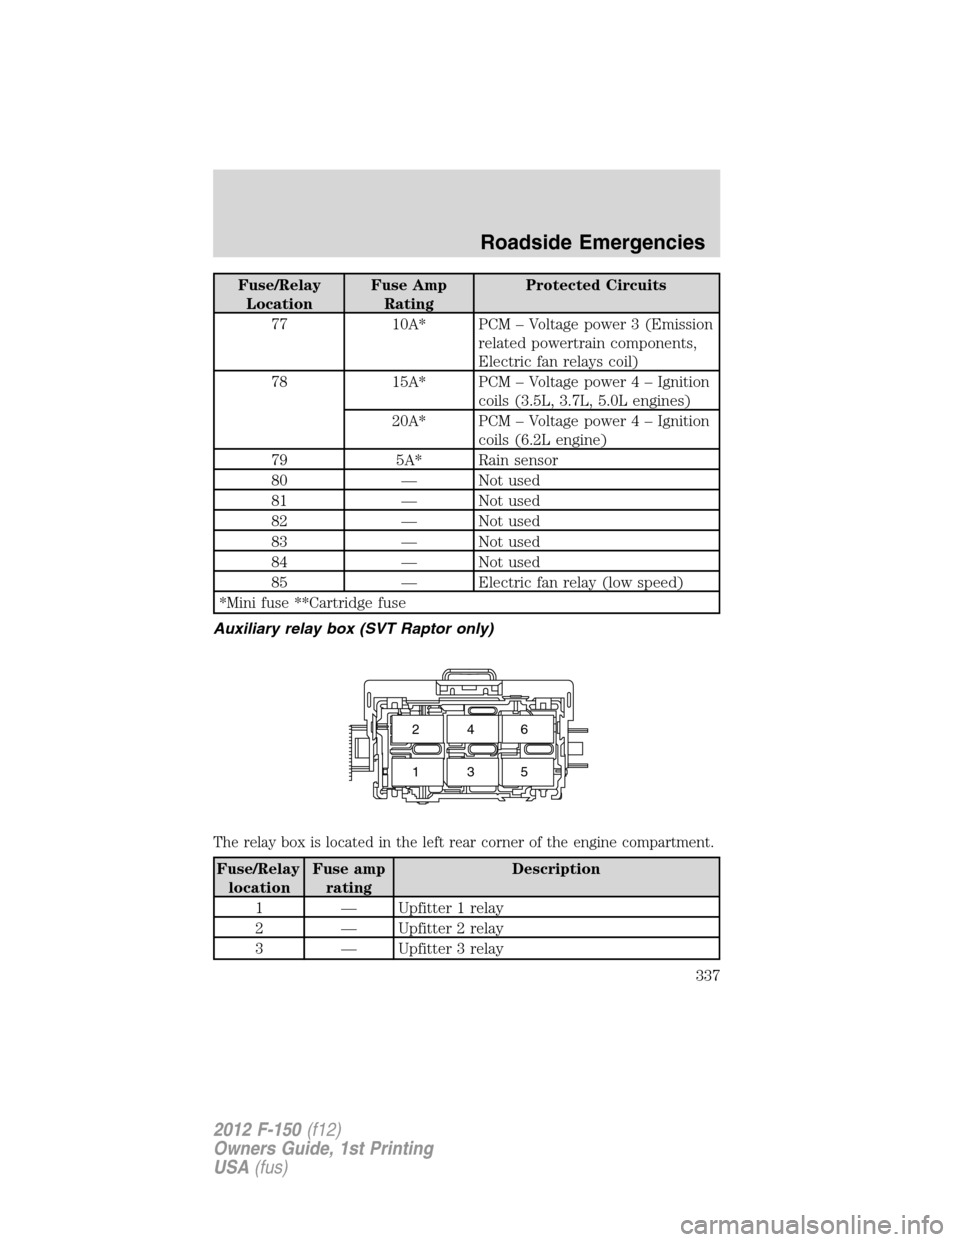
Fuse/Relay
LocationFuse Amp
RatingProtected Circuits
77 10A* PCM – Voltage power 3 (Emission
related powertrain components,
Electric fan relays coil)
78 15A* PCM – Voltage power4–Ignition
coils (3.5L, 3.7L, 5.0L engines)
20A* PCM – Voltage power4–Ignition
coils (6.2L engine)
79 5A* Rain sensor
80 — Not used
81 — Not used
82 — Not used
83 — Not used
84 — Not used
85 — Electric fan relay (low speed)
*Mini fuse **Cartridge fuse
Auxiliary relay box (SVT Raptor only)
The relay box is located in the left rear corner of the engine compartment.
Fuse/Relay
locationFuse amp
ratingDescription
1 — Upfitter 1 relay
2 — Upfitter 2 relay
3 — Upfitter 3 relay
246
135
Roadside Emergencies
337
2012 F-150(f12)
Owners Guide, 1st Printing
USA(fus)
Page 341 of 462

Location of the spare tire and tools
The spare tire is located under the vehicle, just forward of the rear
bumper. The jack, jack handle and lug wrench are located in the
following locations:
Body Style Location
Regular Cab Attached to a floor bracket
behind/under the driver’s seat (for
easier access move the driver seat
forward)
SuperCab Attached to a floor bracket under
the rear seat on the driver’s side
SuperCrew In a plastic box in the floor under
the rear seat
To remove the jack on Regular Cab and SuperCab models:
Remove the wing nut and turn the jack screw counterclockwise to
release pressure before removing the jack from the bracket.
To remove the jack on SuperCrew models:
1. Lift both rear seat cushions.
2. Remove the insert containing the Easy Fuel ™ funnel from the driver’s
side.
3. Remove the two small wing nuts on the passenger side.
4. Slide the plastic box toward the driver’s side and remove.
Removing the spare tire
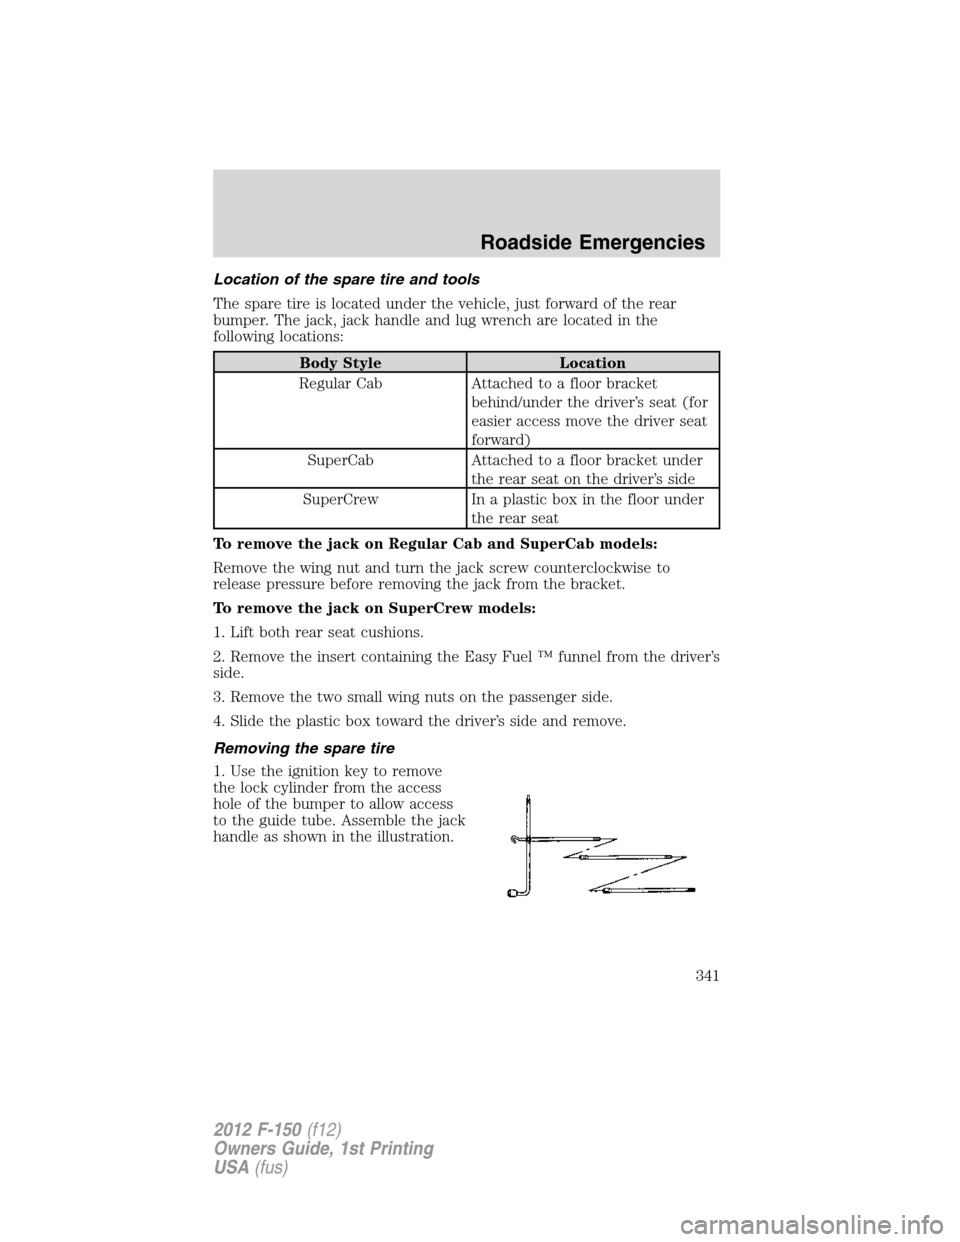
1. Use the ignition key to remove
the lock cylinder from the access
hole of the bumper to allow access
to the guide tube. Assemble the jack
handle as shown in the illustration.
Roadside Emergencies
341
2012 F-150(f12)
Owners Guide, 1st Printing
USA(fus)
Page 362 of 462

ENGINE
Engines are more efficient when they are clean because grease and dirt
buildup keep the engine warmer than normal. When washing:
•Take care when using a power washer to clean the engine. The
high-pressure fluid could penetrate the sealed parts and cause
damage.
•Do not spray a hot engine with cold water to avoid cracking the
engine block or other engine components.
•Spray Motorcraft Engine Shampoo and Degreaser (ZC-20) on all parts
that require cleaning and pressure rinse clean. In Canada use
Motorcraft Engine Shampoo (CXC-66-A).
•Cover the highlighted areas to prevent water damage when cleaning
the engine.
•Never wash or rinse the engine while it is hot or running; water in the
running engine may cause internal damage.
•Never wash or rinse any ignition coil, spark plug wire or spark plug
well, or the area in and around these locations.
3.7L engine
Cleaning
362
2012 F-150(f12)
Owners Guide, 1st Printing
USA(fus)