Page 47 of 160
calculation would be: 635 kg - (2 x 99 kg) - (12 x 45 kg) = 635 - 198 -
540 = -103 kg. You will need to reduce the load weight by at least
240 lb. (104 kg). If you remove 3-100 lb. (45 kg) cement bags, then
the load calculation would be:
1400 - (2 x 220) - (9 x 100) = 1400 - 440 - 900 = 60 lb. Now you have
the load capacity to transport the cement and your friend home. In
metric units, the calculation would be: 635 kg - (2 x 99 kg) - (9 x
45 kg) = 635 - 198 - 405 = 32 kg.
The above calculations also assume that the loads are positioned in your
vehicle in a manner that does not overload the Front or the Rear Gross
Axle Weight Rating specified for your vehicle on the Safety Compliance
Certification Label found on the edge of the driver’s door.
Special loading instructions for owners of pick-up trucks and
utility-type vehicles
WARNING:For important information regarding safe operation
of this type of vehicle, see thePreparing to drive your vehicle
section in theDrivingchapter of this owner’s guide.
WARNING:Loaded vehicles may handle differently than
unloaded vehicles. Extra precautions, such as slower speeds and
increased stopping distance, should be taken when driving a heavily
loaded vehicle.
Your vehicle can haul more cargo and people than most passenger cars.
Depending upon the type and placement of the load, hauling cargo and
people may raise the center of gravity of the vehicle.
Tires, Wheels and Loading
47
2012 Motorhome(mot)
Supplement, 2nd Printing
USA(fus)
Page 49 of 160
5. Install and adjust the tension in the weight distributing bars so that the
height of the front fender is approximately halfway between H1 and H2.
6. Check that the trailer is level. If not level, adjust the ball height
accordingly and repeat Steps 3–6.
WARNING:Do not adjust a weight-distributing hitch to any
position where the rear bumper of the vehicle is higher than it
was before attaching the trailer. Doing so will defeat the function of
the weight-distributing hitch, which may cause unpredictable handling,
and could result in serious personal injury.
Safety chains
Always connect the trailer’s safety chains to the frame or hook retainers
of the vehicle hitch. To connect the trailer’s safety chains, cross the
chains under the trailer tongue and allow slack for turning corners.
If you use a rental trailer, follow the instructions that the rental agency
gives to you.
Do not attach safety chains to the bumper.
Trailer brakes
Electric brakes and manual, automatic or surge-type brakes are safe if
installed properly and adjusted to the manufacturer’s specifications. The
trailer brakes must meet local and Federal regulations.
WARNING:Do not connect a trailer’s hydraulic brake system
directly to your vehicle’s brake system. Your vehicle may not
have enough braking power and your chances of having a collision
greatly increase.
The towing vehicle braking system is rated for operation at the
GVWR, not the GCWR.
Separate functioning brake systems are required for safe control
of towed vehicles and trailers weighing more than 1,500 lb
(680 kg) when loaded.
Trailer lamps
Trailer lamps are required on most towed vehicles. Make sure all running
lights, brake lights, turn signals and hazard lights are working. Contact
your authorized dealer or trailer rental agency for proper instructions
and equipment for hooking-up trailer lamps.
Tires, Wheels and Loading
49
2012 Motorhome(mot)
Supplement, 2nd Printing
USA(fus)
Page 74 of 160
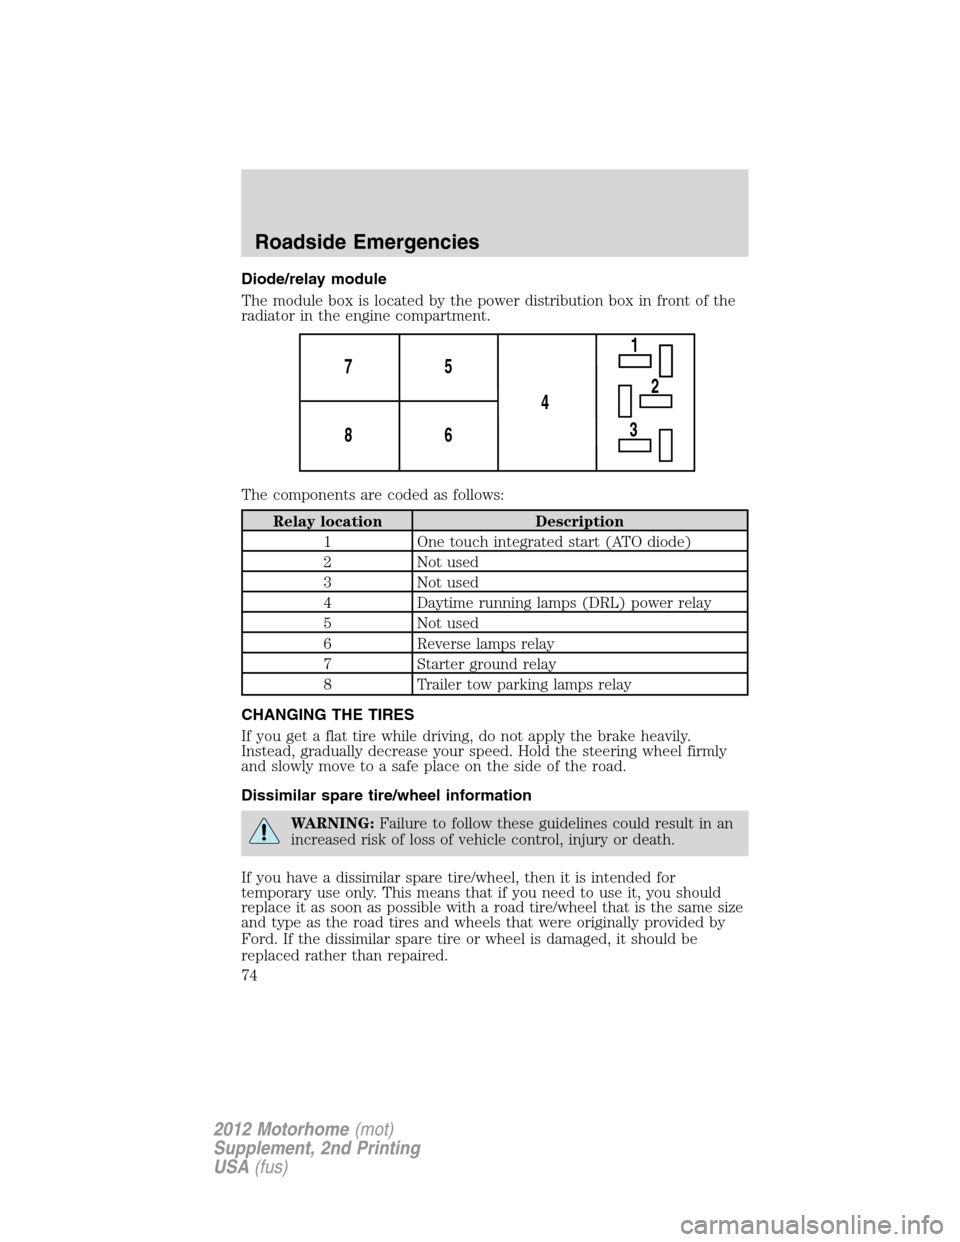
Diode/relay module
The module box is located by the power distribution box in front of the
radiator in the engine compartment.
The components are coded as follows:
Relay location Description
1 One touch integrated start (ATO diode)
2 Not used
3 Not used
4 Daytime running lamps (DRL) power relay
5 Not used
6 Reverse lamps relay
7 Starter ground relay
8 Trailer tow parking lamps relay
CHANGING THE TIRES
If you get a flat tire while driving, do not apply the brake heavily.
Instead, gradually decrease your speed. Hold the steering wheel firmly
and slowly move to a safe place on the side of the road.
Dissimilar spare tire/wheel information
WARNING:Failure to follow these guidelines could result in an
increased risk of loss of vehicle control, injury or death.
If you have a dissimilar spare tire/wheel, then it is intended for
temporary use only. This means that if you need to use it, you should
replace it as soon as possible with a road tire/wheel that is the same size
and type as the road tires and wheels that were originally provided by
Ford. If the dissimilar spare tire or wheel is damaged, it should be
replaced rather than repaired.
1
4 5 7
6 8
2
3
Roadside Emergencies
74
2012 Motorhome(mot)
Supplement, 2nd Printing
USA(fus)
Page 75 of 160
A dissimilar spare tire/wheel is defined as a spare tire and/or wheel that
is different in brand, size or appearance from the road tires and wheels
and can be one of three types:
1.T-type mini-spare:This spare tire begins with the letter “T” for tire
size and may have “Temporary Use Only” molded in the sidewall
2.Full-size dissimilar spare with label on wheel:This spare tire has
a label on the wheel that states: “THIS TIRE AND WHEEL FOR
TEMPORARY USE ONLY”
When driving with one of the dissimilar spare tires listed above,do not:
•Exceed 50 mph (80 km/h)
•Load the vehicle beyond maximum vehicle load rating listed on the
Safety Compliance Label
•Tow a trailer
•Use snow chains on the end of the vehicle with the dissimilar spare
tire
•Use more than one dissimilar spare tire at a time
•Use commercial car washing equipment
•Try to repair the dissimilar spare tire
Use of one of the dissimilar spare tires listed above at any one wheel
location can lead to impairment of the following:
•Handling, stability and braking performance
•Comfort and noise
•Ground clearance and parking at curbs
•Winter weather driving capability
•Wet weather driving capability
•All-wheel driving capability (if applicable)
3.Full-size dissimilar spare without label on wheel
When driving with the full-size dissimilar spare tire/wheel,do not:
•Exceed 70 mph (113 km/h)
•Use more than one dissimilar spare tire/wheel at a time
•Use commercial car washing equipment
•Use snow chains on the end of the vehicle with the dissimilar spare
tire/wheel
Roadside Emergencies
75
2012 Motorhome(mot)
Supplement, 2nd Printing
USA(fus)
Page 113 of 160
•You may want to turn off the speed control in hilly terrain if
unnecessary shifting between the top gears occurs. Unnecessary
shifting of this type could result in reduced fuel economy.
•Warming up a vehicle on cold mornings is not required and may
reduce fuel economy.
•Resting your foot on the brake pedal while driving may reduce fuel
economy.
•Combine errands and minimize stop-and-go driving.
Maintenance
•Keep tires properly inflated and use only recommended size.
•Operating a vehicle with the wheels out of alignment will reduce fuel
economy.
•Use recommended engine oil. Refer toMaintenance product
specifications and capacitiesin this chapter.
•Perform all regularly scheduled maintenance items. Follow the
recommended maintenance schedule and owner maintenance checks
found inscheduled maintenance information.
Conditions
•Heavily loading a vehicle or towing a trailer may reduce fuel economy
at any speed.
•Carrying unnecessary weight may reduce fuel economy (approximately
1 mpg [0.4 km/L] is lost for every 400 lb [180 kg] of weight carried).
•Adding certain accessories to your vehicle (for example bug
deflectors, rollbars/light bars, running boards, ski racks) may reduce
fuel economy.
•Using fuel blended with alcohol may lower fuel economy.
•Fuel economy may decrease with lower temperatures during the first
8–10 miles (12–16 km) of driving.
•Driving on flat terrain offers improved fuel economy as compared to
driving on hilly terrain.
•Transmissions give their best fuel economy when operated in the top
cruise gear and with steady pressure on the gas pedal.
•Close windows for high speed driving.
Maintenance and Specifications
113
2012 Motorhome(mot)
Supplement, 2nd Printing
USA(fus)