2012 FIAT FREEMONT audio
[x] Cancel search: audioPage 156 of 332

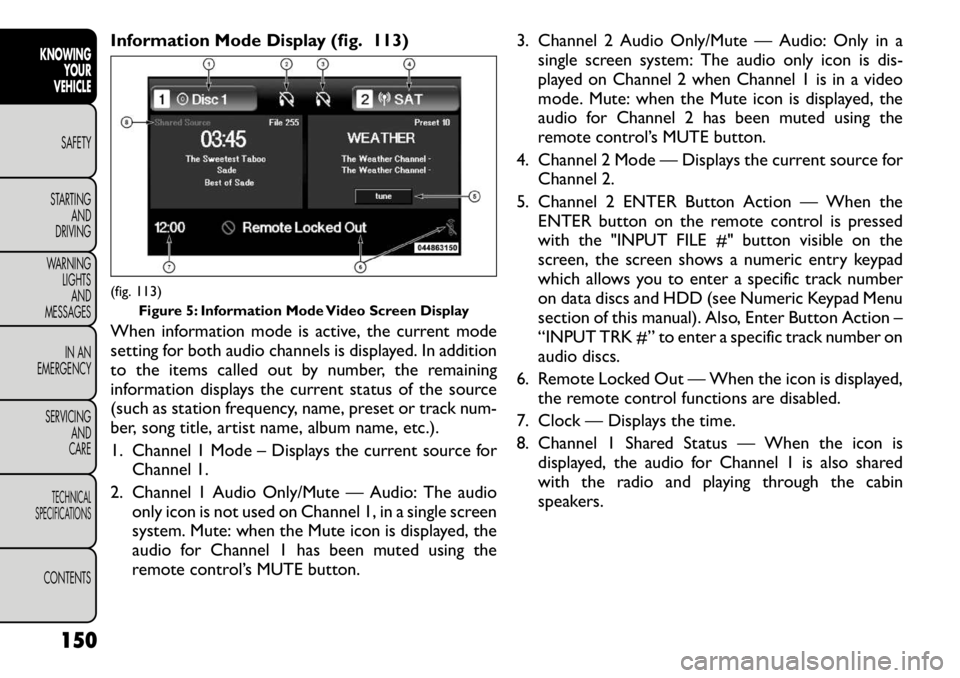
Information Mode Display (fig. 113)
When information mode is active, the current mode
setting for both audio channels is displayed. In addition
to the items called out by number, the remaining
information displays the current status of the source
(such as station frequency, name, preset or track num-
ber, song title, artist name, album name, etc.).
1. Channel 1 Mode – Displays the current source forChannel 1.
2. Channel 1 Audio Only/Mute — Audio: The audio only icon is not used on Channel 1, in a single screen
system. Mute: when the Mute icon is displayed, the
audio for Channel 1 has been muted using the
remote control’s MUTE button. 3. Channel 2 Audio Only/Mute — Audio: Only in a
single screen system: The audio only icon is dis-
played on Channel 2 when Channel 1 is in a video
mode. Mute: when the Mute icon is displayed, the
audio for Channel 2 has been muted using the
remote control’s MUTE button.
4. Channel 2 Mode — Displays the current source for Channel 2.
5. Channel 2 ENTER Button Action — When the ENTER button on the remote control is pressed
with the "INPUT FILE #" button visible on the
screen, the screen shows a numeric entry keypad
which allows you to enter a specific track number
on data discs and HDD (see Numeric Keypad Menu
section of this manual). Also, Enter Button Action –
“INPUT TRK #” to enter a specific track number on
audio discs.
6. Remote Locked Out — When the icon is displayed, the remote control functions are disabled.
7. Clock — Displays the time.
8. Channel 1 Shared Status — When the icon is displayed, the audio for Channel 1 is also shared
with the radio and playing through the cabin
speakers.(fig. 113) Figure 5: Information Mode Video Screen Display
150
KNOWING YOUR
VEHICLE
SAFETY
STARTING AND
DRIVING
WARNING LIGHTSAND
MESSAGES
IN AN
EMERGENCY
SERVICING AND
CARETECHNICAL
SPECIFICATIONSCONTENTS
Page 158 of 332

3. To delete the last digit, navigate to the Del buttonand press the remote control’s ENTER button.
4. After all of the digits are entered, navigate to the Go button and press the remote control’s ENTER
button.
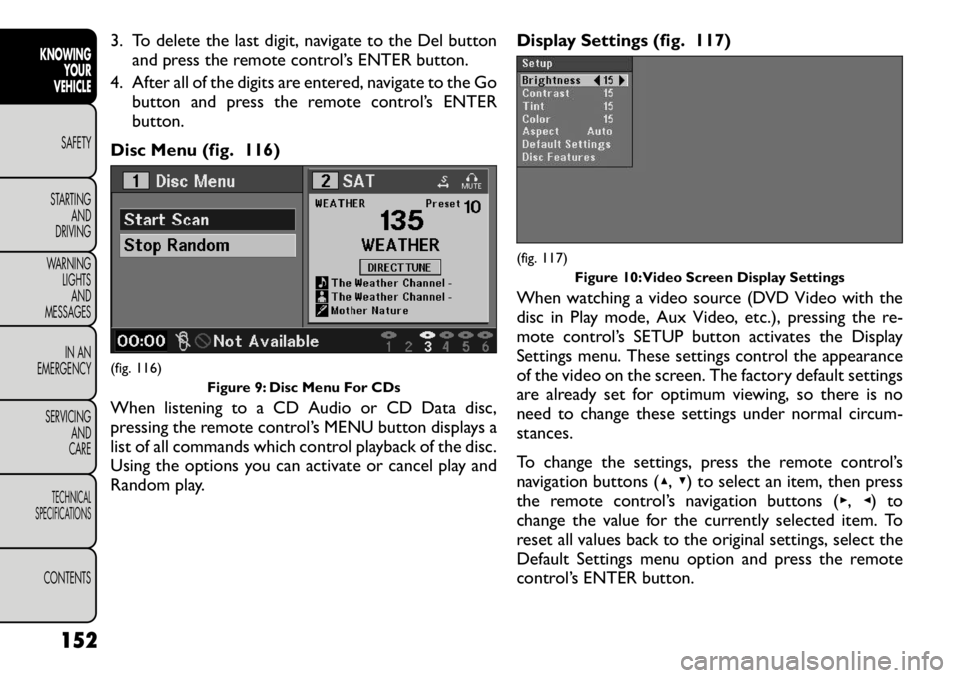
Disc Menu (fig. 116)
When listening to a CD Audio or CD Data disc,
pressing the remote control’s MENU button displays a
list of all commands which control playback of the disc.
Using the options you can activate or cancel play and
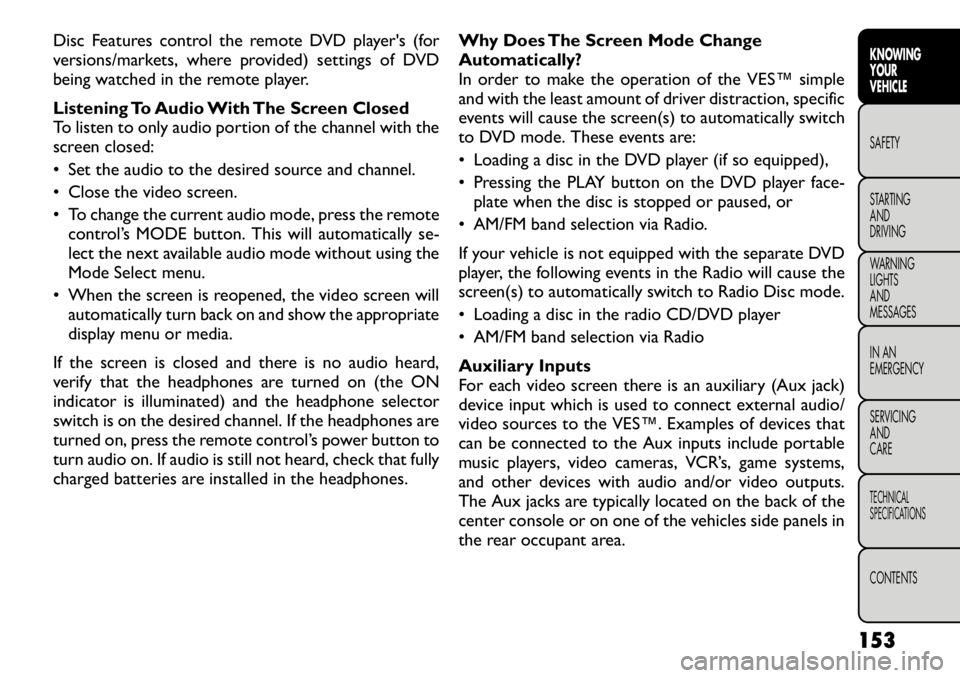
Random play. Display Settings (fig. 117)
When watching a video source (DVD Video with the
disc in Play mode, Aux Video, etc.), pressing the re-
mote control’s SETUP button activates the Display
Settings menu. These settings control the appearance
of the video on the screen. The factory default settings
are already set for optimum viewing, so there is no
need to change these settings under normal circum-
stances.
To change the settings, press the remote control’s
navigation buttons (
▴,▾ ) to select an item, then press
the remote control’s navigation buttons ( ▸, ◂) to
change the value for the currently selected item. To
reset all values back to the original settings, select the
Default Settings menu option and press the remote
control’s ENTER button.(fig. 116) Figure 9: Disc Menu For CDs
(fig. 117)Figure 10:Video Screen Display Settings
152
KNOWING YOUR
VEHICLE
SAFETY
STARTING AND
DRIVING
WARNING LIGHTSAND
MESSAGES
IN AN
EMERGENCY
SERVICING AND
CARETECHNICAL
SPECIFICATIONSCONTENTS
Page 159 of 332

Disc Features control the remote DVD player's (for
versions/markets, where provided) settings of DVD
being watched in the remote player.
Listening To Audio With The Screen Closed
To listen to only audio portion of the channel with the
screen closed:
• Set the audio to the desired source and channel.
• Close the video screen.
• To change the current audio mode, press the remotecontrol’s MODE button. This will automatically se-
lect the next available audio mode without using the
Mode Select menu.
• When the screen is reopened, the video screen will automatically turn back on and show the appropriate
display menu or media.
If the screen is closed and there is no audio heard,
verify that the headphones are turned on (the ON
indicator is illuminated) and the headphone selector
switch is on the desired channel. If the headphones are
turned on, press the remote control’s power button to
turn audio on. If audio is still not heard, check that fully
charged batteries are installed in the headphones. Why Does The Screen Mode Change
Automatically?
In order to make the operation of the VES™ simple
and with the least amount of driver distraction, specific
events will cause the screen(s) to automatically switch
to DVD mode. These events are:
• Loading a disc in the DVD player (if so equipped),
• Pressing the PLAY button on the DVD player face-
plate when the disc is stopped or paused, or
• AM/FM band selection via Radio.
If your vehicle is not equipped with the separate DVD
player, the following events in the Radio will cause the
screen(s) to automatically switch to Radio Disc mode.
• Loading a disc in the radio CD/DVD player
• AM/FM band selection via Radio
Auxiliary Inputs
For each video screen there is an auxiliary (Aux jack)
device input which is used to connect external audio/
video sources to the VES™. Examples of devices that
can be connected to the Aux inputs include portable
music players, video cameras, VCR’s, game systems,
and other devices with audio and/or video outputs.
The Aux jacks are typically located on the back of the
center console or on one of the vehicles side panels in
the rear occupant area.
153
KNOWING
YOURVEHICLESAFETY
STARTING ANDDRIVING
WARNING LIGHTSAND
MESSAGES
IN AN
EMERGENCY
SERVICING AND
CARETECHNICAL
SPECIFICATIONSCONTENTS
Page 160 of 332

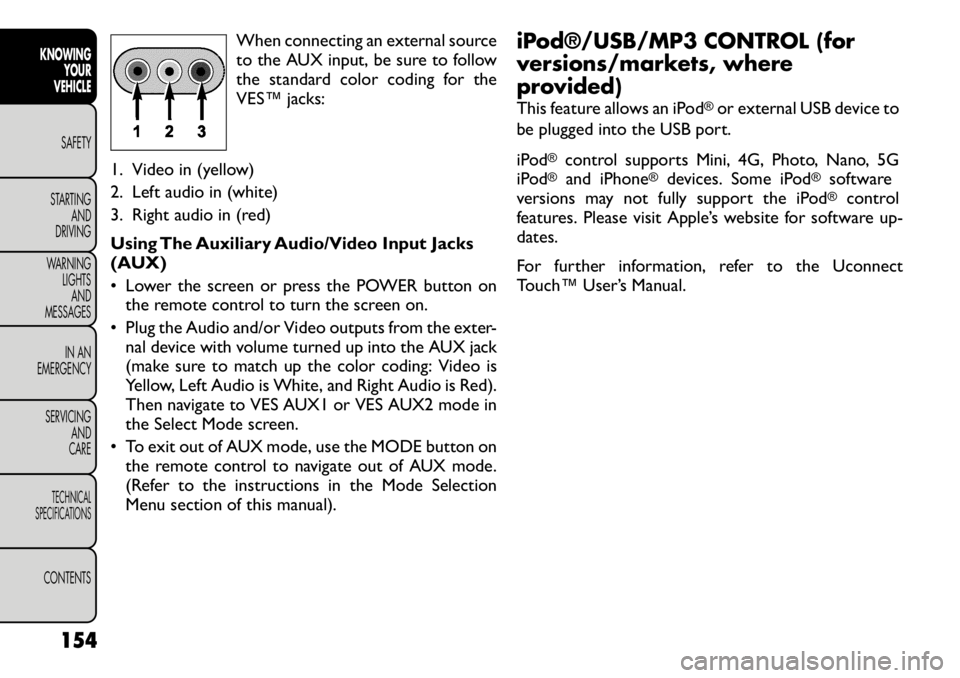
When connecting an external source
to the AUX input, be sure to follow
the standard color coding for the
VES™ jacks:
1. Video in (yellow)
2. Left audio in (white)
3. Right audio in (red)
Using The Auxiliary Audio/Video Input Jacks
(AUX)
• Lower the screen or press the POWER button on the remote control to turn the screen on.
• Plug the Audio and/or Video outputs from the exter- nal device with volume turned up into the AUX jack
(make sure to match up the color coding: Video is
Yellow, Left Audio is White, and Right Audio is Red).
Then navigate to VES AUX1 or VES AUX2 mode in
the Select Mode screen.
• To exit out of AUX mode, use the MODE button on the remote control to navigate out of AUX mode.
(Refer to the instructions in the Mode Selection
Menu section of this manual). iPod®/USB/MP3 CONTROL (for
versions/markets, where
provided)
This feature allows an iPod
®or external USB device to
be plugged into the USB port.
iPod
®
control supports Mini, 4G, Photo, Nano, 5G
iPod
®
and iPhone
®
devices. Some iPod
®
software
versions may not fully support the iPod®
control
features. Please visit Apple’s website for software up-
dates.
For further information, refer to the Uconnect
Touch™ User’s Manual.
154
KNOWING YOUR
VEHICLE
SAFETY
STARTING AND
DRIVING
WARNING LIGHTSAND
MESSAGES
IN AN
EMERGENCY
SERVICING AND
CARETECHNICAL
SPECIFICATIONSCONTENTS
Page 261 of 332

Cavity
CartridgeFuse
Mini-Fuse Description
F122 25 Amp
Natural Driver Door Module
F123 25 Amp
Natural Passenger Door Module
F124 10 Amp
Red Mirrors
F125 10 Amp
Red Steering Column
Control Module
F126 10 Amp
Red Audio Amplifier
F127 20 Amp
Yellow Trailer Tow – For
Versions/Markets,
Where Provided
F128 15 Amp
Blue Radio
F129 15 Amp
Blue Video/DVD – For
Versions/Markets,
Where Provided
F130 15 Amp
Blue Climate
Control/InstrumentPanel
F131 10 Amp
Red Passenger
Assistance/Hands
Free System – For
Versions/Markets,
Where Provided
Cavity
Cartridge
Fuse
Mini-Fuse Description
F132 10 Amp
Red Tire Pressure Module
F133 10 Amp
Red Spare
255
KNOWING
YOURVEHICLE SAFETY
STARTING ANDDRIVING
WARNING LIGHTSAND
MESSAGESIN AN
EMERGENCYSERVICING AND
CARETECHNICAL
SPECIFICATIONSCONTENTS
Page 322 of 332

Sentry Key Programming . . . . . . . . . . . . . . . . . . . . 12
Sentry Key Replacement . . . . . . . . . . . . . . . . . . . . 11
Service Engine Soon Light (Malfunction Indicator) . . . 225
Shoulder Belt Upper Anchorage . . . . . . . . . . . . . . 162
Shoulder Belts . . . . . . . . . . . . . . . . . . . . . . . . . . 159
Side Airbag . . . . . . . . . . . . . . . . . . . . . . . . . . . . 188
Side Repeater Lights . . . . . . . . . . . . . . . . . . . . . . 251
Side View Mirror Adjustment . . . . . . . . . . . . . . . . . 57
Signals, Turn . . . . . . . . . . . . . . . . . . . . 73,194,226,251
Slippery Surfaces, Driving On . . . . . . . . . . . . . . . . 210
Sound Systems . . . . . . . . . . . . . . . . . . . . . . . . . . 136
Sound Systems (Radio) . . . . . . . . . . . . . . . . . . . . . 136
Spare Tire . . . . . . . . . . . . . . . . . . . . . . . 234,294,295
Spark Plugs . . . . . . . . . . . . . . . . . . . . . . . . . . . . 302
SpecificationsFuel (Gasoline) . . . . . . . . . . . . . . . . . . . . . . . . 302
Oil . . . . . . . . . . . . . . . . . . . . . . . . . . . . . . . . 302
Speed Control (Cruise Control) . . . . . . . . . . . . . . . 81
Speedometer . . . . . . . . . . . . . . . . . . . . . . . . . . . . . 7
Starting . . . . . . . . . . . . . . . . . . . . . . . . . . . . . . . 195 Cold Weather . . . . . . . . . . . . . . . . . . . . . . . . . 197
Engine Fails to Start . . . . . . . . . . . . . . . . . . . . . 197
Starting and Operating . . . . . . . . . . . . . . . . . . . . . 195
Starting Procedures . . . . . . . . . . . . . . . . . . . . . . . 195
Starting Procedures (Diesel Engines) . . . . . . . . . . . 198
Steering Column Controls . . . . . . . . . . . . . . . . . . . . . . . 73
Column Lock . . . . . . . . . . . . . . . . . . . . . . . . . . 55
Power . . . . . . . . . . . . . . . . . . . . . . . . . . . 121,122
Tilt Column . . . . . . . . . . . . . . . . . . . . . . . . . . . 55
Wheel Lock . . . . . . . . . . . . . . . . . . . . . . . . . . . 18
Wheel, Tilt . . . . . . . . . . . . . . . . . . . . . . . . . . . 55
Steering Wheel Audio Controls . . . . . . . . . . . . . . 137 Steering Wheel Mounted Sound System Controls . . . 137
Storage . . . . . . . . . . . . . . . . . . . . . . . . . . . . . 85,212
Storage, Vehicle . . . . . . . . . . . . . . . . . . . . . . . . . . 68
Stuck, Freeing . . . . . . . . . . . . . . . . . . . . . . . . . . . 259
Sun Visor Extension . . . . . . . . . . . . . . . . . . . . . . . 59
Sunglasses Storage . . . . . . . . . . . . . . . . . . . . . . . . 84
Sunroof Maintenance . . . . . . . . . . . . . . . . . . . . . . . 95
Supplemental Restraint System - Airbag . . . . . . . . . 181
Sway Control, Trailer . . . . . . . . . . . . . . . . . . . . . . 119
System, Navigation (Uconnect™ gps) . . . . . . . . . . . 136
Tachometer . . . . . . . . . . . . . . . . . . . . . . . . . . . . . . 7
Taillights . . . . . . . . . . . . . . . . . . . . . . . . . . . . . . 251
Telescoping Steering Column . . . . . . . . . . . . . . . . . 55
Temperature Control, Automatic (ATC) . . . . . . . . . . 65
Temperature Gauge, Engine Coolant . . . . . . . . . . . . . 7
Tether Anchor, Child Restraint . . . . . . . . . . . . . . . 176
Theft Alarm (Security Alarm) . . . . . . . . . . . . . . . . . 15
Theft System (Security Alarm) . . . . . . . . . . . . . . . . 15
Tie Down Hooks, Cargo . . . . . . . . . . . . . . . . . . . 108
Tilt Steering Column . . . . . . . . . . . . . . . . . . . . . . . 55
Time Delay, Headlight . . . . . . . . . . . . . . . . . . . . . . 72
TIREFIT . . . . . . . . . . . . . . . . . . . . . . . . . . . . . . 242
Tires . . . . . . . . . . . . . . . . . . . . . . . . . . . . . . 194,291
Aging (Life of Tires) . . . . . . . . . . . . . . . . . . . . . 296
Air Pressure . . . . . . . . . . . . . . . . . . . . . . . . . . 291
Changing . . . . . . . . . . . . . . . . . . . . . . . . . . . . 234
Compact Spare . . . . . . . . . . . . . . . . . . . . . . . . 294
General Information . . . . . . . . . . . . . . . . . . . . . 291
High Speed . . . . . . . . . . . . . . . . . . . . . . . . . . . 293
Inflation Pressures . . . . . . . . . . . . . . . . . . . . . . 292
Jacking . . . . . . . . . . . . . . . . . . . . . . . . . . . . . . 234
Life of Tires . . . . . . . . . . . . . . . . . . . . . . . . . . 296
316
KNOWING YOUR
VEHICLE
SAFETY
STARTING AND
DRIVING
WARNING LIGHTSAND
MESSAGES
IN AN
EMERGENCY
SERVICING AND
CARETECHNICAL
SPECIFICATIONSCONTENTS