2012 FIAT FREEMONT start stop button
[x] Cancel search: start stop buttonPage 101 of 332

automatically. This is called “Express Close”. During
Express Close operation, any movement of the switch
will stop the sunroof.
CLOSING SUNROOF — MANUAL MODE
To close the sunroof, press and hold the switch in the
forward position. Any release of the switch will stop
the movement and the sunroof will remain in a partially
closed condition until the switch is pushed and held
forward again.
PINCH PROTECT FEATURE
This feature will detect an obstruction in the opening
of the sunroof during Express Close operation. If an
obstruction is detected, the sunroof will automatically
retract. Remove the obstruction if this occurs. Next,
press the switch forward and release to Express Close.
NOTE:If three consecutive sunroof close attempts
result in Pinch Protect reversals, the fourth close at-
tempt will be a Manual Close movement with Pinch
Protect disabled.
PINCH PROTECT OVERRIDE
If a known obstruction (ice, debris, etc.) prevents
closing the sunroof, press the switch forward and hold
for two seconds after the reversal occurs. This allows
the sunroof to move toward the closed position.
NOTE: Pinch protection is disabled while the switch
is pressed. VENTING SUNROOF — EXPRESS
Press and release the “Vent” button, and the sunroof
will open to the vent position. This is called “Express
Vent”, and will occur regardless of sunroof position.
During Express Vent operation, any movement of the
switch will stop the sunroof.
SUNSHADE OPERATION
The sunshade can be opened manually. However, the
sunshade will open automatically as the sunroof opens.
NOTE:
The sunshade cannot be closed if the sunroof
is open.
WIND BUFFETING
Wind buffeting can be described as the perception of
pressure on the ears or a helicopter-type sound in the
ears. Your vehicle may exhibit wind buffeting with the
windows down, or the sunroof (for versions/markets,
where provided) is in certain open or partially open
positions. This is a normal occurrence and can be
minimized. If the buffeting occurs with the rear win-
dows open, open the front and rear windows together
to minimize the buffeting. If the buffeting occurs with
the sunroof open, adjust the sunroof opening to mini-
mize the buffeting or open any window.
SUNROOF MAINTENANCE
Use only a nonabrasive cleaner and a soft cloth to clean
the glass panel.
95
KNOWING
YOURVEHICLESAFETY
STARTING ANDDRIVING
WARNING LIGHTSAND
MESSAGES
IN AN
EMERGENCY
SERVICING AND
CARETECHNICAL
SPECIFICATIONSCONTENTS
Page 110 of 332

To close the window part way, pull the window switch
up to the first detent and release it when you want the
window to stop.
NOTE:
• If the window runs into any obstacle during Auto-
closure, it will reverse direction and then go back
down. Remove the obstacle and use the window switch
again to close the window.
• Any impact due to rough road conditions may trigger
the auto-reverse function unexpectedly during auto-
closure. If this happens, pull the switch lightly to the
first detent and hold to close window manually.
WARNING!
There is no anti-pinch protection when
the window is almost closed. To avoid
personal injury, be sure to clear your arms, hands,
fingers, and objects from the window path before
closing the window. Such entrapment may result
in serious injury.
Reset
It may be necessary at some point in time to reactivate
the Auto-up/Auto-down feature. To do so, perform
the following steps:
1. Pull the window switch up to close the window completely and continue to hold the switch up for an additional two seconds after the window is closed.
2. Push the window switch down firmly to the second detent to open the window completely and con-
tinue to hold the switch down for an additional two
seconds after the window is fully open.
Window Lockout Switch
The window lockout switch on the driver's door trim
panel allows you to disable the window control on the
other doors. To disable the window controls, press and
release the window lockout button (setting it in the
down position). To enable the window controls, press
and release the window lockout button again (setting it
in the up position). (fig. 90)
(fig. 90) Window Lockout Switch
104
KNOWING YOUR
VEHICLE
SAFETY
STARTING AND
DRIVING
WARNING LIGHTSAND
MESSAGES
IN AN
EMERGENCY
SERVICING AND
CARETECHNICAL
SPECIFICATIONSCONTENTS
Page 148 of 332

RemoteControl Button Standard Screens Menu Screens
AM/FM/
MW/LW SAT–
Audio HDD–
HardDisc
Drive DISC/
DVD AUX/AUX1/
AUX2 Mode
Select Menu Screen
Setup
Play/Pause Not Available Not
AvailableNot
AvailablePause if
playing,else
resume
play Audio:
Pause if
playing/
resumeNot
Available
Not
Available Not
Available
Video
Play: Pause if
playing/
resume
Video
Menu: Activate
selected
item
Stop Not Available Not
AvailableNot
AvailableStop Stop
Not
AvailableNot
Available Not
Available
Mute Mute/Unmute Headphones
Slow Not Available Not
AvailableNot
AvailableNot
Available Audio:
Not
AvailableNot
AvailableNot
Available Not
Available
Video
Play: Slow
play/
resume
Video
Menu: Not
Available
142
KNOWING YOUR
VEHICLE
SAFETY
STARTING AND
DRIVING
WARNING LIGHTSAND
MESSAGES
IN AN
EMERGENCY
SERVICING AND
CARETECHNICAL
SPECIFICATIONSCONTENTS
Page 150 of 332

When the selector switch is in the Channel 1
position, the remote controls the functionality of
headphone Channel 1 (right side of the screen).
When the selector switch is in the Channel 2,
position the remote controls the functionality of
headphone Channel 2 (left side of the screen).
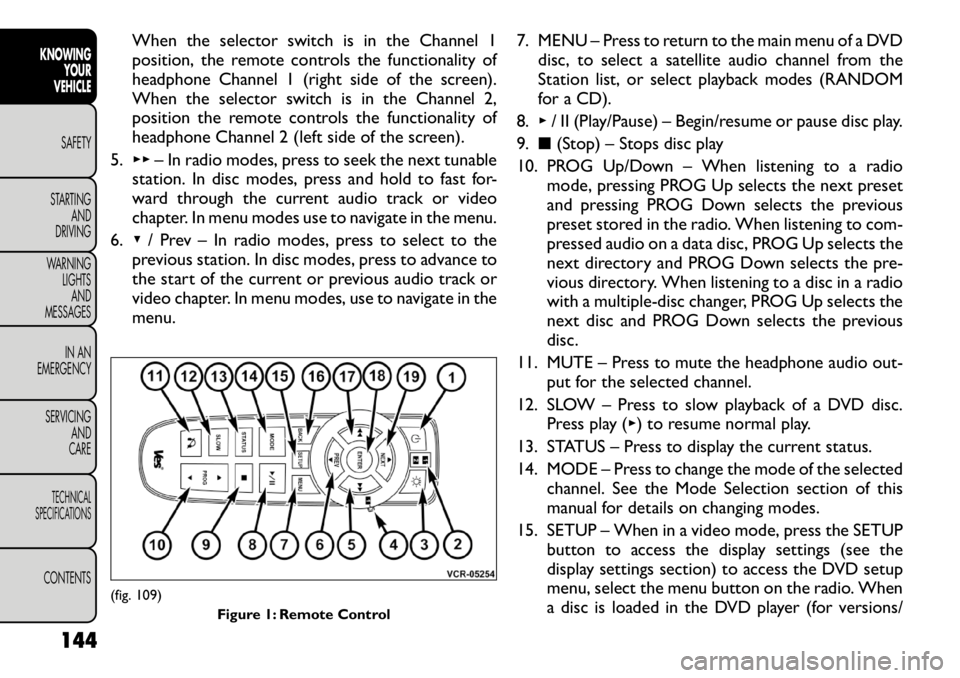
5. ▸▸ – In radio modes, press to seek the next tunable
station. In disc modes, press and hold to fast for-
ward through the current audio track or video
chapter. In menu modes use to navigate in the menu.
6. ▾/ Prev – In radio modes, press to select to the
previous station. In disc modes, press to advance to
the start of the current or previous audio track or
video chapter. In menu modes, use to navigate in the
menu. 7. MENU – Press to return to the main menu of a DVD
disc, to select a satellite audio channel from the
Station list, or select playback modes (RANDOM
for a CD).
8. ▸/ II (Play/Pause) – Begin/resume or pause disc play.
9. ■(Stop) – Stops disc play
10. PROG Up/Down – When listening to a radio mode, pressing PROG Up selects the next preset
and pressing PROG Down selects the previous
preset stored in the radio. When listening to com-
pressed audio on a data disc, PROG Up selects the
next directory and PROG Down selects the pre-
vious directory. When listening to a disc in a radio
with a multiple-disc changer, PROG Up selects the
next disc and PROG Down selects the previous
disc.
11. MUTE – Press to mute the headphone audio out- put for the selected channel.
12. SLOW – Press to slow playback of a DVD disc. Press play ( ▸) to resume normal play.
13. STATUS – Press to display the current status.
14. MODE – Press to change the mode of the selected channel. See the Mode Selection section of this
manual for details on changing modes.
15. SETUP – When in a video mode, press the SETUP button to access the display settings (see the
display settings section) to access the DVD setup
menu, select the menu button on the radio. When
a disc is loaded in the DVD player (for versions/
(fig. 109)
Figure 1: Remote Control
144
KNOWING YOUR
VEHICLE
SAFETY
STARTING AND
DRIVING
WARNING LIGHTSAND
MESSAGES
IN AN
EMERGENCY
SERVICING AND
CARETECHNICAL
SPECIFICATIONSCONTENTS
Page 151 of 332

markets, where provided) and the VES™ mode is
selected and the disc is stopped, press the SETUP
button to access the DVD Setup menu. (see the
DVD Setup Menu of this manual.)
16. BACK – When navigating in menu mode, press to return to the previous screen. When navigating a
DVDs disc menu, the operation depends on the
disc’s contents.
17. ◂◂– In radio modes, press to seek to the previous
tunable station. In disc modes, press and hold to
fast rewind through the current audio track or
video chapter. In menu modes use to navigate in
the menu.
18. ENTER – Press to select the highlighted option in a menu.
19. ▴/ NEXT – In radio modes, press to select to the
next station. In disc modes, press to advance to
the next audio track or video chapter. In menu
modes, use to navigate in the menu.
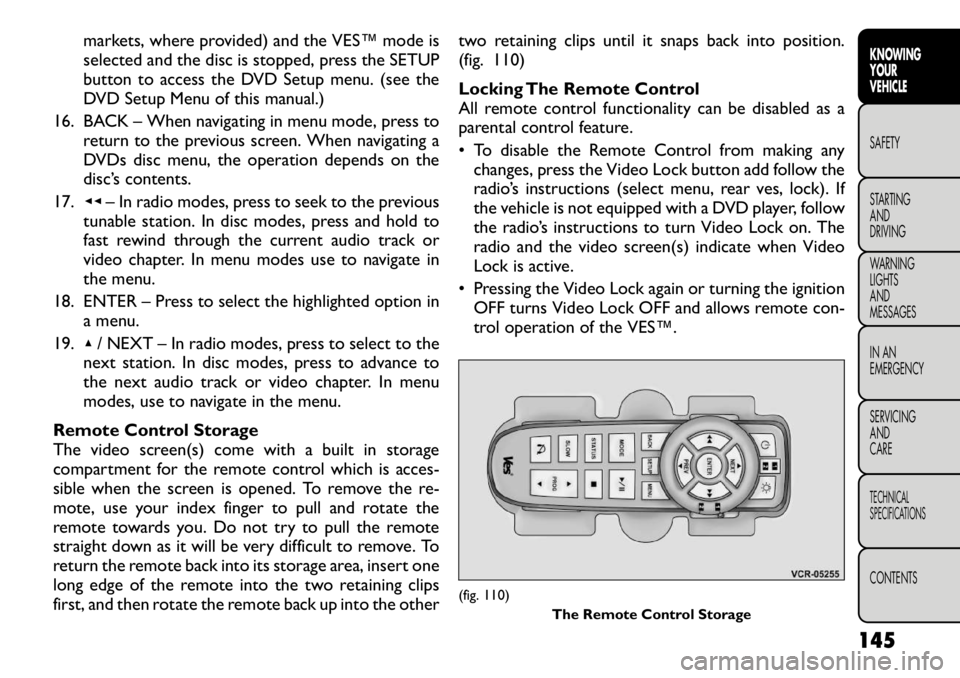
Remote Control Storage
The video screen(s) come with a built in storage
compartment for the remote control which is acces-
sible when the screen is opened. To remove the re-
mote, use your index finger to pull and rotate the
remote towards you. Do not try to pull the remote
straight down as it will be very difficult to remove. To
return the remote back into its storage area, insert one
long edge of the remote into the two retaining clips
first, and then rotate the remote back up into the other two retaining clips until it snaps back into position.
(fig. 110)
Locking The Remote Control
All remote control functionality can be disabled as a
parental control feature.
• To disable the Remote Control from making any
changes, press the Video Lock button add follow the
radio’s instructions (select menu, rear ves, lock). If
the vehicle is not equipped with a DVD player, follow
the radio’s instructions to turn Video Lock on. The
radio and the video screen(s) indicate when Video
Lock is active.
• Pressing the Video Lock again or turning the ignition OFF turns Video Lock OFF and allows remote con-
trol operation of the VES™.
(fig. 110) The Remote Control Storage
145
KNOWING
YOURVEHICLESAFETY
STARTING ANDDRIVING
WARNING LIGHTSAND
MESSAGES
IN AN
EMERGENCY
SERVICING AND
CARETECHNICAL
SPECIFICATIONSCONTENTS
Page 159 of 332

Disc Features control the remote DVD player's (for
versions/markets, where provided) settings of DVD
being watched in the remote player.
Listening To Audio With The Screen Closed
To listen to only audio portion of the channel with the
screen closed:
• Set the audio to the desired source and channel.
• Close the video screen.
• To change the current audio mode, press the remotecontrol’s MODE button. This will automatically se-
lect the next available audio mode without using the
Mode Select menu.
• When the screen is reopened, the video screen will automatically turn back on and show the appropriate
display menu or media.
If the screen is closed and there is no audio heard,
verify that the headphones are turned on (the ON
indicator is illuminated) and the headphone selector
switch is on the desired channel. If the headphones are
turned on, press the remote control’s power button to
turn audio on. If audio is still not heard, check that fully
charged batteries are installed in the headphones. Why Does The Screen Mode Change
Automatically?
In order to make the operation of the VES™ simple
and with the least amount of driver distraction, specific
events will cause the screen(s) to automatically switch
to DVD mode. These events are:
• Loading a disc in the DVD player (if so equipped),
• Pressing the PLAY button on the DVD player face-
plate when the disc is stopped or paused, or
• AM/FM band selection via Radio.
If your vehicle is not equipped with the separate DVD
player, the following events in the Radio will cause the
screen(s) to automatically switch to Radio Disc mode.
• Loading a disc in the radio CD/DVD player
• AM/FM band selection via Radio
Auxiliary Inputs
For each video screen there is an auxiliary (Aux jack)
device input which is used to connect external audio/
video sources to the VES™. Examples of devices that
can be connected to the Aux inputs include portable
music players, video cameras, VCR’s, game systems,
and other devices with audio and/or video outputs.
The Aux jacks are typically located on the back of the
center console or on one of the vehicles side panels in
the rear occupant area.
153
KNOWING
YOURVEHICLESAFETY
STARTING ANDDRIVING
WARNING LIGHTSAND
MESSAGES
IN AN
EMERGENCY
SERVICING AND
CARETECHNICAL
SPECIFICATIONSCONTENTS
Page 202 of 332

(Continued)
Do not leave animals or children inside parked
vehicles in hot weather; interior heat buildup
may cause serious injury or death.
KEYLESS ENTER-N-GO This feature allows the driver to op-
erate the ignition switch with the
push of a button, as long as the Re-
mote Keyless Entry (RKE) transmit-
ter is in the passenger compartment.
NORMAL STARTING – GASOLINE ENGINE
Using The ENGINE START/STOP Button
NOTE: Normal starting of either a cold or a warm
engine is obtained without pumping or pressing the
accelerator pedal.
To start the engine, the transmission must be in PARK
or NEUTRAL. Press and hold the brake pedal while
pressing the ENGINE START/STOP button once. The
system takes over and attempts to start the vehicle. If
the vehicle fails to start, the starter will disengage
automatically after 10 seconds. If you wish to stop the
cranking of the engine prior to the engine starting,
press the button again. To Turn Off The Engine Using ENGINE
START/STOP Button
1. Place the shift lever in PARK, then press and release
the ENGINE START/STOP button.
2. The ignition switch will return to the OFF position.
3. If the shift lever is not in PARK, the ENGINE START/STOP button must be held for two seconds
and vehicle speed must be above 8 km/h before the
engine will shut off. The ignition switch position will
remain in the ACC position until the shift lever is in
PARK and the button is pressed twice to the OFF
position. If the shift lever is not in PARK and the
ENGINE START/STOP button is pressed once, the
EVIC (for versions/markets, where provided) will
display a “Vehicle Not In Park” message and the
engine will remain running. Never leave a vehicle out
of the PARK position, or it could roll.
NOTE: If the ignition switch is left in the ACC or
RUN (engine not running) position and the transmis-
sion is in PARK, the system will automatically time out
after 30 minutes of inactivity and the ignition will switch
to the OFF position.
196
KNOWING YOUR
VEHICLE
SAFETYSTARTING AND
DRIVINGWARNING LIGHTSAND
MESSAGES
IN AN
EMERGENCY
SERVICING AND
CARETECHNICAL
SPECIFICATIONSCONTENTS
Page 203 of 332

ENGINE START/STOP Button Functions –
With Driver’s Foot OFF The Brake Pedal (In
PARK Or NEUTRAL Position)
The ENGINE START/STOP button operates similar to
an ignition switch. It has four positions, OFF, ACC,
RUN and START. To change the ignition switch posi-
tions without starting the vehicle and use the accesso-
ries follow these steps.
• Starting with the ignition switch in the OFF position:
• Press the ENGINE START/STOP button once tochange the ignition switch to the ACC position
(EVIC will display “ACC”),
• Press the ENGINE START/STOP button a second time to change the ignition switch to the RUN
position (EVIC will display “RUN”),
• Press the ENGINE START/STOP button a third time to return the ignition switch to the OFF position
(EVIC will display “OFF”).
EXTREME COLD WEATHER (BELOW�29°C)
To ensure reliable starting at these temperatures, use
of an externally powered electric engine block heater
(available from your authorized dealer) is
recommended. IF ENGINE FAILS TO START
WARNING!
Never pour fuel or other flammable
liquids into the throttle body air inlet
opening in an attempt to start the vehicle. This
could result in a flash fire causing serious per-
sonal injury.
Do not attempt to push or tow your vehicle to
get it started. Vehicles equipped with an auto-
matic transmission cannot be started this way.
Unburned fuel could enter the catalytic con-
verter and once the engine has started, ignite and
damage the converter and vehicle. If the vehicle
has a discharged battery, booster cables may be
used to obtain a start from a booster battery or
the battery in another vehicle.This type of start
can be dangerous if done improperly. Refer to
“Jump Starting” in “In An Emergency” for further
information.
Clearing A Flooded Engine (Using ENGINE
START/STOP Button)
If the engine fails to start after you have followed the
“Normal Starting” or “Extreme Cold Weather" proce-
dures, it may be flooded. To clear any excess fuel, press
and hold the brake pedal, push the accelerator pedal all
the way to the floor and hold it, then press and release
the ENGINE START/STOP button once. The starter 197
KNOWING
YOURVEHICLE SAFETYSTARTING ANDDRIVINGWARNING LIGHTSAND
MESSAGES
IN AN
EMERGENCY
SERVICING AND
CARETECHNICAL
SPECIFICATIONSCONTENTS