2012 DODGE JOURNEY clock
[x] Cancel search: clockPage 39 of 108

Uconnect Touch™ 4.3 & 4.3S AT A GLANCE
Displaying the Time
• If the time is not currently displayed at the top of the screen when in Radio mode,press the Settings button, then touch clock. Select Show Time, then touch On.
Setting the Time
• Press the Settings hard-key, then touch the Clock soft-key.
• Touch the Set the Time soft-key.
• Touch the up or down soft-keys to adjust the hours, minutes or AM/PM.
NOTE: 12hr format and 24hr format can also be set.
• Once the time is set press the "Done" soft-key to exit the time screen.
Audio Settings
• Press the SETTINGS hard-key on the right side of the unit.
• Then scroll down and press the Audio soft-key to get to the Audio menu.
• The Audio Menu shows the following options for you to customize your audio settings.
• Equalizer
• Balance/Fade
• Speed Adjust Volume
• Touch the Exit soft-key to exit from the Audio Menu.
ELECTRONICS
37
Page 40 of 108
Equalizer• Touch the Equalizer soft-key to adjust the Bass, Mid and Treble. Use the + or - soft-key to adjust the equalizer to your desired settings. Press the back arrow
soft-key when done.
Balance/Fade • Touch the Balance/Fade soft-key to adjust the sound from the speakers. Use the arrow soft-key to adjust the sound level from the front and rear or right and left
side speakers. Touch the Center "C" soft-key to reset the balance and fade to the
factory setting. Press the back arrow soft-key when done.
Speed Adjust Volume • Touch the Speed Adjust Volume soft-key to select between OFF, 1, 2 or 3. This will decrease the radio volume relative to a decrease in vehicle speed. Press the back
arrow soft-key when done.
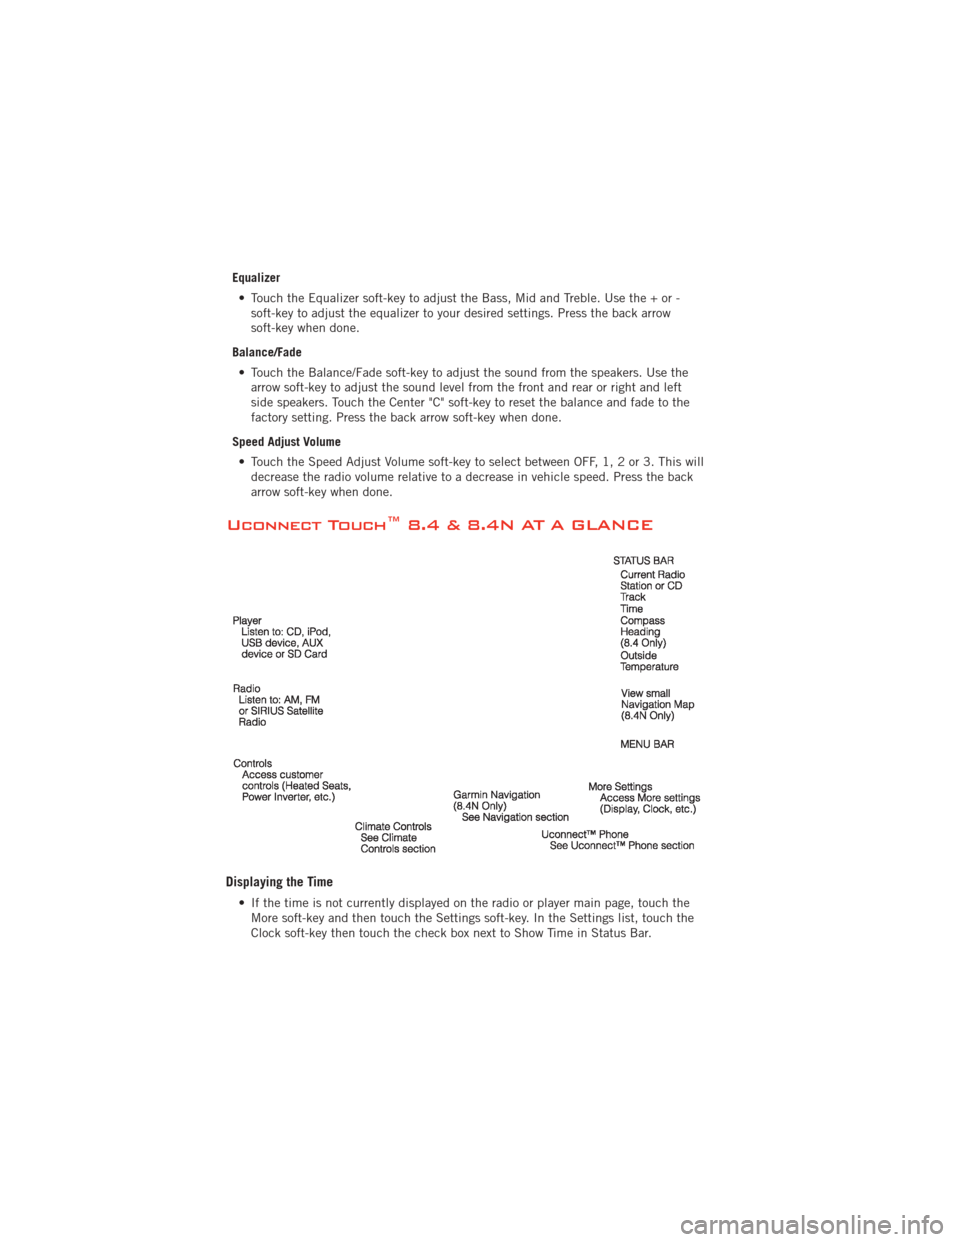
Uconnect Touch™ 8.4 & 8.4N AT A GLANCE
Displaying the Time
• If the time is not currently displayed on the radio or player main page, touch theMore soft-key and then touch the Settings soft-key. In the Settings list, touch the
Clock soft-key then touch the check box next to Show Time in Status Bar.
ELECTRONICS
38
Page 41 of 108
Setting the Time
• Model 8.4N synchronizes time automatically via GPS, so should not require anytime adjustment. If you do need to set the time manually, follow the instructions
below for Model 8.4.
• For Model 8.4, turn the unit on, then touch the time display at the top of the screen. Touch Yes.
• If the time is not displayed at the top of the screen, touch More soft-key and then Settings soft-key. In the Settings screen, touch the Clock soft-key, then check or
uncheck this option.
• Touch + or – next to Set Time Hours and Set Time Minutes to adjust the time.
• If these features are not available, uncheck the Sync with GPS box.
• Touch X to save your settings and exit out of the Clock Setting screen.
Audio Settings
• Touch the Audio soft-key to activate the Audio settings screen to adjust Balance\Fade, Equalizer, and Speed Adjusted Volume.
• You can return to the Radio screen by touching the X located at the top right.
Balance/Fade • Touch the Balance/Fade soft-key to Balance audio between the front speakers or fade the audio between the rear and front speakers.
• Touching the Front, Rear, Left, or Right soft-keys or touch and drag the red Speaker Icon to adjust the Balance/Fade.
Equalizer • Touch the Equalizer soft-key to activate the Equalizer screen.
• Touch the + or - soft-keys, or by touching and dragging over the level bar for each of the equalizer bands. The level value, which spans between ±9, is displayed at
the bottom of each of the Bands.
Speed Adjusted Volume • Touch the Speed Adjusted Volume soft-key to activate the Speed Adjusted Volume screen. The Speed Adjusted Volume is adjusted by touching the + and - buttons or
by touching and dragging over the level bar. This alters the automatic adjustment
of the audio volume with variation to vehicle speed.
ELECTRONICS
39
Page 63 of 108
PROGRAMMABLE FEATURES
Electronic Vehicle Information Center (EVIC)
• The EVIC can be used to view or change the following settings. Press the UPor DOWNbutton until System Setup displays, then press the SELECTbutton. Scroll through the settings using the UP or DOWN buttons. Press the
SELECTbutton to change the setting. Press the BACK button to scroll back to
a previous menu or sub menu.
• Fuel Economy: • Average Fuel Economy
• Distance To Empty (DTE)
• Miles Per Gallon (MPG) • Trip Info
• Trip A
• Trip B
• Elapsed Time
• Vehicle Speed • Units
• To Reset The Display • Vehicle Info (Customer Information Features)
Uconnect Touch™ 4.3 Customer Programmable Features
• The Uconnect Touch™ 4.3 system allows you to access Customer Programmable
feature settings such as Display, Clock, Safety/Assistance, Lights, Doors & Locks,
Heated Seats, Engine Off Operation, Compass Settings, Audio, Phone/ Bluetooth
and SIRIUS Setup through hard-keys and soft-keys.
• Press the Settings hard-key to on the right side of the unit to access the Settings screen, use the Page Up/Down soft-keys to scroll through the following settings.
The following feature settings are available:
• Display • Engine Off Options
• Clock • Compass Settings
• Safety / Assistance • Audio
• Lights • Phone / Bluetooth
• Doors & Locks • SIRIUS Setup
• Heated Seats
Uconnect Touch™ 8.4 Customer Programmable Features
• The Uconnect Touch™ 8.4 system allows you to access Customer Programmable feature settings such as Display, Clock, Safety/Assistance, Lights, Doors & Locks,
Heated Seats, Engine Off Operation, Compass Settings, Audio, Phone/ Bluetooth
and SIRIUS Setup through soft-keys.
• Touch the Settings soft-key to on the bottom of the screen, then touch the Settings soft-key to access the Settings screen. When making a selection, scroll up or down
until the preferred setting is highlighted, then press and release the preferred
setting until a check-mark appears next to the setting, showing that setting has
been selected. The following feature settings are available:
• Display • Engine Off Options
• Clock • Compass Settings
• Safety / Assistance • Audio
ELECTRONICS
61
Page 76 of 108
• Block both the front and rear of thewheel diagonally opposite of the
jacking position. For example, if
changing the right front tire, block the
left rear wheel.
NOTE: Passengers should not remain in the
vehicle when the vehicle is being jacked.
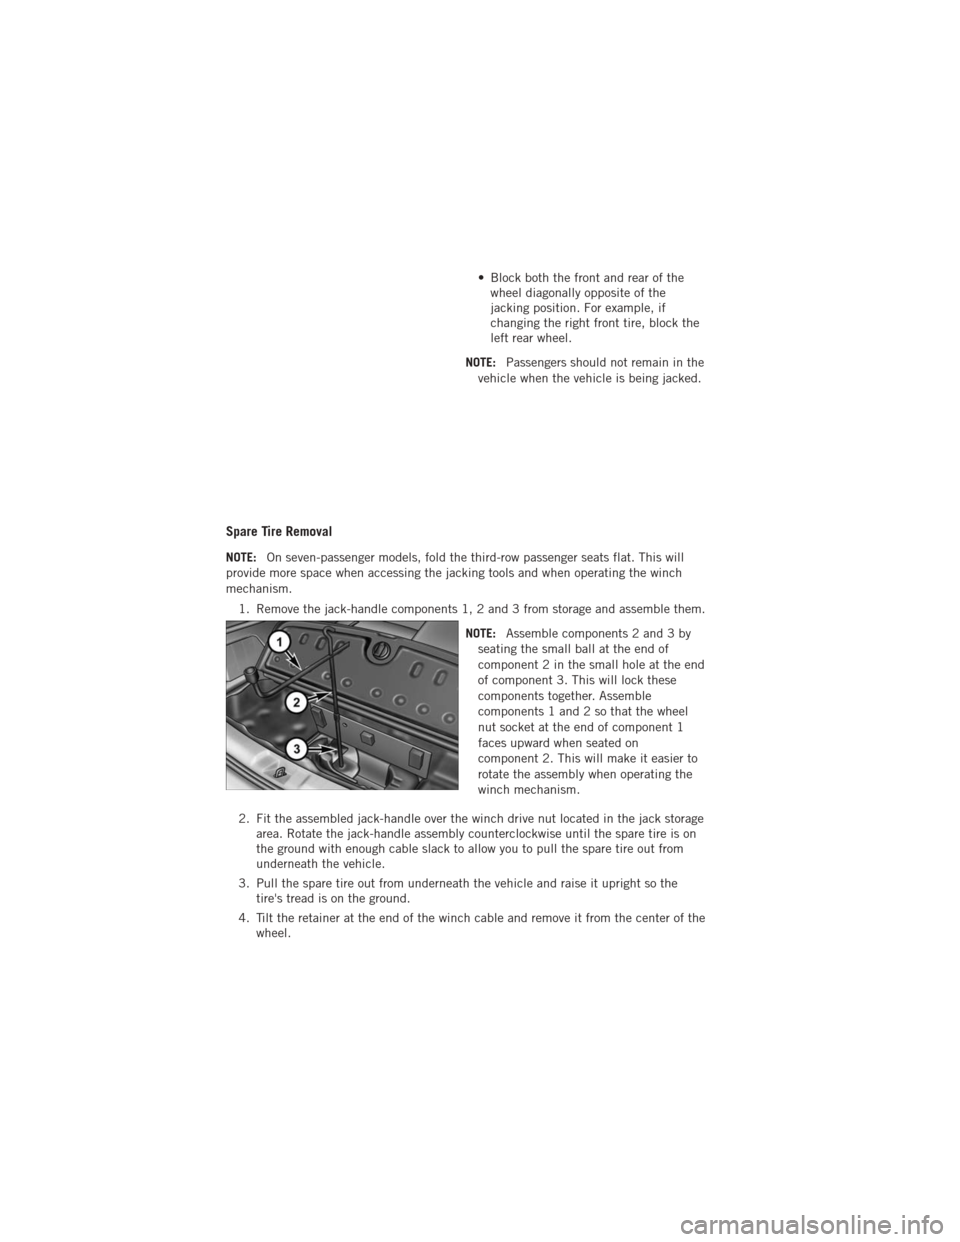
Spare Tire Removal
NOTE: On seven-passenger models, fold the third-row passenger seats flat. This will
provide more space when accessing the jacking tools and when operating the winch
mechanism.
1. Remove the jack-handle components 1, 2 and 3 from storage and assemble them.
NOTE:Assemble components 2 and 3 by
seating the small ball at the end of
component 2 in the small hole at the end
of component 3. This will lock these
components together. Assemble
components 1 and 2 so that the wheel
nut socket at the end of component 1
faces upward when seated on
component 2. This will make it easier to
rotate the assembly when operating the
winch mechanism.
2. Fit the assembled jack-handle over the winch drive nut located in the jack storage area. Rotate the jack-handle assembly counterclockwise until the spare tire is on
the ground with enough cable slack to allow you to pull the spare tire out from
underneath the vehicle.
3. Pull the spare tire out from underneath the vehicle and raise it upright so the tire's tread is on the ground.
4. Tilt the retainer at the end of the winch cable and remove it from the center of the wheel.
WHAT TO DO IN EMERGENCIES
74
Page 77 of 108

Spare Tire Stowage
NOTE:Refer to “Spare Tire Removal” for
information on assembling the winch tools.
1. Place the spare tire near to the winch cable. Hold the spare upright so that
the tire's tread is on the ground and
the valve stem is at the top of the
wheel facing away from the rear of the
vehicle.
2. Tilt the retainer at the end of the winch cable and drop it through the
center of the wheel. Then place the
spare tire with the cable and retainer
underneath the vehicle.
3. Fit the assembled jack-handle over the winch drive nut. Rotate the jack-handle assembly clockwise to raise the spare tire into the storage area. Continue to rotate
the jack-handle assembly until you hear the winch mechanism click three times.
It cannot be over tightened. Push against the tire several times to be sure it is
held securely in place.
WHAT TO DO IN EMERGENCIES
75
Page 78 of 108

Jacking Instructions
1. Remove the spare tire, jack, andjack-handle from stowage.
2. Loosen, but do not remove, the wheel nuts on the wheel with the flat tire.
Turn the wheel nuts counterclockwise
one turn while the wheel is still on the
ground.
3. Place the jack underneath the lift area that is closest to the flat tire. Turn the jack screw clockwise to firmly engage the jack saddle with the lift area of the sill
flange.
WHAT TO DO IN EMERGENCIES
76
Page 79 of 108
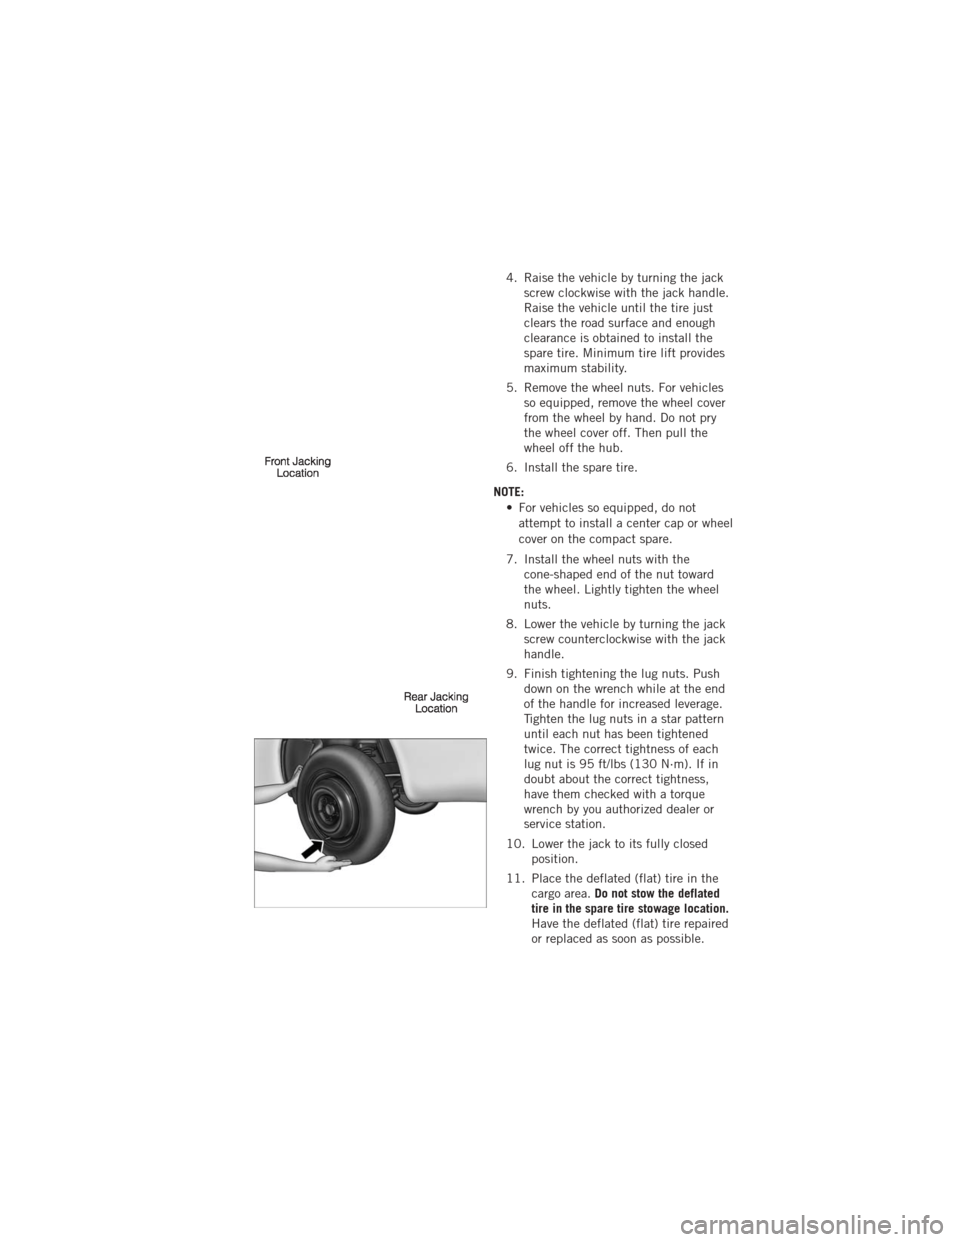
4. Raise the vehicle by turning the jackscrew clockwise with the jack handle.
Raise the vehicle until the tire just
clears the road surface and enough
clearance is obtained to install the
spare tire. Minimum tire lift provides
maximum stability.
5. Remove the wheel nuts. For vehicles so equipped, remove the wheel cover
from the wheel by hand. Do not pry
the wheel cover off. Then pull the
wheel off the hub.
6. Install the spare tire.
NOTE: • For vehicles so equipped, do notattempt to install a center cap or wheel
cover on the compact spare.
7. Install the wheel nuts with the cone-shaped end of the nut toward
the wheel. Lightly tighten the wheel
nuts.
8. Lower the vehicle by turning the jack screw counterclockwise with the jack
handle.
9. Finish tightening the lug nuts. Push down on the wrench while at the end
of the handle for increased leverage.
Tighten the lug nuts in a star pattern
until each nut has been tightened
twice. The correct tightness of each
lug nut is 95 ft/lbs (130 N·m). If in
doubt about the correct tightness,
have them checked with a torque
wrench by you authorized dealer or
service station.
10. Lower the jack to its fully closed position.
11. Place the deflated (flat) tire in the cargo area. Do not stow the deflated
tire in the spare tire stowage location.
Have the deflated (flat) tire repaired
or replaced as soon as possible.
WHAT TO DO IN EMERGENCIES
77