2012 DODGE JOURNEY odometer
[x] Cancel search: odometerPage 210 of 603

Interior Light Defeat (OFF)
Rotate the dimmer control to the extreme bottom off
position. The interior lights will remain off when the
doors are open.
Parade Mode (Daytime Brightness Feature)
Rotate the dimmer control upward to the first detent.
This feature brightens all text displays such as the
odometer, EVIC (if equipped), and radio when the park-
ing lights or headlights are on.
Map/Reading Lights
These lights are mounted between the sun visors on the
overhead console. Refer to “Overhead Console” in “Un-
derstanding The Features Of Your Vehicle” for further
information.
WINDSHIELD WIPERS AND WASHERS
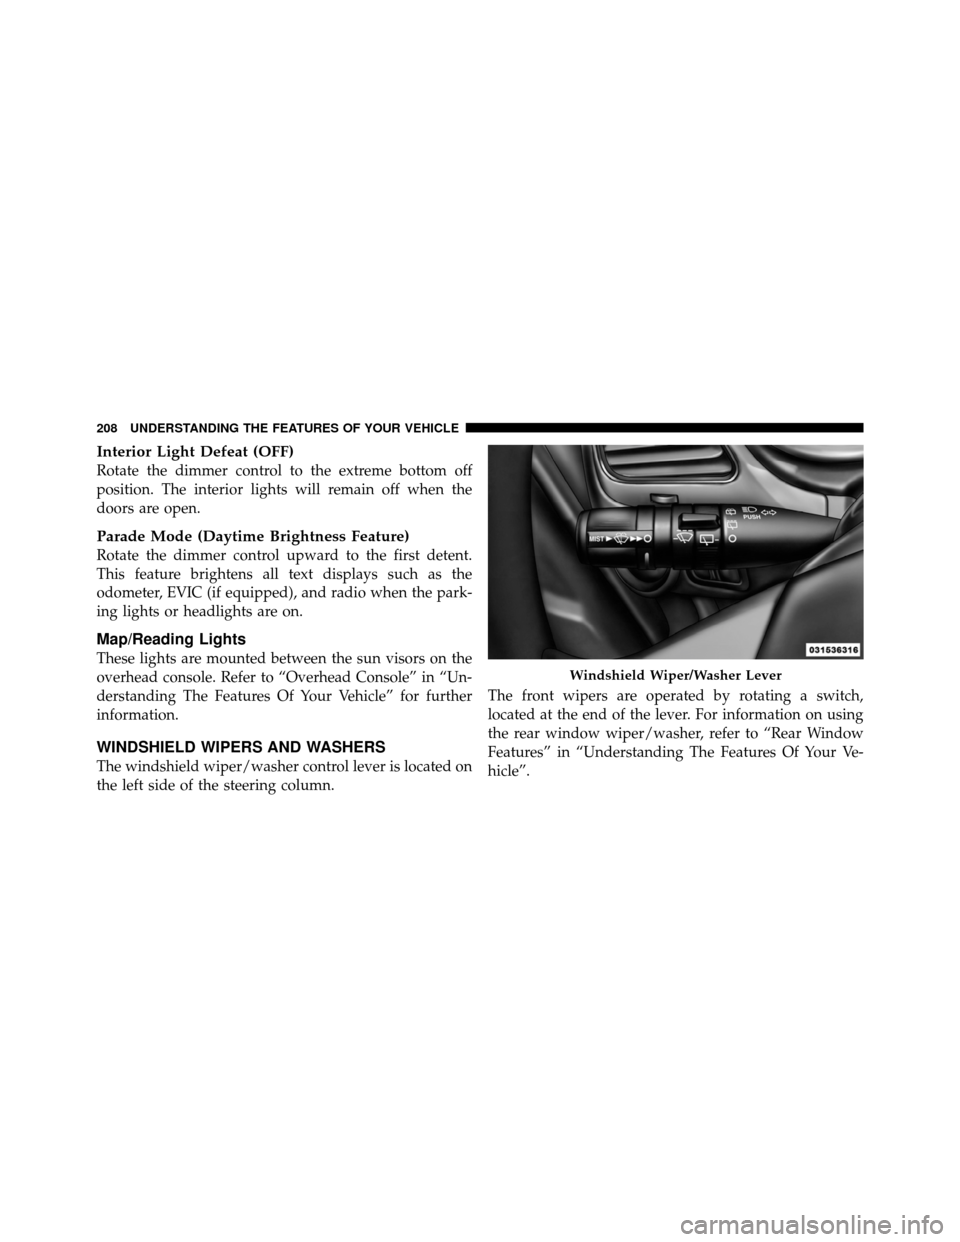
The windshield wiper/washer control lever is located on
the left side of the steering column.The front wipers are operated by rotating a switch,
located at the end of the lever. For information on using
the rear window wiper/washer, refer to “Rear Window
Features” in “Understanding The Features Of Your Ve-
hicle”.
Windshield Wiper/Washer Lever
208 UNDERSTANDING THE FEATURES OF YOUR VEHICLE
Page 278 of 603

5. Turn Signal IndicatorsThe arrow will flash with the exterior turn signal
when the turn signal lever is operated.
If the vehicle electronics sense that the vehicle is driven
more than 1 mile (1.6 km) with either turn signal on, a
continuous chime will sound to alert you to turn the
signals off. If either indicator flashes at a rapid rate, check
for a defective outside light bulb.
6. High Beam Indicator This indicator shows that the high beam head-
lights are on. Push the multifunction lever forward
to switch the headlights to high beam, and pull toward
yourself (normal position) to return to low beam.
7. Front Fog Light Indicator — If Equipped This indicator will illuminate when the front fog
lights are on. 8. Electronic Vehicle Information Center (EVIC)
Display / Odometer Display
Odometer Display
The odometer display shows the total distance the ve-
hicle has been driven.
U.S. Federal regulations require that upon transfer of
vehicle ownership, the seller certify to the purchaser the
correct mileage that the vehicle has been driven. If your
odometer needs to be repaired or serviced, the repair
technician should leave the odometer reading the same
as it was before the repair or service. If s/he cannot do so,
then the odometer must be set at zero, and a sticker must
be placed in the door jamb stating what the mileage was
before the repair or service. It is a good idea for you to
make a record of the odometer reading before the repair/
service, so that you can be sure that it is properly reset, or
that the door jamb sticker is accurate if the odometer
must be reset at zero.
276 UNDERSTANDING YOUR INSTRUMENT PANEL
Page 286 of 603

UP ButtonPress and release the UP button to scroll up-
ward through the main menus (Fuel Economy,
Vehicle Info, Tire PSI, Cruise, Messages, Units)
and sub-menus.
DOWN Button Press and release the DOWN button to scroll
downward through the main menus and sub-
menus.
SELECT Button Press and release the SELECT button for access
to main menus or sub-menus. Press and hold
the SELECT button for two seconds to reset
features. BACK Button
Press the BACK button to scroll back to a
previous menu or sub-menu.
Electronic Vehicle Information Center (EVIC)
Displays
The EVIC display consists of three sections:
1. The top line where compass direction, odometer line
and outside temperature are displayed.
2. The main display area where the menus and pop up
messages are displayed.
3. The reconfigurable telltales section below the odom-
eter line.
284 UNDERSTANDING YOUR INSTRUMENT PANEL
Page 300 of 603

•Units
Touch the Units soft-key to change this display. When in
this display, you may switch the EVIC, odometer, and
navigation system (if equipped) between US and Metric
units of measure. Touch US or Metric then touch the
arrow back soft-key. As you continue, the information
will display in the selected units of measure.
•Voice Response
Touch the Voice Response soft-key to change the Voice
Response Length settings. To change the Voice Response
Length, press and release the Brief or Long soft-key. Then
touch the arrow back soft-key.
•Touch Screen Beep
Touch the Touch Screen Beep soft-key to turn on or shut
off the sound heard when a touch screen button (soft-
key) is pressed. To change the Touch Screen Beep setting
press and release the ON or OFF soft-key, then touch the
arrow back soft-key.
Clock
•
Set Time
Touch the Set Time soft-key to change this display. When
in this display, you may select the time display settings.
To make your selection, touch the Set Time soft-key,
adjust the hours and minutes using the up and down
soft-keys, select AM or PM, select 12 hr or 24 hr. Then
touch the arrow back soft-key when all selections are
complete.
•Show Time Status
Touch the Show Time Status soft-key to change this
display. When in this display, you may turn on or shut off
the digital clock in the status bar. To change the Show
Time Status setting, press and release the ON or OFF
soft-key. Then touch the arrow back soft-key.
•Sync Time
Touch the Sync Time soft-key to change this display.
When in this display, you may have the radio set the time
298 UNDERSTANDING YOUR INSTRUMENT PANEL
Page 310 of 603

setting soft-keys or by selecting any point on the scale
between the + and – soft-keys. Then touch the arrow back
soft-key.
•Display Brightness With Headlights OFF
When in this display, you may select the brightness with
the headlights off. Adjust the brightness with the + and –
setting soft-keys or by selecting any point on the scale
between the + and – soft-keys. Then touch the arrow back
soft-key.
•Set Language
When in this display, you may select one of three
languages for all display nomenclature, including the trip
functions and the navigation system (if equipped). Touch
the Set Language soft-key and then touch the desired
language soft-key until a check-mark appears next to the
language, showing that setting has been selected. Touch
the back arrow soft-key to return to the previous menu.
•Units
When in this display, you may select to have the EVIC,
odometer, and navigation system (if equipped) changed
between US and Metric units of measure. Touch US or
Metric until a check-mark appears next to the setting,
showing that setting has been selected. Touch the back
arrow soft-key to return to the previous menu.
•Voice Response Length
When in this display, you may change the Voice Re-
sponse Length settings. To change the Voice Response
Length, touch the Brief or Detailed soft-key until a
check-mark appears next to the setting, showing that
setting has been selected. Touch the back arrow soft-key
to return to the previous menu.
•Touchscreen Beep
When in this display, you may turn on or shut off the
sound heard when a touch screen button (soft-key) is
pressed. Touch the Touchscreen Beep soft-key until a
308 UNDERSTANDING YOUR INSTRUMENT PANEL
Page 429 of 603

WARNING!
•Do not use a tire, wheel size or rating other than
that specified for your vehicle. Some combinations
of unapproved tires and wheels may change sus-
pension dimensions and performance characteris-
tics, resulting in changes to steering, handling, and
braking of your vehicle. This can cause unpredict-
able handling and stress to steering and suspen-
sion components. You could lose control and have
a collision resulting in serious injury or death. Use
only the tire and wheel sizes with load ratings
approved for your vehicle.
•Never use a tire with a smaller load index or
capacity, other than what was originally equipped
on your vehicle. Using a tire with a smaller load
index could result in tire overloading and failure.
You could lose control and have a collision.(Continued)
WARNING! (Continued)
•Failure to equip your vehicle with tires having
adequate speed capability can result in sudden tire
failure and loss of vehicle control.
CAUTION!
Replacing original tires with tires of a different size
may result in false speedometer and odometer read-
ings.
TIRE CHAINS
Use only compact chains, or other traction aids that meet
SAE type “Class S” specifications. Chains must be the
proper size for the vehicle, as recommended by the chain
manufacturer.
5
STARTING AND OPERATING 427
Page 451 of 603

on if the gas cap is not secured properly. Make sure
that the gas cap is tightened each time the vehicle is
refueled.
•When the fuel nozzle “clicks” or shuts off, the fuel
tank is full.
Loose Fuel Filler Cap Message
If the vehicle diagnostic system determines that the fuel
filler cap is loose, improperly installed, or damaged, the
word “gASCAP” will display in the odometer. If this
occurs, tighten the fuel filler cap until a “clicking” sound
is heard and press the TRIP ODOMETER button to turn
off the message. If the problem persists, the message will
appear the next time the vehicle is started.
A loose, improperly installed, or damaged fuel filler cap
may also turn on the MIL. Refer to “Onboard Diagnostic
System” in “Maintaining Your Vehicle” for further
information.
VEHICLE LOADING
The load carrying capacity of your vehicle is shown on
the “Vehicle Certification Label.” This information
should be used for passenger and luggage loading as
indicated.
Do not exceed the specified Gross Vehicle Weight Rating
(GVWR) or the Gross Axle Weight Rating (GAWR).
Vehicle Certification Label
Your vehicle has a Vehicle Certification Label affixed to
the rear of the driver’s door.
The label contains the following information:
•Name of manufacturer
•Month and year of manufacture
•Gross Vehicle Weight Rating (GVWR)
•Gross Axle Weight Rating (GAWR) front
5
STARTING AND OPERATING 449
Page 472 of 603

CAUTION!
Driving with a hot cooling system could damage
your vehicle. If the temperature gauge reads “H,”
safely pull over and stop the vehicle. Idle the vehicle
with the A/C turned off until the pointer drops back
into the normal range. If the pointer remains on the
“H,” and you hear continuous chimes, turn the en-
gine OFF immediately, and call for service.
WARNING!
You or others can be badly burned by hot engine
coolant (antifreeze) or steam from your radiator. If
you see or hear steam coming from under the hood,
do not open the hood until the radiator has had time
to cool. Never try to open a cooling system pressure
cap when the radiator or coolant bottle is hot.
2.4L Engine — If Equipped
On hot days the engine oil temperature may become too
hot during sustained high-speed driving or if towing a
trailer up long grades. If this happens, a HOTOIL mes-
sage will flash in the odometer and the vehicle speed will
be reduced to 48 mph (77 km/h) maximum until the
engine oil temperature is reduced.
NOTE:The maximum vehicle speed is reduced to
48 mph (77 km/h), you may reduce vehicle speed further
as needed. Once the engine oil temperature is reduced,
you may continue to drive normally.
470 WHAT TO DO IN EMERGENCIES