Page 214 of 643
from the driver to provide improved position with the
steering wheel.
The switch is located on the left side of the steering
column.
Press the switch forward to move the pedals forward
(toward the front of the vehicle).Press the switch rearward to move the pedals rearward
(toward the driver).
•The pedals can be adjusted with the ignition OFF.
•The pedals
cannotbe adjusted when the vehicle is in
REVERSE or when the Electronic Speed Control Sys-
tem is on. The following messages will be displayed
on vehicles equipped with the Electronic Vehicle In-
formation System (EVIC) if the pedals are attempted to
be adjusted when the system is locked out (“Adjust-
able Pedal Disabled — Cruise Control Engaged” or
“Adjustable Pedal Disabled — Vehicle In Reverse”.
Adjustable Pedal Switch
3
UNDERSTANDING THE FEATURES OF YOUR VEHICLE 211
Page 231 of 643

Courtesy/Interior Lighting
At the forward end of the console are two courtesy lights
(standard dome light has two buttons). The lights turn on
when a front door, a sliding door or the liftgate is opened.
If your vehicle is equipped with Remote Keyless Entry
(RKE) the lights will also turn on when the UNLOCK
button on the RKE transmitter is pressed.
The courtesy lights also function as reading lights. Press
in on each lens to turn these lights on while inside the
vehicle. Press a second time to turn each light off. You
may adjust the direction of these lights by pressing the
outside ring, which is identified with four directional
arrows (LED lamps only).
The area around the instrument panel cupholders is also
illuminated from a light in the overhead console (pre-
mium console only). This light is turned on when the
headlight switch is on, and will adjust in brightness when
the dimmer control is rotated up or down.
Sunglass Storage (Non-Sunroof Only)
At the front of the overhead console, a compartment is
provided for the storage of two pairs of sunglasses.
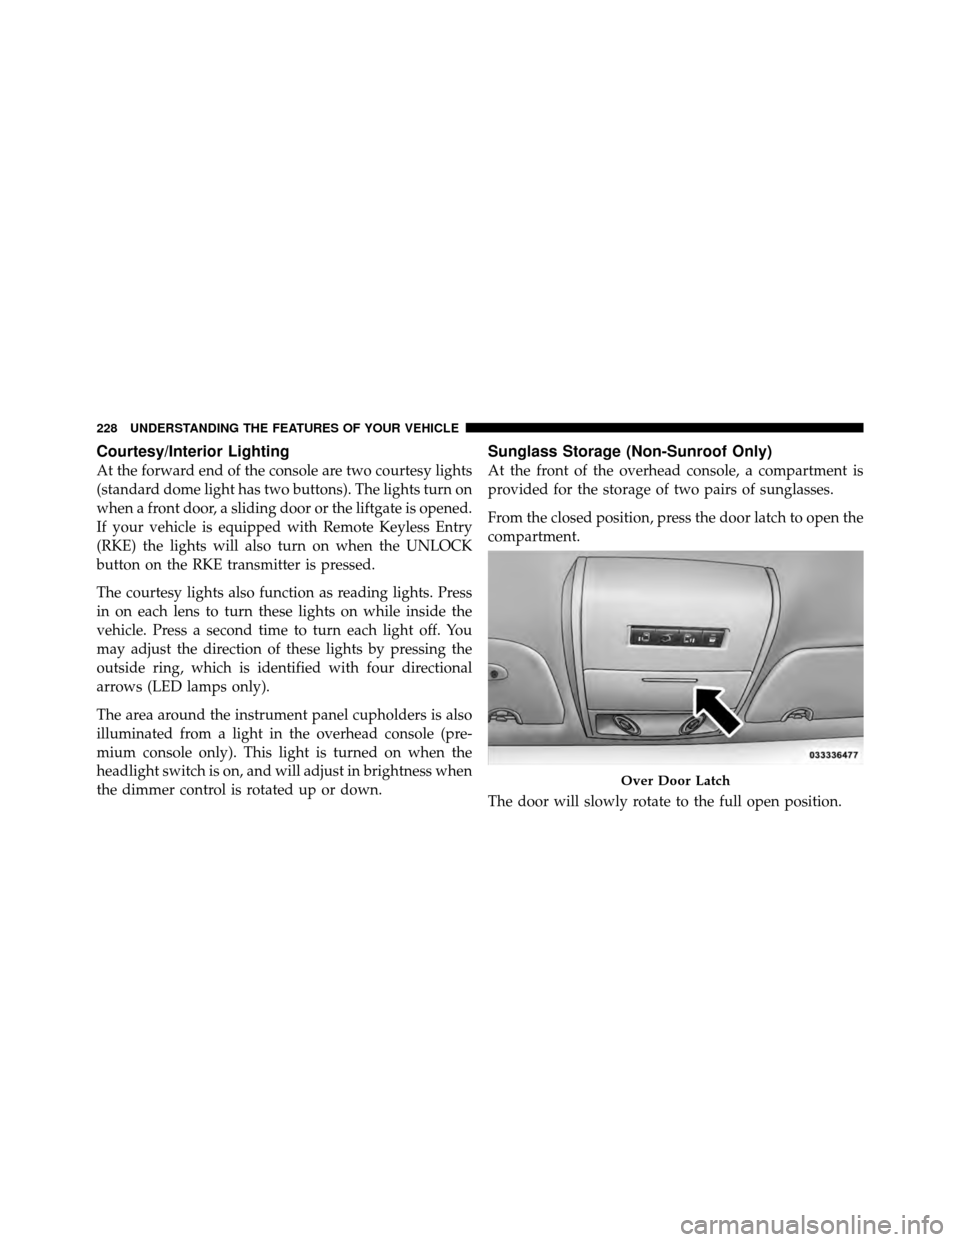
From the closed position, press the door latch to open the
compartment.
The door will slowly rotate to the full open position.
Over Door Latch
228 UNDERSTANDING THE FEATURES OF YOUR VEHICLE
Page 233 of 643
Rear Courtesy/Reading Lights — If Equipped
The overhead console has two sets of courtesy lights. The
lights turn on when a front door, a sliding door or the
liftgate is opened. If your vehicle is equipped with
Remote Keyless Entry (RKE) the lights will also turn on
when the UNLOCK button on the RKE transmitter is
pressed.
The courtesy lights also function as reading lights. Press
in on each lens to turn these lights on while inside the
vehicle. Press the lens a second time to turn each light off.
You may adjust the direction of these lights by pressing
the outside ring, which is identified with four directional
arrows.
Rear Overhead Consoles — If Equipped
The rear overhead storage system is available in two
versions: with or without sunroof.
An additional LED at the front of the rear console shines
down on the front foot-well area while in courtesy mode,
for added convenience.
Reading Lights
230 UNDERSTANDING THE FEATURES OF YOUR VEHICLE
Page 241 of 643

4. Watch for the HomeLink�indicator to change flash
rates. When it changes, it is programmed. It may take up
to 30 seconds or longer in rare cases. The garage door
may open and close while you are programming.
5. Press and hold the programmed HomeLink� button
and observe the indicator light.
•If the indicator light stays on constantly, program-
ming is complete and the garage door/device
should activate when the HomeLink� button is
pressed.
•To program the two remaining HomeLink� buttons,
repeat each step for each remaining button. DO
NOT erase the channels.
If you unplugged the garage door opener/device for
programming, plug it back in at this time.
Reprogramming A Single HomeLink� Button
To reprogram a channel that has been previously trained,
follow these steps:
1. Turn the ignition switch to the ON/RUN position.
2. Press and hold the desired HomeLink� button until
the indicator light begins to flash after 20 seconds. Do not
release the button.
3. Without releasing the button proceed with
“Canadian/Gate Operator Programming” Step 2 and
follow all remaining steps.
Using HomeLink�
To operate, press and release the programmed
HomeLink� button. Activation will now occur for the
programmed device (i.e., garage door opener, gate opera-
tor, security system, entry door lock, home/office light-
ing, etc.,). The hand-held transmitter of the device may
also be used at any time.
238 UNDERSTANDING THE FEATURES OF YOUR VEHICLE
Page 247 of 643

Sunroof Maintenance
Use only a non-abrasive cleaner and a soft cloth to clean
the glass panel.
Ignition Off Operation
For vehicles not equipped with the Electronic Vehicle
Information Center (EVIC), the power sunroof switch
will remain active for 45 seconds after the ignition switch
is turned to the LOCK position. Opening either front
door will cancel this feature.
NOTE:For vehicles equipped with the EVIC, the power
sunroof switch will remain active for up to approxi-
mately ten minutes after the ignition switch is turned to
the LOCK position. Opening either front door will cancel
this feature.
Sunroof Fully Closed
Press the switch forward and release to ensure that the
sunroof is fully closed.
ELECTRICAL POWER OUTLETS — IF EQUIPPED
Two 12 Volt (13 Amp) power outlets are located on the
lower instrument panel, below the open storage bin. The
driver-side power outlet is controlled by the ignition
switch and the passenger-side power outlet is connected
directly to the battery. The driver-side power outlet will
also operate a conventional cigar lighter unit (if equipped
with an optional Smoker’s Package).
244 UNDERSTANDING THE FEATURES OF YOUR VEHICLE
Page 258 of 643
Lower Glove Compartment
To open the lower compartment pull out on the release
handle.NOTE:
The lower compartment is equipped with a lock
that is part of the compartment handle.
Door Trim Panel Storage
Front Door Storage
Both interior front door panels have multiple pockets for
storage.
Lower Compartment
3
UNDERSTANDING THE FEATURES OF YOUR VEHICLE 255
Page 260 of 643
Second Row Seat Storage Bins — If Equipped
The seat storage bins are located on the floor in front of
the second row seats. The area below the covers can be
used for storage when the second row seat is in the
upright position.
Pull up on the storage bin latch to open the cover. Slide
the storage bin locking mechanism to the�Lock�position
to allow greater access to the storage bin.
CAUTION!
NOTE: The storage bin cover must be locked and flat
to avoid damage from contact with the front seat
tracks, which have minimal clearance to the cover.
Storage Bin
3
UNDERSTANDING THE FEATURES OF YOUR VEHICLE 257
Page 262 of 643
CAUTION!
The storage bin cover must be flat and locked to
avoid damage from contact with the front seat tracks,
which have minimal clearance to the cover.
Seat Storage Bin Cover Emergency Release Lever
As a security measure, your vehicle may be built with a
Storage Bin Cover Emergency Release is built into the
storage bin cover latching mechanism.NOTE:In the event of an individual being locked inside
the storage bin, the storage bin cover can be opened from
inside of the bin by pushing on the glow-in-the-dark
lever attached to the storage bin cover latching
mechanism.
Storage Bin Cover Emergency Release Lever
3
UNDERSTANDING THE FEATURES OF YOUR VEHICLE 259