2012 DODGE CHARGER SRT reset
[x] Cancel search: resetPage 294 of 546
NOTE:Changing the unit of measure in the Vehicle
Speed menu will not change the unit of measure in the
EVIC.
Trip Info
Press and release the UP or DOWN button until “Trip
Info” displays highlighted in the EVIC and press the
SELECT button. Press and release the UP/DOWN but-
tons until one of the following Trip functions displays in
the EVIC:
•Trip A
•Trip B
•Elapsed Time
Press the UP/DOWN buttons to cycle through all the
Trip Computer functions.The Trip Functions mode displays the following informa-
tion:
Trip A
Shows the total distance traveled for Trip A since the last
reset.
Trip B
Shows the total distance traveled for Trip B since the last
reset.
Elapsed Time
Shows the total elapsed time of travel since the last reset
when the ignition is in the ACC position. Elapsed time
will increment when the ignition is in the ON/RUN
position.
To Reset The Display
Reset will only occur while a resettable function is being
displayed. Press and release the SELECT button once to
clear the resettable function being displayed. To reset all
292 UNDERSTANDING YOUR INSTRUMENT PANEL
PAGE POSITION:292JOB:@zeta.tweddle.com/chry_pdm/CLS_chrysler/GRP_owners/JOB_918945-en-dsr-12D482-126-AA_DSR/DIV_og pubnum: 12D482-126-AB_DSR NOTE:Changing the unit of measure in the Vehicle
Speed menu will not change the unit of measure in the
EVIC.
Trip Info
Press and release the UP or DOWN button until “Trip
Info” displays highlighted in the EVIC and press the
SELECT button. Press and release the UP/DOWN but-
tons until one of the following Trip functions displays in
the EVIC:
•Trip A
•Trip B
•Elapsed Time
Press the UP/DOWN buttons to cycle through all the
Trip Computer functions.The Trip Functions mode displays the following informa-
tion:
Trip A
Shows the total distance traveled for Trip A since the last
reset.
Trip B
Shows the total distance traveled for Trip B since the last
reset.
Elapsed Time
Shows the total elapsed time of travel since the last reset
when the ignition is in the ACC position. Elapsed time
will increment when the ignition is in the ON/RUN
position.
To Reset The Display
Reset will only occur while a resettable function is being
displayed. Press and release the SELECT button once to
clear the resettable function being displayed. To reset all
292 UNDERSTANDING YOUR INSTRUMENT PANEL
PAGE POSITION:292JOB:@zeta.tweddle.com/chry_pdm/CLS_chrysler/GRP_owners/JOB_918945-en-dsr-12D482-126-AA_DSR/DIV_og pubnum: 12D482-126-AB_DSR
Page 295 of 546
resettable functions, press and hold the SELECT button
for two seconds. The current display will reset along with
other functions.
Units
Press and release the UP or DOWN button until “Units”
displays highlighted in the EVIC and press the SELECT
button. The EVIC, odometer, and navigation system (if
equipped) can be changed between English and Metric
units of measure. To make your selection, scroll up or
down until the preferred setting is highlighted, then
press and release the SELECT button until a check-mark
appears next to the setting, showing that the setting has
been selected.
Vehicle Info (Customer Information Features)
Press and release the UP or DOWN button until “Vehicle
Info” displays in the EVIC and press the SELECT button.Press the UP and DOWN button to scroll through the
available information displays, then press SELECT to
display any one of the following choices.
•Coolant Temp
Displays the actual coolant temperature.
•Oil Temperature
Displays the actual oil temperature.
•Oil Pressure
Displays the actual oil pressure.
•Trans Temperature
Displays the actual transmission temperature.
•Engine Hours
Displays the number of hours of engine operation.
•Tire Pressure
Shows the actual tire pressure for each tire (EXCLUDING
THE SPARE TIRE).
4
UNDERSTANDING YOUR INSTRUMENT PANEL 293
PAGE POSITION:293JOB:@zeta.tweddle.com/chry_pdm/CLS_chrysler/GRP_owners/JOB_918945-en-dsr-12D482-126-AA_DSR/DIV_og pubnum: 12D482-126-AB_DSR resettable functions, press and hold the SELECT button
for two seconds. The current display will reset along with
other functions.
Units
Press and release the UP or DOWN button until “Units”
displays highlighted in the EVIC and press the SELECT
button. The EVIC, odometer, and navigation system (if
equipped) can be changed between English and Metric
units of measure. To make your selection, scroll up or
down until the preferred setting is highlighted, then
press and release the SELECT button until a check-mark
appears next to the setting, showing that the setting has
been selected.
Vehicle Info (Customer Information Features)
Press and release the UP or DOWN button until “Vehicle
Info” displays in the EVIC and press the SELECT button.Press the UP and DOWN button to scroll through the
available information displays, then press SELECT to
display any one of the following choices.
•Coolant Temp
Displays the actual coolant temperature.
•Oil Temperature
Displays the actual oil temperature.
•Oil Pressure
Displays the actual oil pressure.
•Trans Temperature
Displays the actual transmission temperature.
•Engine Hours
Displays the number of hours of engine operation.
•Tire Pressure
Shows the actual tire pressure for each tire (EXCLUDING
THE SPARE TIRE).
4
UNDERSTANDING YOUR INSTRUMENT PANEL 293
PAGE POSITION:293JOB:@zeta.tweddle.com/chry_pdm/CLS_chrysler/GRP_owners/JOB_918945-en-dsr-12D482-126-AA_DSR/DIV_og pubnum: 12D482-126-AB_DSR
Page 305 of 546
touching the handle more than once will only result in
the driver ’s door opening. If Unlock Driver Door Only
On 1st Press is selected, once the driver door is opened,
the interior door lock/unlock switch can be used to
unlock all the doors (or use the RKE transmitter).
•Memory Linked to FOB
Touch the Memory Linked to FOB soft-key to change this
display. This feature provides automatic driver seat po-
sitioning to enhance driver mobility when entering and
exiting the vehicle, driver 1 and driver 2 last mode,
settings and presets. To make your selection, touch the
Memory Linked to FOB soft-key and select ON or OFF.
Then touch the arrow back soft-key.
NOTE:The seat will return to the memorized seat
location (if Recall Memory with Remote Key Unlock is set
to ON) when the RKE transmitter is used to unlock the
door. Refer to “Driver Memory Seat” in “Understanding
The Features Of Your Vehicle” for further information.
•Passive Entry (Keyless Enter-N-Go)
Touch the Passive Entry soft-key to change this display.
This feature allows you to lock and unlock the vehicle’s
door(s) without having to press the RKE transmitter lock
or unlock buttons. To make your selection, touch the
Passive Entry soft-key and select ON or OFF. Then touch
the arrow back soft-key. Refer to “Keyless Enter-N-Go” in
“Things To Know Before Starting Your Vehicle”.
Heated Seats
•
Auto Heated Seats
Touch the Auto Heated Seats soft-key to change this
display. When this feature is selected, the driver’s heated
seat will automatically turn on when temperatures are
below 40° F (4.4° C). To make your selection, touch the
Auto Heated Seats soft-key and select ON or OFF. Then
touch the arrow back soft-key.
4
UNDERSTANDING YOUR INSTRUMENT PANEL 303
PAGE POSITION:303JOB:@zeta.tweddle.com/chry_pdm/CLS_chrysler/GRP_owners/JOB_918945-en-dsr-12D482-126-AA_DSR/DIV_og pubnum: 12D482-126-AB_DSR touching the handle more than once will only result in
the driver ’s door opening. If Unlock Driver Door Only
On 1st Press is selected, once the driver door is opened,
the interior door lock/unlock switch can be used to
unlock all the doors (or use the RKE transmitter).
•Memory Linked to FOB
Touch the Memory Linked to FOB soft-key to change this
display. This feature provides automatic driver seat po-
sitioning to enhance driver mobility when entering and
exiting the vehicle, driver 1 and driver 2 last mode,
settings and presets. To make your selection, touch the
Memory Linked to FOB soft-key and select ON or OFF.
Then touch the arrow back soft-key.
NOTE:The seat will return to the memorized seat
location (if Recall Memory with Remote Key Unlock is set
to ON) when the RKE transmitter is used to unlock the
door. Refer to “Driver Memory Seat” in “Understanding
The Features Of Your Vehicle” for further information.
•Passive Entry (Keyless Enter-N-Go)
Touch the Passive Entry soft-key to change this display.
This feature allows you to lock and unlock the vehicle’s
door(s) without having to press the RKE transmitter lock
or unlock buttons. To make your selection, touch the
Passive Entry soft-key and select ON or OFF. Then touch
the arrow back soft-key. Refer to “Keyless Enter-N-Go” in
“Things To Know Before Starting Your Vehicle”.
Heated Seats
•
Auto Heated Seats
Touch the Auto Heated Seats soft-key to change this
display. When this feature is selected, the driver’s heated
seat will automatically turn on when temperatures are
below 40° F (4.4° C). To make your selection, touch the
Auto Heated Seats soft-key and select ON or OFF. Then
touch the arrow back soft-key.
4
UNDERSTANDING YOUR INSTRUMENT PANEL 303
PAGE POSITION:303JOB:@zeta.tweddle.com/chry_pdm/CLS_chrysler/GRP_owners/JOB_918945-en-dsr-12D482-126-AA_DSR/DIV_og pubnum: 12D482-126-AB_DSR
Page 307 of 546
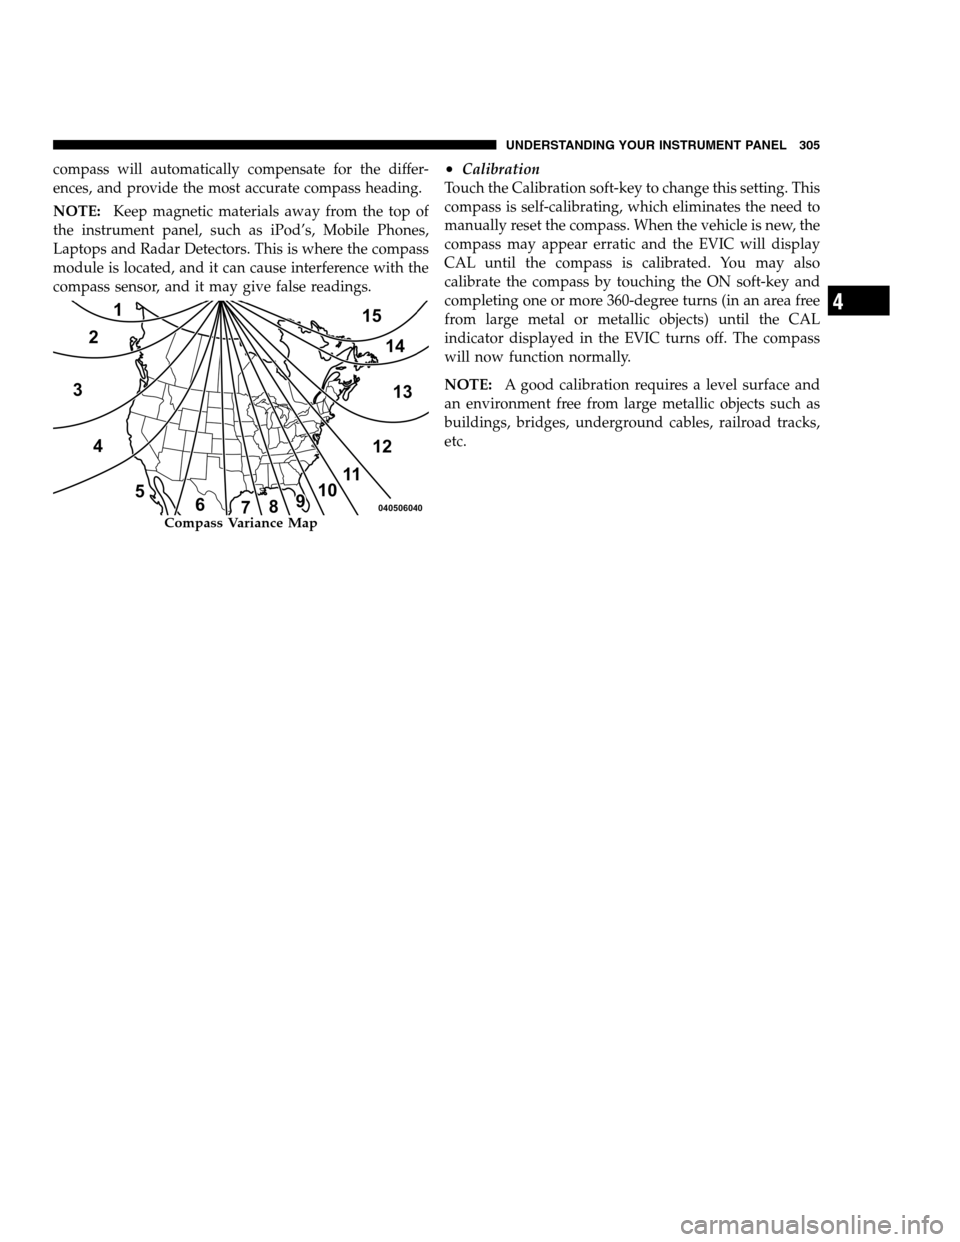
compass will automatically compensate for the differ-
ences, and provide the most accurate compass heading.
NOTE:Keep magnetic materials away from the top of
the instrument panel, such as iPod’s, Mobile Phones,
Laptops and Radar Detectors. This is where the compass
module is located, and it can cause interference with the
compass sensor, and it may give false readings.
•Calibration
Touch the Calibration soft-key to change this setting. This
compass is self-calibrating, which eliminates the need to
manually reset the compass. When the vehicle is new, the
compass may appear erratic and the EVIC will display
CAL until the compass is calibrated. You may also
calibrate the compass by touching the ON soft-key and
completing one or more 360-degree turns (in an area free
from large metal or metallic objects) until the CAL
indicator displayed in the EVIC turns off. The compass
will now function normally.
NOTE:A good calibration requires a level surface and
an environment free from large metallic objects such as
buildings, bridges, underground cables, railroad tracks,
etc.
Compass Variance Map
4
UNDERSTANDING YOUR INSTRUMENT PANEL 305
PAGE POSITION:305JOB:@zeta.tweddle.com/chry_pdm/CLS_chrysler/GRP_owners/JOB_918945-en-dsr-12D482-126-AA_DSR/DIV_og pubnum: 12D482-126-AB_DSR compass will automatically compensate for the differ-
ences, and provide the most accurate compass heading.
NOTE:Keep magnetic materials away from the top of
the instrument panel, such as iPod’s, Mobile Phones,
Laptops and Radar Detectors. This is where the compass
module is located, and it can cause interference with the
compass sensor, and it may give false readings.
•Calibration
Touch the Calibration soft-key to change this setting. This
compass is self-calibrating, which eliminates the need to
manually reset the compass. When the vehicle is new, the
compass may appear erratic and the EVIC will display
CAL until the compass is calibrated. You may also
calibrate the compass by touching the ON soft-key and
completing one or more 360-degree turns (in an area free
from large metal or metallic objects) until the CAL
indicator displayed in the EVIC turns off. The compass
will now function normally.
NOTE:A good calibration requires a level surface and
an environment free from large metallic objects such as
buildings, bridges, underground cables, railroad tracks,
etc.
Compass Variance Map
4
UNDERSTANDING YOUR INSTRUMENT PANEL 305
PAGE POSITION:305JOB:@zeta.tweddle.com/chry_pdm/CLS_chrysler/GRP_owners/JOB_918945-en-dsr-12D482-126-AA_DSR/DIV_og pubnum: 12D482-126-AB_DSR
Page 322 of 546
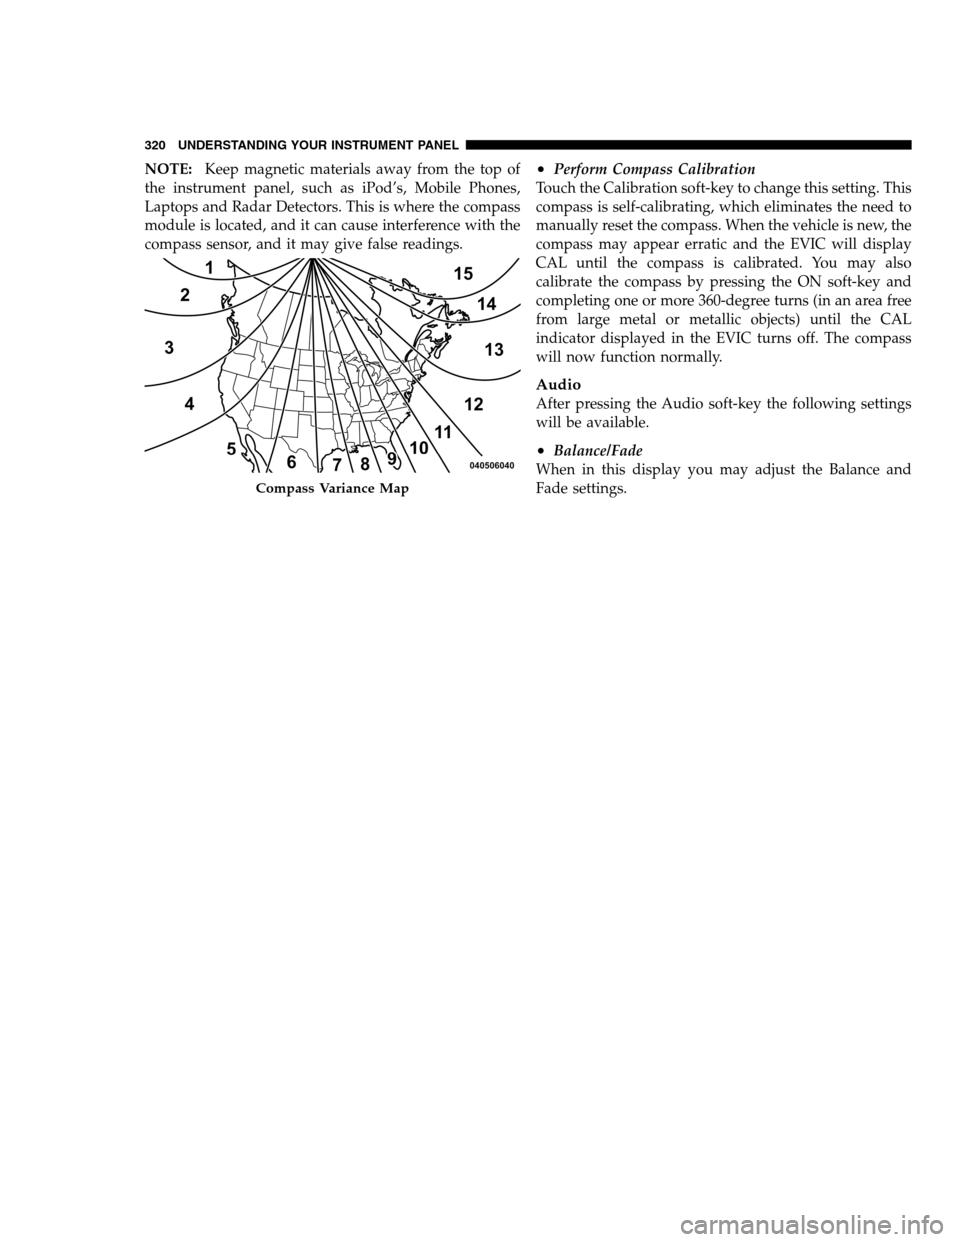
NOTE:Keep magnetic materials away from the top of
the instrument panel, such as iPod’s, Mobile Phones,
Laptops and Radar Detectors. This is where the compass
module is located, and it can cause interference with the
compass sensor, and it may give false readings.•Perform Compass Calibration
Touch the Calibration soft-key to change this setting. This
compass is self-calibrating, which eliminates the need to
manually reset the compass. When the vehicle is new, the
compass may appear erratic and the EVIC will display
CAL until the compass is calibrated. You may also
calibrate the compass by pressing the ON soft-key and
completing one or more 360-degree turns (in an area free
from large metal or metallic objects) until the CAL
indicator displayed in the EVIC turns off. The compass
will now function normally.
Audio
After pressing the Audio soft-key the following settings
will be available.
•Balance/Fade
When in this display you may adjust the Balance and
Fade settings.
Compass Variance Map
320 UNDERSTANDING YOUR INSTRUMENT PANEL
PAGE POSITION:320JOB:@zeta.tweddle.com/chry_pdm/CLS_chrysler/GRP_owners/JOB_918945-en-dsr-12D482-126-AA_DSR/DIV_og pubnum: 12D482-126-AB_DSR NOTE:Keep magnetic materials away from the top of
the instrument panel, such as iPod’s, Mobile Phones,
Laptops and Radar Detectors. This is where the compass
module is located, and it can cause interference with the
compass sensor, and it may give false readings.•Perform Compass Calibration
Touch the Calibration soft-key to change this setting. This
compass is self-calibrating, which eliminates the need to
manually reset the compass. When the vehicle is new, the
compass may appear erratic and the EVIC will display
CAL until the compass is calibrated. You may also
calibrate the compass by pressing the ON soft-key and
completing one or more 360-degree turns (in an area free
from large metal or metallic objects) until the CAL
indicator displayed in the EVIC turns off. The compass
will now function normally.
Audio
After pressing the Audio soft-key the following settings
will be available.
•Balance/Fade
When in this display you may adjust the Balance and
Fade settings.
Compass Variance Map
320 UNDERSTANDING YOUR INSTRUMENT PANEL
PAGE POSITION:320JOB:@zeta.tweddle.com/chry_pdm/CLS_chrysler/GRP_owners/JOB_918945-en-dsr-12D482-126-AA_DSR/DIV_og pubnum: 12D482-126-AB_DSR
Page 329 of 546
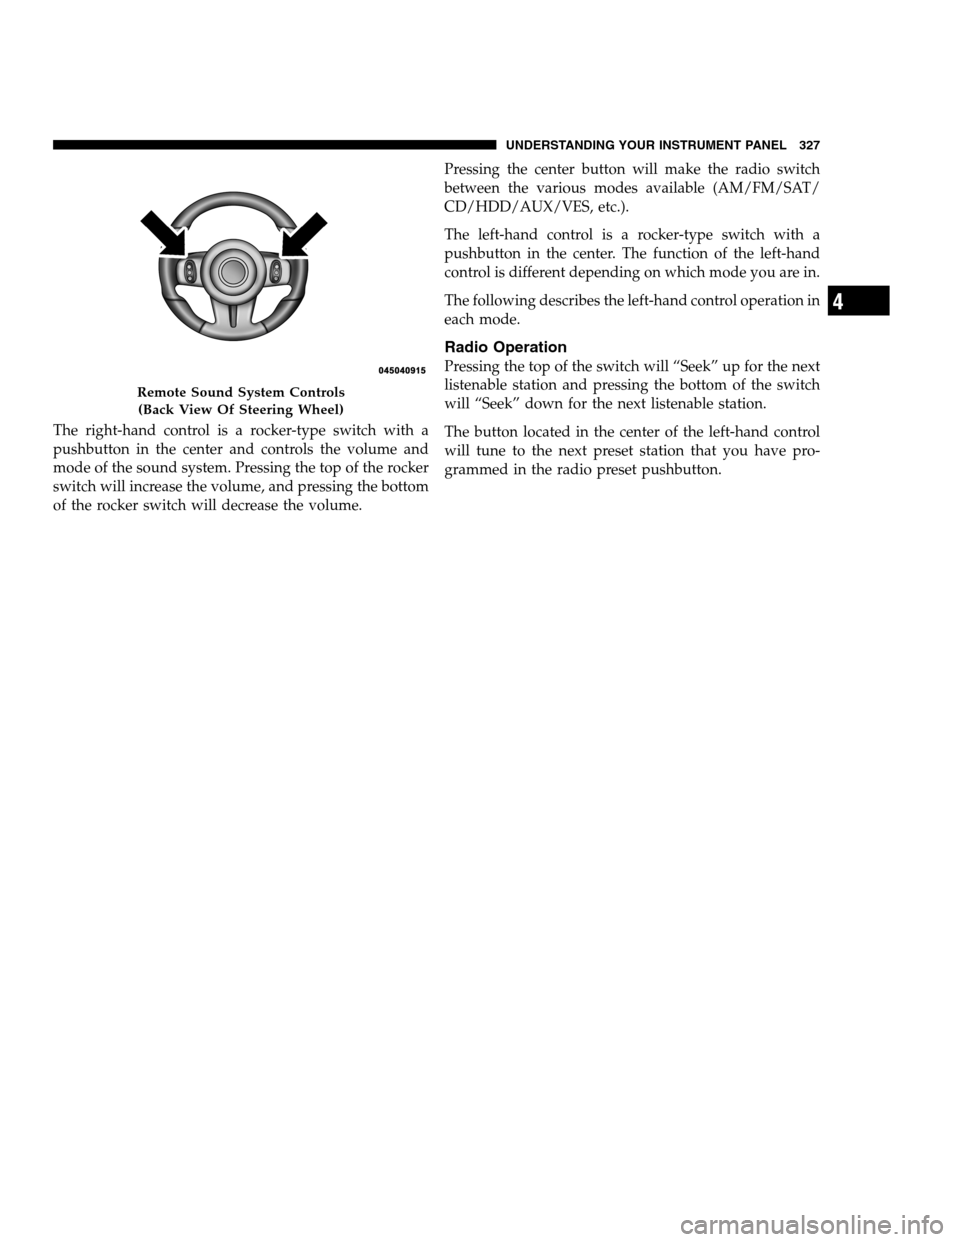
The right-hand control is a rocker-type switch with a
pushbutton in the center and controls the volume and
mode of the sound system. Pressing the top of the rocker
switch will increase the volume, and pressing the bottom
of the rocker switch will decrease the volume.Pressing the center button will make the radio switch
between the various modes available (AM/FM/SAT/
CD/HDD/AUX/VES, etc.).
The left-hand control is a rocker-type switch with a
pushbutton in the center. The function of the left-hand
control is different depending on which mode you are in.
The following describes the left-hand control operation in
each mode.
Radio Operation
Pressing the top of the switch will “Seek” up for the next
listenable station and pressing the bottom of the switch
will “Seek” down for the next listenable station.
The button located in the center of the left-hand control
will tune to the next preset station that you have pro-
grammed in the radio preset pushbutton.
Remote Sound System Controls
(Back View Of Steering Wheel)
4
UNDERSTANDING YOUR INSTRUMENT PANEL 327
PAGE POSITION:327JOB:@zeta.tweddle.com/chry_pdm/CLS_chrysler/GRP_owners/JOB_918945-en-dsr-12D482-126-AA_DSR/DIV_og pubnum: 12D482-126-AB_DSR The right-hand control is a rocker-type switch with a
pushbutton in the center and controls the volume and
mode of the sound system. Pressing the top of the rocker
switch will increase the volume, and pressing the bottom
of the rocker switch will decrease the volume.Pressing the center button will make the radio switch
between the various modes available (AM/FM/SAT/
CD/HDD/AUX/VES, etc.).
The left-hand control is a rocker-type switch with a
pushbutton in the center. The function of the left-hand
control is different depending on which mode you are in.
The following describes the left-hand control operation in
each mode.
Radio Operation
Pressing the top of the switch will “Seek” up for the next
listenable station and pressing the bottom of the switch
will “Seek” down for the next listenable station.
The button located in the center of the left-hand control
will tune to the next preset station that you have pro-
grammed in the radio preset pushbutton.
Remote Sound System Controls
(Back View Of Steering Wheel)
4
UNDERSTANDING YOUR INSTRUMENT PANEL 327
PAGE POSITION:327JOB:@zeta.tweddle.com/chry_pdm/CLS_chrysler/GRP_owners/JOB_918945-en-dsr-12D482-126-AA_DSR/DIV_og pubnum: 12D482-126-AB_DSR
Page 361 of 546

may be illuminated. Limp Home Mode allows the vehicle
to be driven to an authorized dealer for service without
damaging the transmission.
In the event of a momentary problem, the transmission
can be reset to regain all forward gears by performing the
following steps:
1. Stop the vehicle.
2. Shift the transmission into PARK.
3. Turn the engine OFF.
4. Wait approximately 10 seconds.
5. Restart the engine.
6. Shift into the desired gear range. If the problem is no
longer detected, the transmission will return to normal
operation.NOTE:Even if the transmission can be reset, we recom-
mend that you visit your authorized dealer at your
earliest possible convenience. Your authorized dealer has
diagnostic equipment to determine if the problem could
recur.
If the transmission cannot be reset, authorized dealer
service is required.
Overdrive Operation
The automatic transmission includes an electronically
controlled Overdrive (fifth gear). The transmission will
automatically shift into the Overdrive gear if the follow-
ing conditions are present:
•the shift lever is in the DRIVE position,
•vehicle speed is sufficiently high, and
•the driver is not heavily pressing the accelerator
5
STARTING AND OPERATING 359
PAGE POSITION:359JOB:@zeta.tweddle.com/chry_pdm/CLS_chrysler/GRP_owners/JOB_918945-en-dsr-12D482-126-AA_DSR/DIV_og pubnum: 12D482-126-AB_DSR may be illuminated. Limp Home Mode allows the vehicle
to be driven to an authorized dealer for service without
damaging the transmission.
In the event of a momentary problem, the transmission
can be reset to regain all forward gears by performing the
following steps:
1. Stop the vehicle.
2. Shift the transmission into PARK.
3. Turn the engine OFF.
4. Wait approximately 10 seconds.
5. Restart the engine.
6. Shift into the desired gear range. If the problem is no
longer detected, the transmission will return to normal
operation.NOTE:Even if the transmission can be reset, we recom-
mend that you visit your authorized dealer at your
earliest possible convenience. Your authorized dealer has
diagnostic equipment to determine if the problem could
recur.
If the transmission cannot be reset, authorized dealer
service is required.
Overdrive Operation
The automatic transmission includes an electronically
controlled Overdrive (fifth gear). The transmission will
automatically shift into the Overdrive gear if the follow-
ing conditions are present:
•the shift lever is in the DRIVE position,
•vehicle speed is sufficiently high, and
•the driver is not heavily pressing the accelerator
5
STARTING AND OPERATING 359
PAGE POSITION:359JOB:@zeta.tweddle.com/chry_pdm/CLS_chrysler/GRP_owners/JOB_918945-en-dsr-12D482-126-AA_DSR/DIV_og pubnum: 12D482-126-AB_DSR
Page 414 of 546

E-85 Usage In Non-Flex Fuel Vehicles
Non-FFV vehicles are compatible with gasoline contain-
ing 10% ethanol (E10). Gasoline with higher ethanol
content may void the vehicle’s warranty.
If a Non-FFV vehicle is inadvertently fueled with E-85
fuel, the engine will have some or all of these symptoms:
•operate in a lean mode
•OBD II “Malfunction Indicator Light” on
•poor engine performance
•poor cold start and cold drivability
•increased risk for fuel system component corrosion
To fix a Non-FFV vehicle inadvertently fueled once with
E-85 perform the following:
•drain the fuel tank (see your authorized dealer)
•change the engine oil and oil filter
•disconnect and reconnect the battery to reset the
engine controller memory
More extensive repairs will be required for prolonged
exposure to E-85 fuel.
MMT In Gasoline
MMT is a manganese-containing metallic additive that is
blended into some gasoline to increase octane. Gasoline
blended with MMT provides no performance advantage
beyond gasoline of the same octane number without
MMT. Gasoline blended with MMT reduces spark plug
life and reduces emissions system performance in some
vehicles. The manufacturer recommends that gasoline
without MMT be used in your vehicle. The MMT content
of gasoline may not be indicated on the gasoline pump,
therefore, you should ask your gasoline retailer whether
the gasoline contains MMT. It is even more important to
look for gasoline without MMT in Canada, because MMT
412 STARTING AND OPERATING
PAGE POSITION:412JOB:@zeta.tweddle.com/chry_pdm/CLS_chrysler/GRP_owners/JOB_918945-en-dsr-12D482-126-AA_DSR/DIV_og pubnum: 12D482-126-AB_DSR E-85 Usage In Non-Flex Fuel Vehicles
Non-FFV vehicles are compatible with gasoline contain-
ing 10% ethanol (E10). Gasoline with higher ethanol
content may void the vehicle’s warranty.
If a Non-FFV vehicle is inadvertently fueled with E-85
fuel, the engine will have some or all of these symptoms:
•operate in a lean mode
•OBD II “Malfunction Indicator Light” on
•poor engine performance
•poor cold start and cold drivability
•increased risk for fuel system component corrosion
To fix a Non-FFV vehicle inadvertently fueled once with
E-85 perform the following:
•drain the fuel tank (see your authorized dealer)
•change the engine oil and oil filter
•disconnect and reconnect the battery to reset the
engine controller memory
More extensive repairs will be required for prolonged
exposure to E-85 fuel.
MMT In Gasoline
MMT is a manganese-containing metallic additive that is
blended into some gasoline to increase octane. Gasoline
blended with MMT provides no performance advantage
beyond gasoline of the same octane number without
MMT. Gasoline blended with MMT reduces spark plug
life and reduces emissions system performance in some
vehicles. The manufacturer recommends that gasoline
without MMT be used in your vehicle. The MMT content
of gasoline may not be indicated on the gasoline pump,
therefore, you should ask your gasoline retailer whether
the gasoline contains MMT. It is even more important to
look for gasoline without MMT in Canada, because MMT
412 STARTING AND OPERATING
PAGE POSITION:412JOB:@zeta.tweddle.com/chry_pdm/CLS_chrysler/GRP_owners/JOB_918945-en-dsr-12D482-126-AA_DSR/DIV_og pubnum: 12D482-126-AB_DSR