2012 DODGE CHARGER SRT instrument cluster
[x] Cancel search: instrument clusterPage 271 of 546

INSTRUMENT PANEL FEATURES
1 — Air Outlet 7 — ESC Off Switch 13 — Engine Start/Stop Button
2 — Instrument Cluster 8 — Uconnect Touch™ System Hard Controls 14 — Trunk Release Button
3 — Hazard Switch 9 — SD Memory Card Slot 15 — Dimmer Controls
4 — Uconnect Touch™ System 10 — Power Outlet 16 — Hood Release
5 — Climate Control Hard Controls 11 — CD/DVD Slot 17 — Headlight Switch
6 — Glove Compartment 12 — Storage Compartment 18 — Paddle Shifters
4
UNDERSTANDING YOUR INSTRUMENT PANEL 269
PAGE POSITION:269JOB:@zeta.tweddle.com/chry_pdm/CLS_chrysler/GRP_owners/JOB_918945-en-dsr-12D482-126-AA_DSR/DIV_og pubnum: 12D482-126-AB_DSR INSTRUMENT PANEL FEATURES
1 — Air Outlet 7 — ESC Off Switch 13 — Engine Start/Stop Button
2 — Instrument Cluster 8 — Uconnect Touch™ System Hard Controls 14 — Trunk Release Button
3 — Hazard Switch 9 — SD Memory Card Slot 15 — Dimmer Controls
4 — Uconnect Touch™ System 10 — Power Outlet 16 — Hood Release
5 — Climate Control Hard Controls 11 — CD/DVD Slot 17 — Headlight Switch
6 — Glove Compartment 12 — Storage Compartment 18 — Paddle Shifters
4
UNDERSTANDING YOUR INSTRUMENT PANEL 269
PAGE POSITION:269JOB:@zeta.tweddle.com/chry_pdm/CLS_chrysler/GRP_owners/JOB_918945-en-dsr-12D482-126-AA_DSR/DIV_og pubnum: 12D482-126-AB_DSR
Page 272 of 546
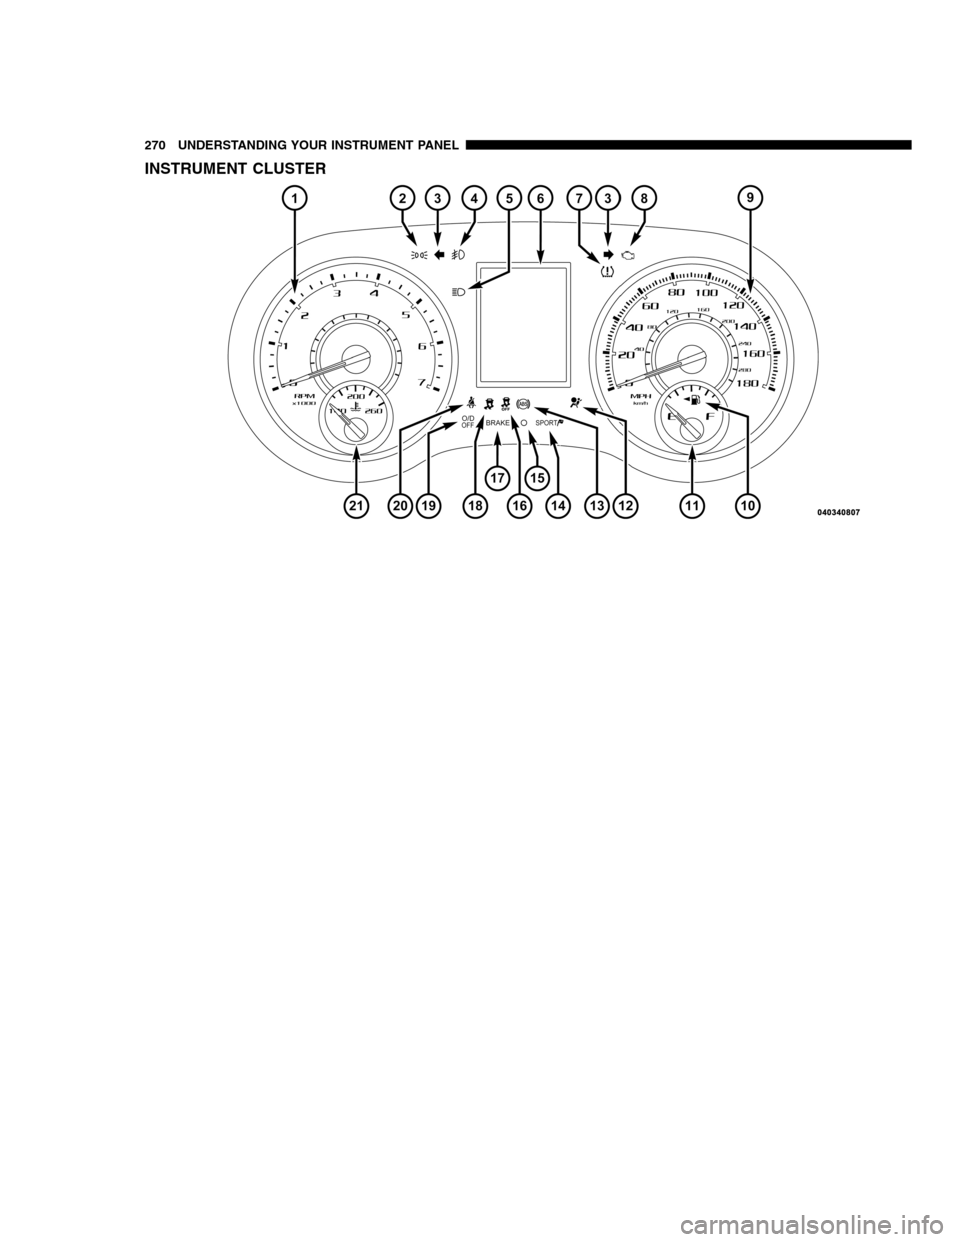
INSTRUMENT CLUSTER
270 UNDERSTANDING YOUR INSTRUMENT PANEL
PAGE POSITION:270JOB:@zeta.tweddle.com/chry_pdm/CLS_chrysler/GRP_owners/JOB_918945-en-dsr-12D482-126-AA_DSR/DIV_og pubnum: 12D482-126-AB_DSR INSTRUMENT CLUSTER
270 UNDERSTANDING YOUR INSTRUMENT PANEL
PAGE POSITION:270JOB:@zeta.tweddle.com/chry_pdm/CLS_chrysler/GRP_owners/JOB_918945-en-dsr-12D482-126-AA_DSR/DIV_og pubnum: 12D482-126-AB_DSR
Page 273 of 546
INSTRUMENT CLUSTER DESCRIPTIONS
1. Tachometer
The red segments indicate the maximum permissible
engine revolutions per minute (RPM x 1000) for each gear
range. Before reaching the red area, ease up on the
accelerator.
2. Park/Headlight ON Indicator — If Equipped
This indicator will illuminate when the park
lights or headlights are turned on.
3. Turn Signal Indicators
The arrow will flash with the exterior turn signal
when the turn signal lever is operated.
If the vehicle electronics sense that the vehicle is driven
more than 1 mile (1.6 km) with either turn signal on, acontinuous chime will sound to alert you to turn the
signals off. If either indicator flashes at a rapid rate, check
for a defective outside light bulb.
4. Front Fog Light Indicator — If Equipped
This indicator will illuminate when the front fog
lights are on.
5. High Beam Indicator
This indicator shows that the high beam head-
lights are on. Push the multifunction lever forward
to switch the headlights to high beam, and pull toward
yourself (normal position) to return to low beam.
6. Odometer Display / Electronic Vehicle Information
Center (EVIC) Display
Odometer Display
The odometer display shows the total distance the ve-
hicle has been driven.
4
UNDERSTANDING YOUR INSTRUMENT PANEL 271
PAGE POSITION:271JOB:@zeta.tweddle.com/chry_pdm/CLS_chrysler/GRP_owners/JOB_918945-en-dsr-12D482-126-AA_DSR/DIV_og pubnum: 12D482-126-AB_DSR INSTRUMENT CLUSTER DESCRIPTIONS
1. Tachometer
The red segments indicate the maximum permissible
engine revolutions per minute (RPM x 1000) for each gear
range. Before reaching the red area, ease up on the
accelerator.
2. Park/Headlight ON Indicator — If Equipped
This indicator will illuminate when the park
lights or headlights are turned on.
3. Turn Signal Indicators
The arrow will flash with the exterior turn signal
when the turn signal lever is operated.
If the vehicle electronics sense that the vehicle is driven
more than 1 mile (1.6 km) with either turn signal on, acontinuous chime will sound to alert you to turn the
signals off. If either indicator flashes at a rapid rate, check
for a defective outside light bulb.
4. Front Fog Light Indicator — If Equipped
This indicator will illuminate when the front fog
lights are on.
5. High Beam Indicator
This indicator shows that the high beam head-
lights are on. Push the multifunction lever forward
to switch the headlights to high beam, and pull toward
yourself (normal position) to return to low beam.
6. Odometer Display / Electronic Vehicle Information
Center (EVIC) Display
Odometer Display
The odometer display shows the total distance the ve-
hicle has been driven.
4
UNDERSTANDING YOUR INSTRUMENT PANEL 271
PAGE POSITION:271JOB:@zeta.tweddle.com/chry_pdm/CLS_chrysler/GRP_owners/JOB_918945-en-dsr-12D482-126-AA_DSR/DIV_og pubnum: 12D482-126-AB_DSR
Page 274 of 546
U.S. Federal regulations require that upon transfer of
vehicle ownership, the seller certify to the purchaser the
correct mileage that the vehicle has been driven. If your
odometer needs to be repaired or serviced, the repair
technician should leave the odometer reading the same
as it was before the repair or service. If s/he cannot do so,
then the odometer must be set at zero, and a sticker must
be placed in the door jamb stating what the mileage was
before the repair or service. It is a good idea for you to
make a record of the odometer reading before the repair/
service, so that you can be sure that it is properly reset, or
that the door jamb sticker is accurate if the odometer
must be reset at zero.
Electronic Vehicle Information Center (EVIC) Display
The Electronic Vehicle Information Center (EVIC) fea-
tures a driver-interactive display that is located in the
instrument cluster. For further information, refer to
“Electronic Vehicle Information Center (EVIC)”.The Shift Lever Indicator is self-contained within the
EVIC displauy. It displays the gear position of the
automatic transmission.
NOTE:
•You must apply the brakes before shifting from PARK.
•The highest available transmission gear is displayed in
the lower right corner of the Electronic Vehicle Infor-
mation Center (EVIC) whenever the Electronic Range
Select (ERS) feature is active. Use the +/- selector on
the shift lever to activate ERS. Refer to “Automatic
Transmission” in “Starting And Operating” for further
information.
7. Tire Pressure Monitoring Telltale Light — If
Equipped
Each tire, including the spare (if provided),
should be checked monthly when cold and
inflated to the inflation pressure recommended
by the vehicle manufacturer on the vehicle
272 UNDERSTANDING YOUR INSTRUMENT PANEL
PAGE POSITION:272JOB:@zeta.tweddle.com/chry_pdm/CLS_chrysler/GRP_owners/JOB_918945-en-dsr-12D482-126-AA_DSR/DIV_og pubnum: 12D482-126-AB_DSR U.S. Federal regulations require that upon transfer of
vehicle ownership, the seller certify to the purchaser the
correct mileage that the vehicle has been driven. If your
odometer needs to be repaired or serviced, the repair
technician should leave the odometer reading the same
as it was before the repair or service. If s/he cannot do so,
then the odometer must be set at zero, and a sticker must
be placed in the door jamb stating what the mileage was
before the repair or service. It is a good idea for you to
make a record of the odometer reading before the repair/
service, so that you can be sure that it is properly reset, or
that the door jamb sticker is accurate if the odometer
must be reset at zero.
Electronic Vehicle Information Center (EVIC) Display
The Electronic Vehicle Information Center (EVIC) fea-
tures a driver-interactive display that is located in the
instrument cluster. For further information, refer to
“Electronic Vehicle Information Center (EVIC)”.The Shift Lever Indicator is self-contained within the
EVIC displauy. It displays the gear position of the
automatic transmission.
NOTE:
•You must apply the brakes before shifting from PARK.
•The highest available transmission gear is displayed in
the lower right corner of the Electronic Vehicle Infor-
mation Center (EVIC) whenever the Electronic Range
Select (ERS) feature is active. Use the +/- selector on
the shift lever to activate ERS. Refer to “Automatic
Transmission” in “Starting And Operating” for further
information.
7. Tire Pressure Monitoring Telltale Light — If
Equipped
Each tire, including the spare (if provided),
should be checked monthly when cold and
inflated to the inflation pressure recommended
by the vehicle manufacturer on the vehicle
272 UNDERSTANDING YOUR INSTRUMENT PANEL
PAGE POSITION:272JOB:@zeta.tweddle.com/chry_pdm/CLS_chrysler/GRP_owners/JOB_918945-en-dsr-12D482-126-AA_DSR/DIV_og pubnum: 12D482-126-AB_DSR
Page 280 of 546
WARNING!
Driving a vehicle with the red brake light on is
dangerous. Part of the brake system may have failed.
It will take longer to stop the vehicle. You could have
a collision. Have the vehicle checked immediately.
Vehicles equipped with the Anti-Lock Brake System
(ABS), are also equipped with Electronic Brake Force
Distribution (EBD). In the event of an EBD failure, the
Brake Warning Light will turn on along with the ABS
Light. Immediate repair to the ABS system is required.
Operation of the Brake Warning Light can be checked by
turning the ignition switch from the OFF position to the
ON/RUN position. The light should illuminate for ap-
proximately two seconds. The light should then turn off
unless the parking brake is applied or a brake fault is
detected. If the light does not illuminate, have the light
inspected by an authorized dealer.
The light also will turn on when the parking brake is
applied with the ignition switch in the ON/RUN position.
NOTE:This light shows only that the parking brake is
applied. It does not show the degree of brake application.
18. Electronic Stability Control (ESC) Activation/
Malfunction Indicator Light — If Equipped
The “ESC Activation/Malfunction Indicator
Light” in the instrument cluster will come on
when the ignition switch is turned to the
ON/RUN position. It should go out with the
engine running. If the “ESC Activation/Malfunction In-
dicator Light” comes on continuously with the engine
running, a malfunction has been detected in the ESC
system. If this light remains on after several ignition
cycles, and the vehicle has been driven several miles
(kilometers) at speeds greater than 30 mph (48 km/h), see
your authorized dealer as soon as possible to have the
problem diagnosed and corrected.
278 UNDERSTANDING YOUR INSTRUMENT PANEL
PAGE POSITION:278JOB:@zeta.tweddle.com/chry_pdm/CLS_chrysler/GRP_owners/JOB_918945-en-dsr-12D482-126-AA_DSR/DIV_og pubnum: 12D482-126-AB_DSR WARNING!
Driving a vehicle with the red brake light on is
dangerous. Part of the brake system may have failed.
It will take longer to stop the vehicle. You could have
a collision. Have the vehicle checked immediately.
Vehicles equipped with the Anti-Lock Brake System
(ABS), are also equipped with Electronic Brake Force
Distribution (EBD). In the event of an EBD failure, the
Brake Warning Light will turn on along with the ABS
Light. Immediate repair to the ABS system is required.
Operation of the Brake Warning Light can be checked by
turning the ignition switch from the OFF position to the
ON/RUN position. The light should illuminate for ap-
proximately two seconds. The light should then turn off
unless the parking brake is applied or a brake fault is
detected. If the light does not illuminate, have the light
inspected by an authorized dealer.
The light also will turn on when the parking brake is
applied with the ignition switch in the ON/RUN position.
NOTE:This light shows only that the parking brake is
applied. It does not show the degree of brake application.
18. Electronic Stability Control (ESC) Activation/
Malfunction Indicator Light — If Equipped
The “ESC Activation/Malfunction Indicator
Light” in the instrument cluster will come on
when the ignition switch is turned to the
ON/RUN position. It should go out with the
engine running. If the “ESC Activation/Malfunction In-
dicator Light” comes on continuously with the engine
running, a malfunction has been detected in the ESC
system. If this light remains on after several ignition
cycles, and the vehicle has been driven several miles
(kilometers) at speeds greater than 30 mph (48 km/h), see
your authorized dealer as soon as possible to have the
problem diagnosed and corrected.
278 UNDERSTANDING YOUR INSTRUMENT PANEL
PAGE POSITION:278JOB:@zeta.tweddle.com/chry_pdm/CLS_chrysler/GRP_owners/JOB_918945-en-dsr-12D482-126-AA_DSR/DIV_og pubnum: 12D482-126-AB_DSR
Page 283 of 546
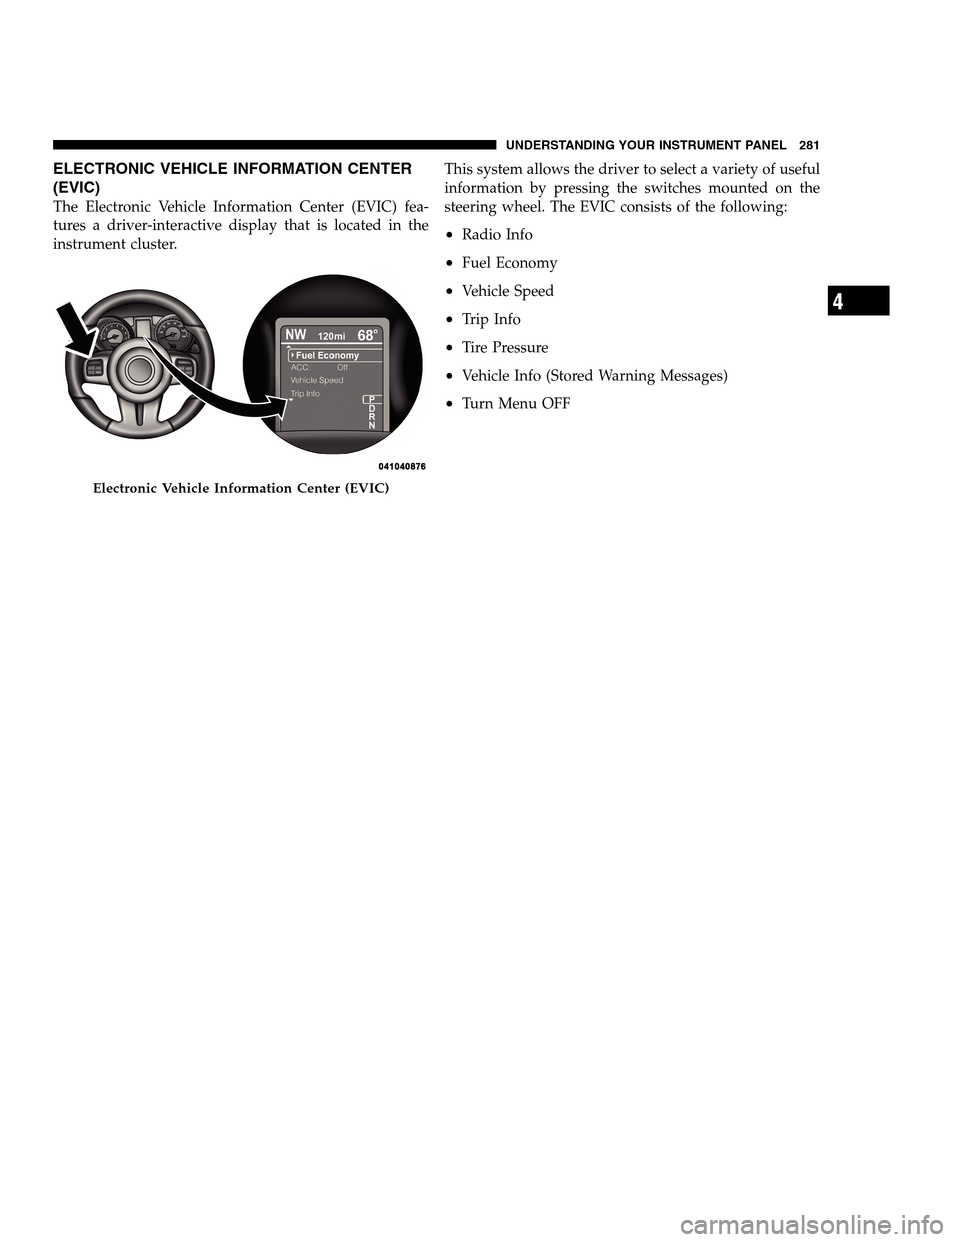
ELECTRONIC VEHICLE INFORMATION CENTER
(EVIC)
The Electronic Vehicle Information Center (EVIC) fea-
tures a driver-interactive display that is located in the
instrument cluster.This system allows the driver to select a variety of useful
information by pressing the switches mounted on the
steering wheel. The EVIC consists of the following:
•Radio Info
•Fuel Economy
•Vehicle Speed
•Trip Info
•Tire Pressure
•Vehicle Info (Stored Warning Messages)
•Turn Menu OFF
Electronic Vehicle Information Center (EVIC)
4
UNDERSTANDING YOUR INSTRUMENT PANEL 281
PAGE POSITION:281JOB:@zeta.tweddle.com/chry_pdm/CLS_chrysler/GRP_owners/JOB_918945-en-dsr-12D482-126-AA_DSR/DIV_og pubnum: 12D482-126-AB_DSR ELECTRONIC VEHICLE INFORMATION CENTER
(EVIC)
The Electronic Vehicle Information Center (EVIC) fea-
tures a driver-interactive display that is located in the
instrument cluster.This system allows the driver to select a variety of useful
information by pressing the switches mounted on the
steering wheel. The EVIC consists of the following:
•Radio Info
•Fuel Economy
•Vehicle Speed
•Trip Info
•Tire Pressure
•Vehicle Info (Stored Warning Messages)
•Turn Menu OFF
Electronic Vehicle Information Center (EVIC)
4
UNDERSTANDING YOUR INSTRUMENT PANEL 281
PAGE POSITION:281JOB:@zeta.tweddle.com/chry_pdm/CLS_chrysler/GRP_owners/JOB_918945-en-dsr-12D482-126-AA_DSR/DIV_og pubnum: 12D482-126-AB_DSR
Page 299 of 546
•Fuel Saver Display
Touch the Fuel Saver Display soft-key to turn the “ECO”
message (located in the instrument cluster display) on or
off. To make your selection, touch the Fuel Saver Display
soft-key and select ON or OFF. Then touch the arrow
back soft-key.
Clock
•
Set Time
Touch the Set Time soft-key to change this display. When
in this display, you may select the time display settings.
To make your selection, touch the Set Time soft-key,
adjust the hours and minutes using the up and down
soft-keys, select AM or PM, select 12 hr or 24 hr. Then
touch the arrow back soft-key when all selections are
complete.
•Show Time Status
Touch the Show Time Status soft-key to change this
display. When in this display, you may turn on or shut offthe digital clock in the status bar. To change the Show
Time Status setting, press and release the ON or OFF
soft-key. Then touch the arrow back soft-key.
•Sync Time
Touch the Sync Time soft-key to change this display.
When in this display, you may have the radio set the time
automatically. To change the Sync Time setting, press and
release the ON or OFF soft-key. Then touch the arrow
back soft-key.
Safety / Assistance
•
Front Collision Warning — If Equipped
Touch the Front Collision Warning soft-key to change this
display. The Front Collision Warning (FCW) feature can
be can be set to Far, set to Near or turned Off. The default
status of FCW is the Far setting. This means the system
will warn you of a possible collision with the vehicle in
front of you when you are farther away. This gives you
the most reaction time. To change the setting for more
4
UNDERSTANDING YOUR INSTRUMENT PANEL 297
PAGE POSITION:297JOB:@zeta.tweddle.com/chry_pdm/CLS_chrysler/GRP_owners/JOB_918945-en-dsr-12D482-126-AA_DSR/DIV_og pubnum: 12D482-126-AB_DSR •Fuel Saver Display
Touch the Fuel Saver Display soft-key to turn the “ECO”
message (located in the instrument cluster display) on or
off. To make your selection, touch the Fuel Saver Display
soft-key and select ON or OFF. Then touch the arrow
back soft-key.
Clock
•
Set Time
Touch the Set Time soft-key to change this display. When
in this display, you may select the time display settings.
To make your selection, touch the Set Time soft-key,
adjust the hours and minutes using the up and down
soft-keys, select AM or PM, select 12 hr or 24 hr. Then
touch the arrow back soft-key when all selections are
complete.
•Show Time Status
Touch the Show Time Status soft-key to change this
display. When in this display, you may turn on or shut offthe digital clock in the status bar. To change the Show
Time Status setting, press and release the ON or OFF
soft-key. Then touch the arrow back soft-key.
•Sync Time
Touch the Sync Time soft-key to change this display.
When in this display, you may have the radio set the time
automatically. To change the Sync Time setting, press and
release the ON or OFF soft-key. Then touch the arrow
back soft-key.
Safety / Assistance
•
Front Collision Warning — If Equipped
Touch the Front Collision Warning soft-key to change this
display. The Front Collision Warning (FCW) feature can
be can be set to Far, set to Near or turned Off. The default
status of FCW is the Far setting. This means the system
will warn you of a possible collision with the vehicle in
front of you when you are farther away. This gives you
the most reaction time. To change the setting for more
4
UNDERSTANDING YOUR INSTRUMENT PANEL 297
PAGE POSITION:297JOB:@zeta.tweddle.com/chry_pdm/CLS_chrysler/GRP_owners/JOB_918945-en-dsr-12D482-126-AA_DSR/DIV_og pubnum: 12D482-126-AB_DSR
Page 312 of 546
check-mark appears next to the setting, showing that
setting has been selected. Touch the back arrow soft-key
to return to the previous menu.
•Navigation Turn-By-Turn In Cluster
When this feature is selected, the turn-by-turn directions
will appear in the display as the vehicle approaches a
designated turn within a programmed route. To make
your selection, touch the Navigation Turn-By-Turn In
Cluster soft-key, until a check-mark appears next to the
setting, showing that setting has been selected. Touch the
back arrow soft-key to return to the previous menu.
•Fuel Saver Display In Cluster
The “ECO” message is located in the instrument cluster
display, this message can be turned on or off. To make
your selection, touch the Fuel Saver Display soft-key,
until a check-mark appears next to the setting, showing
that setting has been selected. Touch the back arrow
soft-key to return to the previous menu.
Clock
After pressing the Clock soft-key the following settings
will be available.
•Sync Time With GPS
When in this display, you may automatically have the
radio set the time. To change the Sync Time setting touch
the Sync with GPS Time soft-key until a check-mark
appears next to the setting, showing that setting has been
selected. Touch the back arrow soft-key to return to the
previous menu.
•Set Time Hours
When in this display, you may adjust the hours. The Sync
with GPS Time soft-key must be unchecked. To make
your selection touch the + or - soft-keys to adjust the
hours up or down. Touch the back arrow soft-key to
return to the previous menu or touch the X soft-key to
close out of the settings screen.
310 UNDERSTANDING YOUR INSTRUMENT PANEL
PAGE POSITION:310JOB:@zeta.tweddle.com/chry_pdm/CLS_chrysler/GRP_owners/JOB_918945-en-dsr-12D482-126-AA_DSR/DIV_og pubnum: 12D482-126-AB_DSR check-mark appears next to the setting, showing that
setting has been selected. Touch the back arrow soft-key
to return to the previous menu.
•Navigation Turn-By-Turn In Cluster
When this feature is selected, the turn-by-turn directions
will appear in the display as the vehicle approaches a
designated turn within a programmed route. To make
your selection, touch the Navigation Turn-By-Turn In
Cluster soft-key, until a check-mark appears next to the
setting, showing that setting has been selected. Touch the
back arrow soft-key to return to the previous menu.
•Fuel Saver Display In Cluster
The “ECO” message is located in the instrument cluster
display, this message can be turned on or off. To make
your selection, touch the Fuel Saver Display soft-key,
until a check-mark appears next to the setting, showing
that setting has been selected. Touch the back arrow
soft-key to return to the previous menu.
Clock
After pressing the Clock soft-key the following settings
will be available.
•Sync Time With GPS
When in this display, you may automatically have the
radio set the time. To change the Sync Time setting touch
the Sync with GPS Time soft-key until a check-mark
appears next to the setting, showing that setting has been
selected. Touch the back arrow soft-key to return to the
previous menu.
•Set Time Hours
When in this display, you may adjust the hours. The Sync
with GPS Time soft-key must be unchecked. To make
your selection touch the + or - soft-keys to adjust the
hours up or down. Touch the back arrow soft-key to
return to the previous menu or touch the X soft-key to
close out of the settings screen.
310 UNDERSTANDING YOUR INSTRUMENT PANEL
PAGE POSITION:310JOB:@zeta.tweddle.com/chry_pdm/CLS_chrysler/GRP_owners/JOB_918945-en-dsr-12D482-126-AA_DSR/DIV_og pubnum: 12D482-126-AB_DSR