Page 491 of 594
ENGINE COMPARTMENT — 3.6L
1 — Integrated Power Module (Fuses)5 — Air Cleaner Filter
2 — Engine Oil Dipstick 6 — Engine Oil Fill
3 — Brake Fluid Reservoir Access Cover 7 — Remote Jump Start (Positive Battery Post)
4 — Engine Coolant Reservoir 8 — Washer Fluid Reservoir
7
MAINTAINING YOUR VEHICLE 489
Page 492 of 594
ENGINE COMPARTMENT — 5.7L
1 — Integrated Power Module (Fuses)5 — Engine Oil Fill
2 — Brake Fluid Reservoir Access Cover 6 — Engine Oil Dipstick
3 — Engine Coolant Reservoir 7 — Remote Jump Start (Positive Battery Post)
4 — Air Cleaner Filter 8 — Washer Fluid Reservoir
490 MAINTAINING YOUR VEHICLE
Page 494 of 594
, this check verifies the “Malfunction
Indicator Light (MIL)” is functioning and is not
on when the engine is running, and that the OBD")
For states that require an Inspection and Mainte-
nance (I/M), this check verifies the “Malfunction
Indicator Light (MIL)” is functioning and is not
on when the engine is running, and that the OBD II
system is ready for testing.
Normally, the OBD II system will be ready. The OBD II
system may notbe ready if your vehicle was recently
serviced, recently had a dead battery or a battery replace-
ment. If the OBD II system should be determined not
ready for the I/M test, your vehicle may fail the test.
Your vehicle has a simple ignition key-actuated test,
which you can use prior to going to the test station. To
check if your vehicle’s OBD II system is ready, you must
do the following:
1. Turn the ignition switch to the ON position, but do not
crank or start the engine. 2. If you crank or start the engine, you will have to start
this test over.
3. As soon as you turn the ignition switch to the ON
position, you will see the MIL symbol come on as part of
a normal bulb check.
4. Approximately 15 seconds later, one of two things will
happen:
a. The MIL will flash for about 10 seconds and then
return to being fully illuminated until you turn OFF
the ignition or start the engine. This means that your
vehicle’s OBD II system is not readyand you should
not proceed to the I/M station.
b. The MIL will not flash at all and will remain fully
illuminated until you turn OFF the ignition or start the
engine. This means that your vehicle’s OBD II system
is ready and you can proceed to the I/M station.
492 MAINTAINING YOUR VEHICLE
Page 495 of 594

If your OBD II system isnot ready,you should see your
authorized dealer or repair facility. If your vehicle was
recently serviced or had a battery failure or replacement,
you may need to do nothing more than drive your
vehicle as you normally would in order for your OBD II
system to update. A recheck with the above test routine
may then indicate that the system is now ready.
Regardless of whether your vehicle’s OBD II system is
ready or not, if the MIL is illuminated during normal
vehicle operation you should have your vehicle serviced
before going to the I/M station. The I/M station can fail
your vehicle because the MIL is on with the engine
running.REPLACEMENT PARTS
Use of genuine MOPAR� parts for normal/scheduled
maintenance and repairs is highly recommended to en-
sure the designed performance. Damage or failures
caused by the use of non-MOPAR� parts for maintenance
and repairs will not be covered by the manufacturer’s
warranty.
DEALER SERVICE
Your authorized dealer has the qualified service person-
nel, special tools, and equipment to perform all service
operations in an expert manner. Service Manuals are
available which include detailed service information for
your vehicle. Refer to these Service Manuals before
attempting any procedure yourself.
NOTE: Intentional tampering with emissions control
systems may void your warranty and could result in civil
penalties being assessed against you.
7
MAINTAINING YOUR VEHICLE 493
Page 501 of 594
Engine Air Cleaner Filter Selection
The quality of replacement engine air cleaner filters
varies considerably. Only high quality filters should be
used to assure most efficient service. MOPAR�engine air
cleaner filters are a high quality filter and are
recommended.
Maintenance-Free Battery
Your vehicle is equipped with a maintenance-free battery.
You will never have to add water, nor is periodic main-
tenance required.
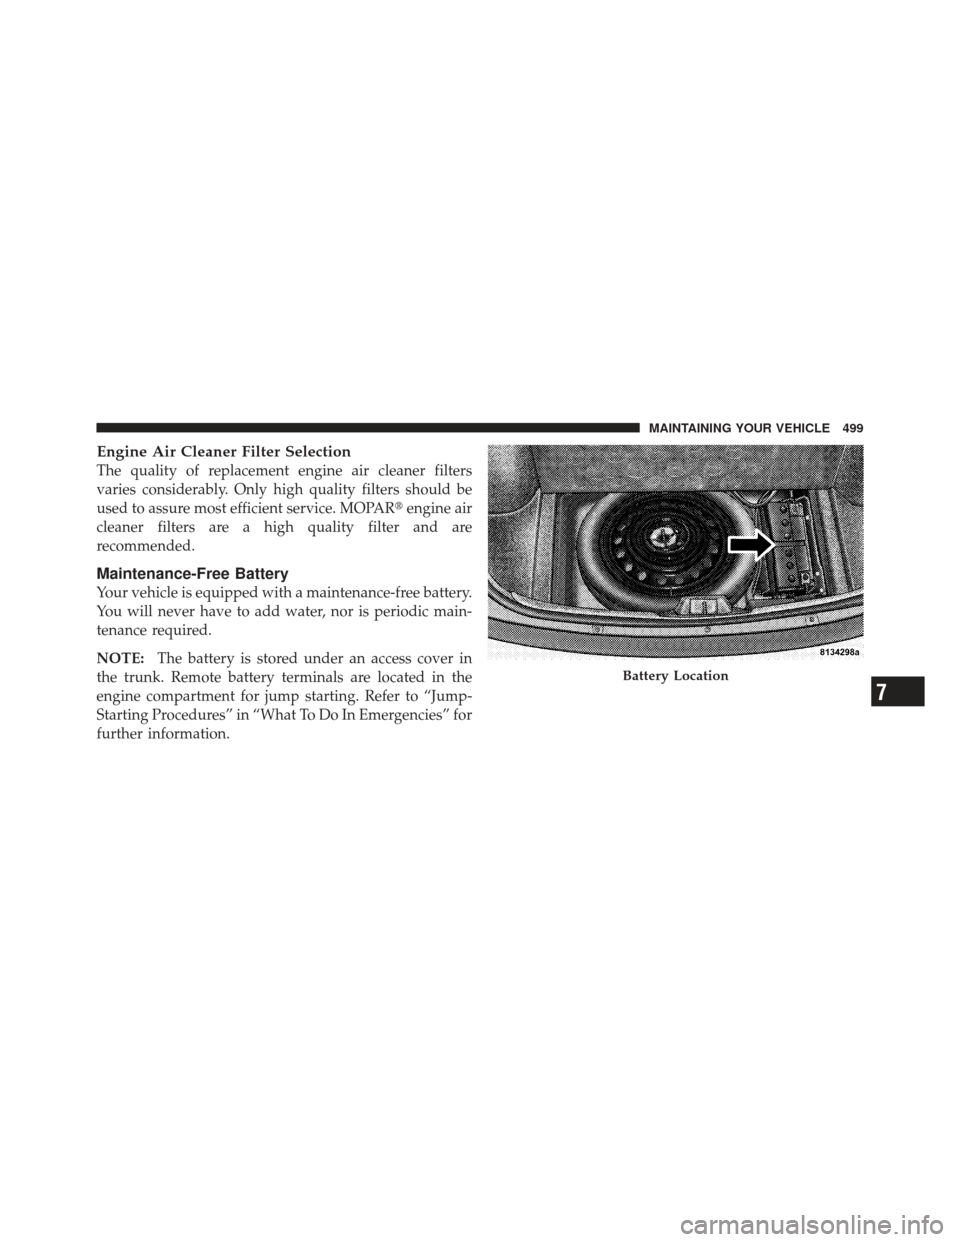
NOTE: The battery is stored under an access cover in
the trunk. Remote battery terminals are located in the
engine compartment for jump starting. Refer to “Jump-
Starting Procedures” in “What To Do In Emergencies” for
further information.
Battery Location
7
MAINTAINING YOUR VEHICLE 499
Page 502 of 594

WARNING!
•Battery fluid is a corrosive acid solution and can
burn or even blind you. Do not allow battery fluid
to contact your eyes, skin, or clothing. Do not lean
over a battery when attaching clamps. If acid
splashes in eyes or on skin, flush the area imme-
diately with large amounts of water.
•Battery gas is flammable and explosive. Keep
flame or sparks away from the battery. Do not use
a booster battery or any other booster source with
an output greater than 12 Volts. Do not allow cable
clamps to touch each other.
•Battery posts, terminals, and related accessories
contain lead and lead compounds. Wash hands
after handling.
•The battery in this vehicle has a vent hose that
should not be disconnected and should only be
replaced with a battery of the same type (vented).
CAUTION!
•It is essential when replacing the cables on the
battery that the positive cable is attached to the
positive post and the negative cable is attached to
the negative post. Battery posts are marked posi-
tive (+) and negative (-) and are identified on the
battery case. Cable clamps should be tight on the
terminal posts and free of corrosion.
•If a “fast charger” is used while the battery is in
the vehicle, disconnect both vehicle battery cables
before connecting the charger to the battery. Do
not use a “fast charger” to provide starting voltage.
500 MAINTAINING YOUR VEHICLE
Page 533 of 594
Cavity CartridgeFuseMini-
Fuse Description
34 — 10 Amp RedSteering Column
Module/Clock
35 — 10 Amp RedBattery Sensor
36 — — Fuse — Spare
37 — 15 Amp BlueRadio
38 — 20 Amp YellowPower Outlet Inside
Arm Rest
40 — — Fuse — Spare
41 — — Fuse — Spare
42 30 Amp Pink — Rear Defrost
43 — 25 Amp NaturalRear Heated Seats/
Steering WheelCavity Cartridge
FuseMini-
Fuse Description
44 — 10 Amp RedPark Assist/Blind
Spot/Camera
45 — 15 Amp BlueCluster/Rearview
Mirror/Compass
46 — 10 Amp RedAdaptive Cruise
Control
47 — 10 Amp RedAdaptive Front
Lighting
48 — 20 Amp YellowActive Suspension
49 — — Fuse — Spare
50 — — Fuse — Spare
51 — 20 Amp YellowFront Heated Seats
7
MAINTAINING YOUR VEHICLE 531
Page 535 of 594

VEHICLE STORAGE
If you are leaving your vehicle dormant for more than
21 days, you may want to take these steps to protect your
battery.
•Disconnect the negative cable from the battery.
•Anytime you store your vehicle, or keep it out of
service (i.e., vacation) for two weeks or more, run the
air conditioning system at idle for about five minutes
in the fresh air and high blower setting. This will
ensure adequate system lubrication to minimize the
possibility of compressor damage when the system is
started again.
REPLACEMENT BULBS
InteriorBulb Number
Rear Courtesy/Reading Lamps ............. W5W
Rear Compartment (Trunk) Lamp ............. 562
Overhead Console Reading Lamp ............. 578
Visor Vanity Lamps ..................... A6220
Glove Box Lamp – If Equipped ............... 194
Door Courtesy .......................... 562
Shift Indicator Lamp ................. JKLE14140
Optional Door Map Pocket/Cupholder ........ LED
(Serviced at Authorized Dealer)
NOTE: For lighted switches, see your authorized dealer
for replacement instructions.
All of the interior bulbs are glass wedge base or glass
cartridge types. Aluminum base bulbs are not approved
and should not be used for replacement.
7
MAINTAINING YOUR VEHICLE 533
5 — Air Cleaner Filter
2 — Engine Oil Dipstick 6 — Engine Oil Fill
3 — Brake Fluid Reservoir Access Cover 7 — Remote Jump Sta")
5 — Engine Oil Fill
2 — Brake Fluid Reservoir Access Cover 6 — Engine Oil Dipstick
3 — Engine Coolant Reservoir 7 — Remote Ju")