Page 196 of 594

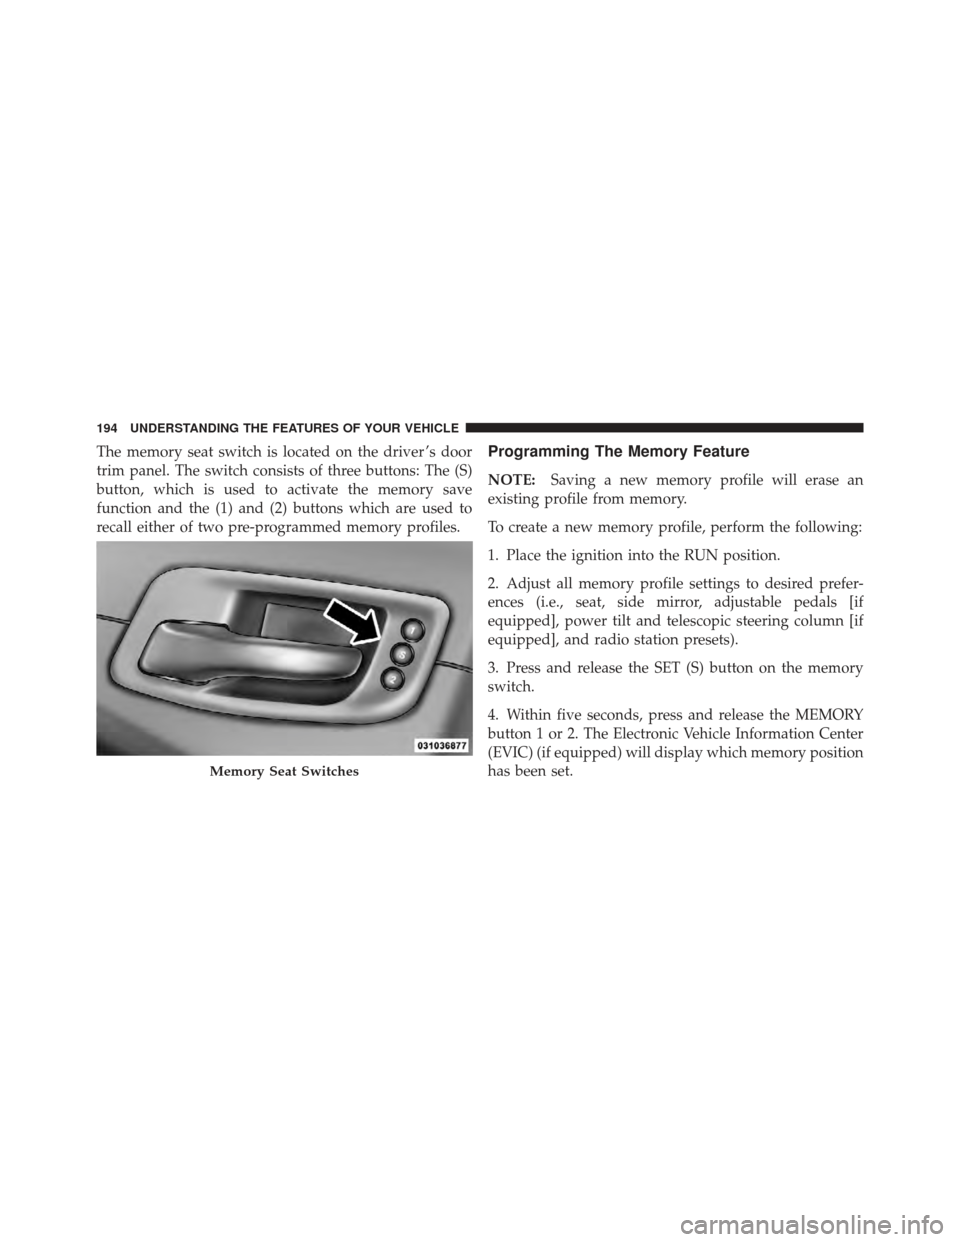
The memory seat switch is located on the driver ’s door
trim panel. The switch consists of three buttons: The (S)
button, which is used to activate the memory save
function and the (1) and (2) buttons which are used to
recall either of two pre-programmed memory profiles.Programming The Memory Feature
NOTE:Saving a new memory profile will erase an
existing profile from memory.
To create a new memory profile, perform the following:
1. Place the ignition into the RUN position.
2. Adjust all memory profile settings to desired prefer-
ences (i.e., seat, side mirror, adjustable pedals [if
equipped], power tilt and telescopic steering column [if
equipped], and radio station presets).
3. Press and release the SET (S) button on the memory
switch.
4. Within five seconds, press and release the MEMORY
button 1 or 2. The Electronic Vehicle Information Center
(EVIC) (if equipped) will display which memory position
has been set.
Memory Seat Switches
194 UNDERSTANDING THE FEATURES OF YOUR VEHICLE
Page 221 of 594

NOTE:In order to ensure proper operation, the Elec-
tronic Speed Control system has been designed to shut
down if multiple Speed Control functions are operated at
the same time. If this occurs, the Electronic Speed Control system can be reactivated by pushing the Electronic
Speed Control ON/OFF button and resetting the desired
vehicle set speed.
To Activate
Push the ON/OFF button. The Cruise Indicator light in
the Electronic Vehicle Information Center (EVIC) will
illuminate. To turn the system off, push the ON/OFF
button a second time. The Cruise Indicator light will turn
off. The system should be turned off when not in use.
WARNING!
Leaving the Electronic Speed Control system on
when not in use is dangerous. You could accidentally
set the system or cause it to go faster than you want.
You could lose control and have an accident. Always
leave the system OFF when you are not using it.1 — ON/OFF
2 — RES +
4 — CANCEL 3 — SET -
3
UNDERSTANDING THE FEATURES OF YOUR VEHICLE 219
Page 224 of 594

ADAPTIVE CRUISE CONTROL (ACC) — IF
EQUIPPED
Adaptive Cruise Control (ACC) increases the driving
convenience provided by cruise control while traveling
on highways and major roadways. However, it is not a
safety system and not designed to prevent collisions.
ACC will allow you to keep cruise control engaged in
light to moderate traffic conditions without the constant
need to reset your cruise control. ACC utilizes a radar
sensor designed to detect a vehicle directly ahead of you.
NOTE:
•If the sensor does not detect a vehicle ahead of you,
ACC will maintain a fixed set speed.
•If the ACC sensor detects a vehicle ahead, ACC will
apply limited braking or acceleration (not to exceed
the original set speed) automatically to maintain a
preset following distance, while matching the speed of
the vehicle ahead.
WARNING!
•Adaptive Cruise Control (ACC) is a convenience
system. It is not a substitute for active driving
involvement. It is always the driver ’s responsibil-
ity to be attentive of road, traffic, and weather
conditions, vehicle speed, distance to the vehicle
ahead; and, most importantly, brake operation to
ensure safe operation of the vehicle under all road
conditions. Your complete attention is always re-
quired while driving to maintain safe control of
your vehicle. Failure to follow these warnings can
result in a collision and death or serious personal
injury.(Continued)
222 UNDERSTANDING THE FEATURES OF YOUR VEHICLE
Page 226 of 594
The Cruise Control system has two control modes:
•Adaptive Cruise Control mode for maintaining an
appropriate distance between vehicles.
•Normal (fixed speed) cruise control mode is for cruis-
ing at a constant preset speed. For additional informa-
tion, refer to “Normal (Fixed Speed) Cruise Control
Mode” in this section.
NOTE: The system will not react to preceding vehicles.
Always be aware of the mode selected.
You can change the mode by using the Cruise Control
buttons. The two control modes function differently.
Always confirm which mode is selected.
Adaptive Cruise Control (ACC) Operation
The speed control buttons (located on the right side of the
steering wheel) operates the ACC system.
1 — DISTANCE SETTING
2 — RES +
3 — SET -
4 — CANCEL
5 — ON/OFF
6 — MODE
224 UNDERSTANDING THE FEATURES OF YOUR VEHICLE
Page 285 of 594
LOAD LEVELING SYSTEM — IF EQUIPPED
The automatic load leveling system will provide a level-
riding vehicle under most passenger and cargo loading
conditions.
A hydraulic pump contained within the shock absorbers
raises the rear of the vehicle to the correct height. It takesapproximately 1 mile (1.6 km) of driving for the leveling
to complete depending on road surface conditions.
If the leveled vehicle is not moved for approximately
15 hours, the leveling system will bleed itself down. The
vehicle must be driven to reset the system.
3
UNDERSTANDING THE FEATURES OF YOUR VEHICLE 283
Page 293 of 594

U.S. Federal regulations require that upon transfer of
vehicle ownership, the seller certify to the purchaser the
correct mileage that the vehicle has been driven. If your
odometer needs to be repaired or serviced, the repair
technician should leave the odometer reading the same
as it was before the repair or service. If s/he cannot do so,
then the odometer must be set at zero, and a sticker must
be placed in the door jamb stating what the mileage was
before the repair or service. It is a good idea for you to
make a record of the odometer reading before the repair/
service, so that you can be sure that it is properly reset, or
that the door jamb sticker is accurate if the odometer
must be reset at zero.
Electronic Vehicle Information Center (EVIC) Display
The Electronic Vehicle Information Center (EVIC) fea-
tures a driver-interactive display that is located in the
instrument cluster. For further information, refer to
“Electronic Vehicle Information Center (EVIC)”.The Shift Lever Indicator is self-contained within the
EVIC display. It displays the gear position of the auto-
matic transmission.
NOTE:
•You must apply the brakes before shifting from PARK.
•The highest available transmission gear is displayed in
the lower right corner of the Electronic Vehicle Infor-
mation Center (EVIC) whenever the Electronic Range
Select (ERS) feature is active. Use the +/- selector on
the shift lever to activate ERS. Refer to “Automatic
Transmission” in “Starting And Operating” for further
information.
8. Tire Pressure Monitoring Telltale Light — If
Equipped Each tire, including the spare (if provided),
should be checked monthly when cold and
inflated to the inflation pressure recommended
by the vehicle manufacturer on the vehicle
4
UNDERSTANDING YOUR INSTRUMENT PANEL 291
Page 304 of 594

SELECT ButtonPress and release the SELECT button for access
to main menus, sub-menus or to select a per-
sonal setting in the setup menu. Press and hold
the SELECT button for two seconds to reset
features.
BACK Button Press the BACK button to scroll back to a
previous menu or sub-menu.
Electronic Vehicle Information Center (EVIC)
Displays
The EVIC display consists of three sections:
1. The top line where compass direction, odometer line
and outside temperature are displayed.
2. The main display area where the menus and pop up
messages are displayed. 3. The reconfigurable telltales section.
The main display area will normally display the main
menu or the screens of a selected feature of the main
menu. The main display area also displays
�pop up�
messages that consist of approximately 60 possible warn-
ing or information messages. These pop up messages fall
into several categories:
•Five Second Stored Messages
When the appropriate conditions occur, this type of
message takes control of the main display area for five
seconds and then returns to the previous screen. Most of
the messages of this type are then stored (as long as the
condition that activated it remains active) and can be
reviewed from the �Messages�main menu item. As long
as there is a stored message, an �i�will be displayed in the
EVIC’s compass/outside temp line. Examples of this
message type are �Right Front Turn Signal Lamp Out�
and �Low Tire Pressure�.
302 UNDERSTANDING YOUR INSTRUMENT PANEL
Page 310 of 594

WARNING!
If the Transmission Temperature Warning Light is
illuminated and you continue operating the vehicle,
in some circumstances you could cause the fluid to
boil over, come in contact with hot engine or exhaust
components and cause a fire.
Oil Change Due
Your vehicle is equipped with an engine oil change
indicator system. The “Oil Change Due” message will
flash in the EVIC display for approximately 10 seconds
after a single chime has sounded to indicate the next
scheduled oil change interval. The engine oil change
indicator system is duty cycle based, which means the
engine oil change interval may fluctuate dependent upon
your personal driving style.Unless reset, this message will continue to display each
time you cycle the ignition to the ON/RUN position. To
turn off the message temporarily, press and release the
MENU button. To reset the oil change indicator system
(after performing the scheduled maintenance), perform
the following procedure:
1. Without pressing the brake pedal, push the ENGINE
START/STOP button and cycle the ignition to the ON/
RUN position (Do not start the engine.)
2. Fully depress the accelerator pedal, slowly, three times
within 10 seconds.
3. Without pressing the brake pedal, push the ENGINE
START/STOP button once to return the ignition to the
OFF/LOCK position.
NOTE:
If the indicator message illuminates when you
start the vehicle, the oil change indicator system did not
reset. If necessary, repeat this procedure.
308 UNDERSTANDING YOUR INSTRUMENT PANEL