Page 475 of 594

NOTE:
•For vehicles so equipped, do not attempt to install a
center cap or wheel cover on the compact spare.
•Refer to “Compact Spare Tire” and to “Limited-Use
Spare” under “Tires—General Information” in “Start-
ing and Operating” for additional warnings, cautions,
and information about the spare tire, its use, and
operation.
8. Install the lug nuts with the cone shaped end of the lug
nut toward the wheel. Lightly tighten the lug nuts.
WARNING!
To avoid the risk of forcing the vehicle off the jack,
do not tighten the wheel nuts fully until the vehicle
has been lowered. Failure to follow this warning may
result in personal injury. 9. Lower the vehicle to the ground by turning the jack
handle counterclockwise.
10. Finish tightening the lug nuts. Push down on the
wrench while at the end of the handle for increased
leverage. Tighten the lug nuts in a star pattern until each
nut has been tightened twice. The correct tightness of
each lug nut is 110 ft/lb. (150 N·m). If in doubt about the
correct tightness, have them checked with a torque
wrench by your authorized dealer or at a service station.
11. Stow the jack, tools and flat tire. Make sure the base
of the jack faces the front of the vehicle before tightening
down the fastener.
6
WHAT TO DO IN EMERGENCIES 473
Page 476 of 594

WARNING!
•A loose tire or jack thrown forward in a collision
or hard stop could endanger the occupants of the
vehicle. Always stow the jack parts and the spare
tire in the places provided.
•Have the deflated (flat) tire repaired or replaced
immediately.
Road Tire Installation
1. Mount the road tire on the axle.
2. Install the remaining lug nuts with the cone shaped
end of the nut toward the wheel. Lightly tighten the lug
nuts.
WARNING!
To avoid the risk of forcing the vehicle off the jack,
do not tighten the wheel nuts fully until the vehicle
has been lowered. Failure to follow this warning may
result in personal injury.
3. Lower the vehicle to the ground by turning the jack
handle counterclockwise.
4. Finish tightening the lug nuts. Push down on the
wrench while at the end of the handle for increased
leverage. Tighten the lug nuts in a star pattern until each
nut has been tightened twice. The correct tightness of
each lug nut is 110 ft/lbs (150 N·m). If in doubt about the
correct tightness, have them checked with a torque
wrench by your authorized dealer or service station.
474 WHAT TO DO IN EMERGENCIES
Page 533 of 594
Cavity CartridgeFuseMini-
Fuse Description
34 — 10 Amp RedSteering Column
Module/Clock
35 — 10 Amp RedBattery Sensor
36 — — Fuse — Spare
37 — 15 Amp BlueRadio
38 — 20 Amp YellowPower Outlet Inside
Arm Rest
40 — — Fuse — Spare
41 — — Fuse — Spare
42 30 Amp Pink — Rear Defrost
43 — 25 Amp NaturalRear Heated Seats/
Steering WheelCavity Cartridge
FuseMini-
Fuse Description
44 — 10 Amp RedPark Assist/Blind
Spot/Camera
45 — 15 Amp BlueCluster/Rearview
Mirror/Compass
46 — 10 Amp RedAdaptive Cruise
Control
47 — 10 Amp RedAdaptive Front
Lighting
48 — 20 Amp YellowActive Suspension
49 — — Fuse — Spare
50 — — Fuse — Spare
51 — 20 Amp YellowFront Heated Seats
7
MAINTAINING YOUR VEHICLE 531
Page 536 of 594

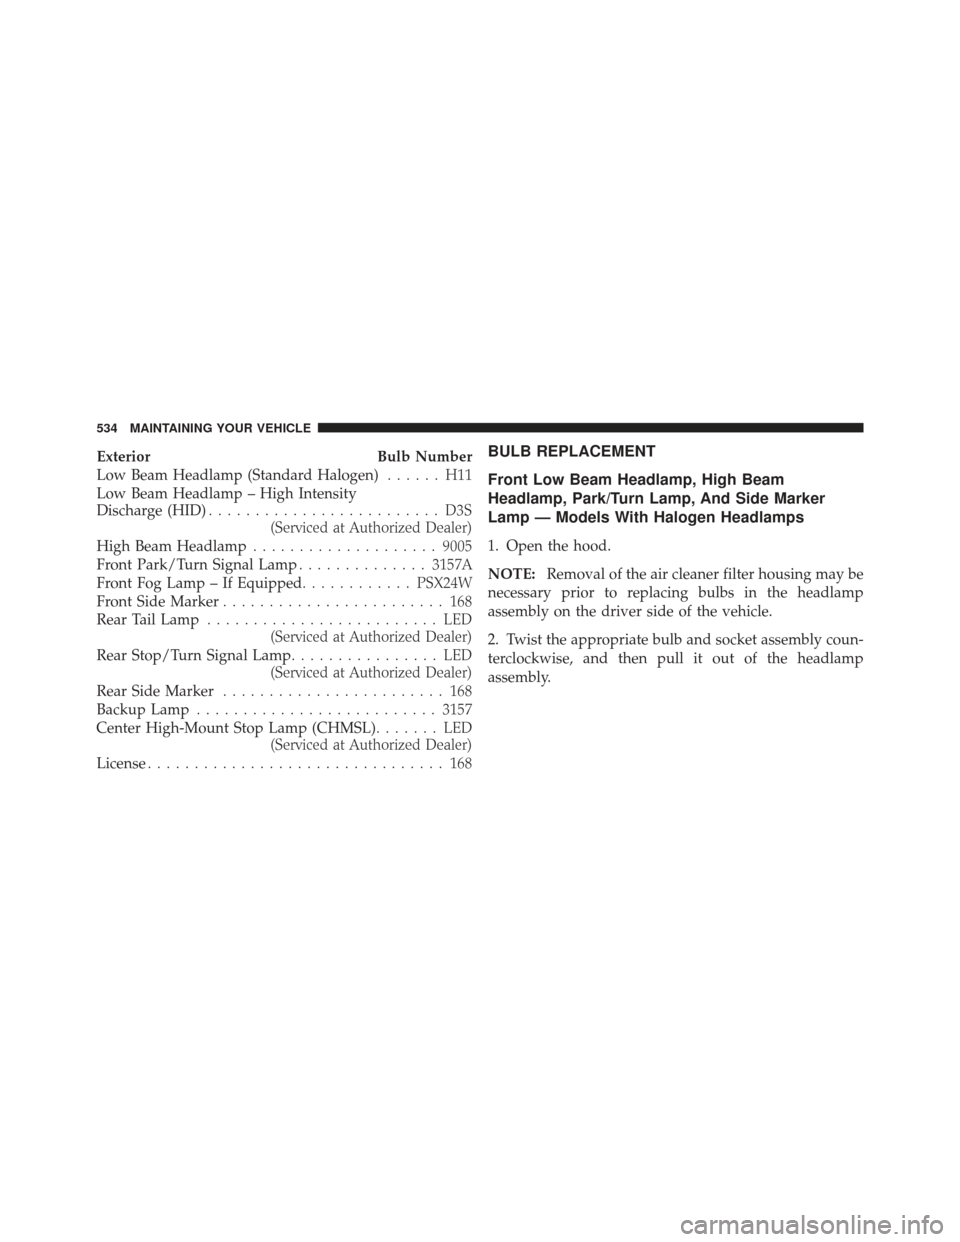
ExteriorBulb Number
Low Beam Headlamp (Standard Halogen) ...... H11
Low Beam Headlamp – High Intensity
Discharge (HID) ......................... D3S
(Serviced at Authorized Dealer)
High Beam Headlamp .................... 9005
Front Park/Turn Signal Lamp ..............3157A
Front Fog Lamp – If Equipped ............PSX24W
Front Side Marker ........................ 168
Rear Tail Lamp ......................... LED
(Serviced at Authorized Dealer)
Rear Stop/Turn Signal Lamp ................ LED
(Serviced at Authorized Dealer)
Rear Side Marker ........................ 168
Backup Lamp .......................... 3157
Center High-Mount Stop Lamp (CHMSL) ....... LED
(Serviced at Authorized Dealer)
License ................................ 168BULB REPLACEMENT
Front Low Beam Headlamp, High Beam
Headlamp, Park/Turn Lamp, And Side Marker
Lamp — Models With Halogen Headlamps
1. Open the hood.
NOTE: Removal of the air cleaner filter housing may be
necessary prior to replacing bulbs in the headlamp
assembly on the driver side of the vehicle.
2. Twist the appropriate bulb and socket assembly coun-
terclockwise, and then pull it out of the headlamp
assembly.
534 MAINTAINING YOUR VEHICLE
Page 537 of 594

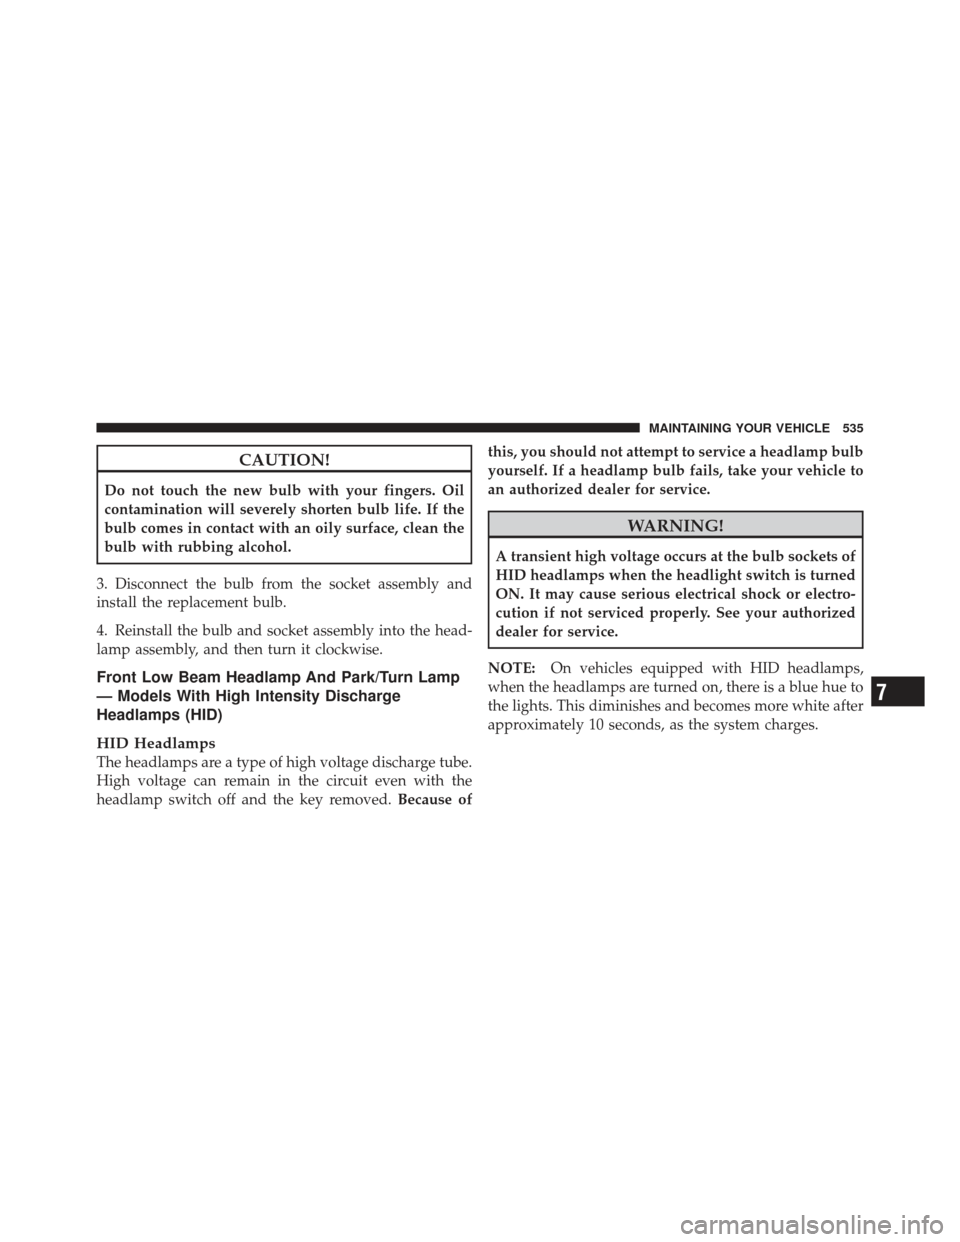
CAUTION!
Do not touch the new bulb with your fingers. Oil
contamination will severely shorten bulb life. If the
bulb comes in contact with an oily surface, clean the
bulb with rubbing alcohol.
3. Disconnect the bulb from the socket assembly and
install the replacement bulb.
4. Reinstall the bulb and socket assembly into the head-
lamp assembly, and then turn it clockwise.
Front Low Beam Headlamp And Park/Turn Lamp
— Models With High Intensity Discharge
Headlamps (HID)
HID Headlamps
The headlamps are a type of high voltage discharge tube.
High voltage can remain in the circuit even with the
headlamp switch off and the key removed. Because ofthis, you should not attempt to service a headlamp bulb
yourself. If a headlamp bulb fails, take your vehicle to
an authorized dealer for service.
WARNING!
A transient high voltage occurs at the bulb sockets of
HID headlamps when the headlight switch is turned
ON. It may cause serious electrical shock or electro-
cution if not serviced properly. See your authorized
dealer for service.
NOTE: On vehicles equipped with HID headlamps,
when the headlamps are turned on, there is a blue hue to
the lights. This diminishes and becomes more white after
approximately 10 seconds, as the system charges.
7
MAINTAINING YOUR VEHICLE 535