2012 DODGE CHALLENGER navigation system
[x] Cancel search: navigation systemPage 37 of 124

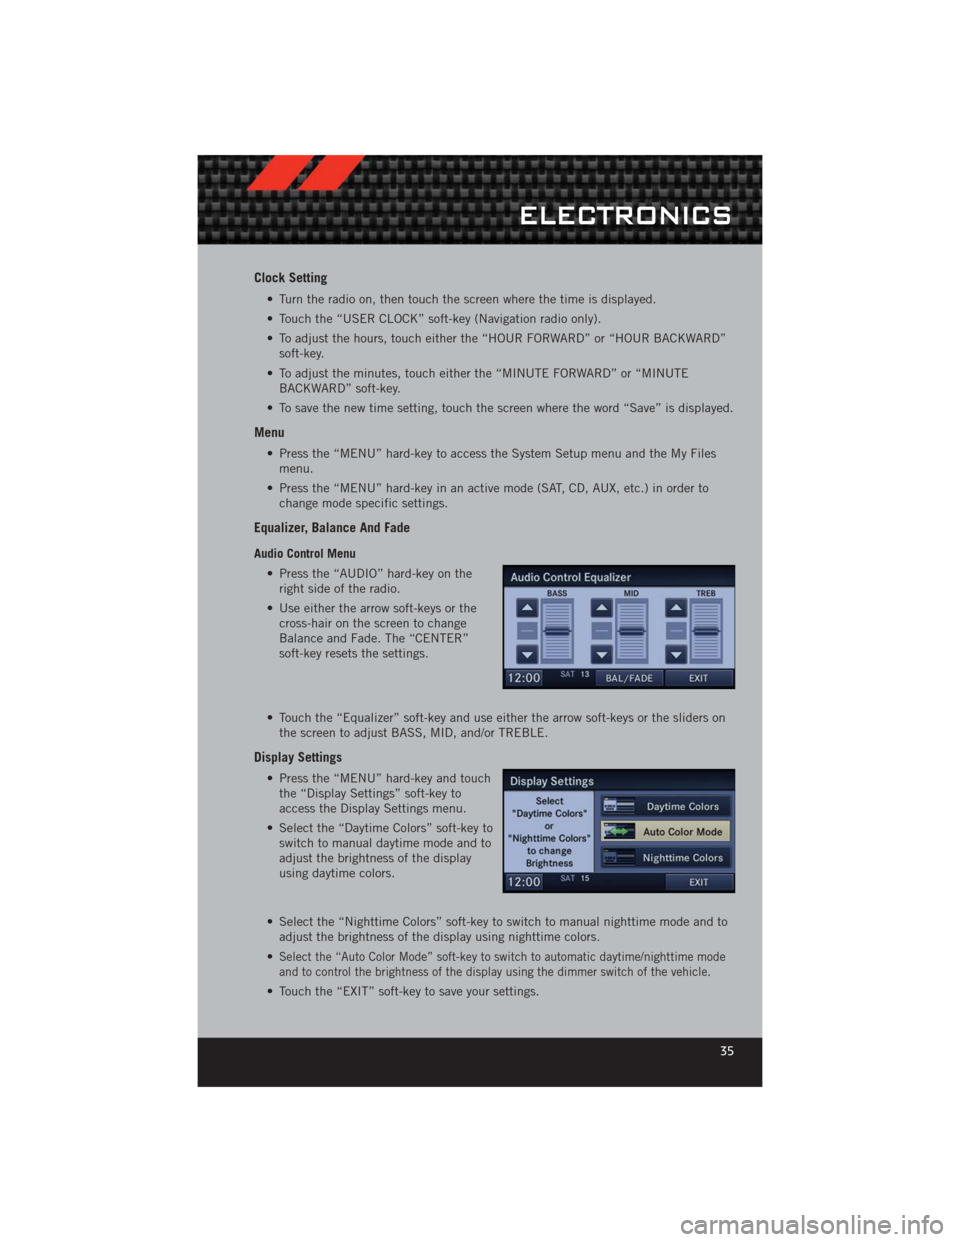
Clock Setting
• Turn the radio on, then touch the screen where the time is displayed.
• Touch the “USER CLOCK” soft-key (Navigation radio only).
• To adjust the hours, touch either the “HOUR FORWARD” or “HOUR BACKWARD”soft-key.
• To adjust the minutes, touch either the “MINUTE FORWARD” or “MINUTE BACKWARD” soft-key.
• To save the new time setting, touch the screen where the word “Save” is displayed.
Menu
• Press the “MENU” hard-key to access the System Setup menu and the My Files menu.
• Press the “MENU” hard-key in an active mode (SAT, CD, AUX, etc.) in order to change mode specific settings.
Equalizer, Balance And Fade
Audio Control Menu
• Press the “AUDIO” hard-key on theright side of the radio.
• Use either the arrow soft-keys or the cross-hair on the screen to change
Balance and Fade. The “CENTER”
soft-key resets the settings.
• Touch the “Equalizer” soft-key and use either the arrow soft-keys or the sliders on the screen to adjust BASS, MID, and/or TREBLE.
Display Settings
• Press the “MENU” hard-key and touchthe “Display Settings” soft-key to
access the Display Settings menu.
• Select the “Daytime Colors” soft-key to switch to manual daytime mode and to
adjust the brightness of the display
using daytime colors.
• Select the “Nighttime Colors” soft-key to switch to manual nighttime mode and to adjust the brightness of the display using nighttime colors.
•
Select the “Auto Color Mode” soft-key to switch to automatic daytime/nighttime mode
and to control the brightness of the display using the dimmer switch of the vehicle.
• Touch the “EXIT” soft-key to save your settings.
ELECTRONICS
35
Page 42 of 124

Cleaning Your Touch-Screen Radio
• Do not spray any liquid or causticchemicals directly on the screen. Use a
clean and dry micro fiber lens cleaning
cloth in order to clean the
touch-screen.
• If necessary, use a lint-free cloth dampened with a cleaning solution such as isopropyl alcohol or an isopropyl alcohol and water solution ratio of 50:50. Be sure
to follow the solvent manufacturer's precautions and directions.
Garmin® Navigation
• Media Center 430N integrates Garmin’s consumer-friendly navigation into yourvehicle. Garmin Navigation includes a database with over 6 million points of
interest.
• Touch the “NAV” soft-key in the upper right corner of the screen to access the Navigation system.
NOTE: For your own safety and the safety of others, it is not possible to use certain
features while the vehicle is in motion.
ELECTRONICS
40
Page 43 of 124

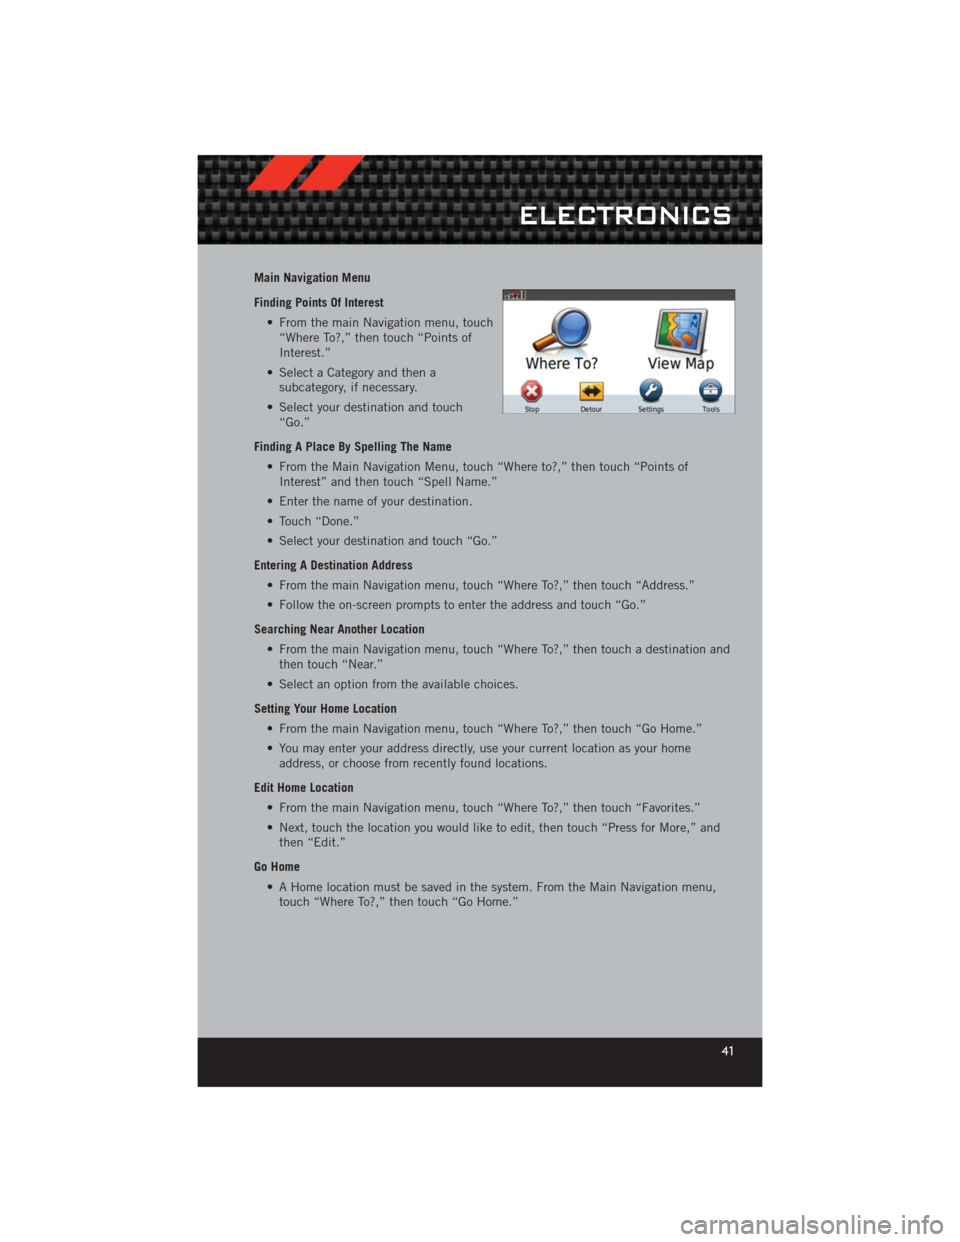
Main Navigation Menu
Finding Points Of Interest• From the main Navigation menu, touch“Where To?,” then touch “Points of
Interest.”
• Select a Category and then a subcategory, if necessary.
• Select your destination and touch “Go.”
Finding A Place By Spelling The Name • From the Main Navigation Menu, touch “Where to?,” then touch “Points ofInterest” and then touch “Spell Name.”
• Enter the name of your destination.
• Touch “Done.”
• Select your destination and touch “Go.”
Entering A Destination Address • From the main Navigation menu, touch “Where To?,” then touch “Address.”
• Follow the on-screen prompts to enter the address and touch “Go.”
Searching Near Another Location • From the main Navigation menu, touch “Where To?,” then touch a destination andthen touch “Near.”
• Select an option from the available choices.
Setting Your Home Location • From the main Navigation menu, touch “Where To?,” then touch “Go Home.”
• You may enter your address directly, use your current location as your homeaddress, or choose from recently found locations.
Edit Home Location • From the main Navigation menu, touch “Where To?,” then touch “Favorites.”
• Next, touch the location you would like to edit, then touch “Press for More,” andthen “Edit.”
Go Home • A Home location must be saved in the system. From the Main Navigation menu,touch “Where To?,” then touch “Go Home.”
ELECTRONICS
41
Page 51 of 124

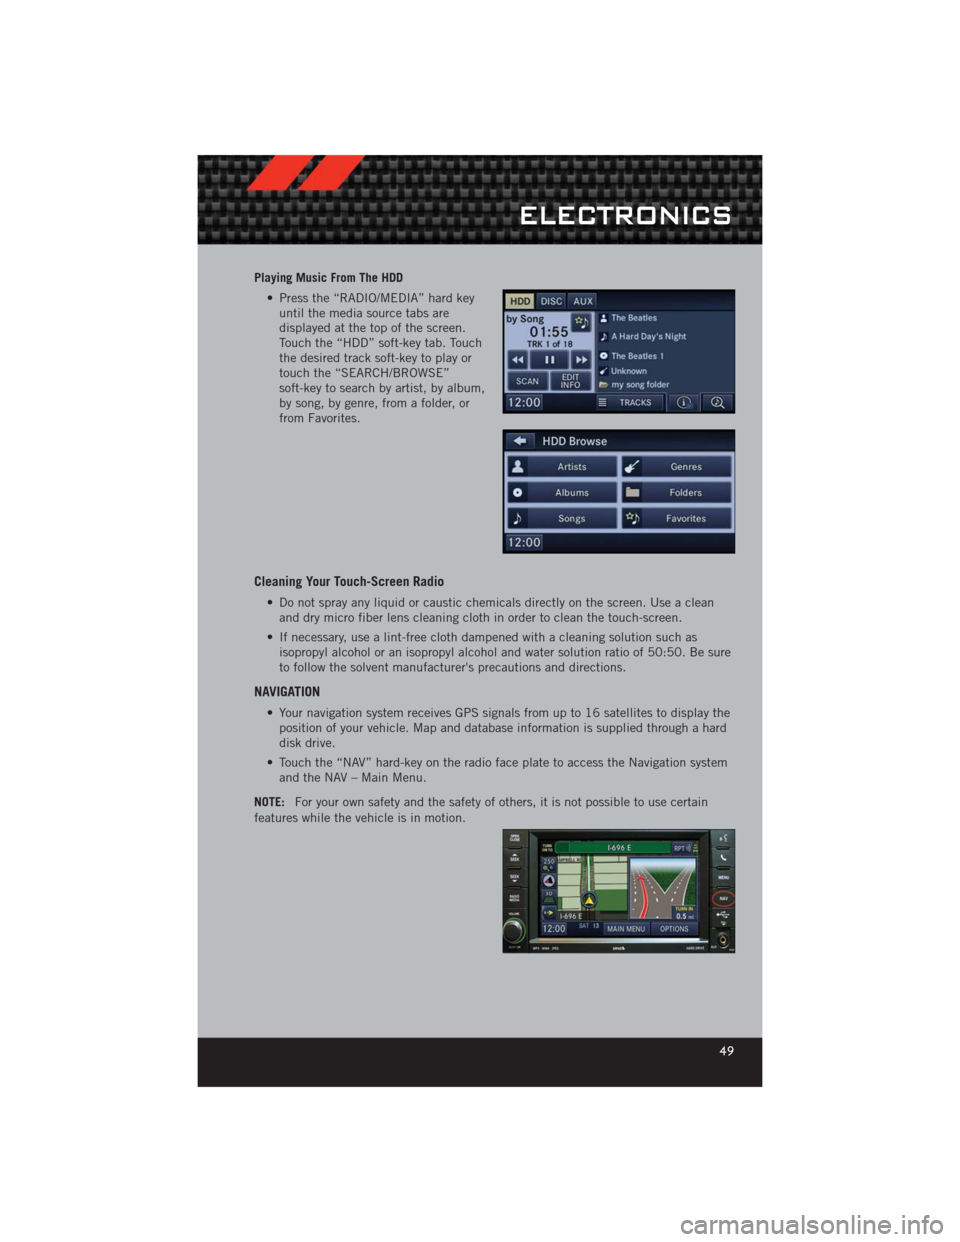
Playing Music From The HDD• Press the “RADIO/MEDIA” hard keyuntil the media source tabs are
displayed at the top of the screen.
Touch the “HDD” soft-key tab. Touch
the desired track soft-key to play or
touch the “SEARCH/BROWSE”
soft-key to search by artist, by album,
by song, by genre, from a folder, or
from Favorites.
Cleaning Your Touch-Screen Radio
• Do not spray any liquid or caustic chemicals directly on the screen. Use a cleanand dry micro fiber lens cleaning cloth in order to clean the touch-screen.
• If necessary, use a lint-free cloth dampened with a cleaning solution such as isopropyl alcohol or an isopropyl alcohol and water solution ratio of 50:50. Be sure
to follow the solvent manufacturer's precautions and directions.
NAVIGATION
• Your navigation system receives GPS signals from up to 16 satellites to display theposition of your vehicle. Map and database information is supplied through a hard
disk drive.
• Touch the “NAV” hard-key on the radio face plate to access the Navigation system and the NAV – Main Menu.
NOTE: For your own safety and the safety of others, it is not possible to use certain
features while the vehicle is in motion.
ELECTRONICS
49
Page 54 of 124

Route Guidance• After starting route guidance, the system calculates the route and announces:“Follow the arrows on the display.” You will receive navigation recommendations by
voice messages and screen displays.
Route Options • After pressing the “OPTIONS” soft-key in the Route Guidance Menu, the followinginformation is displayed:
• In the left half of the screen, the current position and the current routing method are displayed.
• “Take Detour” will allow you to calculate a different route.
• “Find Nearby POI” to search for a local POI.
• “Destination Info” displays destination information.
• “View Turn List” lists streets utilized for the current route.
• “Save Destination” to save the destination address.
• “Change Method” will allow you to change the routing method.
ELECTRONICS
52
Page 65 of 124

ECO
• The ECO message will appear in your EVIC display whenever you are driving in afuel efficient manner.
• This feature allows you to monitor when you are driving in a fuel efficient manner, and it can be used to modify driving habits in order to increase fuel economy.
PROGRAMMABLE FEATURES
Electronic Vehicle Information Center (EVIC)
• The EVIC can be used to program the following Personal Settings. Press andrelease the MENUbutton until Personal Settings displays, then press the UPor DOWNbuttons to scroll through the settings. Press the SELECTbutton to change the setting.
• Language • Hill Start Assist (HSA)
• Unlock Doors Automatically on Exit • Turn Headlights On with Remote Key Unlock
• Remote Key Unlock • Delay Power Off to Accessories Until Exit
• Remote Start Comfort Sys. • Turn-by-Turn Navigation
• Sound Horn with Remote Key Lock • Display ECO Mode
• Flash Lights with Remote Key Lock • Keyless Enter-N-Go™
• Headlamps On with Wipers (Available with Auto Headlamps Only) • Enable/Disable The Rear Park Assist
System
• Delay Turning Headlights Off • Display Units of Measure In
Key Fob Programmable Features
• The following features may also be programmed by using the Key Fob transmitter
or the ignition switch and driver's door lock switch.
NOTE: Pressing the LOCK button while you are inside the vehicle will activate the
Vehicle Security Alarm. Opening a door with the Vehicle Security Alarm activated will
cause the alarm to sound. Press the UNLOCK button to deactivate the Vehicle Security
Alarm.
Unlock On First Press
• To unlock either the driver's side, or all doors, on the first press of the UNLOCKbutton:
• Press and hold the LOCK button for at least 4 seconds, but no longer than 10 seconds. Then, press and hold the UNLOCK button while still holding the
LOCK button.
• Release both buttons at the same time.
Auto Unlock Doors On Exit • To have all of the vehicle doors unlock when any door is opened:• Enter your vehicle and close all the doors.
ELECTRONICS
63
Page 117 of 124

AUTHENTIC ACCESSORIES BY MOPAR®
• The following highlights just some of the many Authentic Dodge Accessories byMopar featuring a fit, finish, and functionality specifically for your Dodge
Challenger.
• In choosing Authentic Accessories you gain far more than expressive style, premium protection, or extreme entertainment, you also benefit from enhancing
your vehicle with accessories that have been thoroughly tested and factory-
approved.
• For the full line of Authentic Dodge Accessories by Mopar, visit your local Dodge dealership or online at mopar.com.
EXTERIOR:
• Rear Go-Wing Spoiler • Body Decal Kit • T/A Hood
• Molded Splash Guards • Full Vehicle Cover • Fuel Filler Doors
• Custom Wheels • Graphics Packages • Quad Exhaust Tips
• Hood Venting System
INTERIOR:
• Premium Carpet Floor Mats • Katzkin Leather Seats • Bright Pedal Kit
• Door Sill Guards • Pedal Kit • Shifters
• Slush Mats
ELECTRONICS:
• Portable Navigation Systems • Uconnect™ Web (WiFi) • Uconnect™ Phone
•iPod
®Adapter • Media Center Upgrades • Remote Start
• Kicker®Double
SubWoofer • Electronic Vehicle
Tracking System • Ecometer
• Rear Park Assist
• iPod
®is a registered trademark of Apple, Inc.
• Kicker
®is a registered trademark of Stillwater Designs and Audio, Inc.
MOPAR ACCESSORIES
115
Page 119 of 124

Instrument Cluster Warning
Lights ................. 6,74
Intermittent Wipers (Delay Wipers) . . 23
Introduction............... 2
iPod
®/USB/MP3 Control ........ 61
Bluetooth Streaming Audio ..... 61
Jack Location .............. 79
Jack Operation ............. 81
Jacking Instructions .......... 81
Jump Starting .............. 89
KeyFob .................. 8
Key Fob Programmable Features . . . 63
Keyless Enter-N-Go™ .......... 9
Lock/Unlock ............. 10
Starting/Stopping ........ 11,12
Lane Change Assist .......... 22
LATCH (Lower Anchors and Tether for
CHildren) ................ 15
Lights TurnSignal .............. 22
Warning (Instrument Cluster
Description) .............. 6
Maintenance Record ......104,107
MaintenanceSchedule ..... 102,105
MediaCenterRadio ........ 30,32
Mirrors Heated .............. 25,26
MOPAR
®Accessories ........ 115
Navigation .............. 40,49
New Vehicle Break-In Period ..... 22
OilChangeIndicator .......... 77
Oil Change Indicator, Reset ...... 77
Oil, Engine Capacity ............... 99
Outlet Power ................. 67
Overheating, Engine .......... 78
Panic Alarm ............... 8 Phone (Pairing)
............. 56
Phone (Uconnect) ........... 56
Placard, Tire and Loading
Information .............. 111
Power Glass Sunroof ............ 26
Outlet (Auxiliary Electrical
Outlet) ................ 67
Seats ................. 18
Steering ................ 99
Preparation for Jacking ........ 80
Programmable Electronic
Features ............... 63,72
Radio Operation .......... 34,43
Rain Sensitive Wiper System ..... 23
Rear Seat, Folding ........... 20
Recreational Towing .......... 69
Remote Starting System ........ 9
ReplacementBulbs .......... 112
Reporting Safety Defects ...... 114
Restraints, Child ............ 15
Rocking Vehicle When Stuck ..... 93
Seat Belts ................ 13
Seats ................... 18
Adjustment .............. 18
Heated ................ 20
Lumbar Support ........... 18
Power ................. 18
RearFolding ............. 20
Seek Button .......... 30,31,33
Setting the Clock ...... 30,32,35,43
Shift Lever Override .......... 91
Short Message Service (SMS) ..... 60
Signals, Turn .............. 22
SIRIUS Travel Link ........... 55
SpareTire ................ 79
SparkPlugs ............... 99
Speed Control Accel/Decel .............. 24
Cancel ................ 24
Resume ................ 24
Speed Control (Cruise Control) .... 24
Starting Remote ................. 9
INDEX
117