Page 84 of 494

•Always make sure that objects cannot fall into the
driver footwell while the vehicle is moving. Ob-
jects can become trapped under the brake pedal
and accelerator pedal causing")
WARNING! (Continued)
•Always make sure that objects cannot fall into the
driver footwell while the vehicle is moving. Ob-
jects can become trapped under the brake pedal
and accelerator pedal causing a loss of vehicle
control.
•If required, mounting posts must be properly
installed, if not equipped from the factory.
Failure to properly follow floor mat installation or
mounting can cause interference with the brake
pedal and accelerator pedal operation causing loss
of control of the vehicle.
Periodic Safety Checks You Should Make Outside
The Vehicle
Tires
Examine tires for excessive tread wear and uneven wear
patterns. Check for stones, nails, glass, or other objectslodged in the tread or sidewall. Inspect the tread for cuts
and cracks. Inspect sidewalls for cuts, cracks and bulges.
Check the wheel nuts for tightness. Check the tires
(including spare) for proper cold inflation pressure.
Lights
Have someone observe the operation of exterior lights
while you work the controls. Check turn signal and high
beam indicator lights on the instrument panel.
Door Latches
Check for positive closing, latching, and locking.
Fluid Leaks
Check area under vehicle after overnight parking for fuel,
engine coolant, oil, or other fluid leaks. Also, if gasoline
fumes are detected or if fuel, power steering fluid, or
brake fluid leaks are suspected, the cause should be
located and corrected immediately.
82 THINGS TO KNOW BEFORE STARTING YOUR VEHICLE
Page 185 of 494

Operation of the Brake Warning Light can be checked by
turning the ignition switch from the OFF position to the
ON/RUN position. The light should illuminate for ap-
proximately two seconds. The light should then turn off
unless the parking brake is applied or a brake fault is
detected. If the light does not illuminate, have the light
inspected by an authorized dealer.
The light also will turn on when the parking brake is
applied with the ignition switch in the ON/RUN posi-
tion.
NOTE:This light shows only that the parking brake is
applied. It does not show the degree of brake application.
21. Vehicle Security Light — If Equipped This light will flash at a fast rate for approxi-
mately 15 seconds, when the vehicle security
alarm is arming, and then will flash slowly
until the vehicle is disarmed. 22. Tire Pressure Monitoring Telltale Light
Each tire, including the spare (if provided),
should be checked monthly when cold and
inflated to the inflation pressure recommended
by the vehicle manufacturer on the vehicle
placard or tire inflation pressure label. (If your vehicle
has tires of a different size than the size indicated on the
vehicle placard or tire inflation pressure label, you should
determine the proper tire inflation pressure for those
tires.)
As an added safety feature, your vehicle has been
equipped with a Tire Pressure Monitoring System
(TPMS) that illuminates a low tire pressure telltale when
one or more of your tires is significantly under-inflated.
Accordingly, when the low tire pressure telltale illumi-
nates, you should stop and check your tires as soon as
possible, and inflate them to the proper pressure. Driving
on a significantly under-inflated tire causes the tire to
overheat and can lead to tire failure. Under-inflation also
4
UNDERSTANDING YOUR INSTRUMENT PANEL 183
Page 199 of 494
1. Turn the ignition switch ON.
2. Press and release the MENU button until Personal
Settings displays in the EVIC.
3. Press the UP or DOWN button until “COMPASS
VARIANCE” message and the last variance zone number
displays in the EVIC.4. Press and release the SELECT button until the proper
variance zone is selected according to the map.
5. Press and release the MENU button to exit.
System Warnings
(Customer Information Features)
Press and release the MENU button until “SYSTEM
WARNINGS” displays in the EVIC. Then, press the Up or
DOWN button to display any one of the following
choices.
•Oil Temperature
Shows the actual oil temperature.
•Oil Pressure
Shows the actual oil pressure.
•Tire Pressure
Shows the actual tire pressure for each tire (EXCLUDING
THE SPARE TIRE).
Compass Variance Map
4
UNDERSTANDING YOUR INSTRUMENT PANEL 197
Page 251 of 494

▫Synchronizing ESC ................... 295
� Tire Safety Information ................. 296
▫ Tire Markings ....................... 296
▫ Tire Terminology And Definitions ......... 300
▫ Tire Loading And Tire Pressure .......... 301
� Tires — General Information ............. 305
▫ Tire Pressure ....................... 305
▫ Tire Inflation Pressures ................ 306
▫ Radial Ply Tires ..................... 308
▫ Spare Tire Matching Original Equipped Tire
And Wheel – If Equipped .............. 308
▫ Compact Spare Tire – If Equipped ........ 309
▫ Full Size Spare – If Equipped ............ 310▫
Limited-Use Spare – If Equipped ......... 310
▫ Tire Spinning ....................... 311
▫ Tread Wear Indicators ................. 312
▫ Life Of Tire ........................ 312
▫ Replacement Tires .................... 313
� Tire Chains .......................... 314
� Snow Tires .......................... 316
� Tire Rotation Recommendations ........... 316
� Tire Pressure Monitor System (TPMS) ....... 317
▫ Base System ........................ 320
▫ Premium System – If Equipped .......... 322
▫ General Information .................. 326
5
STARTING AND OPERATING 249
Page 298 of 494
 - Metric tire sizing is based on U.S.
design standards. P-Metric tires have the letter “P”
molded into the sidewall preceding the size de")
TIRE SAFETY INFORMATION
Tire MarkingsNOTE:•P (Passenger) - Metric tire sizing is based on U.S.
design standards. P-Metric tires have the letter “P”
molded into the sidewall preceding the size designa-
tion. Example: P215/65R15 95H.
•European-Metric tire sizing is based on European
design standards. Tires designed to this standard have
the tire size molded into the sidewall beginning with
the section width. The letter�P�is absent from this tire
size designation. Example: 215/65R15 96H.
•Temporary spare tires are spares designed for tempo-
rary emergency use only. Temporary high pressure
compact spare tires have the letter “T” or “S” molded
into the sidewall preceding the size designation. Ex-
ample: T145/80D18 103M.
CAUTION!
Do not use two different size tires on the rear wheels,
as this can result in rear axle damage.
1 — U.S. DOT Safety Stan-
dards Code (TIN) 4 — Maximum Load
2 — Size Designation 5 — Maximum Pressure
3 — Service Description 6 — Treadwear, Traction and Temperature Grades
296 STARTING AND OPERATING
Page 299 of 494
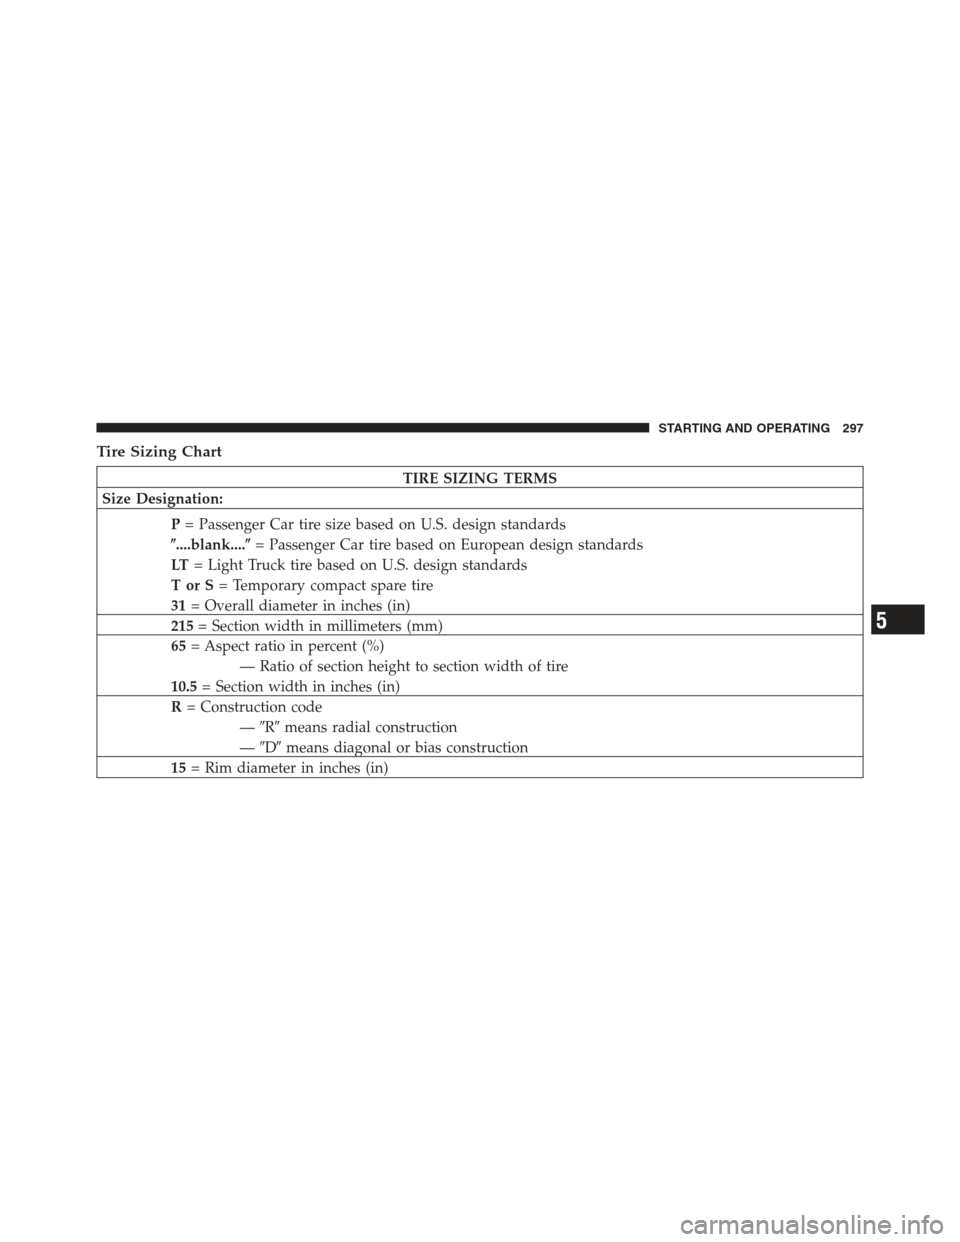
Tire Sizing Chart
TIRE SIZING TERMS
Size Designation:
P= Passenger Car tire size based on U.S. design standards
�....blank....� = Passenger Car tire based on European design standards
LT = Light Truck tire based on U.S. design standards
TorS= Temporary compact spare tire
31 = Overall diameter in inches (in)
215 = Section width in millimeters (mm)
65 = Aspect ratio in percent (%)
— Ratio of section height to section width of tire
10.5 = Section width in inches (in)
R = Construction code
—�R� means radial construction
— �D� means diagonal or bias construction
15 = Rim diameter in inches (in)
5
STARTING AND OPERATING 297
Page 303 of 494
Tire Loading And Tire Pressure
Tire and Loading Information Placard Location
NOTE:The proper cold tire inflation pressure is listed
on the driver ’s side B-Pillar or the rear edge of the
driver’s side door.
Tire and Loading Information Placard
This placard tells you important information about
the:
1) number of people that can be carried in the vehicle
2) total weight your vehicle can carry
3) tire size designed for your vehicle
4) cold tire inflation pressures for the front, rear, and
spare tires.
Loading
The vehicle maximum load on the tire must not exceed
the load carrying capacity of the tire on your vehicle. You
will not exceed the tire’s load carrying capacity if you
adhere to the loading conditions, tire size, and cold tire
inflation pressures specified on the Tire and Loading
Information placard and in the “Vehicle Loading” section
of this manual.
Tire and Loading Information Placard
5
STARTING AND OPERATING 301
Page 310 of 494

Tire Pressures For High Speed Operation
The manufacturer advocates driving at safe speeds
within posted speed limits. Where speed limits or condi-
tions are such that the vehicle can be driven at high
speeds, maintaining correct tire inflation pressure is very
important. Increased tire pressure and reduced vehicle
loading may be required for high-speed vehicle opera-
tion. Refer to original equipment or an authorized tire
dealer for recommended safe operating speeds, loading
and cold tire inflation pressures.
WARNING!
High speed driving with your vehicle under maxi-
mum load is dangerous. The added strain on your
tires could cause them to fail. You could have a
serious collision. Do not drive a vehicle loaded to the
maximum capacity at continuous speeds above
75 mph (120 km/h).
Radial Ply Tires
WARNING!
Combining radial ply tires with other types of tires
on your vehicle will cause your vehicle to handle
poorly. The instability could cause a collision. Al-
ways use radial ply tires in sets of four. Never
combine them with other types of tires.
Cuts and punctures in radial tires are repairable only in
the tread area because of sidewall flexing. Consult your
authorized tire dealer for radial tire repairs.
Spare Tire Matching Original Equipped Tire and
Wheel – If Equipped
Your vehicle may be equivalent with a spare tire and
wheel in look and function as the original equipment tire
and wheel found on the front or rear axle of your vehicle.
This spare tire may be used in the tire rotation for your
308 STARTING AND OPERATING