Page 349 of 643

SET Button – To Set the Pushbutton Memory
When you are receiving a channel that you wish to
commit to pushbutton memory, press the SET button.
The symbol SET 1 will now show in the display window.
Select the button (1-6) you wish to lock onto this channel
and press and release that button. If a button is not
selected within five seconds after pressing the SET but-
ton, the channel will continue to play but will not be
stored into pushbutton memory.
You may add a second channel to each pushbutton by
repeating the above procedure with this exception: Press
the SET button twice and SET 2 will show in the display
window. Each button can be set for SET 1 and SET 2. This
allows a total of 12 Satellite channels to be stored into
pushbutton memory. The channels stored in SET 2
memory can be selected by pressing the pushbutton
twice.Every time a preset button is used, a corresponding
button number will display.
Buttons 1 - 6
These buttons tune the radio to the channels that you
commit to pushbutton memory (12 Satellite stations).
Operating Instructions (Uconnect™ Phone) — If
Equipped
Refer to “Uconnect™ Phone” in the Uconnect™ User
Manual located on the DVD for further details.
iPod�/USB/MP3 CONTROL — IF EQUIPPED
NOTE:
This section is for sales code RES and REQ/
REL/RET radios only with Uconnect™. For sales code
RBZ/RHB, RHR, RHP, RHW or RB2 touch-screen radio
iPod�/USB/MP3 control feature, refer to the separate
RBZ/RHB, RHR, RHP, RHW or RB2 User’s Manual.
iPod�/USB/MP3 control is available only if equipped as
an option with these radios.
346 UNDERSTANDING YOUR INSTRUMENT PANEL
ProCarManuals.com
Page 350 of 643
This feature allows an iPod�or external USB device to be
plugged into the USB port, located in the glove compart-
ment.
iPod� control supports Mini, 4G, Photo, Nano, 5G iPod�
and iPhone� devices. Some iPod� software versions may
not fully support the iPod� control features. Please visit
Apple’s website for software updates.
NOTE:
•If the radio has a USB port, refer to the appropriate
Uconnect™ Multimedia radio User ’s Manual for
iPod� or external USB device support capability.
•Connecting an iPod� or consumer electronic audio
device to the AUX port located in the radio faceplate,
plays media, but does not use the iPod� /MP3 control
feature to control the connected device.
Connecting The iPod� Or External USB Device
Use the connection cable to connect an iPod� or external
USB device to the vehicle’s USB connector port which is
located in the glove compartment.
USB Connector Port
4
UNDERSTANDING YOUR INSTRUMENT PANEL 347
ProCarManuals.com
Page 355 of 643

CAUTION!
•Leaving the iPod�or external USB device (or any
supported device) anywhere in the vehicle in
extreme heat or cold can alter the operation or
damage the device. Follow the device manufactur-
er ’s guidelines.
•Placing items on the iPod� or external USB device,
or connections to the iPod� or external USB device
in the vehicle, can cause damage to the device
and/or to the connectors.
WARNING!
Do not plug in or remove the iPod� or external USB
device while driving. Failure to follow this warning
could result in an accident.
Bluetooth Streaming Audio (BTSA)
Music can be streamed from your cellular phone to the
Uconnect™ phone system.
Controlling BTSA Using Radio Buttons
To get into the BTSA mode, press either “AUX” button on
the radio or press the VR button and say “Bluetooth
Streaming Audio”.
Play Mode
When switched to BTSA mode, some audio devices can
start playing music over the vehicle’s audio system, but
some devices require the music to be initiated on the
device first, then it will get streamed to the Uconnect™
phone system. Seven devices can be paired to the
Uconnect™ phone system, but just one can be selected
and played.
Selecting Different Audio Device
1. Press PHONE button to begin.
352 UNDERSTANDING YOUR INSTRUMENT PANEL
ProCarManuals.com
Page 356 of 643
2. After the�Ready�prompt and the following beep, say
�Setup�, then �Select Audio Devices�.
3. Say the name of the audio device or ask the
Uconnect™ phone system to list audio devices.
Next Track
Use the SEEK UP button, or press the VR button on the
radio and say “Next Track” to jump to the next track
music on your cellular phone.
Previous Track
Use the SEEK DOWN button, or press the VR button on
the radio and say “Previous Track” to jump to the
previous track music on your cellular phone.
Browse
Browsing is not available on a BTSA device. Only the
current song that is playing will display info.
UCONNECT™ MULTIMEDIA VIDEO
ENTERTAINMENT SYSTEM (VES)™ — IF EQUIPPED
Getting Started
•
Screen(s) located in the overhead console : Unfold the
overhead LCD screen(s) by pushing the button on the
overhead console behind the screen(s).
Video Entertainment System (VES)™
4
UNDERSTANDING YOUR INSTRUMENT PANEL 353
ProCarManuals.com
Page 357 of 643

•Cycle the ignition to the ON or ACC position.
•Turn on the VES™ player (if equipped on Dual Screen
System) by pushing the Power button, located on the far
left, or by pressing the button on the Remote Control.
•When the Video Screen(s) are open and a DVD is
inserted into the VES™ player, the screen(s) turn(s) on
automatically, the headphone transmitters turn on and
playback begins.
•For Dual Video Screen System, Channel 1 on the
Remote Control and Headphones refers to Screen 1
(second row) and Channel 2 on the Remote Control
and Headphones refers to Screen 2 (third row). Refer
to the Dual Video Screen section for more information.
Play Video Games
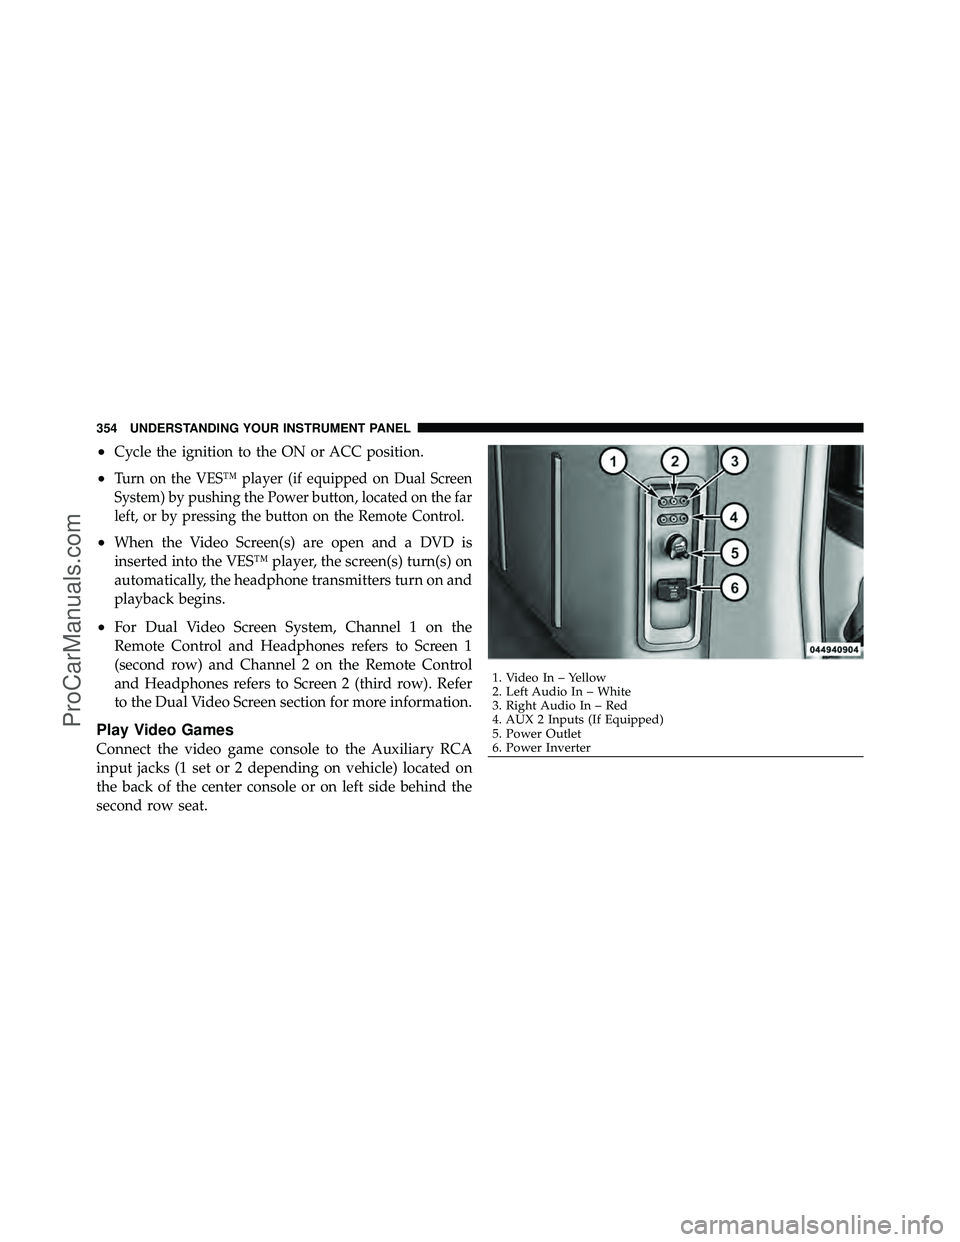
Connect the video game console to the Auxiliary RCA
input jacks (1 set or 2 depending on vehicle) located on
the back of the center console or on left side behind the
second row seat.
1. Video In – Yellow
2. Left Audio In – White
3. Right Audio In – Red
4. AUX 2 Inputs (If Equipped)
5. Power Outlet
6. Power Inverter
354 UNDERSTANDING YOUR INSTRUMENT PANEL
ProCarManuals.com
Page 358 of 643
When connecting an external source to the AUX input, be
sure to follow the standard color coding for the VES™
jacks:
NOTE:Certain high-end video games, such as Playsta-
tion3 and XBox360 will exceed the power limit of the
vehicle’s Power Inverter. Refer to the Power Inverter
section in your vehicle’s Owner’s Manual for more
information.
Ensure the Remote Control and Headphone switch is on
Channel 1.
Using The Remote Control
1. Press the MODE button on the Remote Control.
2. While looking at the video screen, highlight VES AUX
1 or 2 (depending which AUX input the gaming console
is plugged into), by either pressing Up/Down/Left/
Right buttons or by repeatedly pressing the MODE
button, then press ENTER on the Remote Control.
Select VES AUX1 Mode On The VES Screen
4
UNDERSTANDING YOUR INSTRUMENT PANEL 355
ProCarManuals.com
Page 360 of 643
Listen To An Audio Source On Channel 2 While A
Video Is Playing On Channel 1
Ensure the Remote Control and Headphone switch is on
Channel 2.
Using The Remote Control
1. Press the MODE button on the Remote Control and
the Mode Select Screen will display, unless a video is
playing then only a small banner will appear on the
bottom of the screen.
2. While looking at the video screen, either press Up/
Down/Left/Right on the Remote Control to highlight the
desired audio source or repeatedly press the MODE
button on the remote until the desired audio source
appears on the screen.
Select FM Mode On The VES Screen
4
UNDERSTANDING YOUR INSTRUMENT PANEL 357
ProCarManuals.com
Page 362 of 643
Dual Video Screen
NOTE:Typically there are two different ways to operate
the features of the Video Entertainment System (VES)™.
•The Remote Control
•The Touch-Screen Radio (If Equipped)
Play A DVD Using The Touch-Screen Radio
1. Press the OPEN/CLOSE or LOAD hard-key on the
radio faceplate (Touch-Screen).
2. Insert the DVD with the label facing up. The radio
automatically selects the appropriate mode after the disc
is recognized and displays the menu screen or starts
playing the first track. 3. To watch a DVD on Screen 1 for second row passen-
gers, ensure the Remote Control and Headphone switch
is on Channel 1.
4. To watch a DVD on Screen 2 for third row passengers,
ensure the Remote Control and Headphone switch is on
Channel 2.
4
UNDERSTANDING YOUR INSTRUMENT PANEL 359
ProCarManuals.com