Page 188 of 514
Ski Pass-Through
There is a ski pass-through door located behind the rear
seat armrest that allows longer items, such as snow skis,
to be stored in the rear cargo area. Lower the armrest and
pull downward on the latch to open the ski pass-through
door.
REAR WINDOW FEATURES
Rear Window Defroster
The rear window defroster button is located on the
climate control (Mode) knob. Press this button to
turn on the rear window defroster and the heated outside
mirrors (if equipped). An indicator in the button will
illuminate when the rear window defroster is on. The
rear window defroster automatically turns off after ap-
proximately 10 minutes. For an additional five minutes of
operation, press the button a second time.
NOTE: To prevent excessive battery drain, use the rear
window defroster only when the engine is operating.
Ski Pass-Through
186 UNDERSTANDING THE FEATURES OF YOUR VEHICLE
Page 216 of 514
•Right Rear Turn Signal Lamp Out (with a single
chime)
•RKE (Remote Keyless Entry) Battery Low (with a
single chime)
•Personal Settings Not Avail – Vehicle Not In PARK
•Personal Settings Not Avail – Vehicle in Motion
•Door Ajar (with vehicle graphic showing which door
is open. A single chime sounds if the vehicle is in
motion).
•Doors Ajar (with vehicle graphic showing which doors
are open. A single chime sounds if the vehicle is in
motion).
•Trunk Open (with vehicle graphic showing an open
trunk and A single chime )
•Lights On
•Key In Ignition
•Remote start aborted — Door ajar
•Remote start aborted — Hood ajar
•Remote start aborted — Trunk ajar
•Remote start aborted — Fuel low
•Remote start disabled — System fault
•Oil Change Required (with a single chime)
•Low Tire (with a graphic of the car showing which
tire(s) is/are low - with a single chime). Refer to�Ti re
Pressure Monitoring System� in�Starting and Operat-
ing�.
•Check TPM System (with a single chime) Refer to �Ti re
Pressure Monitoring System� in�Starting and
Operating�.
214 UNDERSTANDING YOUR INSTRUMENT PANEL
Page 220 of 514
Compass Variance
Compass Variance is the difference between Magnetic
North and Geographic North. To compensate for the
differences, the variance should be set for the zone where
the vehicle is driven, per the zone map. Once properly
set, the compass will automatically compensate for the
differences and provide the most accurate compass head-
ing.
NOTE:Magnetic and battery powered devices, (such as
cell phones, iPod’s, radar detectors, PDA’s and laptops)
should be kept away from the top of the instrument
panel. This is where the compass module is located and
such devices may interfere and cause false compass
readings. To Change Compass Variance:
1. Turn the ignition switch to the ON position. Leave the
shift lever in PARK.
2. Press and release the MENU button until “Personal
Settings” displays in the EVIC.
Compass Variance Map
218 UNDERSTANDING YOUR INSTRUMENT PANEL
Page 272 of 514
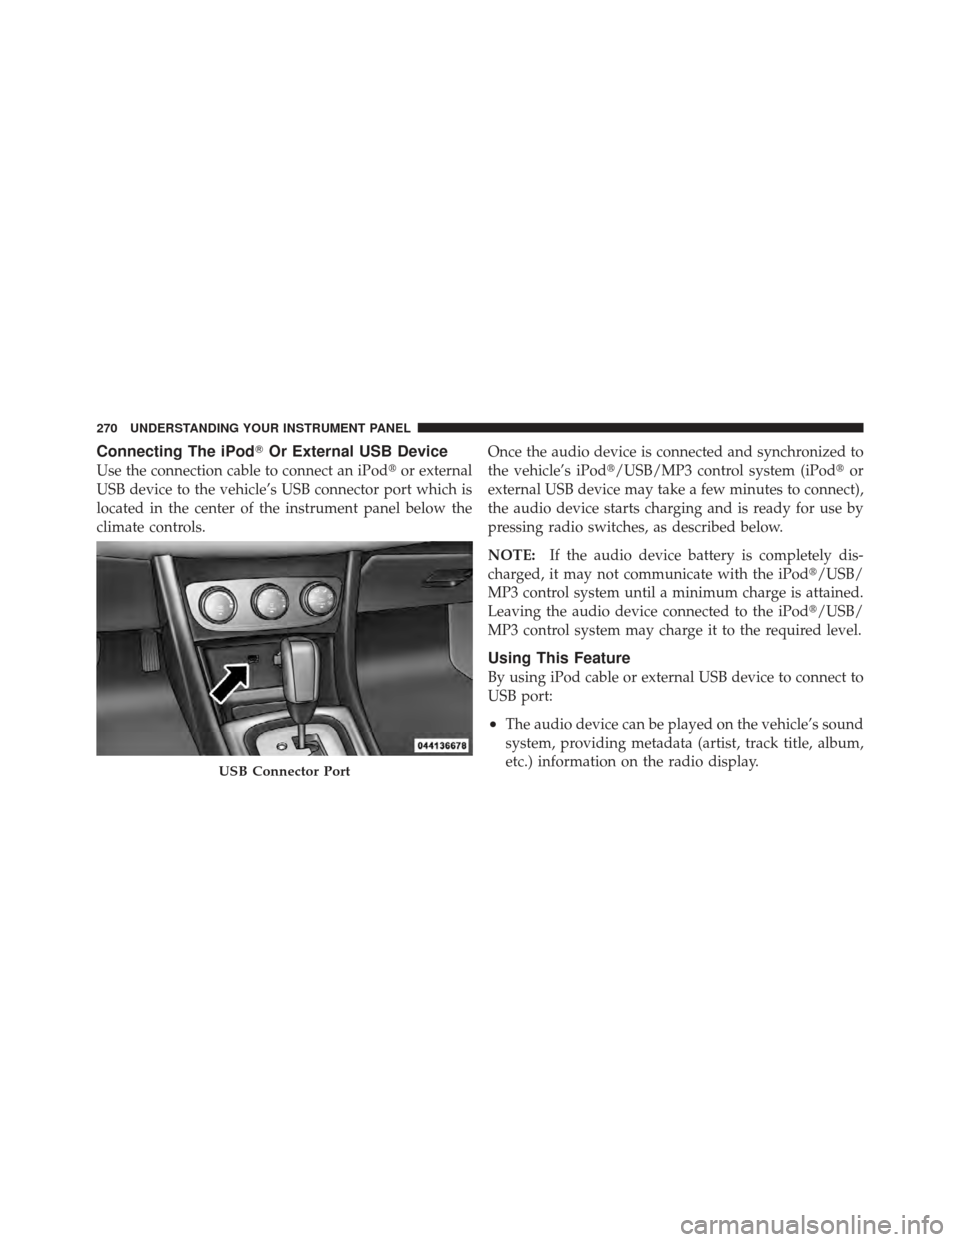
Connecting The iPod�Or External USB Device
Use the connection cable to connect an iPod� or external
USB device to the vehicle’s USB connector port which is
located in the center of the instrument panel below the
climate controls. Once the audio device is connected and synchronized to
the vehicle’s iPod�/USB/MP3 control system (iPod�
or
external USB device may take a few minutes to connect),
the audio device starts charging and is ready for use by
pressing radio switches, as described below.
NOTE: If the audio device battery is completely dis-
charged, it may not communicate with the iPod�/USB/
MP3 control system until a minimum charge is attained.
Leaving the audio device connected to the iPod �/USB/
MP3 control system may charge it to the required level.
Using This Feature
By using iPod cable or external USB device to connect to
USB port:
•The audio device can be played on the vehicle’s sound
system, providing metadata (artist, track title, album,
etc.) information on the radio display.
USB Connector Port
270 UNDERSTANDING YOUR INSTRUMENT PANEL
Page 273 of 514
•The audio device can be controlled using the radio
buttons to Play, Browse, and List the iPod�contents.
•The audio device battery charges when plugged into
the USB/AUX connector (if supported by the specific
audio device)
Controlling The iPod�Or External USB Device
Using Radio Buttons
To get into the iPod�/USB/MP3 control mode and access
a connected audio device, either press the “AUX” button
on the radio faceplate or press the VR button and say
�USB� or�Switch to USB�. Once in the iPod�/USB/MP3
control mode, audio tracks (if available from audio
device) start playing over the vehicle’s audio system.
Play Mode
When switched to iPod�/USB/MP3 control mode, the
iPod� or external USB device automatically starts Play
mode. In Play mode, the following buttons on the radio
faceplate may be used to control the iPod� or external
USB device and display data:
•Use the TUNE control knob to select the next or
previous track.
•Turning it clockwise (forward) by one click, while
playing a track, skips to the next track or press the
VR button and say �Next Track�.
•Turning it counterclockwise (backward) by one
click, will jump to the previous track in the list or
press the VR button and say �Previous Track�
•Jump backward in the current track by pressing and
holding the <
button long enough will jump to the beginning of
the current track.
4
UNDERSTANDING YOUR INSTRUMENT PANEL 271
Page 302 of 514
WARNING! (Continued)
•Do not attempt to push or tow your vehicle to get
it started. Vehicles equipped with an automatic
transmission cannot be started this way. Unburned
fuel could enter the catalytic converter and once
the engine has started, ignite and damage the
converter and vehicle. If the vehicle has a dis-
charged battery, booster cables may be used to
obtain a start from a booster battery or the battery
in another vehicle. This type of start can be dan-
gerous if done improperly. Refer to “Jump Start-
ing” in “What To Do In Emergencies” for further
information.
Without Tip Start
If the engine fails to start after you have followed the
“Normal Starting” or “Extreme Cold Weather” proce-
dures, it may be flooded. Push the accelerator pedal allthe way to the floor and hold it there while cranking the
engine. This should clear any excess fuel in case the
engine is flooded.
CAUTION!
To prevent damage to the starter, do not crank the
engine for more than 15 seconds at a time. Wait 10 to
15 seconds before trying again.
If the engine is flooded, it may start to run, but not have
enough power to continue running when the key is
released. If this occurs, continue cranking up to 15 sec-
onds with the accelerator pedal pushed all the way to the
floor.
If the engine shows no sign of starting after two 15-
second periods of cranking with the accelerator pedal
held to the floor, repeat the “Normal Starting” or “Ex-
treme Cold Weather” procedures.
300 STARTING AND OPERATING
Page 369 of 514
To fix a Non-FFV vehicle inadvertently fueled once with
E-85 perform the following:
•change the engine oil and oil filter
•disconnect and reconnect the battery
•drain the fuel tank (see your authorized dealer)
More extensive repairs will be required for prolonged
exposure to E-85 fuel.
MMT In Gasoline
MMT is a manganese-containing metallic additive that is
blended into some gasoline to increase octane. Gasoline
blended with MMT provides no performance advantage
beyond gasoline of the same octane number without
MMT. Gasoline blended with MMT reduces spark plug
life and reduces emissions system performance in some
vehicles. The manufacturer recommends that gasoline
without MMT be used in your vehicle. The MMT content
of gasoline may not be indicated on the gasoline pump, therefore, you should ask your gasoline retailer whether
the gasoline contains MMT. It is even more important to
look for gasoline without MMT in Canada, because MMT
can be used at levels higher than those allowed in the
United States. MMT is prohibited in Federal and Califor-
nia reformulated gasoline.
Materials Added To Fuel
All gasoline sold in the United States is required to
contain effective detergent additives. Use of additional
detergents or other additives is not needed under normal
conditions and they would result in additional cost.
Therefore, you should not have to add anything to the
fuel.
5
STARTING AND OPERATING 367
Page 394 of 514
HAZARD WARNING FLASHERS
The Hazard Warning flasher switch is located on the
instrument panel, below the radio.Press the switch to turn on the Hazard Warning
flasher. When the switch is activated, all directional
turn signals will flash on and off to warn oncoming
traffic of an emergency. Press the switch a second time to
turn off the Hazard Warning flashers.
This is an emergency warning system and it should not
be used when the vehicle is in motion. Use it when your
vehicle is disabled and it is creating a safety hazard for
other motorists.
When you must leave the vehicle to seek assistance, the
Hazard Warning flashers will continue to operate even
though the ignition is placed in the OFF position.
NOTE: With extended use the Hazard Warning flashers
may wear down your battery.
IF YOUR ENGINE OVERHEATS
In any of the following situations, you can reduce the
potential for overheating by taking the appropriate ac-
tion.
•On the highways — Slow down.
•In city traffic — While stopped, put transaxle in
NEUTRAL, but do not increase engine idle speed.
CAUTION!
Driving with a hot cooling system could damage
your vehicle. If temperature gauge reads “H”, pull
over and stop the vehicle with the engine at idle,
when safe. Turn the air conditioner off and wait until
the pointer drops back into the normal range. After
appropriate action has been taken, if the pointer
remains on the “H”, turn the engine off immediately,
and call for service.
392 WHAT TO DO IN EMERGENCIES