2012 Citroen C4 PICASSO RHD bulb
[x] Cancel search: bulbPage 5 of 352

CONTENTS
3
Direction indicators 126Hazard warning lamps 126Horn 126Tyre under-infl ation detection 127Braking assistance systems 128Trajectory control systems 129Emergency or assistance call 130Seat belts 131Airbags 135
■■■■■■■■■
VIII-SAFETY 126�Î138
Electric parking brake 139Hill start assist 146Manual gearbox 147Gear effi ciency indicator 1486-speed electronic gearbox system 149Stop & Start 153Automatic gearbox 156Fixed centred controlssteering wheel 160Speed limiter 162Cruise control 164Parking space sensors 166Lane departure warning system 168Parking sensors 169Pneumatic suspension 171
■■■■■
■■■
■■■■■■
IX - DRIVING 139�Î172
Bonnet 174Running out of fuel (Diesel) 176Petrol engines 177Diesel engines 178Checking levels 179Checks 181
■■■■■■
X - CHECKS 173�Π182
Temporary puncture repair kit 183Changing a wheel 186Changing a bulb 190Changing a fuse 19712 V battery 203Energy economy mode 206Towing the vehicle 207Towing a trailer 209Roof bars 210Very cold climate screen 210Accessories 211
■■■■■■■■■■■
XI - PRACTICALINFORMATION 183�Π212
Petrol engines 213Petrol weights 214Diesel engines 215Diesel weights 217Petrol/Diesel weights - commercial versions 221Dimensions 223Identifi cation markings 226
■■■■■
■■
XII - TECHNICALDATA 213 �Î226
Emergency or assistance 227NaviDrive 231MyWay 275Audio system 307Video pack 329
■■■■■
AUDIO andTELEMATICS 227 �Î336
VISUALSEARCH 337 �Π341
ALPHABETICALINDEX 342 �Π348
Page 98 of 352

V
96
VISIBILITY
Daytime running lamps
Daytime lighting, compulsory in cer-
tain countries, which comes on auto-
matically when the engine is started
making the vehicle more visible to
other users.
Manual guide-me-home
lighting
The temporary lighting of dipped
headlamps after the vehicle's igni-
tion has been switched off makes
the driver's exit easier when the light
is poor.
Switching on
�)
With the ignition off, "fl ash" the
headlamps using the lighting
stalk B
.
�)
A second "headlamp fl ash" switch-
es the function off again.
Switching off
The manual guide-me-home lighting
switches off automatically after a set
time.
The manual guide-me-home lighting is
also available by pressing the lighting
button on the remote control (refer to
the section "Access - § Remote control
key").
This function is assured:
- in countries where it is imposed
by regulations,
by illumination of the dipped
beam headlamps with the side-
lamps and number plate lamps.
- for other countries where it is
provided,
by the use of dedicated LED lamps.
The instruments and controls (mul-
tifunction screen, air conditioning
control panel, ...) are not illuminated,
except in night mode with manual or
automatic illumination of headlamps.
LED lamps
They come on when the engine is
started.
Depending on the destination country,
they are used for:
- daytime running lamps in day mode
and sidelamps in night mode,
or
- sidelamps in day and night mode
Where LED lamps are fi tted, the fi la-
ment bulbs for the sidelamps in the
front lamp units are not used.
Activation or deactivation of this light-
ing is done via the vehicle confi guration
menu.
This function can be activated or
deactivated via the vehicle confi gu-
ration menu.
Page 100 of 352

V
98
VISIBILITY
OF XENON HEADLAMPS
This system adjusts the height of the
xenon headlamp beams automati-
cally and when stationary, according
to the load in the vehicle, so as to
avoid causing a nuisance to other
road user.
If a malfunction occurs,
this warning lamp is dis-
played in the instrument
panel, accompanied by
an audible signal and a message in
the screen.
The system then places your head-
lamps in the lowest position.
Do not touch the xenon bulbs.
Contact a CITROËN dealer or a
qualifi ed workshop.
MANUAL HEADLAMP ADJUSTMENT
To avoid dazzling other road users,
the height of the halogen bulb head-
lamps must be adjusted according
to the load in the vehicle. To do this,
turn the control, located below the
dashboard to the right of the driver,
to the appropriate position:
0.
1 or 2 people in the front seats.
-.
3 people.
1.
4 to 7 people.
-.
Intermediate setting.
2.
4 to 7 people + maximum authorised
loads.
-.
Intermediate setting.
3.
Driver + maximum authorised
loads.
The initial setting is position "0".
EXTERIOR SIDE SPOTLAMPS
Switching on
The side spotlamps come on tempo-
rarily:
- when you unlock the vehicle,
- when you press the lighting button
on the remote control,
-
with the automatic guide-me-home
lighting, on switching off the ignition,
- when you remove the key from
the ignition,
- when you open a door,
- when you use the remote control
to locate the vehicle.
Page 118 of 352

VI
116
FITTINGS
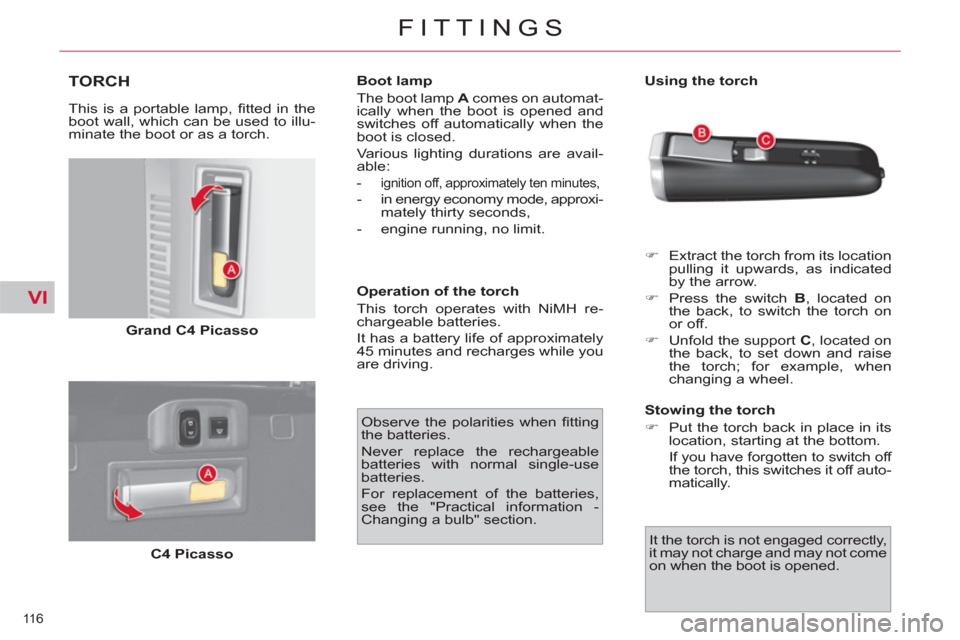
TORCH
This is a portable lamp, fi tted in the
boot wall, which can be used to illu-
minate the boot or as a torch.
Grand C4 Picasso
C4 Picasso
Boot lamp
The boot lamp A
comes on automat-
ically when the boot is opened and
switches off automatically when the
boot is closed.
Various lighting durations are avail-
able:
- ignition off, approximately ten minutes,
- in energy economy mode, approxi-
mately thirty seconds,
- engine running, no limit.
Operation of the torch
This torch operates with NiMH re-
chargeable batteries.
It has a battery life of approximately
45 minutes and recharges while you
are driving.
�)
Extract the torch from its location
pulling it upwards, as indicated
by the arrow.
�)
Press the switch B
, located on
the back, to switch the torch on
or off.
�)
Unfold the support C
, located on
the back, to set down and raise
the torch; for example, when
changing a wheel.
Stowing the torch
�)
Put the torch back in place in its
location, starting at the bottom.
If you have forgotten to switch off
the torch, this switches it off auto-
matically. Observe the polarities when fi tting
the batteries.
Never replace the rechargeable
batteries with normal single-use
batteries.
For replacement of the batteries,
see the "Practical information -
Changing a bulb" section.
It the torch is not engaged correctly,
it may not charge and may not come
on when the boot is opened.
Using the torch
Page 192 of 352

XI
190
PRACTICAL INFORMATION
CHANGING A BULB
The headlamps are fi tted
with polycarbonate glass
with a protective coating:
�)
do not clean them using a dry
or abrasive cloth, nor with a
detergent or solvent product,
�)
use a sponge and soapy water,
�)
when using a high pressure
washer on persistent marks,
do not keep the lance directed
towards the lamps or their
edges for too long, so as not to
damage their protective coating
and seals.
�)
Do not touch the bulb directly
with your fi ngers, use lint-free
cloths.
Changing a bulb should only be
done after the headlamp has been
switched off for a few minutes (risk
of serious burns).
It is imperative to use only anti-ul-
traviolet (UV) type bulbs in order
not to damage the headlamp.
Always replace a failed bulb with a
new bulb with the same type and
specifi cation.
Front lamps
1.
Dipped beam headlamps
(H7-55 W)
2.
Main beam headlamps
(H1-55 W)
3.
Sidelamps (H6W-6 W
)
Daytime running lamps/
sidelamps (LEDs)
4.
Direction indicators
(H21-21 W)
Model with halogen headlamps
Model with Xenon headlamps
and directional headlamps
1.
Dual-function Xenon
headlamps (dipped/main
beam)
2.
Additional main beams
(H7-55W)
3.
Sidelamps (H6W-6W)
Daytime running lamps/
sidelamps (LEDs
)
4.
Direction indicators (H21-21W)
Page 193 of 352

XI
191
PRACTICAL INFORMATION
Main beam headlamps
�)
Remove the rubber cover.
�)
Detach the clips by lowering
them on each side of the bulb.
�)
Pull on the bulb-holder to remove it.
�)
Replace the faulty bulb.
�)
Push the bulb-holder back into
its housing.
�)
Reattach the clips.
�)
Refi t the rubber cover.
Dual-function Xenon headlamps
(dipped/main beam)
Additional main beam headlamps
�)
Remove the rubber cover.
�)
Rotate the bulb-holder a quarter
turn anti-clockwise and remove it
from its housing.
�)
Replace the faulty bulb.
�)
Reposition the bulb-holder by
pushing it in, tightening it by a
quarter turn clockwise.
�)
Refi t the rubber cover.
If the headlamp bears this
symbol, any operation to
change the Xenon dual-
function directional head-
lamp (D1S-35 W) must be carried
out by professionals (risk of elec-
trocution).
Contact a CITROËN dealer or a
qualifi ed workshop.
It is recommended to change both
bulbs at the same time if one of
them is faulty.
Dipped beam headlamps
�)
Remove the rubber cover.
�)
Rotate the bulb-holder a quarter
turn anti-clockwise and remove it
from its housing.
�)
Replace the faulty bulb.
�)
Reposition the bulb-holder by
pushing it in, tightening it by a
quarter turn clockwise.
�)
Refi t the rubber cover.
Page 194 of 352

XI
192
PRACTICAL INFORMATION
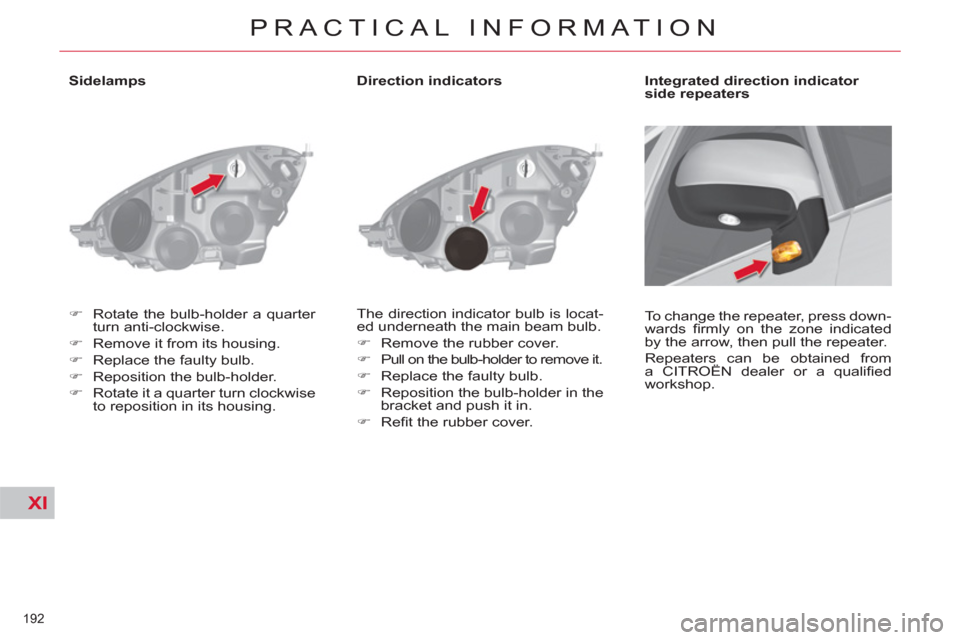
Sidelamps
�)
Rotate the bulb-holder a quarter
turn anti-clockwise.
�)
Remove it from its housing.
�)
Replace the faulty bulb.
�)
Reposition the bulb-holder.
�)
Rotate it a quarter turn clockwise
to reposition in its housing.
Direction indicators
The direction indicator bulb is locat-
ed underneath the main beam bulb.
�)
Remove the rubber cover.
�)
Pull on the bulb-holder to remove it.
�)
Replace the faulty bulb.
�)
Reposition the bulb-holder in the
bracket and push it in.
�)
Refi t the rubber cover.
Integrated direction indicator
side repeaters
To change the repeater, press down-
wards fi rmly on the zone indicated
by the arrow, then pull the repeater.
Repeaters can be obtained from
a CITROËN dealer or a qualifi ed
workshop.
Page 195 of 352

XI
193
PRACTICAL INFORMATION
Front foglamps (H11-55 W)
�)
Insert the key in the notch A
, tilting
the bulb-holder cover, located un-
derneath the bumper, then insert
the key in the notch B
to remove it.
�)
Undo the lamp.
�)
Tilt the bulb-holder.
�)
Change the faulty bulb.
�)
Reposition the bulb-holder.
�)
Do up the lamp and refi t the bulb-
holder cover fi rmly in place.
Rear foglamp (P21 W)
�)
Pass your hand underneath the
bumper to reach the bulb-holder.
�)
Rotate the bulb-holder a quarter
turn.
�)
Pull on the bulb-holder.
�)
Rotate the bulb a quarter turn to
remove it.
�)
Replace the faulty bulb.
�)
Fit the bulb.
�)
Reposition the bulb-holder by
rotating it a quarter turn.
For the replacement of this type
of LED lamp, contact a CITROËN
dealer or a qualifi ed workshop.
Changing daytime running
lamps/sidelamps (LEDs)