2012 Citroen C3 PICASSO heating
[x] Cancel search: heatingPage 4 of 244

2
CONTENTS
Instrument panel 22Indicator and warning lamps 23Indicators 31Adjustment buttons 34
Ventilation 47Rear screen demist/defrost 49Heating 49Manual air conditioning 49Dual-zone digital air conditioning 51Scented air freshener 53Front seats 54Rear seats 56Mirrors 58Steering wheel adjustment 59
3 - COMFORT 47 �Π59
Remote control key 60Window controls 64
Doors 66Boot 68Panoramic sunroof 69Fuel tank 70Misfuel prevention (Diesel) 72
4 - ACCESS 60 �Π72
Lighting controls 73Headlamp adjustment 76Wiper controls 77Courtesy lamps 80Boot lamp 81
5 - VISIBILITY 73�Î81
Conventional child seats 92Isofi x child seats 97Child lock 100
7 - CHILD
SAFETY 92�Π100 FAMILIARISATION 4
�Π19
1 - MONITORIN
G22�Π34
Screen without audio equipment 35Screen with audio equipment 37Trip computer 44
2 - MULTIFUNCTION
SCREENS 35 �Π46
Front fi ttings 82Rear fi ttings 86Boot fi ttings 89
6 - FITTINGS 82�Î91
ECO-DRIVING 20�Î21
Page 11 of 244

9
FAMILIARI
S
AT I
ON
1.
Steering lock and ignition.
2.
Audio equipment steering mounted
control stalk.
3.
Wiper/screenwash/trip computer
control stalk.
4.
Central adjustable air vents.
5.
Storage tray.
Scented air freshener.
6.
Sunshine sensor.
7.
Passenger's air bag.
8.
Side adjustable air vent.
9.
Passenger's airbag deactivation
switch.
10.
Glove box.
11 .
Dynamic stability control
(ESP/ASR) switch
Parking sensors switch.
Central locking switch.
Hazard warning lamps switch.
Stop & Start switch.
12.
Heating/air conditioning controls.
13.
Audio equipment.
14.
Emergency or assistance call.
15.
12 V socket (100 W max).
16.
USB port/auxiliary socket.
17.
Cup holder.
18.
Heated seat controls.
19.
Parking brake.
INSTRUMENTS AND CONTROLS
Page 16 of 244

14
Digital air conditioning:
we recommend use of the fully automatic mode by pressing the "AUTO"
button, after selecting the
level of comfort required.
Recommended interior settings
VENTILATION
I require...
Heating or Manual Air Conditioning
Air distribution
Air fl ow
Air recirculation/Intake
of outside air
Temperature
Manual A/C
HOT
COLD
DEMISTING
DEFROSTING
Page 26 of 244

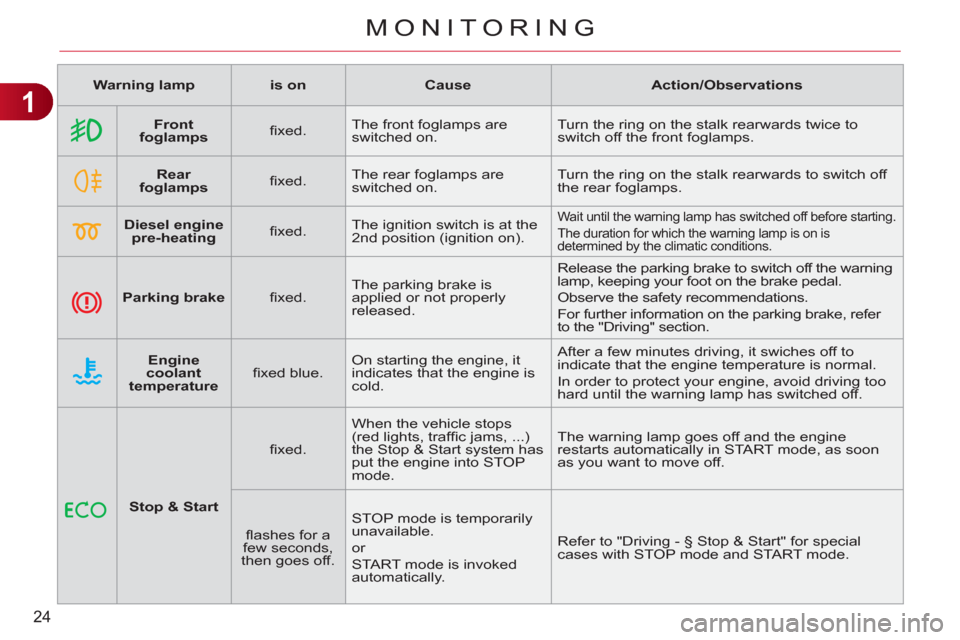
1
24
MONITORING
Warning lamp
is on
Cause
Action/Observations
Front
foglamps
fi xed. The front foglamps are
switched on. Turn the ring on the stalk rearwards twice to
switch off the front foglamps.
Rear
foglamps
fi xed. The rear foglamps are
switched on. Turn the ring on the stalk rearwards to switch off
the rear foglamps.
Diesel engine
pre-heating
fi xed. The ignition switch is at the
2nd position (ignition on).
Wait until the warning lamp has switched off before starting.
The duration for which the warning lamp is on is
determined by the climatic conditions.
Parking brake
fi xed. The parking brake is
applied or not properly
released. Release the parking brake to switch off the warning
lamp, keeping your foot on the brake pedal.
Observe the safety recommendations.
For further information on the parking brake, refer
to the "Driving" section.
Engine
coolant
temperature
fi xed blue
. On starting the engine, it
indicates that the engine is
cold. After a few minutes driving, it swiches off to
indicate that the engine temperature is normal.
In order to protect your engine, avoid driving too
hard until the warning lamp has switched off.
Stop & Start
fi xed. When the vehicle stops
(red lights, traffi c jams, ...)
the Stop & Start system has
put the engine into STOP
mode. The warning lamp goes off and the engine
restarts automatically in START mode, as soon
as you want to move off.
fl ashes for a
few seconds,
then goes off. STOP mode is temporarily
unavailable.
or
START mode is invoked
automatically. Refer to "Driving - § Stop & Start" for special
cases with STOP mode and START mode.
Page 49 of 244

3
47
COMFORT
VENTILATION
System which creates and maintains
comfortable conditions in the vehicle's
passenger compartment.
Air flow paths
The incoming air follows various routes
depending on the controls selected by
the driver:
- direct arrival in the passenger com-
partment (air intake),
- passage through a heating circuit
(heating),
- passage through a cooling circuit
(air conditioning).
The temperature control enables you to
obtain the level of comfort required by
mixing the air of the various circuits. The air distribution control enables you
to diffuse the air in the passenger com-
partment combining several air vents.
The air fl ow control enables you to
increase or reduce the speed of the
ventilation fan.
The air circulating in the passenger com-
partment is fi ltered and originates either
from the outside via the grille located at
the base of the windscreen or from the
inside in air recirculation mode.
Control panel
The controls of this system are grouped
together on control panel A
on the centre
console. Depending on the model, the
functions offered are:
- the level of comfort required,
- air fl ow,
- air distribution,
- demisting and defrosting,
- manual or digital air conditioning
controls.
Air distribution
1.
Windscreen demisting or defrosting
vents.
2.
Front side window demisting or de-
frosting vents.
3.
Side adjustable air vents.
4.
Central adjustable air vents.
5.
Air outlets to the front footwells.
6.
Air outlets to the rear footwells.
Page 51 of 244

3
49
COMFORT
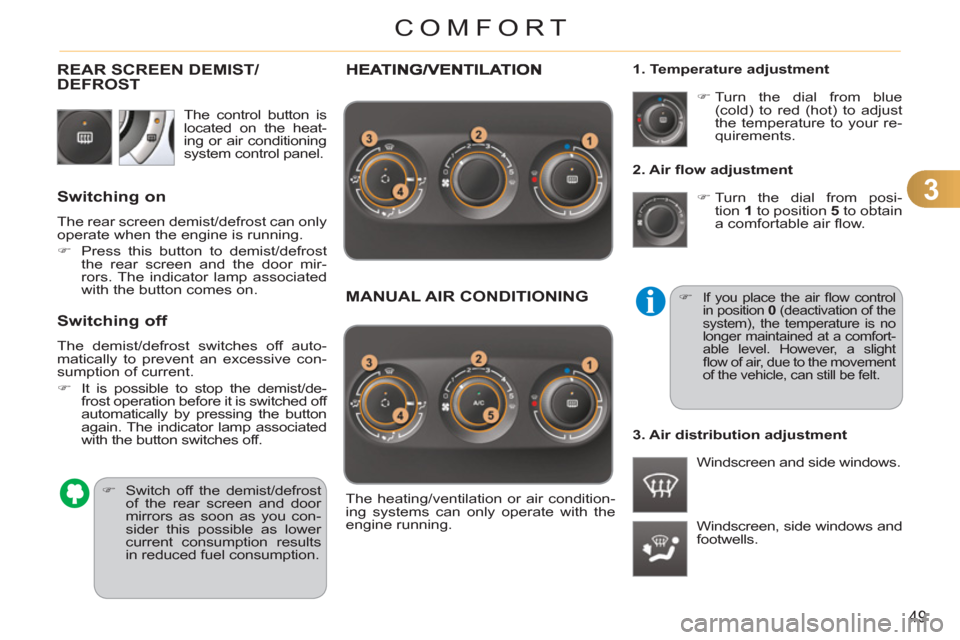
2. Air fl ow adjustment
�)
Turn the dial from posi-
tion 1
to position 5
to obtain
a comfortable air fl ow.
Windscreen, side windows and
footwells.
�)
Turn the dial from blue
(cold) to red (hot) to adjust
the temperature to your re-
quirements.
Windscreen and side windows.
1. Temperature adjustment
The heating/ventilation or air condition-
ing systems can only operate with the
engine running.
�)
If you place the air fl ow control
in position 0
(deactivation of the
system), the temperature is no
longer maintained at a comfort-
able level. However, a slight
fl ow of air, due to the movement
of the vehicle, can still be felt.
3. Air distribution adjustment
MANUAL AIR CONDITIONING
The control button is
located on the heat-
ing or air conditioning
system control panel.
REAR SCREEN DEMIST/DEFROST
�)
Switch off the demist/defrost
of the rear screen and door
mirrors as soon as you con-
sider this possible as lower
current consumption results
in reduced fuel consumption.
Switching on
The rear screen demist/defrost can only
operate when the engine is running.
�)
Press this button to demist/defrost
the rear screen and the door mir-
rors. The indicator lamp associated
with the button comes on.
Switching off
The demist/defrost switches off auto-
matically to prevent an excessive con-
sumption of current.
�)
It is possible to stop the demist/de-
frost operation before it is switched off
automatically by pressing the button
again. The indicator lamp associated
with the button switches off.
Page 54 of 244

3
52
COMFORT
Manual operation
If you wish, you can make a different
choice from that offered by the system by
changing a setting. The other functions
will still be controlled automatically.
�)
Pressing the "AUTO"
button returns
the system to completely automatic
operation.
�)
Press this button to switch
off the air conditioning.
6. Air distribution adjustment
�)
Press one or more buttons to
direct the air fl ow towards:
7. Air fl ow adjustment
�)
Turn this control to the left
to decrease the air fl ow or
to the right to increase the
air fl ow.
8. Air intake/Air recirculation
Switching the system off
�)
Turn the air fl ow control to the left until
all of the indicator lamps go off.
This action switches off the air condi-
tioning and the ventilation.
Temperature related comfort is no lon-
ger guaranteed but a slight fl ow of air,
due to the movement of the vehicle, can
still be felt.
�)
Turn the air fl ow dial to the right or
press the "AUTO"
button to reacti-
vate the system with the values set
before it was switched off.
�)
Press this button for recir-
culation of the interior air.
The indicator lamp in the
button comes on.
5. Air conditioning On/Off
Avoid prolonged operation in inte-
rior air recirculation mode or driving
for long periods with the system off
(risk of condensation and deterio-
ration of the air quality).
- the windscreen and side windows
(demisting or defrosting),
- the windscreen, the side windows and
the vents,
- the windscreen, the side windows, the
vents and the footwells,
- the vents and the footwells,
- the vents,
- the footwells,
- the windscreen, the side windows
and the footwells.
The air fl ow indicator lamps, between
the two fans, come on progressively in
relation to the value requested.
�)
As soon as possible, press this but-
ton again to permit the intake of out-
side air and prevent the formation
of condensation. The indicator lamp
on the button switches off.
For maximum cooling or heating
of the passenger compartment,
it is possible to exceed the mini-
mum value 14 or the maximum
value 28.
�)
Turn control 2
or 3
to the left
until "LO"
is displayed or
to the right until "HI"
is dis-
played.
9. Mono-zone/Dual-zone
�)
Press this button to equalise
the comfort value on the
passenger's side with that
on the driver's side (mono
zone). The indicator lamp in
the button comes on.
Air recirculation enables the passenger
compartment to be isolated from exte-
rior odours and smoke. Switching the system off could result in
discomfort (humidity, condensation).
�)
Press this button again to return to
automatic operation of the air con-
ditioning. The indicator lamp in the
"A/C"
button comes on.
Page 57 of 244

3
55
COMFORT
�)
Press the control located under the
front end of the armrest to release it.
�)
Move it to the low position.
�)
Raise it notch by notch to reach the
desired position.
To place the armrest in the vertical posi-
tion, raise it and push it backwards be-
yond the point of resistance.
Head restraint height adjustment
�)
To raise the head restraint, pull it up-
wards.
�)
To remove the head restraint, press
the lug A
and pull the head restraint
upwards.
�)
To put the head restraint back in
place, engage the head restraint
stems in the openings keeping them
in line with the seat back.
�)
To lower the head restraint, press
the lug A
and the head restraint at
the same time. The head restraint is fi tted with
a frame with notches which pre-
vents it from lowering; this is a
safety device in case of impact.
The adjustment is correct when
the upper edge of the head re-
straint is level with the top of
the head.
Never drive with the head re-
straints removed; they must be
in place and adjusted correctly.
Adjusting the armrest
Additional adjustments
Heated seats control
�)
Use the adjustment dial, placed on
the side of each front seat, to switch
on and select the level of heating re-
quired:
0
:
Off.
1
:
Low.
2
:
Medium.
3
:
High.
With the engine running, the front seats
can be heated separately.