Page 55 of 128

53ACCESS and STARTING
-
OPENING THE BONNET
Inside the vehicle:
pull the lever on
the left-hand side, under the dash-
board.
Outside the vehicle:
lift the safety
catch and raise the bonnet.
BONNET STAY
Secure the stay to hold the bonnet
open.
Before closing the bonnet, return the
stay to its housing.
FILLING WITH FUEL
When the minimum
fuel level in the tank is
reached, this warning
light comes on. When the cap is removed,
the right-hand sliding side
door cannot be opened.
The key cannot be removed
from the lock until the cap
has been replaced on the
fuel tank.
A label reminds you which type of
fuel to use.
When you fi ll your tank, do not con-
tinue after the third cut-off of the
pump. This could cause your vehicle
to malfunction.
To close
Lower the bonnet and release it at
the end of its travel.
Check that the bonnet has latched
correctly.
Low fuel level
You have enough fuel remaining
to drive for approximately 30 miles
(50 km).
The engine must be switched off
when fi lling with fuel.
�)
Insert the key then turn it to the
left.
�)
Remove the cap.
The capacity of the tank is approx-
imately 55 litres for petrol engines
and 60 litres for Diesel engines.
�)
After fi lling the tank, lock the cap. When the engine is hot, take
care when handling the safe-
ty catch and the bonnet stay
(risk of burns).
Page 63 of 128
61 LIFE ON BOARD-
LASHING RINGS
It is recommended that the
load is immobilised by secur-
ing it fi rmly using the lashing
rings on the fl oor. Use the 6 lashing rings on the lug-
gage compartment fl oor to secure
your loads.
You can use suitable load retainers
(half-height partitions, grille, etc.)
supplied by the CITROËN network.
Page 65 of 128

63 LIFE ON BOARD-
REAR FITTINGS
1. Load-space cover
To install it:
- position the front ends of the load
space cover on its support and
press gently to put it in place,
- unfold the load space cover fully,
- position the rear ends of the load
space cover on its support and
press gently to put it in place.
To remove it:
- unclip the rear ends,
- fold the load space cover fully,
- unclip the front ends and remove
the load space cover.
To store it, fold it like an accordion.
Do not roll it
.
2. High load retaining net
The high load retaining net can be fi t-
ted behind the front or rear seats.
Open the covers A
of the correspond-
ing upper fastenings.
Fit the ends of the metal bar in these
fastenings.
Secure the two net strap hooks be-
hind the front seats, with the rear
seat folded, or in the stowing rings B
on the fl oor.
The rings are located directly below
the corresponding upper fastenings.
Pull the two straps C
taut.
3. Stowing rings
4. Side door storage
compartments
5. Containers between the front
and rear seats
6. Seat back storage pockets
Page 81 of 128

79 PRACTICAL INFORMATION
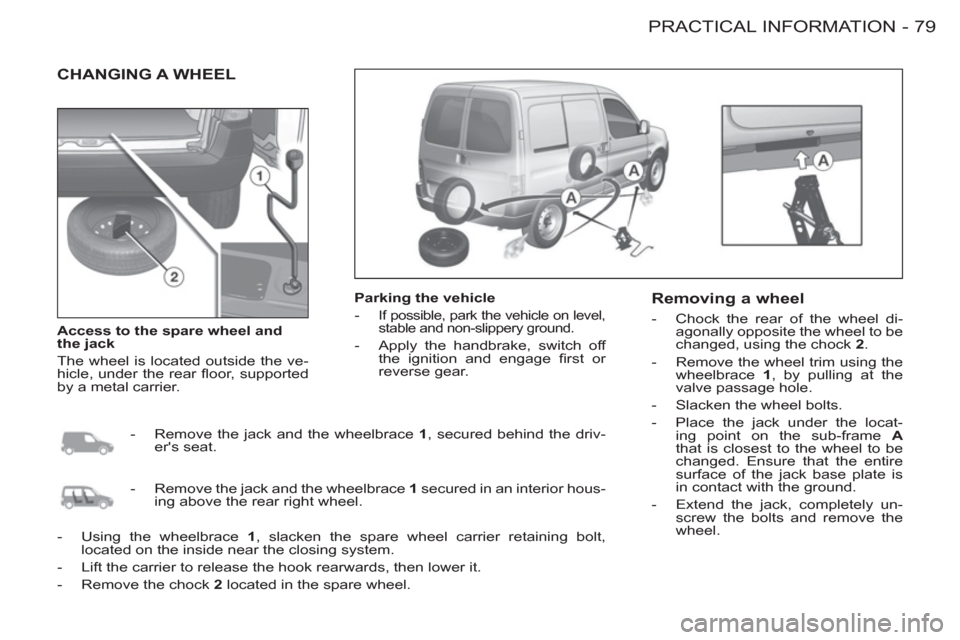
-
CHANGING A WHEEL
Parking the vehicle
-
If possible, park the vehicle on level,
stable and non-slippery ground.
- Apply the handbrake, switch off
the ignition and engage fi rst or
reverse gear.
Removing a wheel
- Chock the rear of the wheel di-
agonally opposite the wheel to be
changed, using the chock 2
.
- Remove the wheel trim using the
wheelbrace 1
, by pulling at the
valve passage hole.
- Slacken the wheel bolts.
- Place the jack under the locat-
ing point on the sub-frame A
that is closest to the wheel to be
changed. Ensure that the entire
surface of the jack base plate is
in contact with the ground.
- Extend the jack, completely un-
screw the bolts and remove the
wheel.
Access to the spare wheel and
the jack
The wheel is located outside the ve-
hicle, under the rear fl oor, supported
by a metal carrier.
- Remove the jack and the wheelbrace 1
, secured behind the driv-
er's seat.
- Remove the jack and the wheelbrace 1
secured in an interior hous-
ing above the rear right wheel.
- Using the wheelbrace 1
, slacken the spare wheel carrier retaining bolt,
located on the inside near the closing system.
- Lift the carrier to release the hook rearwards, then lower it.
- Remove the chock 2
located in the spare wheel.
Page 83 of 128
81 PRACTICAL INFORMATION
-
SPECIAL FEATURES
OF ALLOY WHEELS
Fitting the spare wheel
If your vehicle is equipped with a
steel spare wheel, when fi tting it, it is
normal
to notice that the bolt wash-
ers do not come into contact with the
rim. The spare wheel is secured by
the cone-shape of each bolt.
Fitting snow tyres
If you fi t snow tyres that are mounted
on steel rims onto your vehicle, it is
essential
that you use special bolts
available from your CITROËN dealer.
* According to model and country.
ANTI-THEFT BOLT *
If your wheels are fi tted with an anti-
theft bolt (one per wheel), it must be
unscrewed using an anti-theft socket
(which was given to you on delivery
of your vehicle along with the dupli-
cate keys and the confi dential card)
and the wheelbrace.
Note:
make a careful note of the
code number engraved on the top of
the anti-theft socket. This will enable
you to obtain a duplicate anti-theft
socket from your
CITROËN dealer.