Page 516 of 652
CAUTION!
If the trailer weighs more than 1,000 lbs (454 kg)
loaded, it should have its own brakes and they
should be of adequate capacity. Failure to do this
could lead to accelerated brake lining wear, higher
brake pedal effort, and longer stopping distances.
WARNING!
•Do not connect trailer brakes to your vehicle’s
hydraulic brake lines. It can overload your brake
system and cause it to fail. You might not have
brakes when you need them and could have a
collision.(Continued)
WARNING! (Continued)
•Towing any trailer will increase your stopping
distance. When towing you should allow for addi-
tional space between your vehicle and the vehicle
in front of you. Failure to do so could result in an
collision.
Towing Requirements – Trailer Lights And Wiring
Whenever you pull a trailer, regardless of the trailer size,
stop lights and turn signals on the trailer are required for
motoring safety.
The Trailer Tow Package may include a four-pin or a
seven-pin wiring harness. Use a factory approved trailer
harness and connector.
NOTE:Do not cut or splice wiring into the vehicles
wiring harness.
514 STARTING AND OPERATING
Page 523 of 652
HAZARD WARNING FLASHERS
The Hazard Warning flasher switch is located in the
lower center area of the instrument panel.Press the switch to turn on the Hazard Warning
flasher. When the switch is activated, all directional
turn signals will flash on and off to warn oncoming
traffic of an emergency. Press the switch a second time to
turn off the Hazard Warning flashers.
This is an emergency warning system and it should not
be used when the vehicle is in motion. Use it when your
vehicle is disabled and it is creating a safety hazard for
other motorists.
When you must leave the vehicle to seek assistance, the
Hazard Warning flashers will continue to operate even
though the ignition is placed in the OFF position.
NOTE: With extended use the Hazard Warning flashers
may wear down your battery.
IF YOUR ENGINE OVERHEATS
In any of the following situations, you can reduce the
potential for overheating by taking the appropriate ac-
tion.
•On the highways — slow down.
•In city traffic — while stopped, place the transmission
in NEUTRAL, but do not increase engine idle speed.
NOTE: There are steps that you can take to slow down
an impending overheat condition:
•If your air conditioner (A/C) is on, turn it off. The A/C
system adds heat to the engine cooling system and
turning the A/C off can help remove this heat.
•You can also turn the temperature control to maximum
heat, the mode control to floor and the blower control
to high. This allows the heater core to act as a
supplement to the radiator and aids in removing heat
from the engine cooling system.
6
WHAT TO DO IN EMERGENCIES 521
Page 554 of 652

▫Automatic Transmission ............... 577
▫ Appearance Care And Protection From
Corrosion .......................... 579
▫ Cleaning The Instrument Panel Cupholders . . 585
� Fuses .............................. 586
▫ Totally Integrated Power Module ......... 586
� Vehicle Storage ....................... 593
� Replacement Bulbs .................... 593
� Bulb Replacement ..................... 594
▫ High Intensity Discharge Headlamps
(HID) — If Equipped ................. 594
▫ Quad Headlamps .................... 595 ▫
Front Park/Turn Signal Lamp ........... 595
▫ Front Side Marker Lamp ............... 596
▫ Fog Lamp ......................... 596
▫ Rear Tail, Stop, Turn Signal, Side Marker
And Backup Lamp ................... 597
▫ Center High-Mounted Stop Lamp
(CHMSL) .......................... 598
▫ License Lamp ....................... 598
� Fluid Capacities ...................... 599
� Fluids, Lubricants And Genuine Parts ....... 600
▫ Engine ............................ 600
▫ Chassis ........................... 601
552 MAINTAINING YOUR VEHICLE
Page 596 of 652
LIGHT BULBS – ExteriorBulb Number
Headlamp – (Low and High Beam Halogen) ..... H11
Headlamp (HID – If Equipped) Low Beam ...... D1S
Fog Lamp – If Equipped ................... H11
Front Side Marker ...................... W5W
Front Park/Turn Signal Lamp .....PY27/7W or 3757A
Rear Turn Signal Lamp .................. 3757A
Rear Tail, Stop, and Side Marker Lamp ........ LED
(Serviced at Authorized Dealer)
Backup ............................... 3157
Center High-Mounted Stop Lamp ............ LED
(Serviced at Authorized Dealer)
License ................................ 168
BULB REPLACEMENT
High Intensity Discharge Headlamps (HID) — If
Equipped
The headlamps are a type of high voltage discharge tube.
High voltage can remain in the circuit even with the headlamp switch off and the key removed.
Because of
this, you should not attempt to service a headlamp bulb
yourself. If a headlamp bulb fails, take your vehicle to
an authorized dealer for service.
WARNING!
A transient high voltage occurs at the bulb sockets of
High Intensity Discharge (HID) headlamps when the
headlamp switch is turned ON. It may cause serious
electrical shock or electrocution if not serviced prop-
erly. See your authorized dealer for service.
NOTE: On vehicles equipped with High Intensity Dis-
charge (HID) headlamps, when the headlamps are
turned on, there is a blue hue to the lamps. This dimin-
ishes and becomes more white after approximately
10 seconds, as the system charges.
594 MAINTAINING YOUR VEHICLE
Page 597 of 652
Quad Headlamps
1. Raise the hood to access the high or low beam bulbs at
the rear of the headlamp housing.
2. Release the two tabs on the side of the connector and
remove the connector from the bulb.
3. Twist the headlamp bulb and pull the bulb from the
headlamp housing.
4. Install the new headlamp bulb and twist until locked
into the headlamp housing.
CAUTION!
Do not touch the new bulb with your fingers. Oil
contamination will severely shorten bulb life. If the
bulb comes in contact with an oily surface, clean the
bulb with rubbing alcohol.5. Reconnect the wiring connector to the bulb.
Front Park/Turn Signal Lamp
1. Raise the hood to access the rear of the headlamp
housing.
2. Twist the turn signal socket and remove from the
headlamp housing, then pull the bulb out.
3. Push the new bulb into the socket and reinstall the
socket by twisting until locked into the headlamp
housing.
7
MAINTAINING YOUR VEHICLE 595
Page 599 of 652
3. Reconnect the wiring harness to the new bulb and
reinstall the bulb by twisting clockwise.
Rear Tail, Stop, Turn Signal, Side Marker And
Backup Lamp
1. Raise the liftgate.
2. Remove the tail lamp assembly by removing the two
screws from the inboard side. Use a fiber stick or similar
tool to gently pry the light on the outboard side to
disengage the two ball studs.NOTE:
•If a screwdriver is used, make sure a soft material is
placed between the vehicle body and tool so not to
scratch the paint.
•The PRY location is best closest to the studs while
dislodging them separately.
7
MAINTAINING YOUR VEHICLE 597
Page 637 of 652
Exhaust Gas Caution.............57,104,494
Fails to Start ........................ 429
Flooded, Starting ..................... 429
Fuel Requirements ................. 491,599
Oil ......................... 558,599,600
Oil Change Interval ................... 559
Oil Disposal ........................ 560
Oil Filler Cap ....................... 560
Oil Filter Disposal .................... 560
Oil Selection ..................... 559,599
Oil Synthetic ........................ 560
Overheating ........................ 521
Starting ........................... 425
Temperature Gauge ................... 300
Enhanced Accident Response Feature .......... 85
Entry System, Illuminated .................. 20
Ethanol ............................... 492
Event Data Recorder ...................... 88
Exhaust Gas Caution ................57,104,494Exhaust System
...................... 104,562
Extender, Seat Belt ........................ 75
Exterior Folding Mirrors ................... 118
Exterior Lights .......................... 107
Fabric Care ............................ 582
Filler Location Fuel ...................... 297
Filters Air Cleaner ......................... 561
Air Conditioning .................. 419,566
Engine Oil ....................... 560,600
Engine Oil Disposal ................... 560
Flash-To-Pass ........................... 209
Flashers Hazard Warning ..................... 521
Turn Signal ...................... 107,290
Flexible Fuel Vehicles Cruising Range ...................... 498
Engine Oil ......................... 497
10
INDEX 635
Page 642 of 652
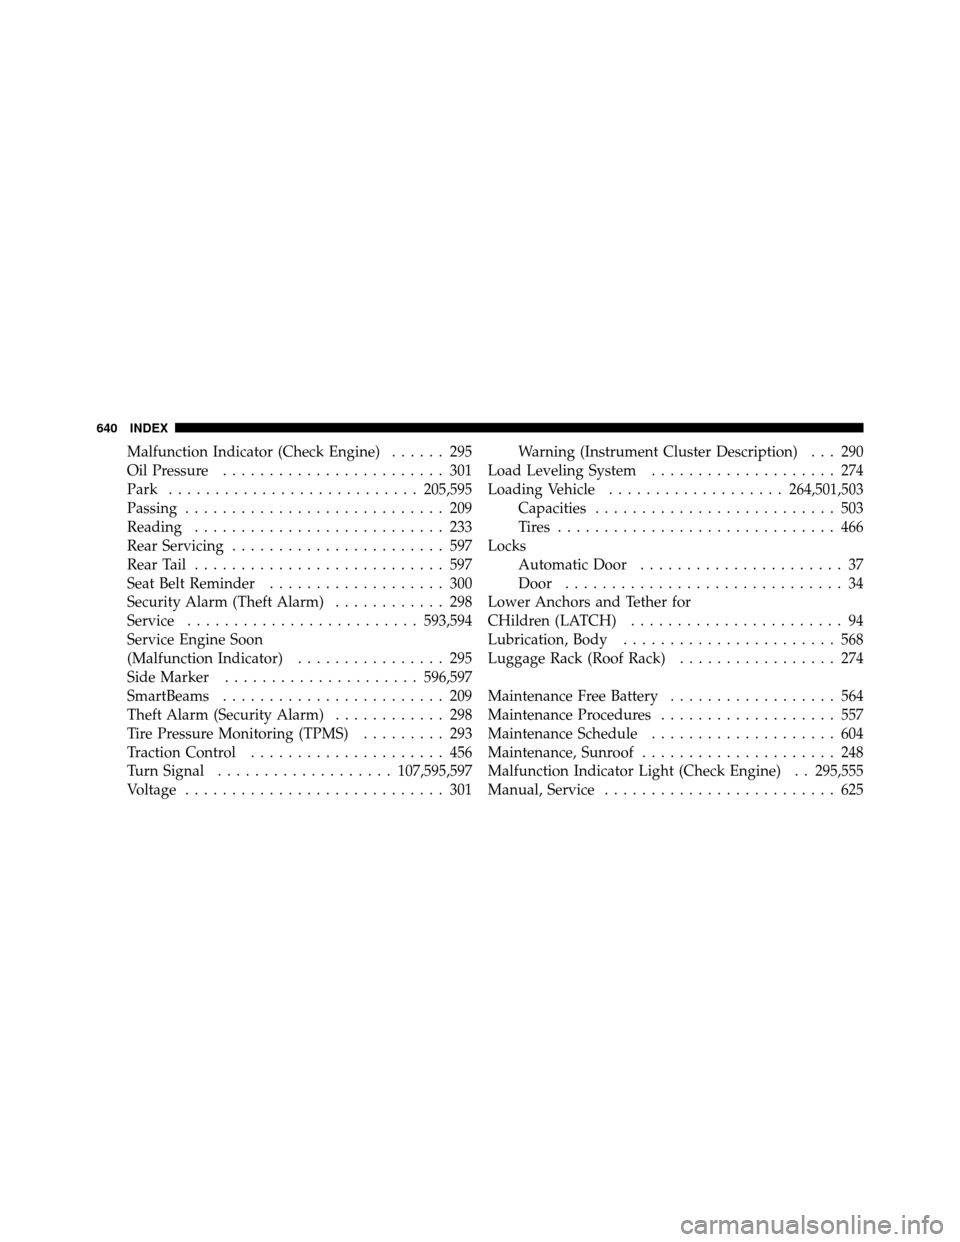
Malfunction Indicator (Check Engine)...... 295
Oil Pressure ........................ 301
Park ........................... 205,595
Passing ............................ 209
Reading ........................... 233
Rear Servicing ....................... 597
Rear Tail ........................... 597
Seat Belt Reminder ................... 300
Security Alarm (Theft Alarm) ............ 298
Service ......................... 593,594
Service Engine Soon
(Malfunction Indicator) ................ 295
Side Marker ..................... 596,597
SmartBeams ........................ 209
Theft Alarm (Security Alarm) ............ 298
Tire Pressure Monitoring (TPMS) ......... 293
Traction Control ..................... 456
Turn Signal ................... 107,595,597
Voltage ............................ 301 Warning (Instrument Cluster Description) . . . 290
Load Leveling System .................... 274
Loading Vehicle ................... 264,501,503
Capacities .......................... 503
Tires .............................. 466
Locks Automatic Door ...................... 37
Door .............................. 34
Lower Anchors and Tether for
CHildren (LATCH) ....................... 94
Lubrication, Body ....................... 568
Luggage Rack (Roof Rack) ................. 274
Maintenance Free Battery .................. 564
Maintenance Procedures ................... 557
Maintenance Schedule .................... 604
Maintenance, Sunroof ..................... 248
Malfunction Indicator Light (Check Engine) . . 295,555
Manual, Service ......................... 625
640 INDEX