Page 316 of 652
Vehicles Not Equipped With Keyless Enter-N-Go
1. Turn the ignition switch to the ON/RUN position (Do
not start the engine.)
2. Fully depress the accelerator pedal, slowly, three times
within 10 seconds.
3. Turn the ignition switch to the OFF/LOCK position.
NOTE:If the indicator message illuminates when you
start the engine, the oil change indicator system did not
reset. If necessary, repeat these steps.Fuel Economy
Press and release the UP or DOWN button until “Fuel
Economy” displays highlighted in the EVIC and press
the SELECT button. The following Fuel Economy func-
tions display in the EVIC:
•Average Fuel Economy (AVG)
•Distance To Empty (DTE)
•Miles Per Gallon (MPG)
Average Fuel Economy
Shows the average fuel economy since the last reset. The
Average Fuel Economy can be reset by following the
prompt in the EVIC to use the SELECT button. When the
fuel economy is reset, the display will read “zero” for two
seconds. Then, the history information will be erased,
and the averaging will continue from the last fuel aver-
age reading before the reset.
314 UNDERSTANDING YOUR INSTRUMENT PANEL
Page 317 of 652
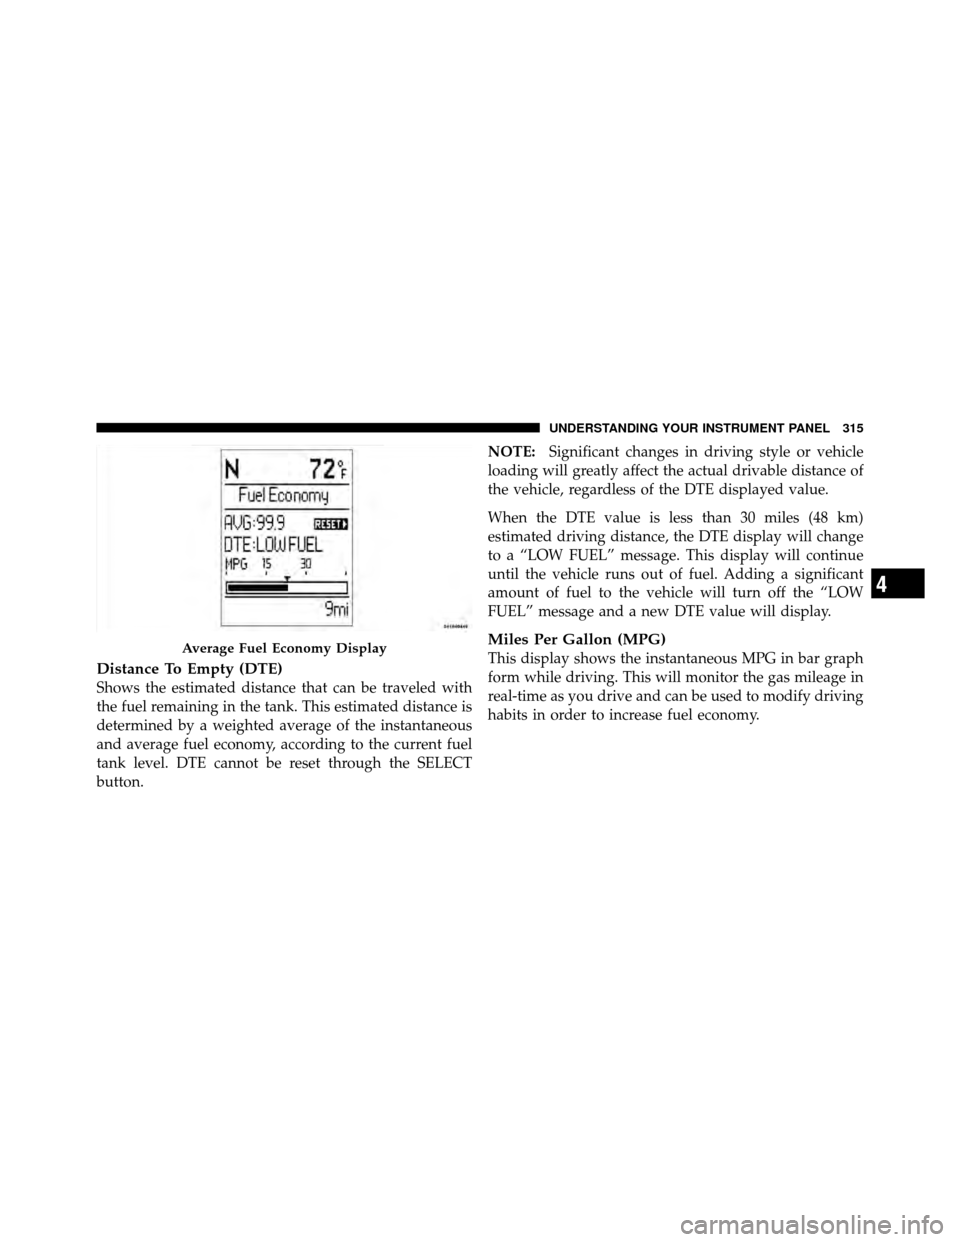
Distance To Empty (DTE)
Shows the estimated distance that can be traveled with
the fuel remaining in the tank. This estimated distance is
determined by a weighted average of the instantaneous
and average fuel economy, according to the current fuel
tank level. DTE cannot be reset through the SELECT
button.NOTE:
Significant changes in driving style or vehicle
loading will greatly affect the actual drivable distance of
the vehicle, regardless of the DTE displayed value.
When the DTE value is less than 30 miles (48 km)
estimated driving distance, the DTE display will change
to a “LOW FUEL” message. This display will continue
until the vehicle runs out of fuel. Adding a significant
amount of fuel to the vehicle will turn off the “LOW
FUEL” message and a new DTE value will display.
Miles Per Gallon (MPG)
This display shows the instantaneous MPG in bar graph
form while driving. This will monitor the gas mileage in
real-time as you drive and can be used to modify driving
habits in order to increase fuel economy.Average Fuel Economy Display
4
UNDERSTANDING YOUR INSTRUMENT PANEL 315
Page 318 of 652
Vehicle Speed
Press and release the UP or DOWN button until “Vehicle
Speed” displays highlighted in the EVIC and press the
SELECT button. Press the SELECT button to display the
current speed in mph or km/h. Pressing the SELECT
button a second time will toggle the unit of measure
between mph or km/h.
NOTE:Changing the unit of measure in the Vehicle
Speed menu will not change the unit of measure in the
EVIC.
Trip Info
Press and release the UP or DOWN button until “Trip
Info” is highlighted in the EVIC and press the SELECT
button. Press and release the UP/DOWN buttons to
highlight one of the following functions if you want to
reset it:
Trip A
Shows the total distance traveled for Trip A since the last
reset.
Trip B
Shows the total distance traveled for Trip B since the last
reset.
Elapsed Time
Shows the total elapsed time of travel since the last reset
when the ignition switch is in the ACC position. Elapsed
time will increment when the ignition switch is in the ON
or START position.
316 UNDERSTANDING YOUR INSTRUMENT PANEL
Page 331 of 652
Power Switch/Volume Control (Rotary)
Push the ON/VOLUME control knob to turn on the
radio. Push the ON/VOLUME control knob a second
time to turn off the radio.
Electronic Volume Control
The electronic volume control turns continuously (360
degrees) in either direction, without stopping. Turning
the ON/VOLUME control knob to the right increases the
volume, and to the left decreases it.
When the audio system is turned on, the sound will be
set at the same volume level as last played.
SEEK Buttons
Press and release the SEEK buttons to search for the next
listenable station in AM/FM mode. Press the right switch
to seek up and the left switch to seek down. The radio
will remain tuned to the new station until you make
another selection. Holding either button will bypass
stations without stopping, until you release it.
TIME Button
Press the TIME button to alternate display of the time
and radio frequency.
Clock Setting Procedure
1. Press and hold the TIME button until the hours blink.
2. Adjust the hours by turning the right side TUNE/
SCROLL control knob.
3. After adjusting the hours, press the right side TUNE/
SCROLL control knob to set the minutes. The minutes
will begin to blink.
4. Adjust the minutes using the right side TUNE/
SCROLL control knob. Press the TUNE/SCROLL control
knob to save time change.
5. To exit, press any button/knob, or wait five seconds.
4
UNDERSTANDING YOUR INSTRUMENT PANEL 329
Page 335 of 652
NOTE:Ejecting with the ignition OFF is not allowed on
convertible or soft-top models (if equipped).
SEEK Button
Press the right SEEK button for the next selection on the
CD. Press the left SEEK button to return to the beginning
of the current selection, or return to the beginning of the
previous selection if the CD is within the first second of
the current selection. Pressing and holding the SEEK
button will allow faster scrolling through the tracks in
CD and MP3 modes.
TIME Button
Press this button to change the display from a large CD
playing time display to a small CD playing time display.
RW/FF
Press and hold the FF (Fast Forward) button and the CD
player will begin to fast forward until FF is released, or
RW or another CD button is pressed. The RW (Reverse)
button works in a similar manner.
AM/FM Button
Press the button to select either AM or FM mode.
SET/RND Button (Random Play Button)
Press this button while the CD is playing to activate
Random Play. This feature plays the selections on the
compact disc in random order to provide an interesting
change of pace.
Press the right SEEK button to move to the next ran-
domly selected track.
Press the RND button a second time to stop Random
Play.
Notes on Playing MP3 Files
The radio can play MP3 files; however, acceptable MP3
file recording media and formats are limited. When
writing MP3 files, pay attention to the following restric-
tions.
4
UNDERSTANDING YOUR INSTRUMENT PANEL 333
Page 338 of 652
Playback of MP3 Files
When a medium containing MP3 data is loaded, the
radio checks all files on the medium. If the medium
contains a lot of folders or files, the radio will take more
time to start playing the MP3 files.
Loading times for playback of MP3 files may be affected
by the following:
•Media - CD-RW media may take longer to load than
CD-R media
•Medium formats - Multisession discs may take longer
to load than non-multisession discs
•Number of files and folders - Loading times will
increase with more files and folders
To increase the speed of disc loading, it is recommended
to use CD-R media and single-session discs. To create a
single-session disc, enable the “Disc at Once” option
before writing to the disc.
Operation Instructions - Auxiliary Mode
The auxiliary (AUX) jack is an audio input jack, which
allows the user to plug in a portable device, such as an
MP3 player, or cassette player, and utilize the vehicle’s
audio system to amplify the source and play through the
vehicle speakers.
Pressing the DISC/AUX button will change the mode to
auxiliary device if the AUX jack is connected.
NOTE: The AUX device must be turned on and the
device’s volume set to proper level. If the AUX audio is
not loud enough, turn the device’s volume up. If the AUX
audio sounds distorted, turn the device’s volume down.
TIME Button (Auxiliary Mode)
Press this button to change the display to time of day. The
time of day will display for five seconds (when ignition is
OFF).
336 UNDERSTANDING YOUR INSTRUMENT PANEL
Page 341 of 652
3. After adjusting the hours, press the right side TUNE/
SCROLL control knob to set the minutes. The minutes
will begin to blink.
4. Adjust the minutes using the right side TUNE/
SCROLL control knob. Press the TUNE/SCROLL control
knob to save time change.
5. To exit, press any button/knob or wait five seconds.
The clock can also be set by pressing the SETUP button.
For vehicles equipped with satellite radio, press the
SETUP button, use the TUNE/SCROLL control to select
SET CLOCK, and then follow the above procedure,
starting at Step 2. For vehicles not equipped with satellite
radio, press the SETUP button and then follow the above
procedure, starting at Step 2.INFO Button
Press the INFO button for an RDS station (one with call
letters displayed). The radio will return a Radio Text
message broadcast from an FM station (FM mode only).
RW/FF
Pressing the RW (Rewind) or FF (Fast Forward) buttons
causes the tuner to search for the next frequency in the
direction of the arrows. This feature operates in either
AM or FM frequencies.
TUNE Control
Turn the rotary TUNE/SCROLL control knob clockwise
to increase or counterclockwise to decrease the frequency.
Setting the Tone, Balance, and Fade
Push the rotary TUNE/SCROLL control knob and BASS
will display. Turn the TUNE/SCROLL control knob to
the right or left to increase or decrease the bass tones.
4
UNDERSTANDING YOUR INSTRUMENT PANEL 339
Page 344 of 652
hours, press the TUNE/SCROLL control knob to set
the minutes. The minutes will begin to blink. Adjust
the minutes using the right side TUNE/SCROLL
control knob. Press the TUNE/SCROLL control knob
to save time change.
AM/FM Button
Press the button to select either AM or FM mode.
SET/RND Button — To Set the Pushbutton
Memory
When you are receiving a station that you wish to
commit to pushbutton memory, press the SET/RND
button. The symbol SET 1 will now show in the display
window. Select the button (1–6) you wish to lock onto this
station and press and release that button. If a button is
not selected within five seconds after pressing the SET/
RND button, the station will continue to play but will not
be stored into pushbutton memory.You may add a second station to each pushbutton by
repeating the above procedure with this exception: Press
the SET/RND button twice and SET 2 will show in the
display window. Each button can be set for SET 1 and
SET 2 in both AM and FM. This allows a total of 12 AM
and 12 FM stations to be stored into pushbutton memory.
The stations stored in SET 2 memory can be selected by
pressing the pushbutton twice.
Every time a preset button is used, a corresponding
button number will display.
Buttons 1 - 6
These buttons tune the radio to the stations that you
commit to pushbutton memory (12 AM and 12 FM
stations).
DISC/AUX Button
Pressing the DISC/AUX button will allow you to switch
from AM/FM modes to DISC/AUX mode.
342 UNDERSTANDING YOUR INSTRUMENT PANEL