Page 343 of 652
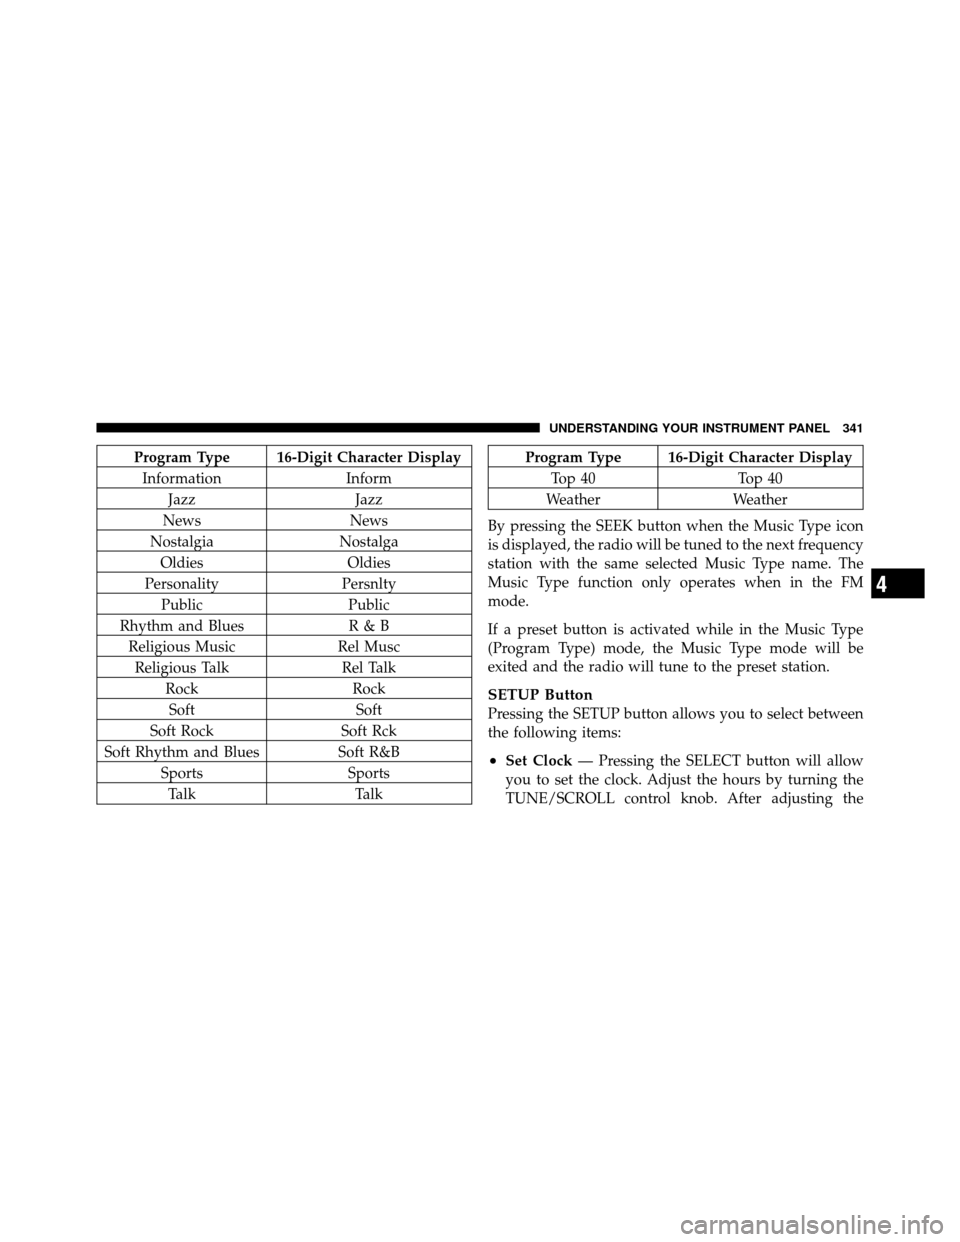
Program Type 16-Digit Character DisplayInformation Inform
Jazz Jazz
News News
Nostalgia Nostalga
Oldies Oldies
Personality Persnlty
Public Public
Rhythm and Blues R & B
Religious Music Rel Musc
Religious Talk Rel Talk
Rock Rock
Soft Soft
Soft Rock Soft Rck
Soft Rhythm and Blues Soft R&B
Sports Sports
Talk TalkProgram Type 16-Digit Character Display
Top 40 Top 40
Weather Weather
By pressing the SEEK button when the Music Type icon
is displayed, the radio will be tuned to the next frequency
station with the same selected Music Type name. The
Music Type function only operates when in the FM
mode.
If a preset button is activated while in the Music Type
(Program Type) mode, the Music Type mode will be
exited and the radio will tune to the preset station.
SETUP Button
Pressing the SETUP button allows you to select between
the following items:
•Set Clock — Pressing the SELECT button will allow
you to set the clock. Adjust the hours by turning the
TUNE/SCROLL control knob. After adjusting the
4
UNDERSTANDING YOUR INSTRUMENT PANEL 341
Page 353 of 652
RW/FF
Pressing the RW (Rewind) or FF (Fast Forward) buttons
causes the tuner to search for the next channel in the
direction of the arrows.
TUNE Control (Rotary)
Turn the rotary TUNE/SCROLL control knob clockwise
to increase or counterclockwise to decrease the channel.
MUSIC TYPE Button
Pressing this button once will turn on the Music Type
mode for five seconds. Pressing the MUSIC TYPE button
or turning the TUNE/SCROLL control knob within five
seconds will allow the program format type to be se-
lected.
Toggle the MUSIC TYPE button again to select the music
type.By pressing the SEEK button when the Music Type
function is active, the radio will be tuned to the next
channel with the same selected Music Type name.
If a preset button is activated while in the Music Type
(Program Type) mode, the Music Type mode will be
exited and the radio will tune to the preset channel.
SETUP Button
Pressing the SETUP button allows you to select the
following items:
•Display Sirius ID number — Press the AUDIO/
SELECT button to display the Sirius ID number. This
number is used to activate, deactivate, or change the
Sirius subscription.
4
UNDERSTANDING YOUR INSTRUMENT PANEL 351
Page 357 of 652
control mode, audio tracks (if available from audio
device) start playing over the vehicle’s audio system.
Play Mode
When switched to iPod�/USB/MP3 control mode, the
iPod�or external USB device automatically starts Play
mode. In Play mode, the following buttons on the radio
faceplate may be used to control the iPod� or external
USB device and display data:
•Use the TUNE control knob to select the next or
previous track.
•Turning it clockwise (forward) by one click, while
playing a track, skips to the next track or press the
VR button and say �Next Track�.
•Turning it counterclockwise (backward) by one
click, will jump to the previous track in the list or
press the VR button and say �Previous Track�
•Jump backward in the current track by pressing and
holding the <
button long enough will jump to the beginning of
the current track.
•Jump forward in the current track by pressing and
holding the FF>> button.
•A single press backward << RWor forward FF>> will
jump backward or forward respectively, for five
seconds.
•Use the << SEEKandSEEK >> buttons to jump to the
previous or next track. Pressing the SEEK>> button
during play mode will jump to the next track in the
list, or press the VR button and say �Next or Previous
Track�.
•While a track is playing, press the INFObutton to see
the associated metadata (artist, track title, album, etc.)
for that track. Pressing the INFObutton again jumps
4
UNDERSTANDING YOUR INSTRUMENT PANEL 355
Page 358 of 652
to the next screen of data for that track. Once all
screens have been viewed, the lastINFObutton press
will go back to the play mode screen on the radio.
•Pressing the REPEATbutton will change the audio
device mode to repeat the current playing track or
press the VR button and say �Repeat ON�or�Repeat
Off�.
•Press the SCANbutton to use iPod�/USB/MP3 de-
vice scan mode, which will play the first 10 seconds of
each track in the current list and then forward to the
next song. To stop SCAN mode and start playing the
desired track, when it is playing the track, press the
SCAN button again. During Scan mode, pressing the
<< SEEK andSEEK >> buttons will select the previ-
ous and next tracks.
•RND button (available on sales code RES radio only):
Pressing this button toggles between Shuffle ON and
Shuffle OFF modes for the iPod� or external USBdevice, or press the VR button and say
�Shuffle ON�or
�Shuffle Off�.IftheRND icon is showing on the radio
display, then the shuffle mode is ON.
List Or Browse Mode
During Play mode, pressing any of the buttons described
below, will bring up List mode. List mode enables
scrolling through the list of menus and tracks on the
audio device.
•TUNE control knob: The TUNEcontrol knob functions
in a similar manner as the scroll wheel on the audio
device or external USB device.
•Turning it clockwise (forward) and counterclock-
wise (backward) scrolls through the lists, displaying
the track detail on the radio display. Once the track
to be played is highlighted on the radio display,
press the TUNEcontrol knob to select and start
playing the track. Turning the TUNEcontrol knob
356 UNDERSTANDING YOUR INSTRUMENT PANEL
Page 359 of 652
fast will scroll through the list faster. During fast
scroll, a slight delay in updating the information on
the radio display may be noticeable.
•During all List modes, the iPod�displays all lists in
“wrap-around” mode. So if the track is at the
bottom of the list, just turn the wheel backward
(counterclockwise) to get to the track faster.
•In List mode, the radio PRESETbuttons are used as
shortcuts to the following lists on the iPod� or
external USB device.
•Preset 1 – Playlists
•Preset 2 – Artists
•Preset 3 – Albums
•Preset 4 – Genres
•Preset 5 – Audiobooks
•Preset 6 – Podcasts
•Pressing a PRESET button will display the current
list on the top line and the first item in that list on
the second line.
•To exit List mode without selecting a track, press the
same PRESET button again to go back to Play
mode.
•LIST button: The LISTbutton will display the top
level menu of the iPod� or external USB device. Turn
the TUNE control knob to list the top-menu item to be
selected and press the TUNEcontrol knob. This will
display the next sub-menu list item on the audio
device, then follow the same steps to go to the desired
track in that list. Not all iPod� or external USB device
sub-menu levels are available on this system.
•MUSIC TYPE button: TheMUSIC TYPE button is
another shortcut button to the genre listing on your
audio device.
4
UNDERSTANDING YOUR INSTRUMENT PANEL 357
Page 385 of 652
The VES™ can even control radio modes or video modes
while the radio is turned off. The VES™ can access the
radio modes or disc modes by navigating to those modes
on the VES™ and activating a radio mode or disc mode.
Information Mode Display
1. Channel 1 Mode
2. Channel 1 Shared Status
3. Channel 1 Audio Only/Mute
4. Channel 2 Mode
5. Channel 2 Shared Status
6. Channel 2 Audio Only/Mute
7. Channel 1 ENTER Button Action
8. Channel 2 ENTER Button Action
9. Clock
10. Video Lock
11. Not Available / Error
12. Disc Changer Status
Information Mode Video Screen Display
4
UNDERSTANDING YOUR INSTRUMENT PANEL 383
Page 397 of 652
General Information
This system complies with Part 15 of the FCC Operation
is subject to the following two conditions:
1. This device may not cause harmful interference.
2. This device must accept any interference received,
including interference that may cause undesired
operation.STEERING WHEEL AUDIO CONTROLS — IF
EQUIPPED
The remote sound system controls are located on the rear
surface of the steering wheel, at the three and nine
o’clock positions.
Remote Sound System Controls(Back View Of Steering Wheel)
4
UNDERSTANDING YOUR INSTRUMENT PANEL 395
Page 407 of 652
CAUTION!
Interior air enters the Rear Manual Climate Control
system through an intake grille, located in the right
side trim panel behind the third row seats. The
heater outlets are located in the right side trim panel,
just behind the sliding door. Do not block or place
objects directly in front of the inlet grille or heater
outlets. The electrical system could overload, causing
damage to the blower motor.
Rear Temperature Control
The rear mode selectionREAR,allows the settings to be
controlled by the rear mode control knob.
To change the temperature in the rear of the vehicle,
rotate the temperature control knob counterclockwise for
cold air, and clockwise for heated air. When rear controls are locked by the front system, the
lock symbol on the temperature knob is illuminated, and
the rear overhead adjustments are inoperable.
Rear Mode Control
Headliner Mode
Air comes from the outlets in the headliner. Each of
these outlets can be individually adjusted to direct
the flow of air. Moving the air vanes of the outlets to one
side will shut off the airflow.
Bi-Level Mode Air comes from both the headliner outlets and the
floor outlets.
NOTE: In many temperature positions, the Bi-Level
mode is designed to provide cooler air out of the head-
liner outlets and warmer air from the floor outlets.
4
UNDERSTANDING YOUR INSTRUMENT PANEL 405