2012 CHRYSLER 300 key
[x] Cancel search: keyPage 51 of 124

• The iPod® battery charges when plugged into the USB port (if supported by the specificdevice).
• To route the USB/iPod® cable out of the center console, use the access cut out in the front of the console.
NOTE:
• When connecting your iPod® device for the first time, the system may take several minutesto read your music, depending on the number of files. For example, the system will take
approximately 5 minutes for every 1000 songs loaded on the device. Also during the
reading process, the Shuffle and Browse functions will be disabled. This process is needed to
ensure the full use of your iPod® features and only happens the first time it is connected.
After the first time, the reading process of your iPod® will take considerably less time unless
changes are made or new songs are added to the playlist.
• The USB port supports certain Mini, Classic, Nano, Touch, and iPhone® devices. The USB port also supports playing music from compatible external USB Mass Storage Class
memory devices. Some iPod® software versions may not fully support the USB port features.
Please visit Apple’s website for iPod® software updates.
3. SD Card
• Play songs stored on an SD card inserted into the SD card slot.
• Song playback can be controlled using the radio or Steering Wheel Audio Controls toplay, skip to the next or previous track, browse, and list the contents.
4. Bluetooth® Streaming Audio
• If equipped with Uconnect™ Voice Command, your Bluetooth-equipped iPod® devices,cell phones or other media players, may also be able to stream music to your vehicle's
sound system. Your connected device must be Bluetooth-compatible, and paired with
your Uconnect Touch® system (see Uconnect™ Phone for pairing instructions). You can
access the music from your connected Bluetooth® device by touching the Source soft-key
while in Player mode.
Uconnect™ Phone (Bluetooth® HANDS FREE CALLING)
• If the Uconnect™ PhoneButton exists on your steering wheel, then you have the
Uconnect™ Phone features.
• The Uconnect™ Phone is a voice-activated, hands-free, in-vehicle communications system with Voice Command Capability (see Voice Command section).
• The Uconnect™ Phone allows you to dial a phone number with your mobile phone using simple voice commands or using screen soft-keys.
• Refer to the Understand The Features Of Your Vehicle section of your vehicle's Owner's Manual on the DVD for further details.
NOTE:The Uconnect™ Phone requires a mobile phone equipped with the Bluetooth®
Hands-Free Profile, Version 1.0 or higher. For Uconnect™ customer support, call
1–877–855–8400 or visit www.UconnectPhone.com.
ELECTRONICS
49
Page 52 of 124

Pairing a Phone
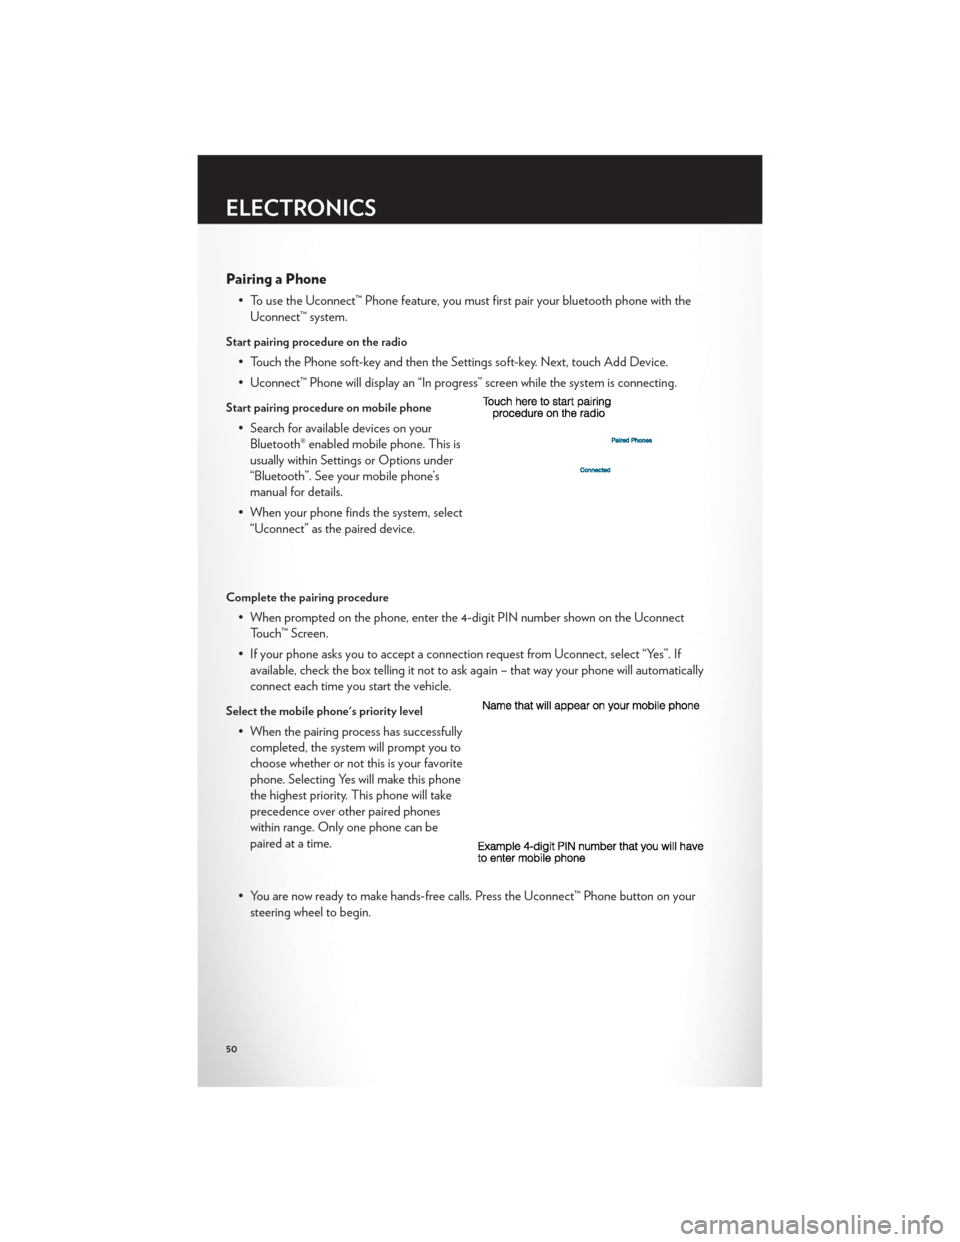
• To use the Uconnect™ Phone feature, you must first pair your bluetooth phone with theUconnect™ system.
Start pairing procedure on the radio
• Touch the Phone soft-key and then the Settings soft-key. Next, touch Add Device.
• Uconnect™ Phone will display an “In progress” screen while the system is connecting.
Start pairing procedure on mobile phone
• Search for available devices on yourBluetooth® enabled mobile phone. This is
usually within Settings or Options under
“Bluetooth”. See your mobile phone’s
manual for details.
• When your phone finds the system, select “Uconnect” as the paired device.
Complete the pairing procedure
• When prompted on the phone, enter the 4-digit PIN number shown on the UconnectTouch™ Screen.
• If your phone asks you to accept a connection request from Uconnect, select “Yes”. If available, check the box telling it not to ask again – that way your phone will automatically
connect each time you start the vehicle.
Select the mobile phone's priority level
• When the pairing process has successfullycompleted, the system will prompt you to
choose whether or not this is your favorite
phone. Selecting Yes will make this phone
the highest priority. This phone will take
precedence over other paired phones
within range. Only one phone can be
paired at a time.
• You are now ready to make hands-free calls. Press the Uconnect™ Phone button on your steering wheel to begin.
ELECTRONICS
50
Page 53 of 124

Phone Menu Screen
Making A Phone Call
• Press the Uconnect™ Phone button.
• (After the BEEP), say “dial” then the number (or “call” then the name as listed in your phone; see Phonebook below).
NOTE:You can also initiate a call by using the touch-screen on the Phone main screen.
Receiving A Call – Accept (And End)
• When an incoming call rings/is announced on Uconnect™, press the Phone button.
• To end a call, press the Phone button
.
Mute (Or Unmute) Microphone During Call
• During a call, touch the mute soft-key on the Phone main screen to mute and unmute the call.
Transfer Ongoing Call Between Handset And Vehicle
• During a call, touch the Transfer soft-key on the Phone main screen to transfer an ongoing call between handset and vehicle.
ELECTRONICS
51
Page 54 of 124

Common Phone Commands
Common Phone Commands (Examples)
“Call John Smith”
“Call John Smith mobile”
“Dial 1 248 555 1212”
“Call Emergency”
“Call Towing Assistance”
“Redial”
Phonebook
• Uconnect Touch™ radios will automatically download your phonebook from your pairedphone, if this feature is supported by your phone. Entries are updated each time that the
phone is paired. If your phone book entries do not appear, check the settings on your
phone. Some phones require you to enable this feature manually.
• Your phonebook can be browsed on your radio screen, but editing can only be done on your phone. To browse, touch the Phone soft-key, then the Phonebook soft-key.
• Favorite phonebook entries can be saved as Favorites for quicker access. Favorites are shown at the top of your main phone screen.
Voice Recognition Tips
• Use longer names that are less easily mistaken for others. For examples, say “Call JohnDoe” instead of “Call John”.
• You can “chain” commands together for faster results. Say “Call John Doe, mobile”, for example.
• You can “barge in” while the system is talking to you, enabling you to enter your response without waiting. Just press the Voice Command button on the steering wheel to barge in.
Changing The Volume
• Start a dialogue by pressing the Phone button, then say a command for example -
"Help".
• Use the radio ON/OFF VOLUME rotary knob to adjust the volume to a comfortable level while the Uconnect™ system is speaking. Please note the volume setting for
Uconnect™ is different than the audio system.
NOTE:To access help, press the Uconnect™ Phonebutton on the steering wheel and
say "help." Touch the display or push either
orbutton and say "cancel" to cancel
the help session.
SMS (Text Messaging)
• Uconnect™ Phone can read or send new text messages on your mobile phone.
• Your mobile phone must support SMS over Bluetooth® in order to use this feature. If the Uconnect™ Phone determines your phone is not compatible with SMS messaging over
Bluetooth® the “Messaging” button will be greyed out and the feature will not be available
for use.
ELECTRONICS
52
Page 58 of 124

Compass Calibration
• This compass is self-calibrating, which eliminates the need to set the compass manually.When the vehicle is new, the compass may appear erratic and the EVIC will display “CAL”
until the compass is calibrated.
• You may also calibrate the compass by completing one or more 360 degree turns (in an area free from large metal or metallic objects) until the “CAL” message displayed in the
EVIC turns off. The compass will now function normally.
ECO
• The ECO message will appear in your EVIC display whenever you are driving in a fuelefficient manner.
• This feature allows you to monitor when you are driving in a fuel efficient manner, and it can be used to modify driving habits in order to increase fuel economy.
PROGRAMMABLE FEATURES
Electronic Vehicle Information Center (EVIC)
• The EVIC can be used to view or change the following settings. Press the UPor
DOWN
button until System Setup displays, then press the SELECTbutton.
Scroll through the settings using the UP or DOWN buttons. Press the SELECT
button to change the setting. Press the BACK button to scroll back to a previous menu or
sub menu.
• Fuel Economy • Vehicle Info (Customer Information
Features)
• Vehicle Speed • Messages
• Trip Info • Turn Menu Off
• Units
Uconnect Touch™ Customer Programmable Features
• The Uconnect Touch™ 8.4 system allows you to access Customer Programmable feature settings such as Display, Clock, Safety/Assistance, Lights, Doors & Locks, Heated Seats,
Engine Off Operation, Compass Settings, Audio, Phone/ Bluetooth and SIRIUS Setup
through soft-keys.
• Touch the More soft-key to on the bottom of the screen, then touch the Settings soft-key to access the Settings screen. When making a selection, scroll up or down until the
preferred setting is highlighted, then press and release the preferred setting until a
check-mark appears next to the setting, showing that setting has been selected. The
following feature settings are available:
• Display • Clock
• Safety / Assistance • Doors & Locks
• Auto-On Comfort & Remote Start • Engine Off Options
• Compass Settings • Audio
• Phone / Bluetooth • SIRIUS Setup
ELECTRONICS
56
Page 68 of 124

1/8 Mile, 1/4 Mile
• When selected, this screen displays the time it takes the vehicle to travel 1/8 mile(1/4 mile) within 30 seconds and the vehicle's speed when it reaches 1/8 mile (1/4 mile).
Instantaneous G-Force
• When selected, this screen displays the current G-Force (lateral and longitudinal) alongwith a friction circle that displays the directions of the forces.
Peak G-Force
• When selected, this screen displays all four G-Force values (two lateral and twolongitudinal).
Uconnect Touch SRT8 Performance Features
• To access the SRT8 Performance Features, touch the “More” soft-key then touch the“SRT” soft-key. Press the UP or DOWN soft-key to cycle through the features. Press the
feature soft-key to select that feature.
• The Performance Page include the following:
• Timers • 1/8 Mile
• Engine Values • 1/4 Mile
• Digital Gauge Displays • Instantaneous G-Force
• 0-60 mph (0-100 km/h) • Peak G-Force
• Braking Distance • Digital Speedometer
Timers
0-60 mph (0-100 km/h), 1/8 Mile, 1/4 Mile
• When selected, this screen displays the time it takes for the vehicle to go from 0 to 60 mph (0 to 100 km/h), 1/8 mile or 1/4 mile.
Braking Distance • When selected, this screen displays the vehicle's braking distance and the speed at whichthe brake pedal was depressed.
G-Force
• When selected, this screen displays all four G-Force values (two lateral and twolongitudinal) as well as steering angle.
Gauges 1
• Oil Temperature
• Oil Pressure
• Battery Voltage
Gauges 2
• Coolant Temperature
• Oil Temperature
• Transmission Temperature
SRT8
66
Page 73 of 124

- Electronic Throttle Control (ETC) Light
• This light informs you of a problem with the Electronic Throttle Control (ETC) system.
• If a problem is detected, the light will come on while the engine is running. Cycle theignition when the vehicle has completely stopped and the shift lever is placed in the
PARK position; the light should turn off.
• If the light remains lit with the engine running, your vehicle will usually be drivable; however, see an authorized service center immediately. If the light is flashing when the
engine is running, immediate service is required and you may experience reduced
performance, an elevated/rough idle or engine stall and your vehicle may require towing.
- Air Bag Warning Light
• If the light is not on during starting, stays on, or turns on while driving, have the vehicleserviced by an authorized service center immediately.
SERVICE AWD SYSTEM Message
• If the SERVICE AWD SYSTEM warning message appears after engine start up, orduring driving, it means the AWD system is not functioning properly. We recommend
you do not operate the vehicle. Have the vehicle serviced immediately.
SPORTSport Mode
• This light will illuminate when the sport mode is selected. This mode providesperformance based tuning.
Oil Change Indicator
Message
• If an “oil change” message (shown as Oil Change Due) appears and a single chimesounds, it is time for your next required oil change.
Resetting The Light After Servicing
Vehicles Equipped With Keyless Enter-N-Go™
• Without pressing the brake pedal, push the ENGINE START/STOP button and cycle theignition to the ON/RUN position (Do not start the engine.)
• Fully depress the accelerator pedal, slowly, three times within 10 seconds.
• Without pressing the brake pedal, push the ENGINE START/STOP button once to return the ignition to the OFF/LOCK position.
Vehicles Not Equipped With Keyless Enter-N-Go™
• Turn the ignition switch to the ON/RUN position (Do not start the engine.)
• Fully depress the accelerator pedal, slowly, three times within 10 seconds.
• Turn the ignition switch to the OFF/LOCK position.
WHAT TO DO IN EMERGENCIES
71
Page 89 of 124

TOWING A DISABLED VEHICLEModelFlat Towing (all four wheels
on the ground)Flatbed Towing (all four
wheels suspended OFF the
ground)Front Wheels Raised, Rear
Wheels on the Ground
Rear Wheels Raised, Front
Wheels on the Ground
RWDWithoutaKey NOT Permitted
Recommended Method NOT Permitted NOT Permitted
RWDWithaKey Shift lever must be in
NEUTRAL. The distance to
be traveled must not exceed
15 mi (24 km), and the
towing speed must not
exceed 30 mph (48 km/h).Recommended Method May Be Used
NOT Permitted
AWD Without a Key NOT Permitted
Recommended Method NOT Permitted NOT Permitted
AWDWithaKey Shift lever must be in
NEUTRAL and the
driveshaft must be removed.Recommended Method NOT Permitted
NOT Permitted
WHAT TO DO IN EMERGENCIES
87