2012 CHEVROLET SILVERADO headlamp
[x] Cancel search: headlampPage 211 of 584
Black plate (7,1)Chevrolet Silverado Owner Manual - 2012
Lighting 6-7
#(Fog Lamps):Press to turn the
fog lamps on or off. A light will come
on in the instrument panel cluster.
When the fog lamps are turned on,
the parking lamps automatically
turn on.
When the headlamps are changed
to high beam, the fog lamps also go
off. When the high-beam headlamps
are turned off, the fog lamps will
come on again.
Some localities have laws that
require the headlamps to be on with
the fog lamps.Auxiliary
Roof-Mounted Lamp
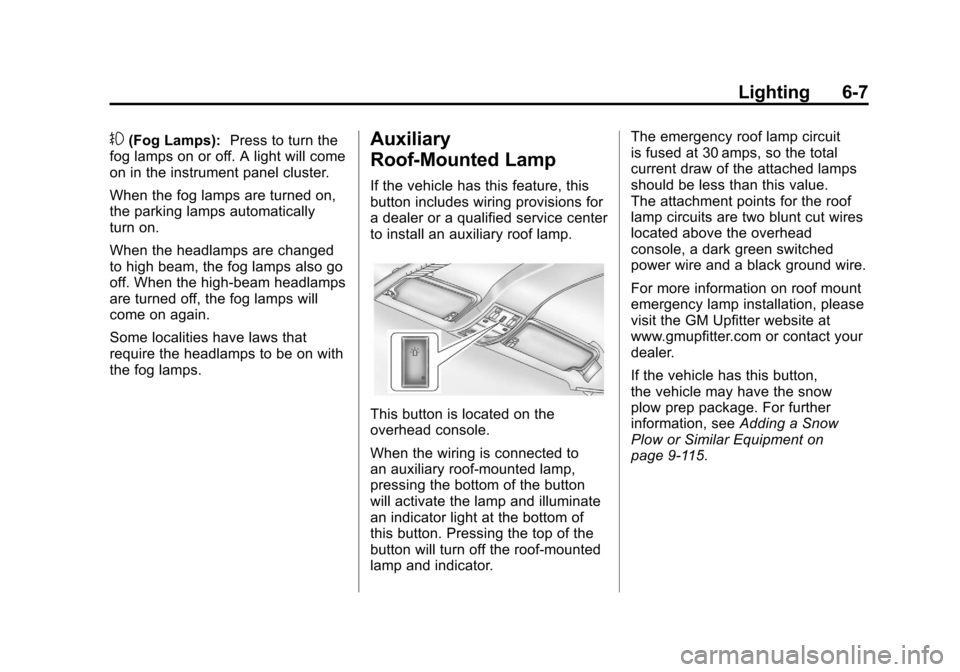
If the vehicle has this feature, this
button includes wiring provisions for
a dealer or a qualified service center
to install an auxiliary roof lamp.
This button is located on the
overhead console.
When the wiring is connected to
an auxiliary roof‐mounted lamp,
pressing the bottom of the button
will activate the lamp and illuminate
an indicator light at the bottom of
this button. Pressing the top of the
button will turn off the roof‐mounted
lamp and indicator. The emergency roof lamp circuit
is fused at 30 amps, so the total
current draw of the attached lamps
should be less than this value.
The attachment points for the roof
lamp circuits are two blunt cut wires
located above the overhead
console, a dark green switched
power wire and a black ground wire.
For more information on roof mount
emergency lamp installation, please
visit the GM Upfitter website at
www.gmupfitter.com or contact your
dealer.
If the vehicle has this button,
the vehicle may have the snow
plow prep package. For further
information, see
Adding a Snow
Plow or Similar Equipment on
page 9‑115.
Page 214 of 584

Black plate (10,1)Chevrolet Silverado Owner Manual - 2012
6-10 Lighting
The battery can be discharged at
idle if the electrical loads are very
high. This is true for all vehicles.
This is because the generator
(alternator) may not be spinning
fast enough at idle to produce all of
the power needed for very high
electrical loads.
A high electrical load occurs when
several of the following are on,
such as: headlamps, high beams,
fog lamps, rear window defogger,
climate control fan at high speed,
heated seats, engine cooling fans,
trailer loads, and loads plugged into
accessory power outlets.
EPM works to prevent excessive
discharge of the battery. It does this
by balancing the generator's output
and the vehicle's electrical needs.It can increase engine idle speed to
generate more power whenever
needed. It can temporarily reduce
the power demands of some
accessories.
Normally, these actions occur in
steps or levels, without being
noticeable. In rare cases at the
highest levels of corrective action,
this action may be noticeable to the
driver. If so, a DIC message might
be displayed, such as BATTERY
SAVER ACTIVE, BATTERY
VOLTAGE LOW, or LOW BATTERY.
If one of these messages displays,
it is recommended that the driver
reduce the electrical loads as much
as possible. See
Driver Information
Center (DIC) on page 5‑32.Battery Power Protection
This feature shuts off the dome and
reading lamps, if they are left on for
more than 10 minutes after the
ignition is turned off. The cargo
lamp shuts off after 20 minutes.
This prevents the battery from
running down.
Page 294 of 584
Black plate (8,1)Chevrolet Silverado Owner Manual - 2012
9-8 Driving and Operating
Driving on Hills
Driving safely on hills requires good
judgment and an understanding of
what the vehicle can and cannot do.
{WARNING
If the vehicle has the two‐speed
automatic transfer case, shifting
the transfer case to N (Neutral)
can cause your vehicle to roll
even if the transmission is in
P (Park) for an automatic
transmission or any gear position
for a manual transmission. This is
because the N (Neutral) position
on the transfer case overrides the
transmission. You or someone
else could be injured. If leaving
the vehicle, set the parking brake
and shift the transmission to
P (Park) for an automatic
transmission or any gear position
for a manual transmission.
Shift the transfer case to any
position but N (Neutral).Before driving on a hill, assess
the steepness, traction, and
obstructions. If the terrain ahead
cannot be seen, get out of the
vehicle and walk the hill before
driving further.
When driving on hills:.Use a low gear and keep a firm
grip on the steering wheel.
.Maintain a slow speed.
.When possible, drive straight up
or down the hill.
.Slow down when approaching
the top of the hill.
.Use headlamps even during the
day to make the vehicle more
visible.
{WARNING
Driving to the top of a hill at high
speed can cause an accident.
There could be a drop-off,
embankment, cliff, or even
another vehicle. You could be
seriously injured or killed. As you
near the top of a hill, slow down
and stay alert.
.Never go downhill forward or
backward with either the
transmission or transfer case in
N (Neutral). The brakes could
overheat and you could lose
control.
{WARNING
If the vehicle has the two‐speed
automatic transfer case, shifting
the transfer case to N (Neutral)
can cause your vehicle to roll
(Continued)
Page 301 of 584
Black plate (15,1)Chevrolet Silverado Owner Manual - 2012
Driving and Operating 9-15
WARNING (Continued)
If the vehicle is stuck in the snow:
.Clear away snow from around
the base of your vehicle,
especially any that is blocking
the exhaust pipe.
.Check again from time to
time to be sure snow does
not collect there.
.Open a window about 5 cm
(2 in) on the side of the
vehicle that is away from the
wind to bring in fresh air.
.Fully open the air outlets on
or under the instrument
panel.(Continued)
WARNING (Continued)
.Adjust the climate control
system to a setting that
circulates the air inside the
vehicle and set the fan speed
to the highest setting. See
“Climate Control Systems” in
the Index.
For more information about
carbon monoxide, see Engine
Exhaust on page 9‑36.
Run the engine for short periods
only as needed to keep warm, but
be careful. To save fuel, run the engine for only
short periods as needed to warm
the vehicle and then shut the engine
off and close the window most of
the way to save heat. Repeat this
until help arrives but only when you
feel really uncomfortable from the
cold. Moving about to keep warm
also helps.
If it takes some time for help to
arrive, now and then when you run
the engine, push the accelerator
pedal slightly so the engine runs
faster than the idle speed. This
keeps the battery charged to restart
the vehicle and to signal for help
with the headlamps. Do this as little
as possible to save fuel.
Page 361 of 584
Black plate (75,1)Chevrolet Silverado Owner Manual - 2012
Driving and Operating 9-75
When the System Does Not
Seem To Work Properly
The RVC system might not work
properly or display a clear image if:
.The RVC is turned off. See
“Turning the RVC System On or
Off”earlier in this section.
.It is dark.
.The sun or the beam of
headlamps is shining directly
into the camera lens.
.Ice, snow, mud, or anything else
builds up on the camera lens.
Clean the lens, rinse it with
water, and wipe it with a soft
cloth.
.The back of the vehicle is in an
accident, the position and
mounting angle of the camera
can change or the camera can
be affected. Be sure to have the
camera and its position and
mounting angle checked at your
dealer. The RVC system display in the
rearview mirror may turn off or not
appear as expected due to one of
the following conditions. If this
occurs the left indicator light on the
mirror will flash.
.A slow flash may indicate a loss
of video signal, or no video
signal present during the reverse
cycle.
.A fast flash may indicate that the
display has been on for the
maximum allowable time during
a reverse cycle, or the display
has reached an Over
Temperature limit.
The fast flash conditions are
used to protect the video
device from high temperature
conditions. Once conditions
return to normal the device will
reset and the green indicator will
stop flashing.
During any of these fault conditions,
the display will be blank and the
indicator will flash while the vehicle
is in R (Reverse) or until the
conditions return to normal.
Press and hold
zwhen the left
indicator light is flashing to turn off
the video display along with the left
indicator light.
Page 391 of 584

Black plate (105,1)Chevrolet Silverado Owner Manual - 2012
Driving and Operating 9-105
If towing a light‐duty trailer with a
standard four‐way round pin
connector, an adapter is available
from your dealer.
Heavy-DutyTrailer Wiring Harness
Package
For vehicles equipped with heavy
duty trailering, the harness
connector is mounted in the bumper.The seven-wire harness contains
the following trailer circuits:
.Yellow: Left Stop/Turn Signal
.Dark Green: Right Stop/Turn
Signal
.Brown: Taillamps
.White: Ground
.Light Green: Back-up Lamps
.Red: Battery Feed*
.Dark Blue: Trailer Brake*
*The fuses for these two circuits are
installed in the underhood electrical
center, but the wires are not
connected. They should be
connected by your dealer or a
qualified service center. The fuse
and wire for the ITBC is factory
installed and connected if the
vehicle is equipped with an ITBC. The fuse for the battery feed is
not required if the vehicle has an
auxiliary battery. If the vehicle does
not have an auxiliary battery, have
your dealer or authorized service
center install the required fuse.
If charging a remote (non-vehicle)
battery, press the Tow/Haul Mode
button, if equipped, located at the
end of the shift lever. This will boost
the vehicle system voltage and
properly charge the battery. If the
trailer is too light for Tow/Haul
Mode, or the vehicle is not
equipped with Tow/Haul, turn on
the headlamps as a second way
to boost the vehicle system and
charge the battery.
Page 407 of 584

Black plate (1,1)Chevrolet Silverado Owner Manual - 2012
Vehicle Care 10-1
Vehicle Care
General Information
General Information . . . . . . . . . . 10-2
California Proposition65 Warning . . . . . . . . . . . . . . . . . 10-3
California Perchlorate Materials Requirements . . . . 10-3
Accessories and Modifications . . . . . . . . . . . . . . . 10-3
Vehicle Checks
Doing Your OwnService Work . . . . . . . . . . . . . . . 10-4
Hood . . . . . . . . . . . . . . . . . . . . . . . . 10-5
Engine Compartment Overview . . . . . . . . . . . . . . . . . . . 10-6
Engine Oil . . . . . . . . . . . . . . . . . . . 10-7
Engine Oil Life System . . . . . 10-10
Automatic Transmission Fluid (4-Speed Transmission) . . . 10-11
Automatic Transmission Fluid (6-Speed
Transmission) . . . . . . . . . . . . . 10-14
Manual Transmission Fluid . . . . . . . . . . . . . . . . . . . . . . 10-17
Hydraulic Clutch . . . . . . . . . . . . 10-17 Engine Air Cleaner/Filter . . . . 10-17
Cooling System . . . . . . . . . . . . 10-19
Engine Coolant . . . . . . . . . . . . . 10-20
Engine Overheating . . . . . . . . 10-23
Overheated Engine
Protection
Operating Mode . . . . . . . . . . . 10-26
Engine Fan . . . . . . . . . . . . . . . . . 10-26
Power Steering Fluid . . . . . . . 10-27
Washer Fluid . . . . . . . . . . . . . . . 10-28
Brakes . . . . . . . . . . . . . . . . . . . . . 10-28
Brake Fluid . . . . . . . . . . . . . . . . . 10-30
Battery . . . . . . . . . . . . . . . . . . . . . 10-31
Four-Wheel Drive . . . . . . . . . . . 10-32
Front Axle . . . . . . . . . . . . . . . . . . 10-33
Rear Axle . . . . . . . . . . . . . . . . . . 10-34
Noise Control System . . . . . . 10-36
Starter Switch Check . . . . . . . 10-36
Automatic Transmission Shift Lock Control Function
Check . . . . . . . . . . . . . . . . . . . . . 10-37
Ignition Transmission Lock Check . . . . . . . . . . . . . . . . . . . . . 10-38
Park Brake and P (Park) Mechanism Check . . . . . . . . 10-38
Wiper Blade Replacement . . . . . . . . . . . . . . 10-39
Glass Replacement . . . . . . . . 10-39
Headlamp Aiming
Headlamp Aiming . . . . . . . . . . 10-39
Bulb Replacement
Bulb Replacement . . . . . . . . . . 10-42
Halogen Bulbs . . . . . . . . . . . . . . 10-42
Headlamps, Front Turn Signal, Sidemarker, and
Parking Lamps . . . . . . . . . . . . 10-42
Pick-Up Box Identification and Fender Marker
Lamps . . . . . . . . . . . . . . . . . . . . 10-43
Taillamps (Chassis Cab Models) . . . . . . . . . . . . . . . . . . . 10-43
Taillamps, Turn Signal, Stoplamps, and Back-Up
Lamps . . . . . . . . . . . . . . . . . . . . 10-44
Center High-Mounted
Stoplamp (CHMSL) and
Cargo Lamp . . . . . . . . . . . . . . 10-44
License Plate Lamp . . . . . . . . 10-45
Replacement Bulbs . . . . . . . . . 10-45
Page 445 of 584
Black plate (39,1)Chevrolet Silverado Owner Manual - 2012
Vehicle Care 10-39
Wiper Blade Replacement
Windshield wiper blades should be
inspected for wear or cracking.
SeeMaintenance Schedule on
page 11‑3 for more information on
wiper blade inspection.
Replacement blades come in
different types and are removed in
different ways. To remove the wiper
blade:
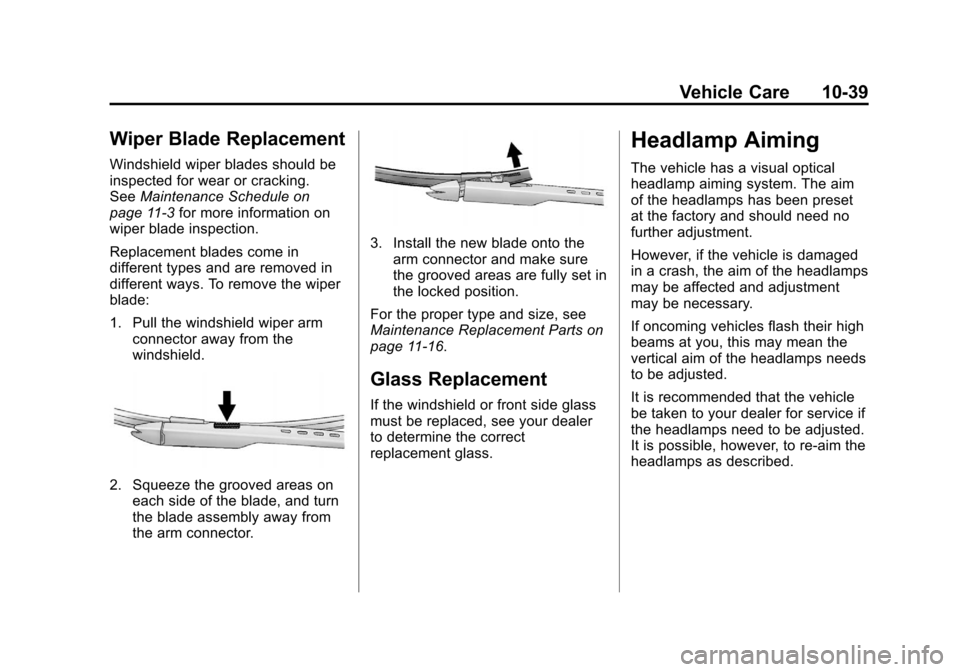
1. Pull the windshield wiper arm connector away from the
windshield.
2. Squeeze the grooved areas on
each side of the blade, and turn
the blade assembly away from
the arm connector.
3. Install the new blade onto thearm connector and make sure
the grooved areas are fully set in
the locked position.
For the proper type and size, see
Maintenance Replacement Parts on
page 11‑16.
Glass Replacement
If the windshield or front side glass
must be replaced, see your dealer
to determine the correct
replacement glass.
Headlamp Aiming
The vehicle has a visual optical
headlamp aiming system. The aim
of the headlamps has been preset
at the factory and should need no
further adjustment.
However, if the vehicle is damaged
in a crash, the aim of the headlamps
may be affected and adjustment
may be necessary.
If oncoming vehicles flash their high
beams at you, this may mean the
vertical aim of the headlamps needs
to be adjusted.
It is recommended that the vehicle
be taken to your dealer for service if
the headlamps need to be adjusted.
It is possible, however, to re-aim the
headlamps as described.