Page 448 of 584

Black plate (42,1)Chevrolet Silverado Owner Manual - 2012
10-42 Vehicle Care
Bulb Replacement
For the proper type of replacement
bulbs, seeReplacement Bulbs on
page 10‑45.
For any bulb‐changing procedure
not listed in this section, contact
your dealer.
Halogen Bulbs
{WARNING
Halogen bulbs have pressurized
gas inside and can burst if you
drop or scratch the bulb. You or
others could be injured. Be sure
to read and follow the instructions
on the bulb package.
Headlamps, Front Turn
Signal, Sidemarker, and
Parking Lamps
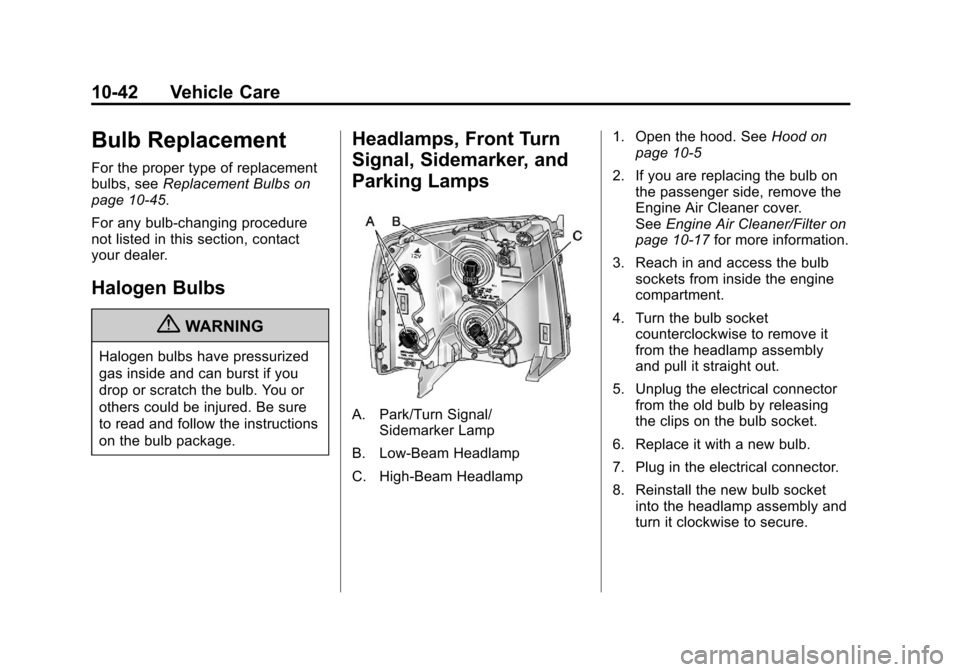
A. Park/Turn Signal/
Sidemarker Lamp
B. Low‐Beam Headlamp
C. High‐Beam Headlamp 1. Open the hood. See
Hood on
page 10‑5
2. If you are replacing the bulb on the passenger side, remove the
Engine Air Cleaner cover.
See Engine Air Cleaner/Filter on
page 10‑17 for more information.
3. Reach in and access the bulb sockets from inside the engine
compartment.
4. Turn the bulb socket counterclockwise to remove it
from the headlamp assembly
and pull it straight out.
5. Unplug the electrical connector from the old bulb by releasing
the clips on the bulb socket.
6. Replace it with a new bulb.
7. Plug in the electrical connector.
8. Reinstall the new bulb socket into the headlamp assembly and
turn it clockwise to secure.
Page 499 of 584

Black plate (93,1)Chevrolet Silverado Owner Manual - 2012
Vehicle Care 10-93
3. Get the vehicles close enoughso the jumper cables can reach,
but be sure the vehicles are not
touching each other. If they are,
it could cause an unwanted
ground connection. You would
not be able to start your vehicle,
and the bad grounding could
damage the electrical systems.
To avoid the possibility of the
vehicles rolling, set the parking
brake firmly on both vehicles
involved in the jump start
procedure. Put the automatic
transmission in P (Park) or a
manual transmission in Neutral
before setting the parking brake.
If you have a four-wheel-drive
vehicle, be sure the transfer
case is in a drive gear, not in
Neutral. Notice:
If any accessories are left
on or plugged in during the jump
starting procedure, they could be
damaged. The repairs would not
be covered by the vehicle
warranty. Whenever possible,
turn off or unplug all accessories
on either vehicle when jump
starting the vehicle.
4. Turn off the ignition on both
vehicles. Unplug unnecessary
accessories plugged into the
cigarette lighter or the accessory
power outlets. Turn off the radio
and all the lamps that are not
needed. This will avoid sparks
and help save both batteries.
And it could save the radio!
5. Open the hood on the other vehicle and locate the
positive (+) and negative (−)
terminal locations on that
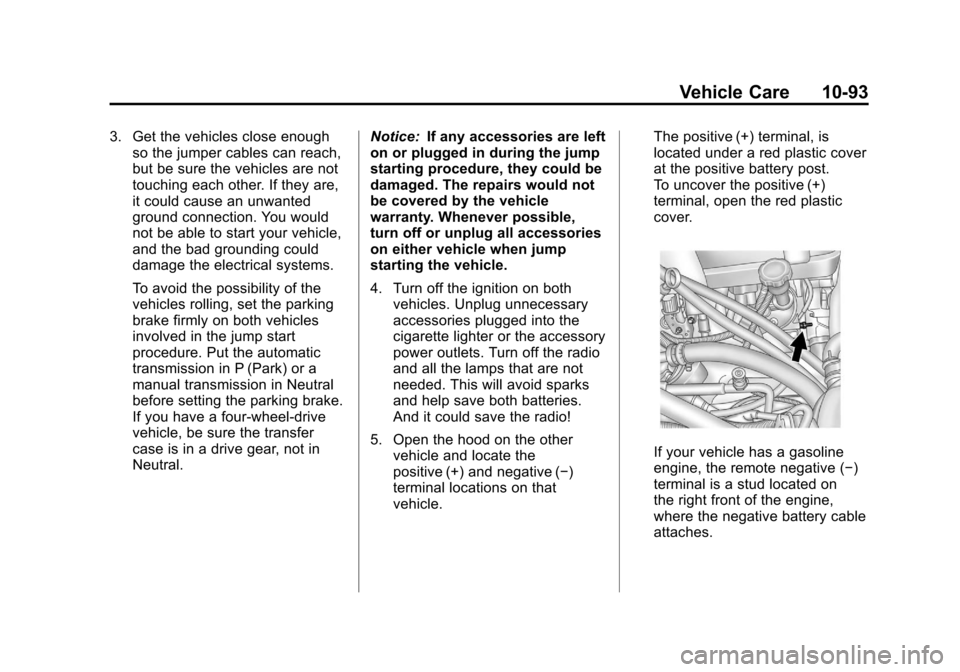
vehicle. The positive (+) terminal, is
located under a red plastic cover
at the positive battery post.
To uncover the positive (+)
terminal, open the red plastic
cover.
If your vehicle has a gasoline
engine, the remote negative (−)
terminal is a stud located on
the right front of the engine,
where the negative battery cable
attaches.
Page 500 of 584

Black plate (94,1)Chevrolet Silverado Owner Manual - 2012
10-94 Vehicle Care
If your vehicle has a diesel
engine, the remote negative (−)
terminal is the negative (−) post
on the auxiliary battery on the
driver side of the engine
compartment.
For more information on the
location of the remote
positive (+) and remote
negative (−) terminals,
seeEngine Compartment
Overview on page 10‑6
{WARNING
An electric fan can start up even
when the engine is not running
and can injure you. Keep hands,
clothing and tools away from any
underhood electric fan.
{WARNING
Using an open flame near a
battery can cause battery gas to
explode. People have been hurt
doing this, and some have been
blinded. Use a flashlight if you
need more light.
Be sure the battery has enough
water. You do not need to add
water to the battery installed in
your new vehicle. But if a battery
has filler caps, be sure the right
amount of fluid is there. If it is low,
add water to take care of that
first. If you do not, explosive gas
could be present.
Battery fluid contains acid that
can burn you. Do not get it on
you. If you accidentally get it in
your eyes or on your skin, flush
the place with water and get
medical help immediately.
{WARNING
Fans or other moving engine
parts can injure you badly. Keep
your hands away from moving
parts once the engine is running.
6. Check that the jumper cables do not have loose or missing
insulation. If they do, you could
get a shock. The vehicles could
be damaged too.
Before you connect the cables,
here are some basic things you
should know. Positive (+) will go
to positive (+) or to a remote
positive (+) terminal if the vehicle
has one. Negative (−) will go to a
heavy, unpainted metal engine
part or to a remote negative (−)
terminal if the vehicle has one.
Page 576 of 584

Black plate (6,1)Chevrolet Silverado Owner Manual - 2012
i-6 INDEX
G
Garage Door Opener . . . . . . . . . . 5-60Programming . . . . . . . . . . . . . . . . . 5-60
Gasoline Specifications . . . . . . . . . . . . . . . . . 9-77
Gauges Engine Coolant
Temperature . . . . . . . . . . . . . . . . 5-17
Engine Oil Pressure . . . . . . . . . . 5-16
Fuel . . . . . . . . . . . . . . . . . . . . . . . . . . 5-14
Odometer . . . . . . . . . . . . . . . . . . . . . 5-14
Speedometer . . . . . . . . . . . . . . . . . 5-14
Tachometer . . . . . . . . . . . . . . . . . . . 5-14
Trip Odometer . . . . . . . . . . . . . . . . 5-14
Voltmeter . . . . . . . . . . . . . . . . . . . . . 5-18
Warning Lights and Indicators . . . . . . . . . . . . . . . . . . . 5-12
General Information Service and Maintenance . . . . . 11-1
Towing . . . . . . . . . . . . . . . . . . . . . . . . 9-82
Vehicle Care . . . . . . . . . . . . . . . . . . 10-2
Glass Replacement . . . . . . . . . . . 10-39
Glove Box . . . . . . . . . . . . . . . . . . . . . . 4-1
GM Mobility Reimbursement Program . . . . . . . . . . . . . . . . . . . . . . 13-7
H
Halogen Bulbs . . . . . . . . . . . . . . . . 10-42
Hazard Warning Flashers . . . . . . . 6-5
Head Restraints . . . . . . . . . . . . . . . . 3-2
Headlamps
Aiming . . . . . . . . . . . . . . . . . . . . . . 10-39
Automatic . . . . . . . . . . . . . . . . . . . . . . 6-4
Bulb Replacement . . . . . . . . . . 10-42
Daytime RunningLamps (DRL) . . . . . . . . . . . . . . . . . 6-3
Flash-to-Pass . . . . . . . . . . . . . . . . . . 6-3
Headlamps, Front Turn
Signal, Sidemarker, and
Parking Lamps . . . . . . . . . . . . 10-42
High-Beam On Light . . . . . . . . . . 5-31
High/Low Beam Changer . . . . . . 6-3
Heated and Ventilated Front Seats . . . . . . . . . . . . . . . . . . 3-10
Heated Mirrors . . . . . . . . . . . . . . . . . 2-16
Heater Engine Coolant . . . . . . . . . . . . . . . 9-32
Heating and Air Conditioning . . . . . . . . . . . . . . . 8-1, 8-4
High-Beam On Light . . . . . . . . . . . 5-31 High-Speed Operation . . . . . . . . 10-63
Highway Hypnosis . . . . . . . . . . . . . 9-12
Hill and Mountain Roads . . . . . . . 9-13
Hill Start Assist (HSA) . . . . . . . . . 9-62
Hood . . . . . . . . . . . . . . . . . . . . . . . . . . 10-5
Horn . . . . . . . . . . . . . . . . . . . . . . . . . . . . 5-5
How to Wear Safety Belts
Properly . . . . . . . . . . . . . . . . . . . . . . 3-14
Hydraulic Clutch . . . . . . . . . . . . . . 10-17
I
Idle System Fast . . . . . . . . . . . . . . . . . . . . . . . . . . 9-31
Ignition Positions . . . . . . . . . . . . . . 9-27
Ignition Transmission Lock Check . . . . . . . . . . . . . . . . . . . . . . . 10-38
Immobilizer . . . . . . . . . . . . . . . . . . . . 2-12
Infants and Young Children, Restraints . . . . . . . . . . . . . . . . . . . . 3-44
Infotainment . . . . . . . . . . . . . . . . . . . . 7-1
Instrument Cluster . . . . . . . . . . . . . 5-13
Instrument Panel Storage Area . . . . . . . . . . . . . . . . . . 4-1
Introduction . . . . . . . . . . . . . . . . . . . . . . . iii