2012 CHEVROLET SILVERADO child lock
[x] Cancel search: child lockPage 126 of 584
Black plate (62,1)Chevrolet Silverado Owner Manual - 2012
3-62 Seats and Restraints
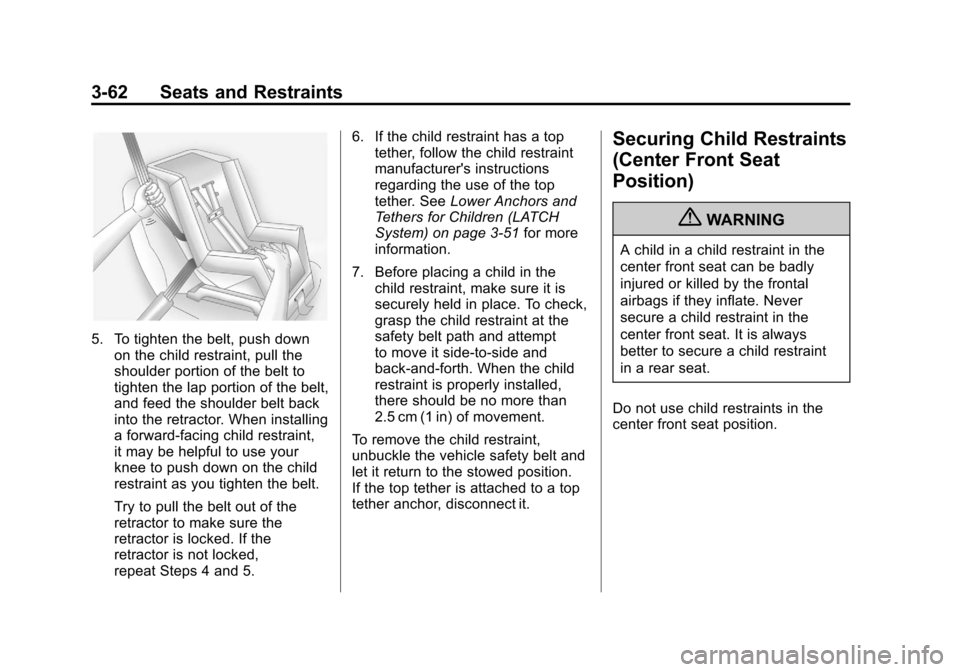
5. To tighten the belt, push downon the child restraint, pull the
shoulder portion of the belt to
tighten the lap portion of the belt,
and feed the shoulder belt back
into the retractor. When installing
a forward-facing child restraint,
it may be helpful to use your
knee to push down on the child
restraint as you tighten the belt.
Try to pull the belt out of the
retractor to make sure the
retractor is locked. If the
retractor is not locked,
repeat Steps 4 and 5. 6. If the child restraint has a top
tether, follow the child restraint
manufacturer's instructions
regarding the use of the top
tether. See Lower Anchors and
Tethers for Children (LATCH
System) on page 3‑51 for more
information.
7. Before placing a child in the child restraint, make sure it is
securely held in place. To check,
grasp the child restraint at the
safety belt path and attempt
to move it side‐to‐side and
back‐and‐forth. When the child
restraint is properly installed,
there should be no more than
2.5 cm (1 in) of movement.
To remove the child restraint,
unbuckle the vehicle safety belt and
let it return to the stowed position.
If the top tether is attached to a top
tether anchor, disconnect it.
Securing Child Restraints
(Center Front Seat
Position)
{WARNING
A child in a child restraint in the
center front seat can be badly
injured or killed by the frontal
airbags if they inflate. Never
secure a child restraint in the
center front seat. It is always
better to secure a child restraint
in a rear seat.
Do not use child restraints in the
center front seat position.
Page 129 of 584
Black plate (65,1)Chevrolet Silverado Owner Manual - 2012
Seats and Restraints 3-65
5. Pull the shoulder belt all the wayout of the retractor to set the
lock. When the retractor lock is
set, the belt can be tightened but
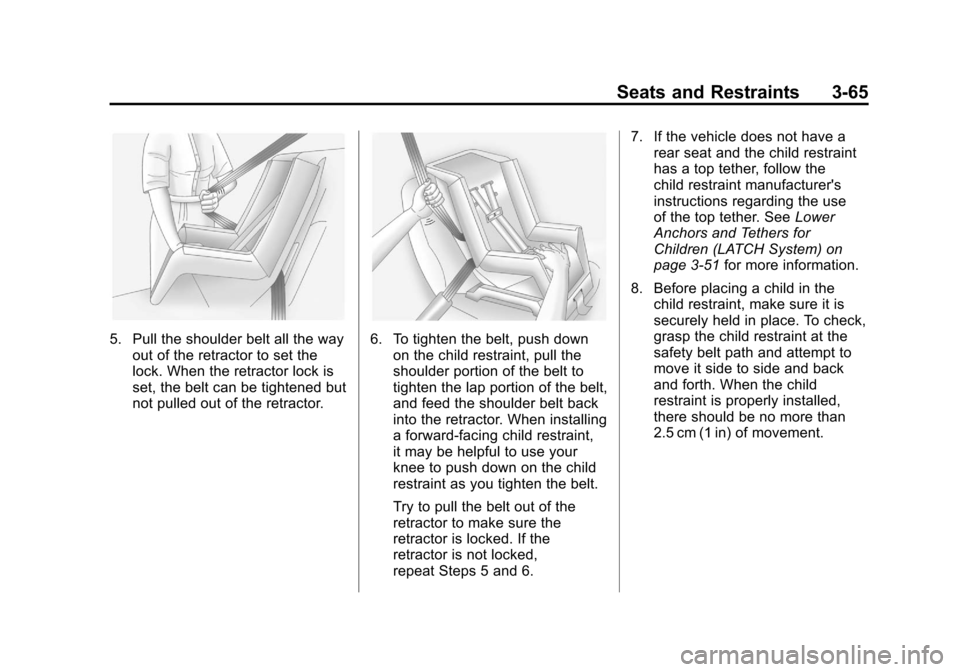
not pulled out of the retractor.6. To tighten the belt, push downon the child restraint, pull the
shoulder portion of the belt to
tighten the lap portion of the belt,
and feed the shoulder belt back
into the retractor. When installing
a forward-facing child restraint,
it may be helpful to use your
knee to push down on the child
restraint as you tighten the belt.
Try to pull the belt out of the
retractor to make sure the
retractor is locked. If the
retractor is not locked,
repeat Steps 5 and 6. 7. If the vehicle does not have a
rear seat and the child restraint
has a top tether, follow the
child restraint manufacturer's
instructions regarding the use
of the top tether. See Lower
Anchors and Tethers for
Children (LATCH System) on
page 3‑51 for more information.
8. Before placing a child in the child restraint, make sure it is
securely held in place. To check,
grasp the child restraint at the
safety belt path and attempt to
move it side to side and back
and forth. When the child
restraint is properly installed,
there should be no more than
2.5 cm (1 in) of movement.
Page 132 of 584
Black plate (68,1)Chevrolet Silverado Owner Manual - 2012
3-68 Seats and Restraints
You will be using the lap-shoulder
belt to secure the child restraint in
this position. Follow the instructions
that came with the child restraint.
1. Move the seat as far back as itwill go before securing the
forward-facing child restraint.
If you have no other choice but
to install a rear-facing child
restraint in this seat, make sure
the airbag is off once the child
restraint has been installed.
When the airbag off switch has
turned off the right front
passenger frontal airbag, the off
indicator in the airbag off light
should light and stay lit when
you start the vehicle. See Airbag
On-Off Light on page 5‑20.
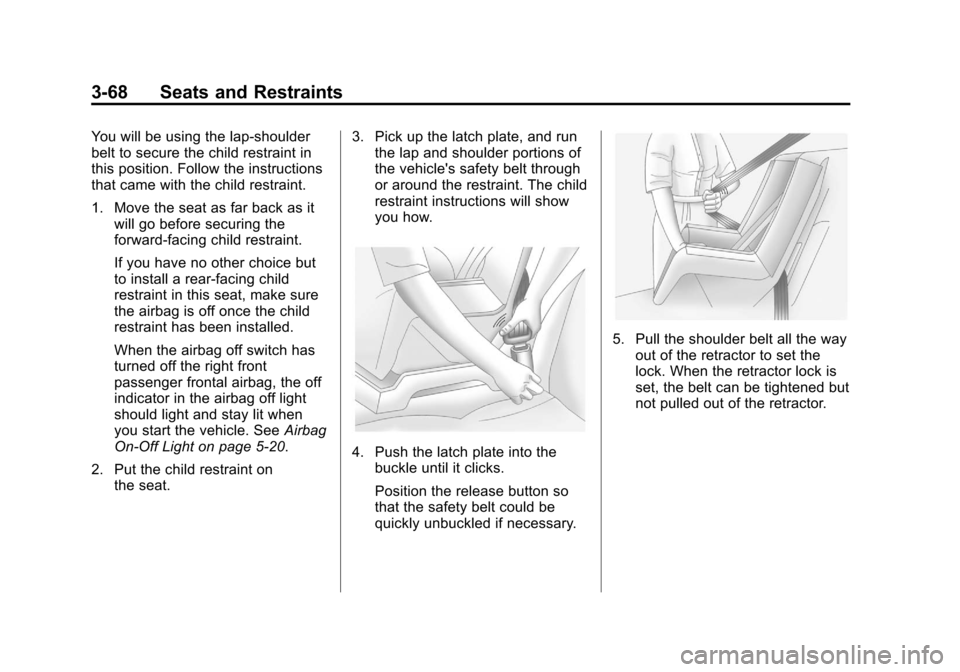
2. Put the child restraint on the seat. 3. Pick up the latch plate, and run
the lap and shoulder portions of
the vehicle's safety belt through
or around the restraint. The child
restraint instructions will show
you how.
4. Push the latch plate into thebuckle until it clicks.
Position the release button so
that the safety belt could be
quickly unbuckled if necessary.
5. Pull the shoulder belt all the way
out of the retractor to set the
lock. When the retractor lock is
set, the belt can be tightened but
not pulled out of the retractor.
Page 133 of 584
Black plate (69,1)Chevrolet Silverado Owner Manual - 2012
Seats and Restraints 3-69
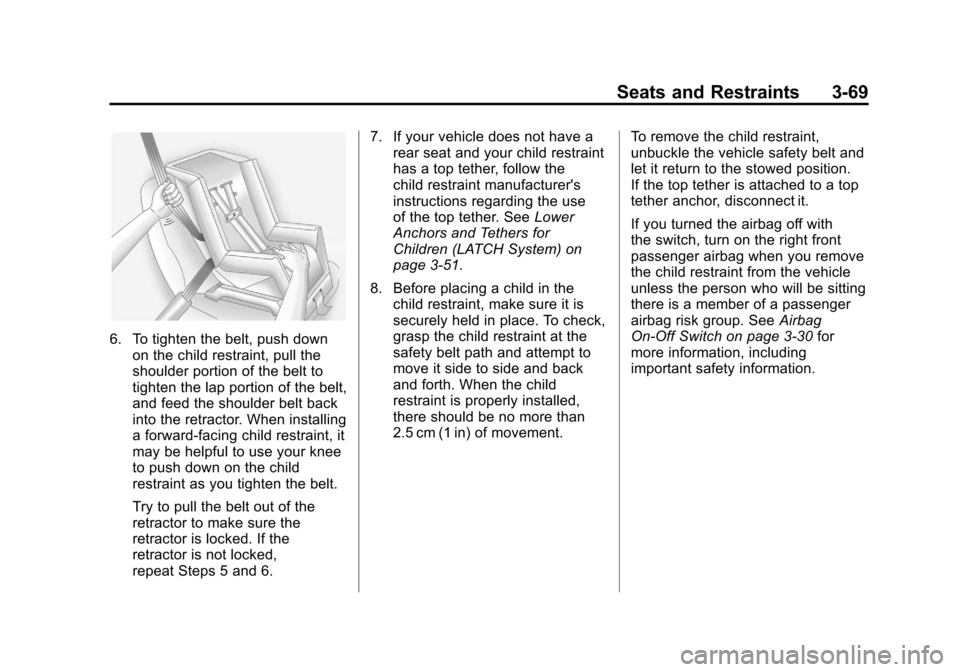
6. To tighten the belt, push downon the child restraint, pull the
shoulder portion of the belt to
tighten the lap portion of the belt,
and feed the shoulder belt back
into the retractor. When installing
a forward-facing child restraint, it
may be helpful to use your knee
to push down on the child
restraint as you tighten the belt.
Try to pull the belt out of the
retractor to make sure the
retractor is locked. If the
retractor is not locked,
repeat Steps 5 and 6. 7. If your vehicle does not have a
rear seat and your child restraint
has a top tether, follow the
child restraint manufacturer's
instructions regarding the use
of the top tether. See Lower
Anchors and Tethers for
Children (LATCH System) on
page 3‑51.
8. Before placing a child in the child restraint, make sure it is
securely held in place. To check,
grasp the child restraint at the
safety belt path and attempt to
move it side to side and back
and forth. When the child
restraint is properly installed,
there should be no more than
2.5 cm (1 in) of movement. To remove the child restraint,
unbuckle the vehicle safety belt and
let it return to the stowed position.
If the top tether is attached to a top
tether anchor, disconnect it.
If you turned the airbag off with
the switch, turn on the right front
passenger airbag when you remove
the child restraint from the vehicle
unless the person who will be sitting
there is a member of a passenger
airbag risk group. See
Airbag
On-Off Switch on page 3‑30 for
more information, including
important safety information.
Page 135 of 584
Black plate (71,1)Chevrolet Silverado Owner Manual - 2012
Seats and Restraints 3-71
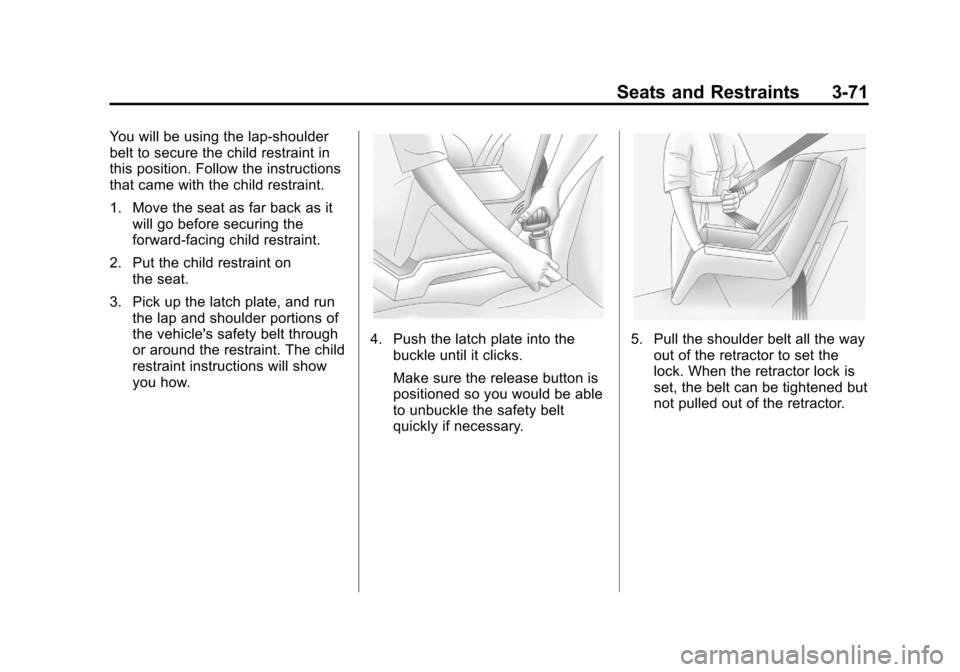
You will be using the lap-shoulder
belt to secure the child restraint in
this position. Follow the instructions
that came with the child restraint.
1. Move the seat as far back as itwill go before securing the
forward-facing child restraint.
2. Put the child restraint on the seat.
3. Pick up the latch plate, and run the lap and shoulder portions of
the vehicle's safety belt through
or around the restraint. The child
restraint instructions will show
you how.
4. Push the latch plate into thebuckle until it clicks.
Make sure the release button is
positioned so you would be able
to unbuckle the safety belt
quickly if necessary.5. Pull the shoulder belt all the wayout of the retractor to set the
lock. When the retractor lock is
set, the belt can be tightened but
not pulled out of the retractor.
Page 136 of 584
Black plate (72,1)Chevrolet Silverado Owner Manual - 2012
3-72 Seats and Restraints
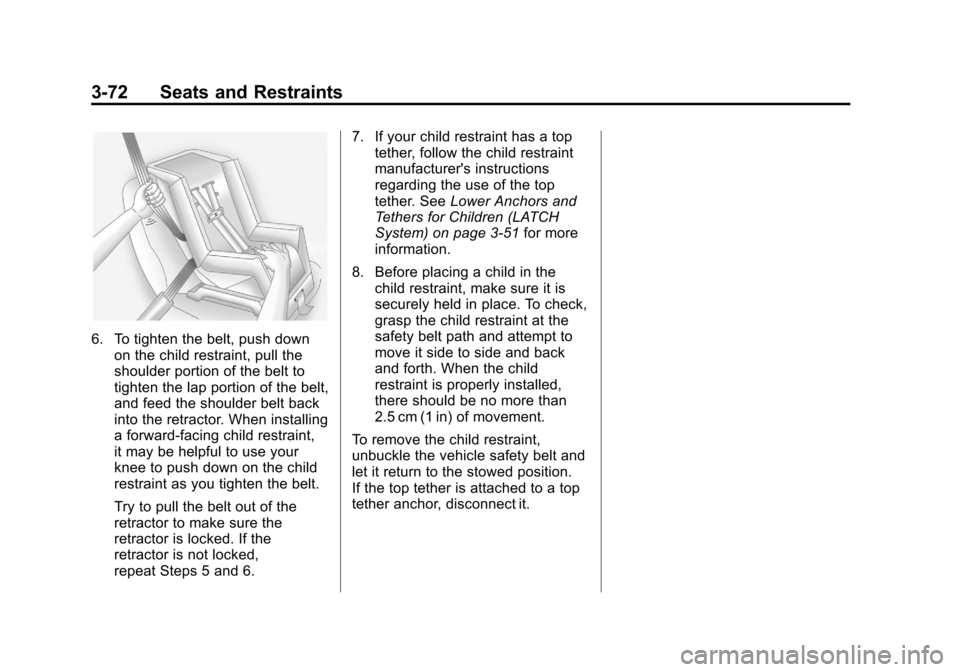
6. To tighten the belt, push downon the child restraint, pull the
shoulder portion of the belt to
tighten the lap portion of the belt,
and feed the shoulder belt back
into the retractor. When installing
a forward-facing child restraint,
it may be helpful to use your
knee to push down on the child
restraint as you tighten the belt.
Try to pull the belt out of the
retractor to make sure the
retractor is locked. If the
retractor is not locked,
repeat Steps 5 and 6. 7. If your child restraint has a top
tether, follow the child restraint
manufacturer's instructions
regarding the use of the top
tether. See Lower Anchors and
Tethers for Children (LATCH
System) on page 3‑51 for more
information.
8. Before placing a child in the child restraint, make sure it is
securely held in place. To check,
grasp the child restraint at the
safety belt path and attempt to
move it side to side and back
and forth. When the child
restraint is properly installed,
there should be no more than
2.5 cm (1 in) of movement.
To remove the child restraint,
unbuckle the vehicle safety belt and
let it return to the stowed position.
If the top tether is attached to a top
tether anchor, disconnect it.
Page 366 of 584
Black plate (80,1)Chevrolet Silverado Owner Manual - 2012
9-80 Driving and Operating
Filling the Tank
If the vehicle has a diesel engine,
see the Duramax diesel supplement
for more information.
{WARNING
Fuel vapor burns violently and a
fuel fire can cause bad injuries.
To help avoid injuries to you and
others, read and follow all the
instructions on the fuel pump
island. Turn off the engine when
refueling. Do not smoke near fuel
or when refueling the vehicle.
Do not use cellular phones.
Keep sparks, flames, and
smoking materials away from fuel.
Do not leave the fuel pump
unattended when refueling the
vehicle. This is against the law in
some places. Do not re-enter the
vehicle while pumping fuel. Keep
children away from the fuel pump;
never let children pump fuel.The tethered fuel cap is located
behind a hinged fuel door on the
driver side of the vehicle. Vehicles
that have a FlexFuel badge and a
yellow fuel cap can use either
unleaded gasoline or ethanol fuel
containing up to 85% ethanol (E85).
See
Fuel E85 (85% Ethanol) on
page 9‑78.
To remove the fuel cap, turn it
slowly counterclockwise.
{WARNING
Fuel can spray out on you if you
open the fuel cap too quickly.
If you spill fuel and then
something ignites it, you could be
badly burned. This spray can
happen if the tank is nearly full,
and is more likely in hot weather.
Open the fuel cap slowly and wait
for any hiss noise to stop. Then
unscrew the cap all the way. If the vehicle is a dual fuel tank
chassis cab model, and it runs out
of fuel, refuel the front fuel tank first
to ensure a quick restart.
Be careful not to spill fuel. Do not
top off or overfill the tank and wait a
few seconds after you have finished
pumping before removing the
nozzle. Clean fuel from painted
surfaces as soon as possible.
See
Exterior Care on page 10‑102.
When replacing the fuel cap, turn it
clockwise until it clicks. It will require
more effort to turn the fuel cap on
the last turn as you tighten it.
Make sure the cap is fully installed.
The diagnostic system can
determine if the fuel cap has been
left off or improperly installed. This
would allow fuel to evaporate into
the atmosphere. See Malfunction
Indicator Lamp on page 5‑24.
Page 573 of 584

Black plate (3,1)Chevrolet Silverado Owner Manual - 2012
INDEX i-3
Cargo Lamp . . . . . . . . . . . . . . . . . . . . 6-8
Cautions, Danger, andWarnings . . . . . . . . . . . . . . . . . . . . . . . . iv
CD Player . . . . . . . . . . . . . . . . . . . . . 7-16
CD/DVD Player . . . . . . . . . . . . . . . . 7-23
Center Console Storage . . . . . . . . 4-2
Center High-Mounted Stoplamp (CHMSL) and
Cargo Lamp . . . . . . . . . . . . . . . . . 10-44
Center Seat . . . . . . . . . . . . . . . . . . . . 3-5
Chains, Tire . . . . . . . . . . . . . . . . . . 10-78
Charging System Light . . . . . . . . 5-23
Check Engine Light . . . . . . . . . . . . . . . . . . 5-24
IgnitionTransmission Lock . . . . . . . . 10-38
Child Restraints Infants and YoungChildren . . . . . . . . . . . . . . . . . . . . . 3-44
Lower Anchors and Tethers for Children . . . . . . . . . 3-51
Older Children . . . . . . . . . . . . . . . . 3-42
Securing . . . . . . . . . . 3-60, 3-62, 3-63
Systems . . . . . . . . . . . . . . . . . . . . . . 3-47 Cigarette Lighter . . . . . . . . . . . . . . . 5-11
Circuit Breakers . . . . . . . . . . . . . . 10-47
Cleaning
Exterior Care . . . . . . . . . . . . . . 10-102
Interior Care . . . . . . . . . . . . . . . 10-105
Climate Control Systems . . . . . . . . . . . . . . . . . . 8-1, 8-4
Air Conditioning . . . . . . . . . . 8-1, 8-4
Dual Automatic . . . . . . . . . . . . . . . . 8-5
Heating . . . . . . . . . . . . . . . . . . . 8-1, 8-4
Clock . . . . . . . . . . . . . . . . . . . . . . . . . . . 5-8
Cluster, Instrument . . . . . . . . . . . . 5-13
Clutch, Hydraulic . . . . . . . . . . . . . 10-17
Collision Damage Repair . . . . . 13-15
Compass . . . . . . . . . . . . . . . . . . . . . . . 5-6
Connections, OnStar
®. . . . . . . . . 14-4
Control of a Vehicle . . . . . . . . . . . . . 9-4
Convex Mirrors . . . . . . . . . . . . . . . . 2-14
Coolant Engine . . . . . . . . . . . . . . . . . . . . . . 10-20
Engine TemperatureGauge . . . . . . . . . . . . . . . . . . . . . . 5-17
Cooling System . . . . . . . . . . . . . . . 10-19 Engine Messages . . . . . . . . . . . . 5-44 Courtesy Transportation
Program . . . . . . . . . . . . . . . . . . . . . 13-13
Cruise Control . . . . . . . . . . . . . . . . . 9-66 Light . . . . . . . . . . . . . . . . . . . . . . . . . . 5-31
Cupholders . . . . . . . . . . . . . . . . . . . . . 4-1
Customer Assistance . . . . . . . . . . 13-6 Offices . . . . . . . . . . . . . . . . . . 13-4, 13-5
Text Telephone (TTY)
Users . . . . . . . . . . . . . . . . . . . . . . . 13-6
Customer Information Service Publications
Ordering Information . . . . . . 13-17
Customer Satisfaction Procedure . . . . . . . . . . . . . . 13-1, 13-3D
Damage Repair, Collision . . . . . 13-15
Danger, Warnings, andCautions . . . . . . . . . . . . . . . . . . . . . . . . iv
Data Recorders, Event . . . . . . . 13-20
Daytime Running Lamps (DRL) . . . . . . . . . . . . . . . . . . 6-3
Defensive Driving . . . . . . . . . . . . . . . 9-3
Delayed Locking . . . . . . . . . . . . . . . . 2-8