2012 CHEVROLET ORLANDO wheel bolts
[x] Cancel search: wheel boltsPage 232 of 378
Black plate (44,1)Chevrolet Orlando Owner Manual - 2012
9-44 Driving and Operating
transmission. Turn the wheels
into the curb if facing downhill or
into traffic if facing uphill.
2. Have someone place chocks under the trailer wheels.
3. When the wheel chocks are in place, release the brake pedal
until the chocks absorb the load.
4. Reapply the brake pedal. Then apply the parking brake and shift
into P (Park) for vehicles with an
automatic transmission or into
gear for vehicles with a manual
transmission.
5. Release the brake pedal.
Leaving After Parking on a Hill
1. Apply and hold the brake pedal while you:
1.1. Start the engine.
1.2. Shift into a gear.
1.3. Release the parking brake.
2. Let up on the brake pedal. 3. Drive slowly until the trailer is
clear of the chocks.
4. Stop and have someone pick up and store the chocks.
Maintenance When Trailer
Towing
The vehicle needs service more
often when pulling a trailer. See this
manual's Maintenance Schedule or
Index for more information. Things
that are especially important in
trailer operation are automatic
transmission fluid, engine oil, axle
lubricant, belts, cooling system, and
brake system. It is a good idea to
inspect these before and during
the trip.
Check periodically to see that all
hitch nuts and bolts are tight.
Engine Cooling When Trailer
Towing
The cooling system may temporarily
overheat during severe operating
conditions. See Engine Overheating
on page 10‑17.
Trailer Towing
Before pulling a trailer, there are
three important considerations that
have to do with weight:
.The weight of the trailer.
.The weight of the trailer tongue.
.The total weight on your
vehicle's tires.
Weight of the Trailer
How heavy can a trailer safely be?
It should never weigh more than
454 kg (1,000 lbs). But even that
can be too heavy.
It depends on how the rig is used.
For example, speed, altitude, road
grades, outside temperature and
how much the vehicle is used to pull
a trailer are all important. It can
depend on any special equipment
on the vehicle, and the amount of
tongue weight the vehicle can carry.
See “Weight of the Trailer Tongue”
later in this section for more
information.
Page 284 of 378
Black plate (50,1)Chevrolet Orlando Owner Manual - 2012
10-50 Vehicle Care
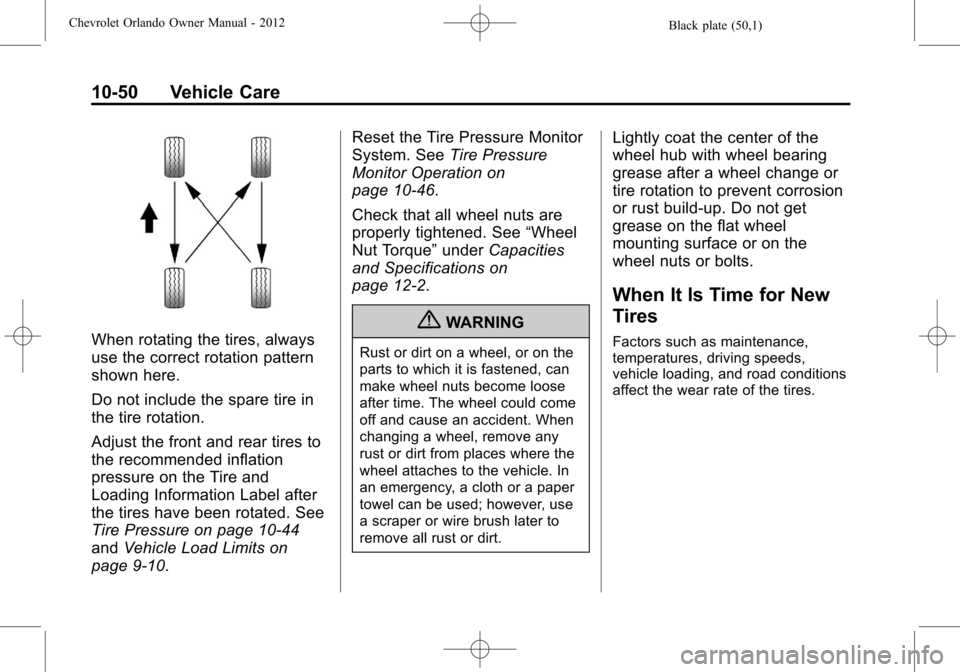
When rotating the tires, always
use the correct rotation pattern
shown here.
Do not include the spare tire in
the tire rotation.
Adjust the front and rear tires to
the recommended inflation
pressure on the Tire and
Loading Information Label after
the tires have been rotated. See
Tire Pressure on page 10‑44
andVehicle Load Limits on
page 9‑10. Reset the Tire Pressure Monitor
System. See
Tire Pressure
Monitor Operation on
page 10‑46.
Check that all wheel nuts are
properly tightened. See “Wheel
Nut Torque” underCapacities
and Specifications on
page 12‑2.
{WARNING
Rust or dirt on a wheel, or on the
parts to which it is fastened, can
make wheel nuts become loose
after time. The wheel could come
off and cause an accident. When
changing a wheel, remove any
rust or dirt from places where the
wheel attaches to the vehicle. In
an emergency, a cloth or a paper
towel can be used; however, use
a scraper or wire brush later to
remove all rust or dirt.
Lightly coat the center of the
wheel hub with wheel bearing
grease after a wheel change or
tire rotation to prevent corrosion
or rust build-up. Do not get
grease on the flat wheel
mounting surface or on the
wheel nuts or bolts.
When It Is Time for New
Tires
Factors such as maintenance,
temperatures, driving speeds,
vehicle loading, and road conditions
affect the wear rate of the tires.
Page 289 of 378
Black plate (55,1)Chevrolet Orlando Owner Manual - 2012
Vehicle Care 10-55
Wheel Alignment and Tire
Balance
The tires and wheels were aligned
and balanced at the factory to
provide the longest tire life and best
overall performance. Adjustments to
wheel alignment and tire balancing
will not be necessary on a regular
basis. However, check the
alignment if there is unusual tire
wear or if the vehicle is pulling to
one side or the other. If the vehicle
vibrates when driving on a smooth
road, the tires and wheels might
need to be rebalanced. See your
dealer for proper diagnosis.
Wheel Replacement
Replace any wheel that is bent,
cracked, or badly rusted or
corroded. If wheel nuts keep coming
loose, the wheel, wheel bolts, and
wheel nuts should be replaced.
If the wheel leaks air, replace it.Some aluminum wheels can be
repaired. See your dealer if any of
these conditions exist.
Your dealer will know the kind of
wheel that is needed.
Each new wheel should have the
same load-carrying capacity,
diameter, width, offset, and be
mounted the same way as the one it
replaces.
Replace wheels, wheel bolts, wheel
nuts, or Tire Pressure Monitor
System (TPMS) sensors with new
GM original equipment parts.
{WARNING
Using the wrong replacement
wheels, wheel bolts, or wheel
nuts can be dangerous. It could
affect the braking and handling of
the vehicle. Tires can lose air,
and cause loss of control, causing
a crash. Always use the correct
wheel, wheel bolts, and wheel
nuts for replacement.Notice:
The wrong wheel can
also cause problems with bearing
life, brake cooling, speedometer
or odometer calibration,
headlamp aim, bumper height,
vehicle ground clearance, and tire
or tire chain clearance to the
body and chassis.
See If a Tire Goes Flat on
page 10‑56 for more information.
Used Replacement Wheels
{WARNING
Replacing a wheel with a used
one is dangerous. How it has
been used or how far it has been
driven may be unknown. It could
fail suddenly and cause a crash.
When replacing wheels, use a
new GM original equipment
wheel.
Page 302 of 378
Black plate (68,1)Chevrolet Orlando Owner Manual - 2012
10-68 Vehicle Care
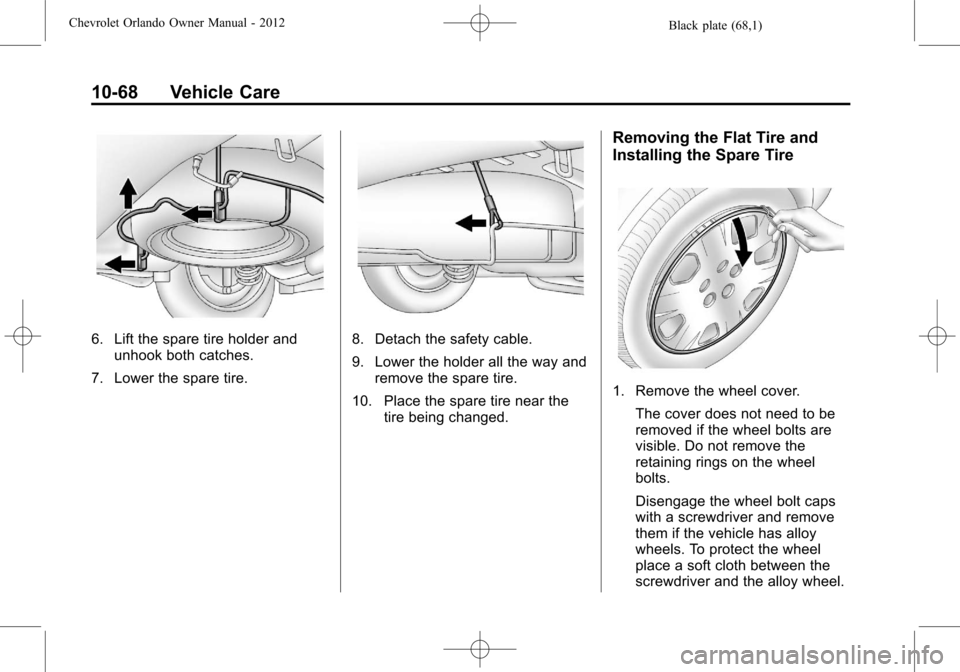
6. Lift the spare tire holder andunhook both catches.
7. Lower the spare tire.8. Detach the safety cable.
9. Lower the holder all the way and remove the spare tire.
10. Place the spare tire near the tire being changed.
Removing the Flat Tire and
Installing the Spare Tire
1. Remove the wheel cover.
The cover does not need to be
removed if the wheel bolts are
visible. Do not remove the
retaining rings on the wheel
bolts.
Disengage the wheel bolt caps
with a screwdriver and remove
them if the vehicle has alloy
wheels. To protect the wheel
place a soft cloth between the
screwdriver and the alloy wheel.
Page 305 of 378
Black plate (71,1)Chevrolet Orlando Owner Manual - 2012
Vehicle Care 10-71
WARNING (Continued)
an emergency, a cloth or a paper
towel can be used; however, use
a scraper or wire brush later to
remove all rust or dirt.
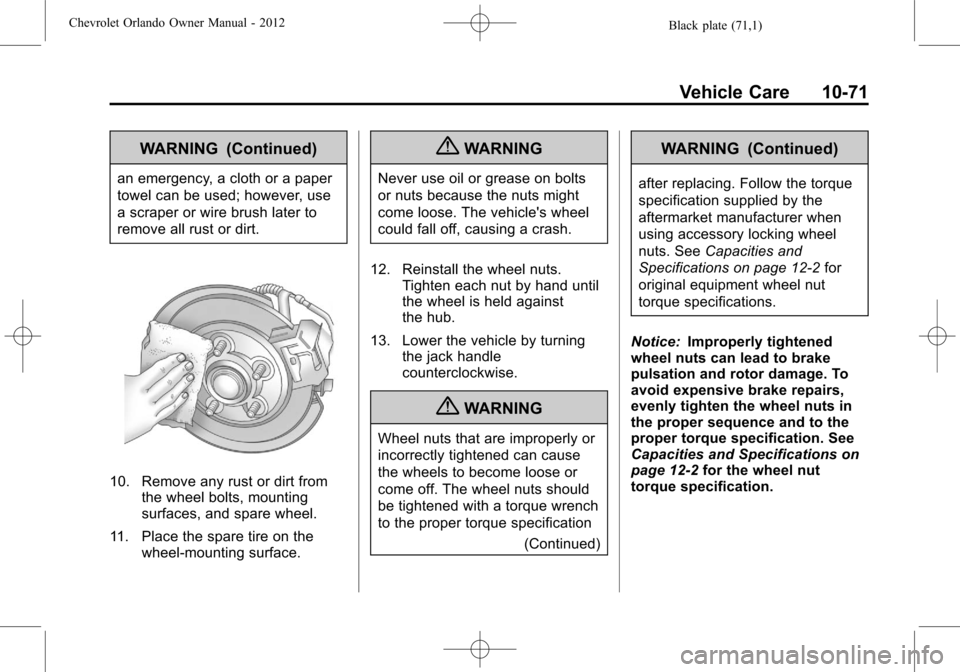
10. Remove any rust or dirt fromthe wheel bolts, mounting
surfaces, and spare wheel.
11. Place the spare tire on the wheel-mounting surface.
{WARNING
Never use oil or grease on bolts
or nuts because the nuts might
come loose. The vehicle's wheel
could fall off, causing a crash.
12. Reinstall the wheel nuts. Tighten each nut by hand until
the wheel is held against
the hub.
13. Lower the vehicle by turning the jack handle
counterclockwise.
{WARNING
Wheel nuts that are improperly or
incorrectly tightened can cause
the wheels to become loose or
come off. The wheel nuts should
be tightened with a torque wrench
to the proper torque specification
(Continued)
WARNING (Continued)
after replacing. Follow the torque
specification supplied by the
aftermarket manufacturer when
using accessory locking wheel
nuts. SeeCapacities and
Specifications on page 12‑2 for
original equipment wheel nut
torque specifications.
Notice: Improperly tightened
wheel nuts can lead to brake
pulsation and rotor damage. To
avoid expensive brake repairs,
evenly tighten the wheel nuts in
the proper sequence and to the
proper torque specification. See
Capacities and Specifications on
page 12‑2 for the wheel nut
torque specification.
Page 306 of 378
Black plate (72,1)Chevrolet Orlando Owner Manual - 2012
10-72 Vehicle Care
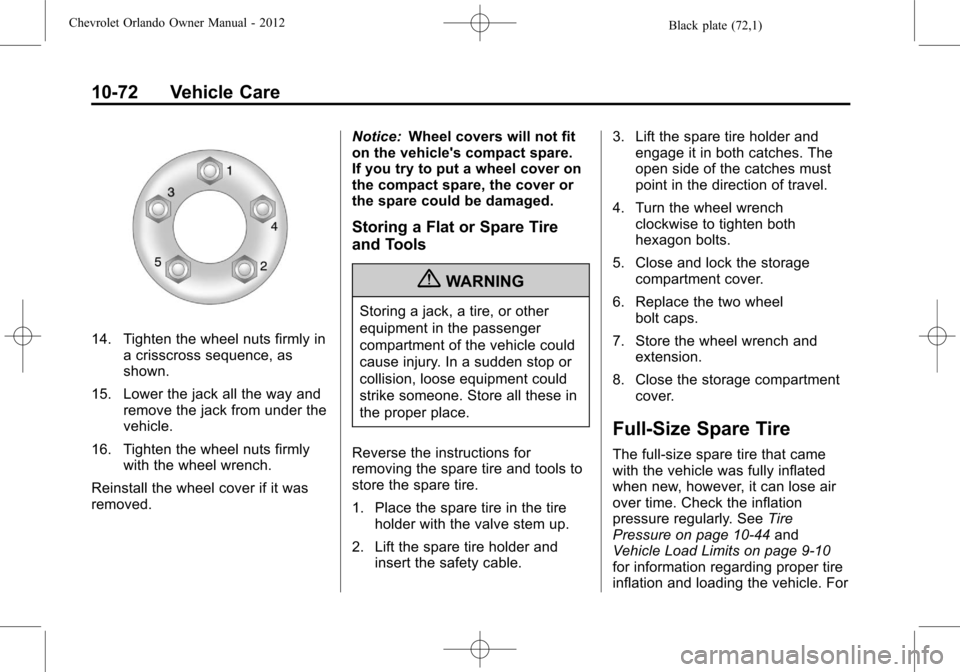
14. Tighten the wheel nuts firmly ina crisscross sequence, as
shown.
15. Lower the jack all the way and remove the jack from under the
vehicle.
16. Tighten the wheel nuts firmly with the wheel wrench.
Reinstall the wheel cover if it was
removed. Notice:
Wheel covers will not fit
on the vehicle's compact spare.
If you try to put a wheel cover on
the compact spare, the cover or
the spare could be damaged.
Storing a Flat or Spare Tire
and Tools
{WARNING
Storing a jack, a tire, or other
equipment in the passenger
compartment of the vehicle could
cause injury. In a sudden stop or
collision, loose equipment could
strike someone. Store all these in
the proper place.
Reverse the instructions for
removing the spare tire and tools to
store the spare tire.
1. Place the spare tire in the tire holder with the valve stem up.
2. Lift the spare tire holder and insert the safety cable. 3. Lift the spare tire holder and
engage it in both catches. The
open side of the catches must
point in the direction of travel.
4. Turn the wheel wrench clockwise to tighten both
hexagon bolts.
5. Close and lock the storage compartment cover.
6. Replace the two wheel bolt caps.
7. Store the wheel wrench and extension.
8. Close the storage compartment cover.
Full-Size Spare Tire
The full-size spare tire that came
with the vehicle was fully inflated
when new, however, it can lose air
over time. Check the inflation
pressure regularly. See Tire
Pressure on page 10‑44 and
Vehicle Load Limits on page 9‑10
for information regarding proper tire
inflation and loading the vehicle. For