2012 CHEVROLET ORLANDO brake
[x] Cancel search: brakePage 256 of 378
Black plate (22,1)Chevrolet Orlando Owner Manual - 2012
10-22 Vehicle Care
Vehicle Storage
{WARNING
Batteries have acid that can burn
you and gas that can explode.
You can be badly hurt if you are
not careful. SeeJump Starting on
page 10‑73 for tips on working
around a battery without
getting hurt.
Infrequent Usage: Remove the
black, negative (−) cable from the
battery to keep the battery from
running down.
Extended Storage: Remove the
black, negative (−) cable from the
battery or use a battery trickle
charger.
Starter Switch Check
{WARNING
When you are doing this
inspection, the vehicle could
move suddenly. If the vehicle
moves, you or others could be
injured.
1. Before starting this check, be sure there is enough room
around the vehicle.
2. Firmly apply both the parking brake and the regular brake.
See Parking Brake on
page 9‑28.
Do not use the accelerator
pedal, and be ready to turn off
the engine immediately if it
starts. 3. For automatic transmission
vehicles, try to start the engine
in each gear. The vehicle
should start only in P (Park) or
N (Neutral). If the vehicle starts
in any other position, contact
your dealer for service.
For manual transmission
vehicles, put the shift lever in
Neutral, push the clutch pedal
down halfway, and try to start
the engine. The vehicle should
start only when the clutch pedal
is pushed down all the way to
the floor. If the vehicle starts
when the clutch pedal is not
pushed all the way down,
contact your dealer for service.
Page 257 of 378
Black plate (23,1)Chevrolet Orlando Owner Manual - 2012
Vehicle Care 10-23
Automatic Transmission
Shift Lock Control
Function Check
{WARNING
When you are doing this
inspection, the vehicle could
move suddenly. If the vehicle
moves, you or others could be
injured.
1. Before starting this check, be sure there is enough room
around the vehicle. It should be
parked on a level surface.
2. Firmly apply the parking brake. See Parking Brake on
page 9‑28.
Be ready to apply the regular
brake immediately if the vehicle
begins to move. 3. With the engine off, turn the
ignition on, but do not start the
engine. Without applying the
regular brake, try to move the
shift lever out of P (Park) with
normal effort. If the shift lever
moves out of P (Park), contact
your dealer for service.
Ignition Transmission
Lock Check
While parked, and with the parking
brake set, try to turn the ignition to
LOCK/OFF in each shift lever
position.
.For automatic transmission
vehicles, the ignition should turn
to LOCK/OFF only when the
shift lever is in P (Park). The
ignition key should come out
only in LOCK/OFF.
.For manual transmission
vehicles, the ignition key should
come out only in LOCK/OFF.
Contact your dealer if service is
required.
Park Brake and P (Park)
Mechanism Check
{WARNING
When you are doing this check,
the vehicle could begin to move.
You or others could be injured
and property could be damaged.
Make sure there is room in front
of the vehicle in case it begins to
roll. Be ready to apply the regular
brake at once should the vehicle
begin to move.
Park on a fairly steep hill, with the
vehicle facing downhill. Keeping
your foot on the regular brake, set
the parking brake.
.To check the parking brake's
holding ability: With the engine
running and the transmission in
N (Neutral), slowly remove foot
pressure from the regular brake
pedal. Do this until the vehicle is
held by the parking brake only.
Page 258 of 378
Black plate (24,1)Chevrolet Orlando Owner Manual - 2012
10-24 Vehicle Care
.To check the P (Park)
mechanism's holding
ability: With the engine running,
shift to P (Park). Then release
the parking brake followed by
the regular brake.
Contact your dealer if service is
required.
Wiper Blade Replacement
Front Wiper Blade
Replacement
Windshield wiper blades should be
inspected for wear or cracking. See
Maintenance Schedule on
page 11‑3 for more information.
Replacement blades come in
different types and are removed in
different ways. For proper
windshield wiper blade length and
type, see Maintenance
Replacement Parts on page 11‑15.
Notice: Allowing the wiper arm to
touch the windshield when no
wiper blade is installed could
damage the windshield. Any damage that occurs would not be
covered by your warranty. Do not
allow the wiper arm to touch the
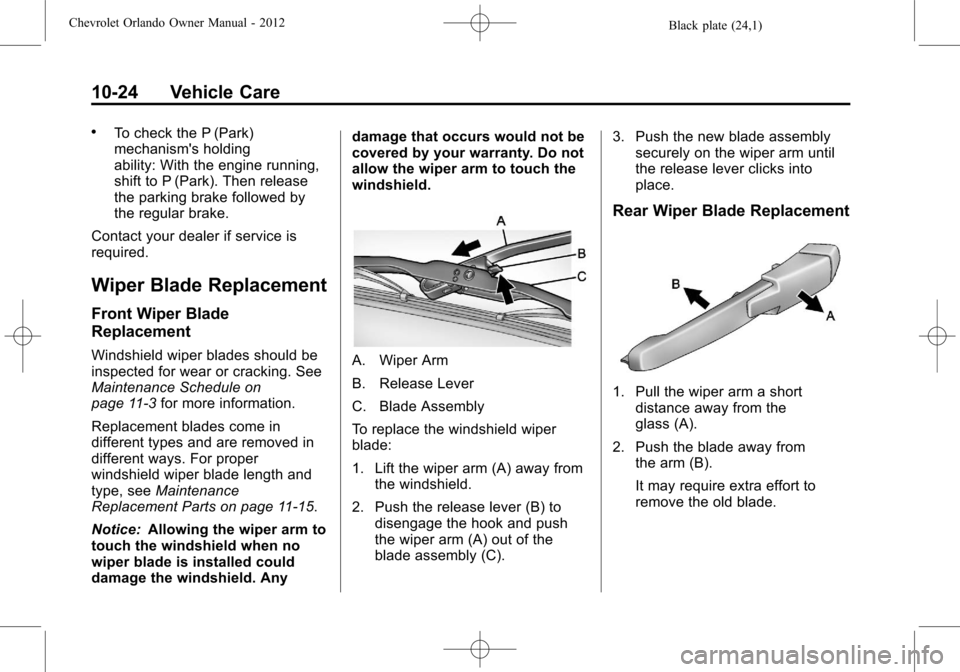
windshield.A. Wiper Arm
B. Release Lever
C. Blade Assembly
To replace the windshield wiper
blade:
1. Lift the wiper arm (A) away from
the windshield.
2. Push the release lever (B) to disengage the hook and push
the wiper arm (A) out of the
blade assembly (C). 3. Push the new blade assembly
securely on the wiper arm until
the release lever clicks into
place.
Rear Wiper Blade Replacement
1. Pull the wiper arm a short
distance away from the
glass (A).
2. Push the blade away from the arm (B).
It may require extra effort to
remove the old blade.
Page 267 of 378
Black plate (33,1)Chevrolet Orlando Owner Manual - 2012
Vehicle Care 10-33
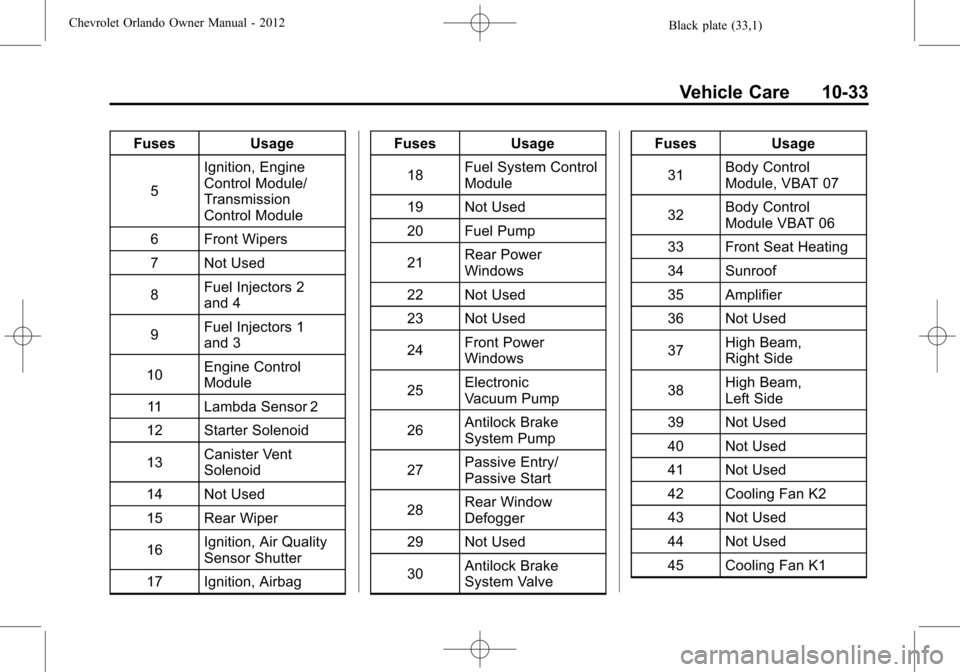
FusesUsage
5 Ignition, Engine
Control Module/
Transmission
Control Module
6 Front Wipers
7 Not Used
8 Fuel Injectors 2
and 4
9 Fuel Injectors 1
and 3
10 Engine Control
Module
11 Lambda Sensor 2
12 Starter Solenoid
13 Canister Vent
Solenoid
14 Not Used
15 Rear Wiper
16 Ignition, Air Quality
Sensor Shutter
17 Ignition, Airbag Fuses
Usage
18 Fuel System Control
Module
19 Not Used
20 Fuel Pump
21 Rear Power
Windows
22 Not Used
23 Not Used
24 Front Power
Windows
25 Electronic
Vacuum Pump
26 Antilock Brake
System Pump
27 Passive Entry/
Passive Start
28 Rear Window
Defogger
29 Not Used
30 Antilock Brake
System Valve Fuses
Usage
31 Body Control
Module, VBAT 07
32 Body Control
Module VBAT 06
33 Front Seat Heating
34 Sunroof
35 Amplifier
36 Not Used
37 High Beam,
Right Side
38 High Beam,
Left Side
39 Not Used
40 Not Used
41 Not Used
42 Cooling Fan K2
43 Not Used
44 Not Used
45 Cooling Fan K1
Page 275 of 378

Black plate (41,1)Chevrolet Orlando Owner Manual - 2012
Vehicle Care 10-41
is certified to carry. The speed
rating is the maximum speed a
tire is certified to carry a load.
Tire Terminology and
Definitions
Air Pressure:The amount of
air inside the tire pressing
outward on each square inch
of the tire. Air pressure is
expressed in kPa (kilopascal)
or psi (pounds per square inch).
Accessory Weight
:The
combined weight of optional
accessories. Some examples of
optional accessories are
automatic transmission, power
steering, power brakes, power
windows, power seats, and air
conditioning.
Aspect Ratio
:The relationship
of a tire's height to its width. Belt
:A rubber coated layer of
cords that is located between
the plies and the tread. Cords
may be made from steel or other
reinforcing materials.
Bead
:The tire bead contains
steel wires wrapped by steel
cords that hold the tire onto
the rim.
Bias Ply Tire
:A pneumatic tire
in which the plies are laid at
alternate angles less than
90 degrees to the centerline of
the tread.
Cold Tire Pressure
:The
amount of air pressure in a tire,
measured in kPa (kilopascal)
or psi (pounds per square inch)
before a tire has built up heat
from driving. See Tire Pressure
on page 10‑44.
Curb Weight
:The weight of a
motor vehicle with standard and
optional equipment including the maximum capacity of fuel, oil,
and coolant, but without
passengers and cargo.
DOT Markings
:A code molded
into the sidewall of a tire
signifying that the tire is in
compliance with the U.S.
Department of Transportation
(DOT) Motor Vehicle Safety
Standards. The DOT code
includes the Tire Identification
Number (TIN), an alphanumeric
designator which can also
identify the tire manufacturer,
production plant, brand, and
date of production.
GVWR
:Gross Vehicle Weight
Rating. See Vehicle Load Limits
on page 9‑10.
GAWR FRT
:Gross Axle Weight
Rating for the front axle. See
Vehicle Load Limits on
page 9‑10.
Page 282 of 378
Black plate (48,1)Chevrolet Orlando Owner Manual - 2012
10-48 Vehicle Care
.Replacement tires or wheels do
not match the original equipment
tires or wheels. Tires and wheels
other than those recommended
could prevent the TPMS from
functioning properly. SeeBuying
New Tires on page 10‑51.
.Operating electronic devices or
being near facilities using radio
wave frequencies similar to the
TPMS could cause the TPMS
sensors to malfunction.
If the TPMS is not functioning
properly, it cannot detect or signal a
low tire condition. See your dealer
for service if the TPMS malfunction
light and DIC message come on
and stay on.
TPMS Sensor Matching
Process
Each TPMS sensor has a unique
identification code. The identification
code needs to be matched to a new
tire/wheel position after rotating the
tires or replacing one or more of the TPMS sensors. The TPMS sensor
matching process should also be
performed after replacing a spare
tire with a road tire containing the
TPMS sensor. The malfunction light
and the DIC message should go off
at the next ignition cycle. The
sensors are matched to the tire/
wheel positions, using a TPMS
relearn tool, in the following order:
driver side front tire, passenger side
front tire, passenger side rear tire,
and driver side rear. See your
dealer for service or to purchase a
relearn tool.
There are two minutes to match
the first tire/wheel position, and
five minutes overall to match all
four tire/wheel positions. If it takes
longer, the matching process stops
and must be restarted.
The TPMS sensor matching
process is:
1. Set the parking brake.
2. Turn the ignition to ON/RUN with
the engine off. 3. Use the MENU button to select
the Vehicle Information menu in
the Driver Information
Center (DIC).
4. Use the thumbwheel to scroll to the Tire Pressure Menu item
screen.
5. Press the SET/CLR button to begin the sensor matching
process.
A message requesting
acceptance of the process
should display.
6. Press the SET/CLR button again to confirm the selection.
The horn sounds twice to signal
the receiver is in relearn mode
and the TIRE LEARNING
ACTIVE message displays on
the DIC screen.
7. Start with the driver side front tire.
8. Place the relearn tool against the tire sidewall, near the valve
stem. Then press the button to
activate the TPMS sensor.
Page 285 of 378
Black plate (51,1)Chevrolet Orlando Owner Manual - 2012
Vehicle Care 10-51
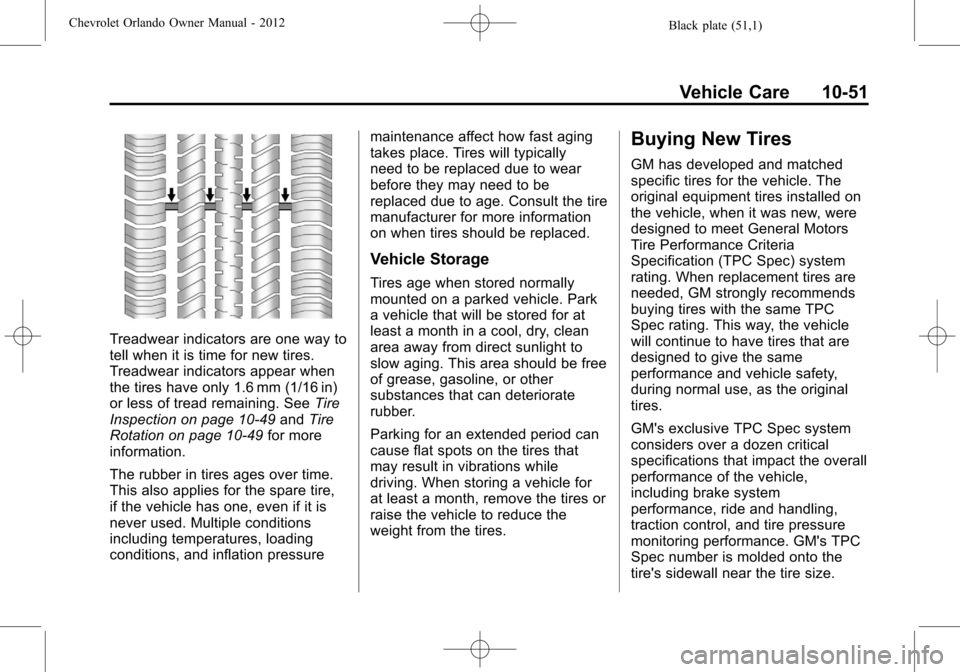
Treadwear indicators are one way to
tell when it is time for new tires.
Treadwear indicators appear when
the tires have only 1.6 mm (1/16 in)
or less of tread remaining. SeeTire
Inspection on page 10‑49 andTire
Rotation on page 10‑49 for more
information.
The rubber in tires ages over time.
This also applies for the spare tire,
if the vehicle has one, even if it is
never used. Multiple conditions
including temperatures, loading
conditions, and inflation pressure maintenance affect how fast aging
takes place. Tires will typically
need to be replaced due to wear
before they may need to be
replaced due to age. Consult the tire
manufacturer for more information
on when tires should be replaced.
Vehicle Storage
Tires age when stored normally
mounted on a parked vehicle. Park
a vehicle that will be stored for at
least a month in a cool, dry, clean
area away from direct sunlight to
slow aging. This area should be free
of grease, gasoline, or other
substances that can deteriorate
rubber.
Parking for an extended period can
cause flat spots on the tires that
may result in vibrations while
driving. When storing a vehicle for
at least a month, remove the tires or
raise the vehicle to reduce the
weight from the tires.
Buying New Tires
GM has developed and matched
specific tires for the vehicle. The
original equipment tires installed on
the vehicle, when it was new, were
designed to meet General Motors
Tire Performance Criteria
Specification (TPC Spec) system
rating. When replacement tires are
needed, GM strongly recommends
buying tires with the same TPC
Spec rating. This way, the vehicle
will continue to have tires that are
designed to give the same
performance and vehicle safety,
during normal use, as the original
tires.
GM's exclusive TPC Spec system
considers over a dozen critical
specifications that impact the overall
performance of the vehicle,
including brake system
performance, ride and handling,
traction control, and tire pressure
monitoring performance. GM's TPC
Spec number is molded onto the
tire's sidewall near the tire size.
Page 287 of 378
Black plate (53,1)Chevrolet Orlando Owner Manual - 2012
Vehicle Care 10-53
brakes, rollover airbags, traction
control, and electronic stability
control, the performance of these
systems can also be affected.
{WARNING
If different sized wheels are used,
there may not be an acceptable
level of performance and safety if
tires not recommended for those
wheels are selected. This
increases the chance of a crash
and serious injury. Only use GM
specific wheel and tire systems
developed for the vehicle, and
have them properly installed by a
GM certified technician.
See Buying New Tires on
page 10‑51 andAccessories and
Modifications on page 10‑2 for
additional information.
Uniform Tire Quality
Grading
Quality grades can be found
where applicable on the tire
sidewall between tread shoulder
and maximum section width. For
example:
Treadwear 200 Traction AA
Temperature A
The following information relates
to the system developed by the
United States National Highway
Traffic Safety Administration
(NHTSA), which grades tires
by treadwear, traction, and
temperature performance. This
applies only to vehicles sold in
the United States. The grades
are molded on the sidewalls of
most passenger car tires. The
Uniform Tire Quality Grading (UTQG) system does not apply
to deep tread, winter-type snow
tires, space-saver, or temporary
use spare tires, tires with
nominal rim diameters of
10 to 12 inches (25 to 30 cm),
or to some limited-production
tires.
While the tires available on
General Motors passenger cars
and light trucks may vary with
respect to these grades, they
must also conform to federal
safety requirements and
additional General Motors Tire
Performance Criteria (TPC)
standards.
All Passenger Car Tires Must
Conform to Federal Safety
Requirements In Addition To
These Grades.