2012 CHEVROLET ORLANDO remote start
[x] Cancel search: remote startPage 34 of 378

Black plate (6,1)Chevrolet Orlando Owner Manual - 2012
2-6 Keys, Doors, and Windows
The engine will continue to run for
10 minutes. Repeat the steps for a
10-minute time extension. Remote
start can be extended only once.
Start the vehicle before driving.
Extending Engine Run Time
For a 10-minute extension, repeat
Steps 1–3 while the engine is still
running. The remote start can be
extended once.
When the remote start is extended,
the second 10 minutes will start
immediately.
For example, if the engine has been
running for five minutes, and
10 minutes are added, the engine
will run for a total of 15 minutes.
A maximum of two remote starts,
or a single start with an extension,
is allowed between ignition cycles.
The vehicle's ignition must be
turned on and then back off before
the remote start procedure can be
used again.Canceling a Remote Start
To cancel a remote start, do one of
the following:
.Aim the RKE transmitter at the
vehicle and press and hold
/
until the parking lamps turn off.
.Turn on the hazard warning
flashers.
.Turn the vehicle on and then off.
Conditions in Which Remote Start
Will Not Work
The remote vehicle start feature will
not operate if:
.The key is in the ignition (key
access) or if the key is in the
vehicle (keyless access).
.The hood is not closed.
.The hazard warning flashers
are on.
.The malfunction indicator lamp
is on.
.The engine coolant temperature
is too high.
.The oil pressure is low.
.Two remote vehicle starts, or a
single remote start with an
extension, have already
been used.
.The vehicle is not in P (Park).
Door Locks
{WARNING
Unlocked doors can be
dangerous.
.Passengers, especially
children, can easily open the
doors and fall out of a moving
vehicle. The chance of being
thrown out of the vehicle in a
crash is increased if the
doors are not locked. So, all
passengers should wear
safety belts properly and the
doors should be locked
whenever the vehicle is
driven. (Continued)
Page 54 of 378

Black plate (8,1)Chevrolet Orlando Owner Manual - 2012
3-8 Seats and Restraints
The passenger seat may take
longer to heat up.
Remote Start Heated Seats
When it is cold outside, the heated
seats can be programmed to turn
on automatically during a remote
vehicle start. The heated seats will
be canceled when the ignition is
turned on. Press the heated seat
button to use the heated seats after
the vehicle is started.
The heated seat button lights will
not turn on during a remote start.
The temperature of an unoccupied
seat may be reduced.
To program the heated seat feature
to enabled, seeVehicle
Personalization on page 5‑32 for
more information.
Rear Seats
Second Row Seats
Adjusting the Seatbacks
{WARNING
If either seatback is not locked, it
could move forward in a sudden
stop or crash. That could cause
injury to the person sitting there.
Always push and pull on the
seatbacks to be sure they are
locked.
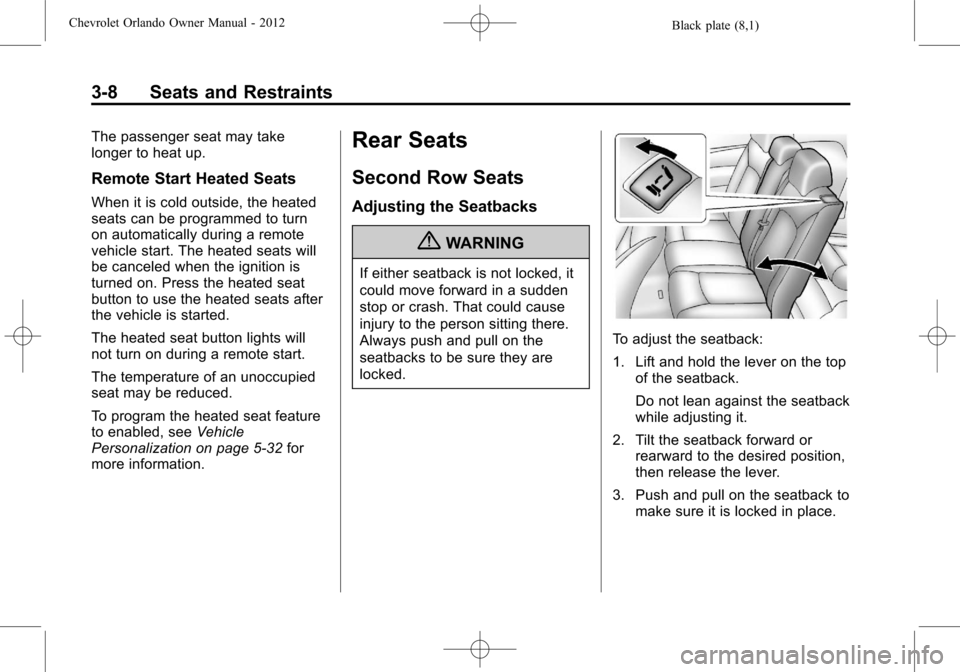
To adjust the seatback:
1. Lift and hold the lever on the top of the seatback.
Do not lean against the seatback
while adjusting it.
2. Tilt the seatback forward or rearward to the desired position,
then release the lever.
3. Push and pull on the seatback to make sure it is locked in place.
Page 130 of 378

Black plate (26,1)Chevrolet Orlando Owner Manual - 2012
5-26 Instruments and Controls
Vehicle Messages
Vehicle Messages (Base
Level)
DIC messages display when the
status of the vehicle has changed
and action may be needed to
correct the condition. Multiple
messages appear one after another.
Press any of the DIC buttons on the
turn signal lever to acknowledge
and clear them from the display.
More urgent messages cannot be
cleared from the DIC display. All
messages should be taken
seriously. Clearing messages will
not correct the problem.
On the base level cluster, vehicle
messages appear as code numbers.
25:Left front turn indicator failure
26: Left rear turn indicator failure
27: Right front turn indicator failure
28: Right rear turn indicator failure 35:
Replace battery in radio remote
control
75: Service air conditioner
79: Engine oil low —Add oil
81: Service transmission
82: Change engine oil soon
84: Engine power is reduced
95: Service airbag
134: Park assist fault —Clean
bumper
136: Service parking assist
Vehicle Messages
(Uplevel)
DIC messages display when the
status of the vehicle has changed
and action may be needed to
correct the condition. Multiple
messages appear one after another.
Press any of the DIC buttons on the
turn signal lever to acknowledge
and clear them from the display. More urgent messages cannot
be cleared from the DIC display.
All messages should be taken
seriously. Clearing messages will
not correct the problem.
On the uplevel cluster, vehicle
messages are displayed as text.
The messages and information
about them follow.
Battery Voltage and
Charging Messages
BATTERY SAVER ACTIVE
This message displays when the
vehicle has detected that the battery
voltage is dropping beyond a
reasonable point. The battery saver
system starts reducing certain
features of the vehicle that you may
be able to notice. At the point that
features are disabled, this message
is displayed. It means that the
vehicle is trying to save the charge
in the battery. Turn off unnecessary
accessories to allow the battery to
recharge.
Page 136 of 378

Black plate (32,1)Chevrolet Orlando Owner Manual - 2012
5-32 Instruments and Controls
Vehicle
Personalization
The audio system controls are used
to access the personalization
menus for customizing vehicle
features.
CONFIG (Configuration):Press to
access the Configuration
Settings menu.
MENU: Press the center of this
knob to enter the menus and select
menu items. Turn the knob to scroll
through the menus.
BACK: Press to exit or move
backward in a menu.
Entering the Personalization
Menus
1. Press CONFIG to access the
Configuration Settings menu.
2. Turn the MENU knob to highlight Vehicle Settings. Press the
CONFIG button until Vehicle is
highlighted on vehicles with a
navigation system only. 3. Press the center of the MENU
knob to select the Vehicle
Settings menu. The vehicle must
be in the run position.
The following list of menu items may
be available:
.Climate and Air Quality
.Comfort and Convenience
.Collision/Detection Systems
.Languages
.Lighting
.Power Door Locks
.Remote Locking, Unlocking,
Starting
.Return to Factory Settings
Turn the MENU knob to highlight the
menu. Press the knob to select it.
Each of the menus is detailed in the
following information.
Vehicles with a navigation system
will display a checkmark to indicate
this feature is on.
Climate and Air Quality
If equipped, select the Climate and
Air Quality menu and the following
will be displayed:
.Auto Fan Speed
.Air Quality Sensor
.Remote Start Auto Heat Seats
.Auto Defog
.Auto Rear Defog
Auto Fan Speed
This will allow you to select the
automatic fan speed. This feature
sets the climate control fan speed to
maintain the interior temperature.
Press the MENU knob when Auto
Fan Speed is highlighted to open
the menu. Turn the knob to highlight
High, Medium, or Low. Press the
BACK button to confirm the
selection and move back to the
last menu.
Page 137 of 378

Black plate (33,1)Chevrolet Orlando Owner Manual - 2012
Instruments and Controls 5-33
Air Quality Sensor
This will allow you to select whether
the system will operate at high or
low sensitivity. Only vehicles with
the automatic climate control will
have this option.
Press the MENU knob when Air
Quality Sensor is highlighted to
open the menu. Turn the knob to
highlight High Sensitivity or Low
Sensitivity. Press the BACK button
to confirm the selection and move
back to the last menu.
Remote Start Auto Heat Seats
On vehicles with remote start and
heated seats, the heated seats can
be set to on or off.
Press the MENU knob when
Remote Start Auto Heat Seats is
highlighted to open the menu. Turn
the knob to highlight On or Off.
Press the BACK button to confirm
the selection and move back to the
last menu.Auto Defog
When turned on and high humidity
is detected, the climate control
system may adjust to outside
air supply and turn on the air
conditioner or the heater. The fan
speed may slightly increase to
help prevent fogging. When high
humidity is no longer detected, the
system will return to its prior
operation.
Press the MENU knob when Auto
Defog is highlighted to open the
menu. Turn the knob to highlight On
or Off. Press the BACK button to
confirm the selection and move
back to the last menu.
Auto Rear Defog
When on, this feature turns on the
rear defogger at vehicle start when
the interior temperature is cold and
fog is likely. The Auto Rear Defog
function can be disabled by
pressing
1. When off, the feature
can be turned on by pressing
1. See
“Rear Window Defogger” under
Climate Control Systems on
page 8‑1 for more information.
Press the MENU knob when Auto
Rear Defog is highlighted to open
the menu. Turn the knob to highlight
On or Off. Press the knob to confirm
the selection and move back to the
last menu.
Comfort and Convenience
Select the Comfort and
Convenience menu and Chime
Volume will be displayed.
Chime Volume
This allows selection of the chime
volume level.
Press the MENU knob when Chime
Volume is highlighted. Turn the knob
to select Normal or High. Press the
BACK button to confirm and go
back to the last menu.
Collision/Detection Systems
If equipped, select the Collision/
Detection Systems menu and Park
Assist will be displayed.
Page 139 of 378

Black plate (35,1)Chevrolet Orlando Owner Manual - 2012
Instruments and Controls 5-35
Press either the power lock button
or
Qon the RKE transmitter twice to
override the delayed locking feature
and immediately lock all of the
doors.
Press the MENU knob when
Delayed Door Lock is highlighted to
select On or Off. Press BACK to
return to the last menu.
Unlocked Door Anti Lock Out
When on, all doors will lock. The
driver door will then unlock if door
locking is requested while the driver
door is open and disable the
Delayed Door Lock feature.
If Off is selected, the Delayed Door
Lock feature may be enabled
through an additional menu
selection.
Press the MENU knob when
Unlocked Door Anti Lock Out is
highlighted to select On or Off.
Press BACK to return to the
last menu. Auto Door Lock
This allows selection of which of the
doors will automatically lock when
the vehicle is shifted into P (Park).
Press the MENU knob when Auto
Door Lock is highlighted. Turn the
knob to select On or Off. Press the
knob to confirm and go back to the
last menu.
Remote Locking, Unlocking,
Starting
Select Remote Locking, Unlocking,
Starting and the following will be
displayed (depending on the
system):
.Remote Lock Feedback
.Door Unlock or Remote Door
Unlock
.Remote Unlock Light Feedback
.Remote Start
Remote Lock Feedback
This allows selection of what type of
feedback is given when locking the
vehicle with the RKE transmitter.
Press the MENU knob when
Remote Lock Feedback is
highlighted. Turn the knob to select
Lights and Horn, Lights Only, Horn
Only, or Off. Press the knob to
confirm and go back to the
last menu.
Door Unlock or Remote Door
Unlock
This allows selection of which doors
will unlock when pressing
Kon the
RKE transmitter.
Press the MENU knob when Door
Unlock is highlighted. Turn the knob
to select All Doors or Driver Door
Only. When set to Driver Door Only,
the driver door will unlock the first
time
Kis pressed and all doors will
unlock when the button is pressed a
second time. When set to All Doors,
all of the doors will unlock at the first
Page 140 of 378

Black plate (36,1)Chevrolet Orlando Owner Manual - 2012
5-36 Instruments and Controls
press ofK. Press the knob to
confirm and go back to the
last menu.
Remote Unlock Light Feedback
If equipped, this allows selection of
what type of feedback is given when
unlocking the vehicle with the RKE
transmitter.
Press the MENU knob when
Remote Unlock Light Feedback is
highlighted. Turn the knob to select
On or Off. Press the knob to confirm
and go back to the last menu. Remote Start
If equipped, this allows Remote
Start to be turned on or off.
Press the MENU knob when
Remote Start is highlighted. Turn
the knob to select On or Off. Press
the knob to confirm and go back to
the last menu.
Return to Factory Settings
Select Return to Factory Settings to
return all vehicle personalization to
the default settings. Turn the knob
to select Yes or No. Press the knob
to confirm and go back to the
last menu.
Page 187 of 378

Black plate (5,1)Chevrolet Orlando Owner Manual - 2012
Climate Controls 8-5
on, see“Climate and Air Quality”
under Vehicle Personalization on
page 5‑32.
Rear Window Defogger
=(Rear Window Defogger):
Press to turn the rear window
defogger on or off.
The rear window defogger turns off
automatically after about
10 minutes. If turned on again it
runs for about five minutes before
turning off.
The rear window defogger can be
set to automatic operation; see
“Climate and Air Quality” under
Vehicle Personalization on
page 5‑32. When auto rear defog is
selected, the rear window defogger
turns on automatically when the
interior temperature is cold and the
outside temperature is about 4°C
(40°F) and below. The auto rear
defogger turns off automatically
after about 10 minutes. At higher
speeds, the rear window defogger
may stay on continuously. For vehicles with heated outside
rearview mirrors, they turn on when
the rear window defogger button is
on and help to clear fog or frost from
the surface of the mirrors. See
Heated Mirrors on page 2‑12.
Notice:
Do not try to clear frost
or other material from the inside
of the front windshield and rear
window with a razor blade or
anything else that is sharp. This
may damage the rear window
defogger grid and affect your
radio's ability to pick up stations
clearly. The repairs would not be
covered by your warranty.
Heated Seats (If Equipped): Press
to turn the heated seats on or off.
See Heated Front Seats on
page 3‑7.
Remote Start Climate Control
Operation: For vehicles with the
remote vehicle start feature, the
climate control system may run
when the vehicle is started remotely. The system will default to a heating
or cooling mode depending on the
outside temperature and then go
back to the previous settings. See
Remote Vehicle Start on page 2‑5.
The rear window defogger turns on
if it is cold outside.
Sensors
The solar sensor, located on top of
the instrument panel near the
windshield, monitors the solar heat.
The climate control system uses the
sensor information to adjust the
temperature, fan speed,
recirculation, and air delivery mode
for best comfort.
If the sensor is covered, the
automatic climate control system
may not work properly.