2012 CHEVROLET MALIBU stop start
[x] Cancel search: stop startPage 277 of 398

Black plate (37,1)Chevrolet Malibu Owner Manual - 2012
Vehicle Care 10-37
FusesUsage
54 Regulated Voltage
Control
55 DC/AC Inverter
56 Antilock Brake
System BATT
Relays Usage
28 Cooling Fan 1
29 Cooling Fan
Series/Parallel
30 Cooling Fan 2
31 Starter
32 Run/Crank, Ignition
33 Powertrain
34 Air Conditioning
Clutch
35 High Beam Relays
Usage
36 Front Fog Lamps
37 Horn
38 Low-Beam Headlamp
39 Windshield Wiper 1
40 Windshield Wiper 2
48 Daytime Running
Lamps
49 Stoplamps
53 AIR Solenoid
Diodes Usage 27 WiperInstrument Panel Fuse
Block
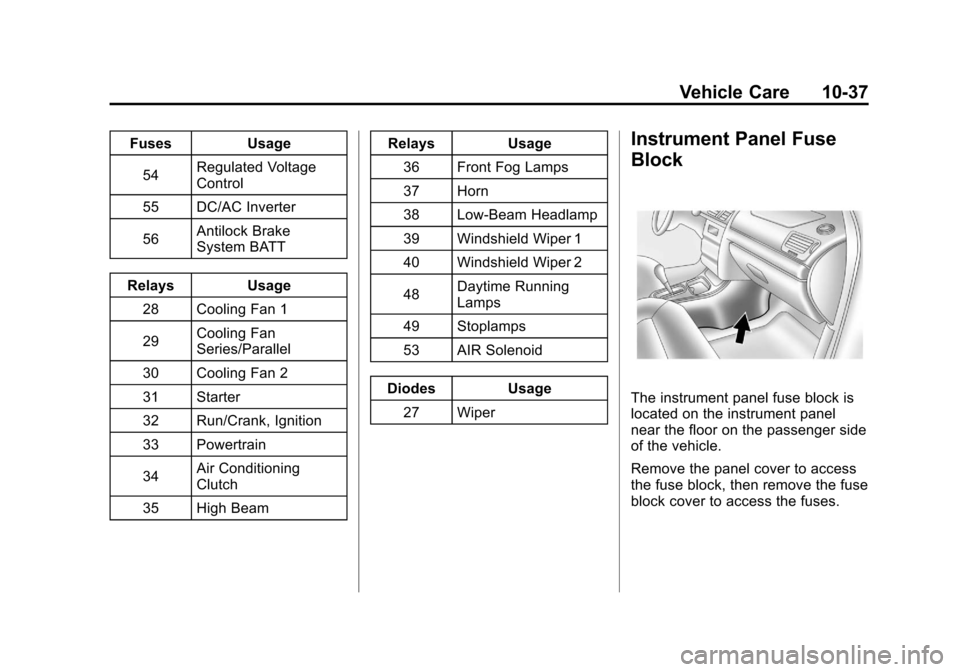
The instrument panel fuse block is
located on the instrument panel
near the floor on the passenger side
of the vehicle.
Remove the panel cover to access
the fuse block, then remove the fuse
block cover to access the fuses.
Page 292 of 398

Black plate (52,1)Chevrolet Malibu Owner Manual - 2012
10-52 Vehicle Care
Tire Pressure Monitor
System
The Tire Pressure Monitor System
(TPMS) uses radio and sensor
technology to check tire pressure
levels. The TPMS sensors monitor
the air pressure in your tires and
transmit tire pressure readings to a
receiver located in the vehicle.
Each tire, including the spare
(if provided), should be checked
monthly when cold and inflated to
the inflation pressure recommended
by the vehicle manufacturer on the
vehicle placard or tire inflation
pressure label. (If your vehicle has
tires of a different size than the size
indicated on the vehicle placard or
tire inflation pressure label, you
should determine the proper tire
inflation pressure for those tires.)
As an added safety feature, your
vehicle has been equipped with a
tire pressure monitoring system
(TPMS) that illuminates a low tirepressure telltale when one or
more of your tires is significantly
under‐inflated.
Accordingly, when the low tire
pressure telltale illuminates, you
should stop and check your tires as
soon as possible, and inflate them
to the proper pressure. Driving on a
significantly under‐inflated tire
causes the tire to overheat and can
lead to tire failure. Under‐inflation
also reduces fuel efficiency and tire
tread life, and may affect the
vehicle's handling and stopping
ability.
Please note that the TPMS is
not a substitute for proper tire
maintenance, and it is the driver's
responsibility to maintain correct tire
pressure, even if under‐inflation has
not reached the level to trigger
illumination of the TPMS low tire
pressure telltale.
Your vehicle has also been
equipped with a TPMS malfunction
indicator to indicate when the
system is not operating properly.
The TPMS malfunction indicator is
combined with the low tire pressure
telltale. When the system detects a
malfunction, the telltale will flash for
approximately one minute and then
remain continuously illuminated.
This sequence will continue upon
subsequent vehicle start‐ups as
long as the malfunction exists.
When the malfunction indicator is
illuminated, the system may not be
able to detect or signal low tire
pressure as intended. TPMS
malfunctions may occur for a variety
of reasons, including the installation
of replacement or alternate tires or
wheels on the vehicle that prevent
the TPMS from functioning properly.
Page 296 of 398

Black plate (56,1)Chevrolet Malibu Owner Manual - 2012
10-56 Vehicle Care
There are two minutes to match
the first tire/wheel position, and
five minutes overall to match all
four tire/wheel positions. If it takes
longer, the matching process stops
and must be restarted.
The TPMS matching process is:
1. Set the parking brake.
2. Turn the ignition to ON/RUN withthe engine off.
3. Press and hold the Remote Keyless Entry (RKE)
transmitter's LOCK and
UNLOCK buttons, at the same
time, for about five seconds to
start the TPMS learn mode.
The horn sounds twice indicating
the TPMS receiver is ready and
in learn mode.
4. Start with the driver side front tire. The driver side front turn
signal also comes on to indicate
that corner's sensor is ready to
be learned. 5. Place the relearn tool against
the tire sidewall, near the valve
stem. Then press the button to
activate the TPMS sensor.
A horn chirp confirms that the
sensor identification code has
been matched to this tire and
wheel position.
6. The passenger side front turn signal comes on to indicate that
corner sensor is ready to be
learned. Proceed to the
passenger side front tire and
repeat the procedure in Step 5.
7. The passenger side rear turn signal comes on to indicate that
corner sensor is ready to be
learned. Proceed to the
passenger side rear tire and
repeat the procedure in Step 5.
8. The driver side rear turn signal comes on to indicate that corner
sensor is ready to be learned.
Proceed to the driver side rear
tire, and repeat the procedure
in Step 5. 9. After hearing the single horn
chirp for the driver side rear tire,
two additional horn chirps sound
to indicate the tire learning
process is done. Turn the
ignition switch to LOCK/OFF.
If no tires are learned after
entering the TPMS learn mode,
or if communication with the
receiver stops, or if the time limit
has expired, turn the ignition
switch to LOCK/OFF and start
over beginning with Step 2.
10. Set all four tires to the recommended air pressure
level as indicated on the Tire
and Loading Information label.
Page 345 of 398

Black plate (9,1)Chevrolet Malibu Owner Manual - 2012
Service and Maintenance 11-9
Battery
The battery supplies power to start
the engine and operate any
additional electrical accessories.
.To avoid break‐down or failure to
start the vehicle, maintain a
battery with full cranking power.
.Trained dealer technicians have
the diagnostic equipment to test
the battery and ensure that the
connections and cables are
corrosion‐free.
Belts
.Belts may need replacing
if they squeak or show signs
of cracking or splitting.
.Trained dealer technicians
can inspect the belts and
recommend replacement
when necessary. Brakes
Brakes stop the vehicle and are
crucial to safe driving.
.Signs of brake wear may include
chirping, grinding, or squealing
noises, or difficulty stopping.
.Trained dealer technicians have
access to tools and equipment
to inspect the brakes and
recommend quality parts
engineered for the vehicle.
Fluids
Proper fluid levels and approved
fluids protect the vehicle’s
systems and components.
See Recommended Fluids and
Lubricants on page 11‑12 for GM
approved fluids.
.Engine oil and windshield
washer fluid levels should be
checked at every fuel fill.
.Instrument cluster lights
may come on to indicate that
fluids may be low and need
to be filled. Hoses
Hoses transport fluids and should
be regularly inspected to ensure
that there are no cracks or leaks.
With a multi‐point inspection, your
dealer can inspect the hoses and
advise if replacement is needed.
Lamps
Properly working headlamps,
taillamps, and brake lamps are
important to see and be seen on
the road.
.Signs that the headlamps need
attention include dimming, failure
to light, cracking, or damage.
The brake lamps need to be
checked periodically to ensure
that they light when braking.
.With a multi‐point inspection,
your dealer can check the lamps
and note any concerns.
Page 388 of 398

Black plate (2,1)Chevrolet Malibu Owner Manual - 2012
i-2 INDEX
B
Battery . . . . . . . . . . . . . . . . . . . . . . . 10-26Jump Starting . . . . . . . . . . . . . . . 10-83
Load Management . . . . . . . . . . . . . 6-6
Power Protection . . . . . . . . . . . . . . 6-7
Blade Replacement, Wiper . . . . . . . . . . . . . . . . . . . . . . . 10-29
Bluetooth . . . . . . . . . . . . . . . . . . . . . . 7-25
Brake System Warning Light . . . . . . . . . . . . . . . . . . . . . . . . . 5-18
Brakes . . . . . . . . . . . . . . . . . . . . . . . . 10-24
Antilock . . . . . . . . . . . . . . . . . . . . . . . 9-28
Assist . . . . . . . . . . . . . . . . . . . . . . . . . 9-29
Fluid . . . . . . . . . . . . . . . . . . . . . . . . 10-25
Parking . . . . . . . . . . . . . . . . . . . . . . . 9-29
System Messages . . . . . . . . . . . . 5-27
Braking . . . . . . . . . . . . . . . . . . . . . . . . . 9-3
Break-In, New Vehicle . . . . . . . . . 9-16
Bulb Replacement . . . . . . . . . . . . 10-33 Back-up Lamps . . . . . . . . . . . . . 10-32
Fog Lamps . . . . . . . . . . . . . . . . . . . . 6-5
Halogen Bulbs . . . . . . . . . . . . . . 10-30
Headlamp Aiming . . . . . . . . . . . 10-30 Bulb Replacement (cont.)
Headlamps . . . . . . . . . . . . . . . . . 10-30
License Plate Lamps . . . . . . . 10-33
Taillamps, Turn Signal,
and Stoplamps . . . . . . . . . . . . 10-30
Buying New Tires . . . . . . . . . . . . . 10-60
C
Calibration . . . . . . . . . . . . . . . . . . . . . . 5-5
California Fuel Requirements . . . . . . . . . . . 9-37
Perchlorate Materials
Requirements . . . . . . . . . . . . . . . 10-3
Warning . . . . . . . . . . . . . . . . . . . . . . 10-3
Canadian Vehicle Owners . . . . . . . . iii
Capacities and Specifications . . . . . . . . . . . . . . . . 12-2
Carbon Monoxide Engine Exhaust . . . . . . . . . . . . . . . 9-23
Trunk . . . . . . . . . . . . . . . . . . . . . . . . . . 2-9
Winter Driving . . . . . . . . . . . . . . . . . 9-8
Cautions, Danger, and Warnings . . . . . . . . . . . . . . . . . . . . . . . . iv
CD Player . . . . . . . . . . . . . . . . . . . . . 7-15 Center Console Storage . . . . . . . . 4-3
Chains, Tire . . . . . . . . . . . . . . . . . . 10-64
Charging System Light . . . . . . . . 5-16
Check
Engine Light . . . . . . . . . . . . . . . . . . 5-16
IgnitionTransmission Lock . . . . . . . . 10-28
Child Restraints Infants and YoungChildren . . . . . . . . . . . . . . . . . . . . . 3-35
Lower Anchors and
Tethers for Children . . . . . . . . . 3-42
Older Children . . . . . . . . . . . . . . . . 3-33
Securing . . . . . . . . . . . . . . . . 3-49, 3-51
Systems . . . . . . . . . . . . . . . . . . . . . . 3-37
Cleaning
Exterior Care . . . . . . . . . . . . . . . 10-90
Interior Care . . . . . . . . . . . . . . . . 10-93
Climate Control Systems . . . . . . . 8-1 Air Conditioning . . . . . . . . . . . . . . . 8-1
Automatic . . . . . . . . . . . . . . . . . . . . . . 8-5
Heating . . . . . . . . . . . . . . . . . . . . . . . . 8-1
Clock . . . . . . . . . . . . . . . . . . . . . . . . . . . 5-6
Cluster, Instrument . . . . . . . . . . . . 5-10