2012 CHEVROLET MALIBU instrument panel
[x] Cancel search: instrument panelPage 135 of 398
Black plate (29,1)Chevrolet Malibu Owner Manual - 2012
Instruments and Controls 5-29
SeeElectronic Stability Control
(ESC) on page 9‑32 andElectronic
Stability Control (ESC)/Traction
Control System (TCS) Indicator/
Warning Light on page 5‑20 for
more information.
LOW TRACTION
If your vehicle has the Traction
Control System (TCS), this
message displays and the ESC/TCS
light on the instrument panel cluster
flashes when the system is actively
limiting wheel spin. Slippery road
conditions may exist if this message
is displayed, so adjust your driving
accordingly. This message stays on
for a few seconds after the system
stops limiting wheel spin. See
Traction Control System (TCS) on
page 9‑30 andElectronic Stability
Control (ESC)/Traction Control
System (TCS) Indicator/Warning
Light on page 5‑20 for more
information.
SERVICE ESC (ELECTRONIC
STABILITY CONTROL)
If your vehicle has Electronic
Stability Control (ESC), this
message displays and a chime
sounds if there has been a problem
detected with ESC. The ESC/TCS
light also appears on the instrument
panel cluster. This light stays on
solid as long as the detected
problem remains present. When this
message displays, the system is
not working. Adjust your driving
accordingly. See Electronic Stability
Control (ESC) on page 9‑32 and
Electronic Stability Control (ESC)/
Traction Control System (TCS)
Indicator/Warning Light on
page 5‑20 for more information.
If this message turns on while you
are driving, pull off the road as soon
as possible and stop carefully.
Try resetting the system by turning
the ignition off and then back on. If this message still stays on or
turns back on again while you are
driving, your vehicle needs service.
Have the ESC inspected by your
dealer as soon as possible.
SERVICE TRACTION
If your vehicle has the Traction
Control System (TCS), this
message displays and a chime
sounds when the system is not
functioning properly. The ESC/TCS
light also appears on the instrument
panel cluster. This light stays on
solid as long as the detected
problem remains present. When this
message displays, the system is
not working. Adjust your driving
accordingly. See
Traction Control
System (TCS) on page 9‑30 and
Electronic Stability Control (ESC)/
Traction Control System (TCS)
Indicator/Warning Light on
page 5‑20 for more information.
Have the system serviced by your
dealer as soon as possible.
Page 136 of 398
Black plate (30,1)Chevrolet Malibu Owner Manual - 2012
5-30 Instruments and Controls
TRACTION OFF
If your vehicle has the Traction
Control System (TCS), this
message displays and the ESC/TCS
light on the instrument panel cluster
comes on solid when the system is
turned off. Adjust your driving
accordingly. SeeTraction Control
System (TCS) on page 9‑30 and
Electronic Stability Control (ESC)/
Traction Control System (TCS)
Indicator/Warning Light on
page 5‑20 for more information.
Airbag System Messages
SERVICE AIR BAG
This message displays when there
is a problem with the airbag system.
Have your vehicle serviced by your
dealer immediately.
Service Vehicle Messages
ENGINE DISABLED
This message displays if the starting
of the engine is disabled. Have your
vehicle serviced by your dealer
immediately.
POWER STEERING
On some vehicles, this message
displays if a problem has been
detected with the electric power
steering. Have your vehicle serviced
by your dealer immediately.
Tire Messages
SVC (Service) TIRE MONITOR
On vehicles with the Tire Pressure
Monitor System (TPMS), this
message displays if a part on the
TPMS is not working properly.
The tire pressure light also flashes
and then remains on during the
same ignition cycle. See Tire
Pressure Light on page 5‑21. Several conditions may cause this
message to appear. See
Tire
Pressure Monitor Operation on
page 10‑53 for more information.
If the warning comes on and stays
on, there may be a problem with the
TPMS. See your dealer.
TIRE LOW ADD AIR
On vehicles with the Tire Pressure
Monitor System (TPMS), this
message displays when the
pressure in one or more of the
vehicle's tires is low on air. The low
tire pressure warning light also
comes on. See Tire Pressure Light
on page 5‑21. If this message
appears on the DIC, stop as soon
as you can. Have the tire pressures
checked and set to those shown on
the Tire Loading Information label.
See Tires on page 10‑42, Vehicle
Load Limits on page 9‑11, and Tire
Pressure on page 10‑50. The DIC
also shows the tire pressure values.
See Driver Information Center (DIC)
on page 5‑24.
Page 143 of 398
Black plate (1,1)Chevrolet Malibu Owner Manual - 2012
Lighting 6-1
Lighting
Exterior Lighting
Exterior Lamp Controls . . . . . . . . 6-1
Exterior Lamps OffReminder . . . . . . . . . . . . . . . . . . . . 6-2
Headlamp High/Low-Beam Changer . . . . . . . . . . . . . . . . . . . . . 6-2
Flash-to-Pass . . . . . . . . . . . . . . . . . 6-2
Daytime Running Lamps (DRL) . . . . . . . . . . . . . . . . 6-2
Automatic Headlamp System . . . . . . . . . . . . . . . . . . . . . . 6-3
Delayed Headlamps . . . . . . . . . . 6-4
Hazard Warning Flashers . . . . . 6-4
Turn and Lane-Change Signals . . . . . . . . . . . . . . . . . . . . . . 6-4
Fog Lamps . . . . . . . . . . . . . . . . . . . . 6-5
Interior Lighting
Instrument Panel Illumination Control . . . . . . . . . . . . . . . . . . . . . . 6-5
Dome Lamps . . . . . . . . . . . . . . . . . 6-6
Reading Lamps . . . . . . . . . . . . . . . 6-6
Lighting Features
Entry/Exit Lighting . . . . . . . . . . . . . 6-6
Parade Dimming . . . . . . . . . . . . . . 6-6
Battery Load Management . . . . 6-6
Battery Power Protection . . . . . . 6-7
Exterior Lighting
Exterior Lamp Controls
The band on the lever located on
the left side of the steering column,
operates the exterior lamps.
The exterior lamp control has the
following four positions:
2(Headlamps): Turns on the
headlamps, parking lamps, and
taillamps.
;(Parking Lamps): Turns on the
parking lamps and taillamps only.
AUTO (Automatic Headlamp
System): Automatically turns on
the Daytime Running Lamps during
daytime, and the headlamps,
parking lamps, and taillamps at
night.
Page 144 of 398
Black plate (2,1)Chevrolet Malibu Owner Manual - 2012
6-2 Lighting
P(Off/On):Turn the band to this
position to turn on the Automatic
Headlamp System. In Canada,
this position only works when a
vehicle is in the P (Park) position.
To turn on the Automatic Headlamp
System, turn the switch to off/on.
To turn them off, turn the switch to
off/on again. This is a momentary
control switch that springs back
when released. The Automatic
Headlamp System always turns on
at the beginning of an ignition cycle.
Exterior Lamps Off
Reminder
If the drivers door is opened and the
ignition is turned off while leaving
the lamps on, a warning chime will
sound.
Headlamp High/
Low-Beam Changer
To change the headlamps from low
beam to high beam, push the turn
signal/multifunction lever away
from you.
This instrument panel cluster
light
3comes on if the high beam
lamps are turned on while the
ignition is in ON/RUN.
To change the headlamps from
high beam to low beam, pull the
turn signal lever toward you.
Flash-to-Pass
This feature lets the high-beam
headlamps be used to signal a
driver in front of you that you want
to pass.
Pull the turn signal/multifunction
lever toward you until the high-beam
headlamps come on, then release
the lever to turn them off.
Daytime Running
Lamps (DRL)
Daytime Running Lamps (DRL) can
make it easier for others to see the
front of your vehicle during the day.
Fully functional DRL are required on
all vehicles first sold in Canada.
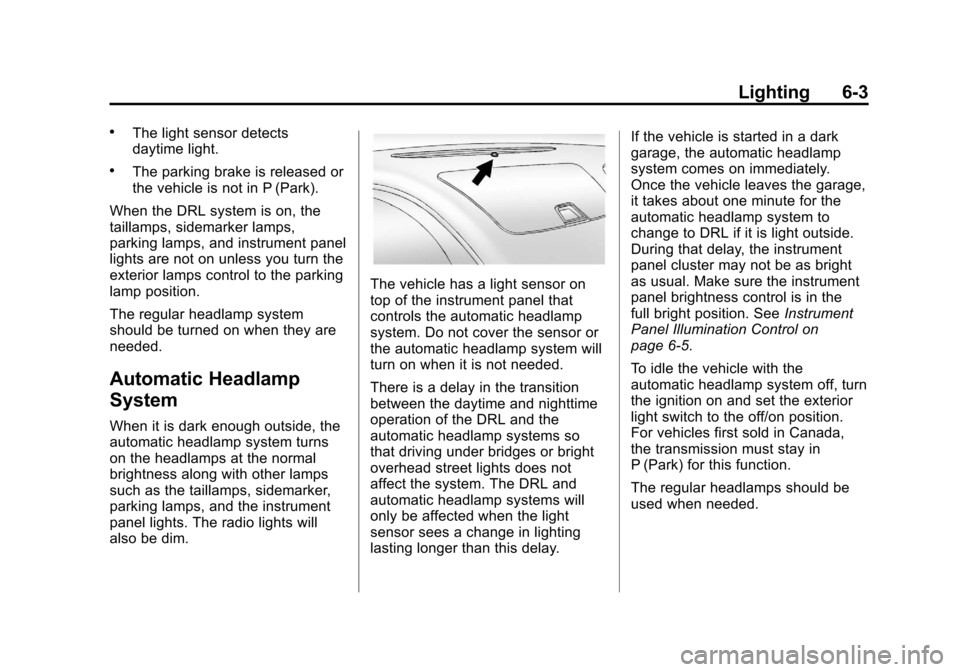
The vehicle has a light sensor on
top of the instrument panel that
controls the DRL. Do not cover this
sensor or the head lamps will be on
when they are not needed.
The DRL system makes the
low-beam headlamps come on at
a reduced brightness when the
following conditions are met:
.The ignition is on.
.The exterior lamps control is
in AUTO.
.The exterior lamps control is in
the parking lamps only position
(This applies only to vehicles
that are first sold in Canada).
Page 145 of 398
Black plate (3,1)Chevrolet Malibu Owner Manual - 2012
Lighting 6-3
.The light sensor detects
daytime light.
.The parking brake is released or
the vehicle is not in P (Park).
When the DRL system is on, the
taillamps, sidemarker lamps,
parking lamps, and instrument panel
lights are not on unless you turn the
exterior lamps control to the parking
lamp position.
The regular headlamp system
should be turned on when they are
needed.
Automatic Headlamp
System
When it is dark enough outside, the
automatic headlamp system turns
on the headlamps at the normal
brightness along with other lamps
such as the taillamps, sidemarker,
parking lamps, and the instrument
panel lights. The radio lights will
also be dim.
The vehicle has a light sensor on
top of the instrument panel that
controls the automatic headlamp
system. Do not cover the sensor or
the automatic headlamp system will
turn on when it is not needed.
There is a delay in the transition
between the daytime and nighttime
operation of the DRL and the
automatic headlamp systems so
that driving under bridges or bright
overhead street lights does not
affect the system. The DRL and
automatic headlamp systems will
only be affected when the light
sensor sees a change in lighting
lasting longer than this delay. If the vehicle is started in a dark
garage, the automatic headlamp
system comes on immediately.
Once the vehicle leaves the garage,
it takes about one minute for the
automatic headlamp system to
change to DRL if it is light outside.
During that delay, the instrument
panel cluster may not be as bright
as usual. Make sure the instrument
panel brightness control is in the
full bright position. See
Instrument
Panel Illumination Control on
page 6‑5.
To idle the vehicle with the
automatic headlamp system off, turn
the ignition on and set the exterior
light switch to the off/on position.
For vehicles first sold in Canada,
the transmission must stay in
P (Park) for this function.
The regular headlamps should be
used when needed.
Page 146 of 398
Black plate (4,1)Chevrolet Malibu Owner Manual - 2012
6-4 Lighting
Delayed Headlamps
The delayed headlamps feature
keeps the headlamps on for
20 seconds after the key is turned to
LOCK/OFF, then the headlamps
automatically turn off.
To override the 20 second delayed
headlamp feature while it is active
turn the turn signal/multifunction
lever up one position and then back
to AUTO.
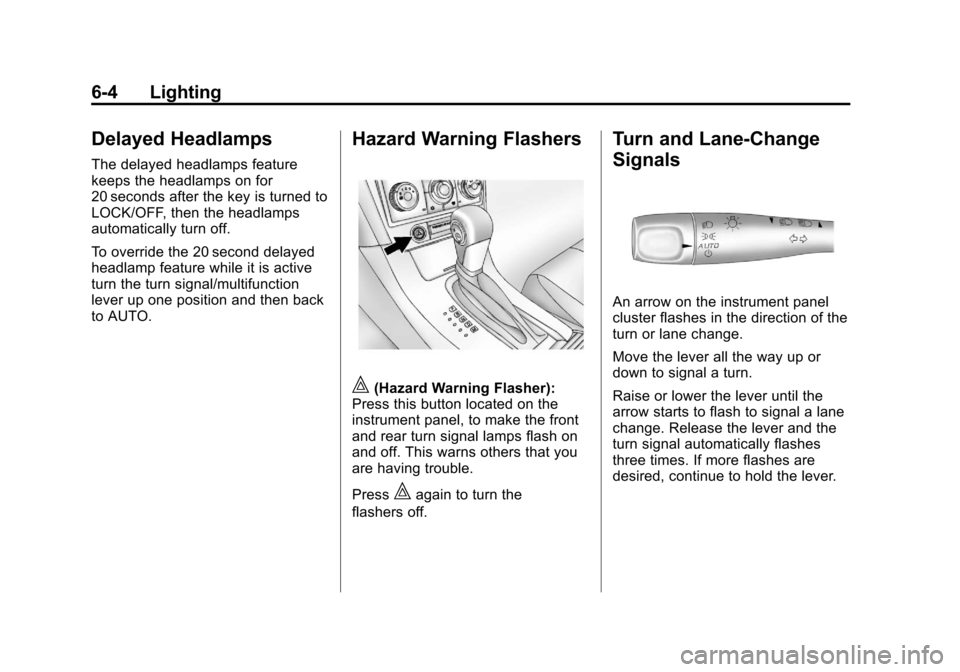
Hazard Warning Flashers
|(Hazard Warning Flasher):
Press this button located on the
instrument panel, to make the front
and rear turn signal lamps flash on
and off. This warns others that you
are having trouble.
Press
|again to turn the
flashers off.
Turn and Lane-Change
Signals
An arrow on the instrument panel
cluster flashes in the direction of the
turn or lane change.
Move the lever all the way up or
down to signal a turn.
Raise or lower the lever until the
arrow starts to flash to signal a lane
change. Release the lever and the
turn signal automatically flashes
three times. If more flashes are
desired, continue to hold the lever.
Page 147 of 398
Black plate (5,1)Chevrolet Malibu Owner Manual - 2012
Lighting 6-5
The lever returns to its starting
position when it is released.
If a turn signal arrow flashes rapidly
or does not come on, a signal bulb
may need to be replaced. See
Fuses on page 10‑34.
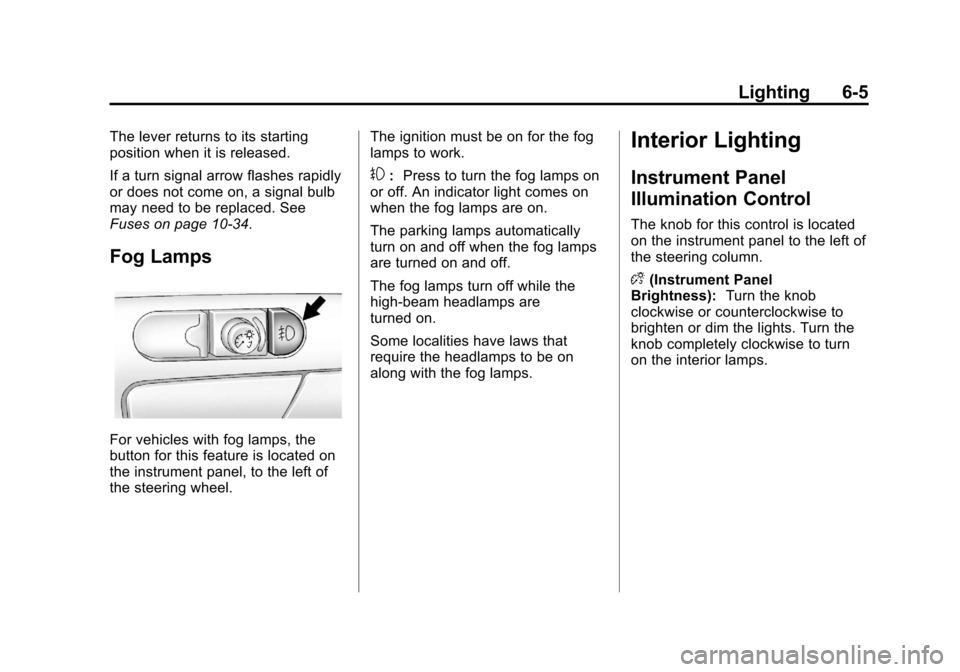
Fog Lamps
For vehicles with fog lamps, the
button for this feature is located on
the instrument panel, to the left of
the steering wheel.The ignition must be on for the fog
lamps to work.
#:
Press to turn the fog lamps on
or off. An indicator light comes on
when the fog lamps are on.
The parking lamps automatically
turn on and off when the fog lamps
are turned on and off.
The fog lamps turn off while the
high-beam headlamps are
turned on.
Some localities have laws that
require the headlamps to be on
along with the fog lamps.
Interior Lighting
Instrument Panel
Illumination Control
The knob for this control is located
on the instrument panel to the left of
the steering column.
D (Instrument Panel
Brightness): Turn the knob
clockwise or counterclockwise to
brighten or dim the lights. Turn the
knob completely clockwise to turn
on the interior lamps.
Page 148 of 398
Black plate (6,1)Chevrolet Malibu Owner Manual - 2012
6-6 Lighting
Dome Lamps
The dome lamps come on when any
door is opened. They turn off after
all the doors are closed.
The dome lamps can also be turned
on by turning the instrument panel
brightness knob, located on the
instrument panel to the left of the
steering column, clockwise to the
farthest position. In this position, the
dome lamps remain on whether a
door is opened or closed.
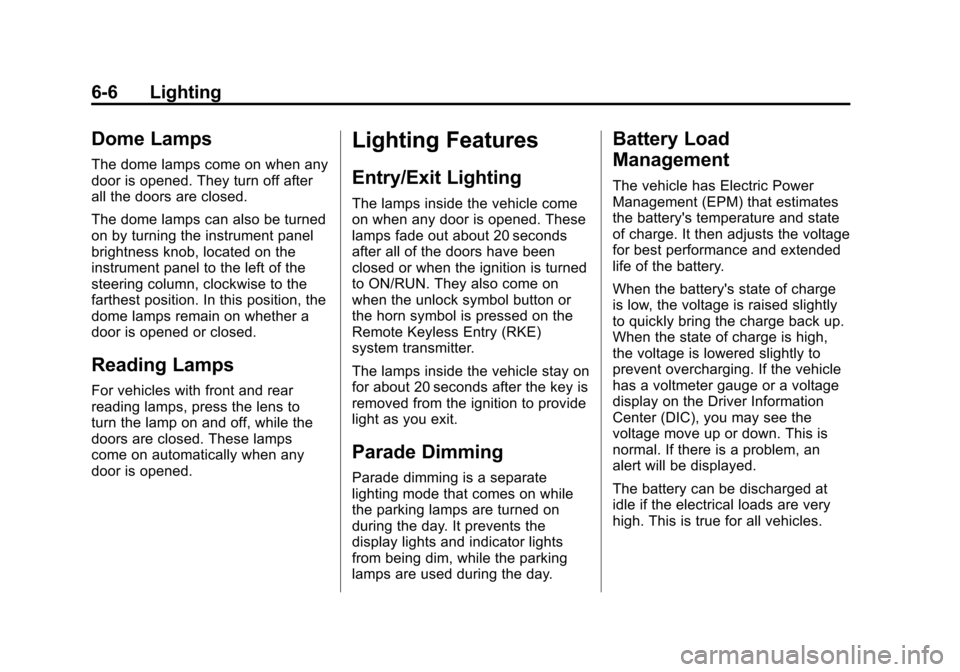
Reading Lamps
For vehicles with front and rear
reading lamps, press the lens to
turn the lamp on and off, while the
doors are closed. These lamps
come on automatically when any
door is opened.
Lighting Features
Entry/Exit Lighting
The lamps inside the vehicle come
on when any door is opened. These
lamps fade out about 20 seconds
after all of the doors have been
closed or when the ignition is turned
to ON/RUN. They also come on
when the unlock symbol button or
the horn symbol is pressed on the
Remote Keyless Entry (RKE)
system transmitter.
The lamps inside the vehicle stay on
for about 20 seconds after the key is
removed from the ignition to provide
light as you exit.
Parade Dimming
Parade dimming is a separate
lighting mode that comes on while
the parking lamps are turned on
during the day. It prevents the
display lights and indicator lights
from being dim, while the parking
lamps are used during the day.
Battery Load
Management
The vehicle has Electric Power
Management (EPM) that estimates
the battery's temperature and state
of charge. It then adjusts the voltage
for best performance and extended
life of the battery.
When the battery's state of charge
is low, the voltage is raised slightly
to quickly bring the charge back up.
When the state of charge is high,
the voltage is lowered slightly to
prevent overcharging. If the vehicle
has a voltmeter gauge or a voltage
display on the Driver Information
Center (DIC), you may see the
voltage move up or down. This is
normal. If there is a problem, an
alert will be displayed.
The battery can be discharged at
idle if the electrical loads are very
high. This is true for all vehicles.